你当前正在访问 Microsoft Azure Global Edition 技术文档网站。 如果需要访问由世纪互联运营的 Microsoft Azure 中国技术文档网站,请访问 https://docs.azure.cn。
快速入门:创建网络安全外围 - Azure CLI
通过使用 Azure CLI 为 Azure Key Vault 创建网络安全外围,开始使用网络安全外围。 网络安全外围允许 Azure 平台即服务 (PaaS) 资源在显式受信任的边界内进行通信。 接下来,在网络安全外围配置文件中创建和更新 PaaS 资源的关联。 然后创建并更新网络安全外围访问规则。 完成后,删除在本快速入门中创建的所有资源。
重要
网络安全外围处于公共预览状态,可在所有 Azure 公有云区域中使用。 此预览版在提供时没有附带服务级别协议,不建议将其用于生产工作负荷。 某些功能可能不受支持或者受限。 有关详细信息,请参阅 Microsoft Azure 预览版补充使用条款。
先决条件
- 具有活动订阅的 Azure 帐户。 免费创建帐户。
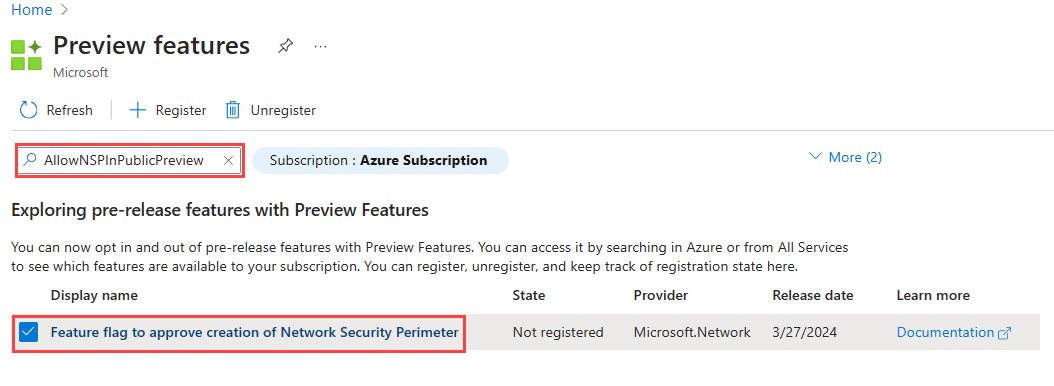
需要注册 Azure 网络安全外围公共预览版。 要注册,请将
AllowNSPInPublicPreview功能添加到订阅。
有关添加功能标志的详细信息,请参阅在 Azure 订阅中设置预览功能。
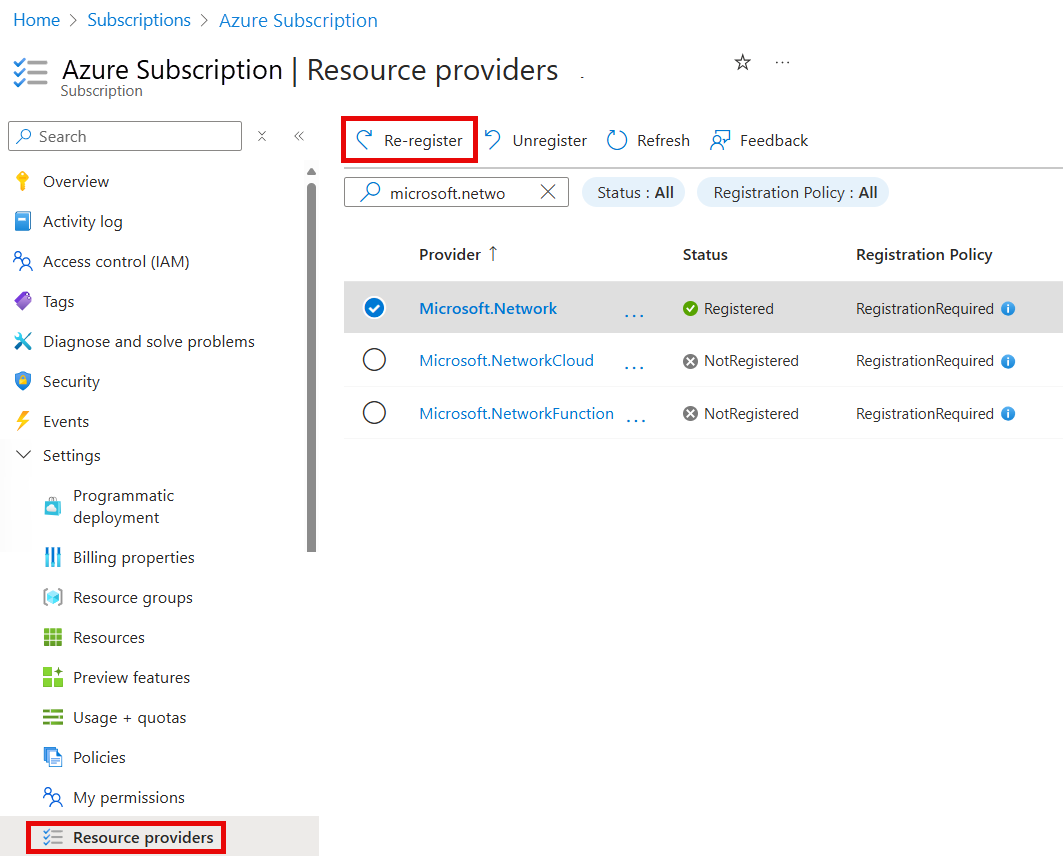
添加功能标志后,需要在订阅中重新注册
Microsoft.Network资源提供程序。要在 Azure 门户中重新注册
Microsoft.Network资源提供程序,请选择你的订阅,然后选择“资源提供程序”。 搜索Microsoft.Network,并选择“重新注册”。
使用以下 Azure PowerShell 命令重新注册
Microsoft.Network资源提供程序:
# Register the Microsoft.Network resource provider
Register-AzResourceProvider -ProviderNamespace Microsoft.Network
使用以下 Azure CLI 命令重新注册
Microsoft.Network资源提供程序:# Register the Microsoft.Network resource provider az provider register --namespace Microsoft.Network
有关重新注册资源提供程序的详细信息,请参阅 Azure 资源提供程序和类型。
-
最新的 Azure CLI,或者可以在门户中使用 Azure Cloud Shell。
- 本文需要 2.38.0 或更高版本的 Azure CLI。 如果使用 Azure Cloud Shell,则最新版本已安装。
- 升级到最新版本的 Azure CLI 后,使用
az extension add --name nsp导入网络安全外围命令。
在 Azure Cloud Shell 中使用 Bash 环境。 有关详细信息,请参阅 Azure Cloud Shell 中的 Bash 快速入门。
如需在本地运行 CLI 参考命令,请安装 Azure CLI。 如果在 Windows 或 macOS 上运行,请考虑在 Docker 容器中运行 Azure CLI。 有关详细信息,请参阅如何在 Docker 容器中运行 Azure CLI。
如果使用的是本地安装,请使用 az login 命令登录 Azure CLI。 若要完成身份验证过程,请遵循终端中显示的步骤。 有关其他登录选项,请参阅使用 Azure CLI 登录。
出现提示时,请在首次使用时安装 Azure CLI 扩展。 有关扩展详细信息,请参阅使用 Azure CLI 的扩展。
运行 az version 以查找安装的版本和依赖库。 若要升级到最新版本,请运行 az upgrade。
连接 Azure 帐户,然后选择自己的订阅
首先连接到 Azure Cloud Shell 或使用本地 CLI 环境。
如果使用 Azure Cloud Shell,请登录并选择自己的订阅。
如果在本地安装了 CLI,使用以下命令登录:
# Sign in to your Azure account
az login
进入 shell 后,使用以下命令在本地选择自己的有效订阅:
# List all subscriptions
az account set --subscription <Azure Subscription>

# Re-register the Microsoft.Network resource provider
az provider register --namespace Microsoft.Network
创建资源组和 Key Vault
需要先使用“az group create”和“az keyvault create”创建资源组和密钥保管库资源,才能创建网络安全外围。
此示例使用以下命令在 WestCentralUS 位置创建名为 resource-group 的资源组,并在资源组中创建名为 key-vault-YYYYDDMM 的密钥保管库:
az group create \
    --name resource-group \
    --location westcentralus

# Create a key vault using a datetime value to ensure a unique name

key_vault_name="key-vault-$(date +%s)"
az keyvault create \
    --name $key_vault_name \
    --resource-group resource-group \
    --location westcentralus \
    --query 'id' \
    --output tsv
创建网络安全外围
在此步骤中,需要使用“az network perimeter create”命令创建网络安全外围。
注意
请勿将任何个人身份或敏感数据放入网络安全外围规则或其他网络安全外围配置中。
az network perimeter create\
    --name network-security-perimeter \
    --resource-group resource-group \
    -l westcentralus
创建和更新 PaaS 资源与新配置文件的关联
在此步骤中,需要使用“az network perimeter profile create”和“az network perimeter association create”命令创建新的配置文件,并将 PaaS 资源、Azure Key Vault 与该配置文件相关联。
注意
对于 --private-link-resource 和 --profile 参数值,将 <PaaSArmId> 和 <networkSecurityPerimeterProfileId> 分别替换为密钥保管库和配置文件 ID 的值。
使用以下命令为网络安全外围创建新的配置文件:
# Create a new profile
az network perimeter profile create \
    --name network-perimeter-profile \
    --resource-group resource-group \
    --perimeter-name network-security-perimeter
使用以下命令将 Azure Key Vault(PaaS 资源)与网络安全外围配置文件相关联.
# Get key vault id az keyvault show \ --name $key_vault_name \ --resource-group resource-group \ --query 'id' # Get the profile id az network perimeter profile show \ --name network-perimeter-profile \ --resource-group resource-group \ --perimeter-name network-security-perimeter # Associate the Azure Key Vault with the network security perimeter profile # Replace <PaaSArmId> and <networkSecurityPerimeterProfileId> with the ID values for your key vault and profile az network perimeter association create \ --name network-perimeter-association \ --perimeter-name network-security-perimeter \ --resource-group resource-group \ --access-mode Learning \ --private-link-resource "{id:<PaaSArmId>}" \ --profile "{id:<networkSecurityPerimeterProfileId>}"使用“az network perimeter association create”命令将访问模式更改为“强制”,以更新关联,具体如下所示:
az network perimeter association create \
    --name network-perimeter-association \
    --perimeter-name network-security-perimeter \
    --resource-group resource-group \
    --access-mode Enforced  \
    --private-link-resource "{id:<PaaSArmId>}" \
    --profile "{id:<networkSecurityPerimeterProfileId>}"
管理网络安全外围访问规则
在此步骤中,需要使用“az network perimeter profile access-rule create”命令创建、更新和删除具有公共 IP 地址前缀的网络安全外围访问规则。
使用以下命令为创建的配置文件创建具有公共 IP 地址前缀的入站访问规则:
# Create an inbound access rule
az network perimeter profile access-rule create \
    --name access-rule \
    --profile-name network-perimeter-profile \
    --perimeter-name network-security-perimeter \
    --resource-group resource-group \
    --address-prefixes "[192.0.2.0/24]"
使用以下命令使用另一个公共 IP 地址前缀更新入站访问规则:
# Update the inbound access rule
az network perimeter profile access-rule create\
    --name access-rule \
    --profile-name network-perimeter-profile \
    --perimeter-name network-security-perimeter \
    --resource-group resource-group \
    --address-prefixes "['198.51.100.0/24', '192.0.2.0/24']"
如果需要删除访问规则,请使用 az network perimeter profile access-rule delete 命令:
# Delete the access rule
az network perimeter profile access-rule delete \
    --Name network-perimeter-association \
    --profile-name network-perimeter-profile \
    --perimeter-name network-security-perimeter \
    --resource-group resource-group
注意
如果托管标识未分配给支持它的资源,则对同一边界内其他资源的出站访问将被拒绝。 基于订阅的入站规则(旨在允许来自该资源的访问)将不会生效。
删除所有资源
若要删除此快速入门中的网络安全外围和其他资源,请使用以下“az network perimeter”命令:
    # Delete the network security perimeter association
    az network perimeter association delete \
        --name network-perimeter-association \
        --resource-group resource-group \
        --perimeter-name network-security-perimeter

    # Delete the network security perimeter
    az network perimeter delete \
        --resource-group resource-group \
        --name network-security-perimeter --yes

    # Delete the key vault
    az keyvault delete \
        --name $key_vault_name \
        --resource-group resource-group

    # Delete the resource group
    az group delete \
        --name resource-group \
        --yes \
        --no-wait
注意
从网络安全外围删除资源关联会导致访问控制回退到现有资源防火墙配置。 这可能会导致根据资源防火墙配置允许/拒绝访问。 如果 PublicNetworkAccess 设置为 SecuredByPerimeter 并已删除关联,则资源将进入锁定状态。 有关详细信息,请参阅在 Azure 中过渡到网络安全外围。
