在本快速入门中,你将了解如何发起从 Azure 通信服务用户到 Teams 自动助理的呼叫。 可通过以下步骤实现此目标:
- 启用 Azure 通信服务资源与 Teams 租户之间的联合。
- 通过 Teams 管理中心选择或创建 Teams 自动助理。
- 通过 Teams 管理中心获取自动助理的电子邮件地址。
- 通过图形 API 获取自动助理的对象 ID。
- 使用 Azure 通信服务呼叫 SDK 发起呼叫。
如果你要向前跳转到末尾,可以从 GitHub 下载此快速入门示例。
在 Teams 租户中实现互操作性
具有 Teams 管理员角色的 Microsoft Entra 用户可以通过 MicrosoftTeams 模块运行 PowerShell cmdlet,以在租户中启用通信服务资源。
1.准备 Microsoft Teams 模块
首先,打开 PowerShell,并使用以下命令验证 Teams 模块是否存在:
Get-module *teams*
如果未看到 MicrosoftTeams 模块,请先安装它。 要安装该模块,需要以管理员身份运行 PowerShell。 然后,运行以下命令:
Install-Module -Name MicrosoftTeams
系统会通知你将要安装的模块,你可以通过回复 Y 或 A 进行确认。 如果模块已安装但已过时,可以运行以下命令来更新模块:
Update-Module MicrosoftTeams
2.连接到 Microsoft Teams 模块
模块安装并就绪后,可以使用以下命令连接到 MicrosoftTeams 模块。 你将看到一个提示你进行登录的交互式窗口。 要使用的用户帐户需要具有 Teams 管理员权限。 否则,可能会在后续步骤中收到 access denied 响应。
Connect-MicrosoftTeams
3.启用租户配置
与通信服务资源的互操作性是通过租户配置和分配的策略来控制的。 Teams 租户具有单个租户配置,Teams 用户则已分配全局策略或自定义策略。 有关详细信息,请参阅在 Teams 中分配策略。
成功登录后,可以运行 cmdlet Set-CsTeamsAcsFederationConfiguration 以在租户中启用通信服务资源。 将文本 IMMUTABLE_RESOURCE_ID 替换为通信资源中的不可变资源 ID。 可在此处找到有关如何获取此信息的更多详细信息。
$allowlist = @('IMMUTABLE_RESOURCE_ID')
Set-CsTeamsAcsFederationConfiguration -EnableAcsUsers $True -AllowedAcsResources $allowlist
4.启用租户策略
每个 Teams 用户都分配了一个 External Access Policy,可用于确定通信服务用户是否可以呼叫此 Teams 用户。 使用 cmdlet Set-CsExternalAccessPolicy 确保分配给 Teams 用户的策略已将 EnableAcsFederationAccess 设置为 $true
Set-CsExternalAccessPolicy -Identity Global -EnableAcsFederationAccess $true
创建或选择 Teams 自动助理
Teams 自动助理是为传入呼叫提供自动呼叫处理系统的系统。 它充当虚拟接待员,允许呼叫者自动路由到合适的个人或部门,而无需人工操作员。 可通过 Teams 管理中心选择现有自动助理或创建新的自动助理。
在此处详细了解如何使用 Teams 管理中心创建自动助理。
查找自动助理的对象 ID
创建自动助理后,需要查找相关的对象 ID,以便稍后将其用于呼叫。 对象 ID 连接到自动助理上附加的资源帐户 - 在 Teams 管理中心打开“资源帐户”选项卡并查找帐户的电子邮件。
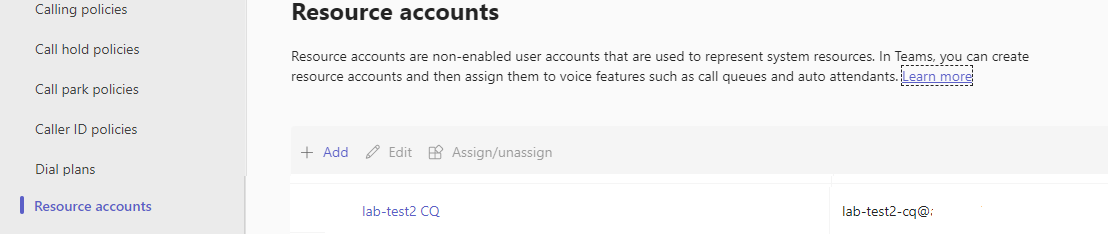 可在搜索中使用此电子邮件地址通过 Microsoft Graph 浏览器找到资源帐户所需的所有信息。
https://graph.microsoft.com/v1.0/users/lab-test2-cq-@contoso.com
在结果中,我们将能够找到“ID”字段
    "userPrincipalName": "lab-test2-cq@contoso.com",
    "id": "31a011c2-2672-4dd0-b6f9-9334ef4999db"
先决条件
- 获取具有有效订阅的 Azure 帐户。 免费创建帐户。
- Node.js Active LTS 和 Maintenance LTS 版本(8.11.1 和 10.14.1)
- 创建活动的通信服务资源。 创建通信服务资源。
设置
创建新的 Node.js 应用程序
打开终端或命令窗口,为应用创建一个新目录,并导航到该目录。
mkdir calling-quickstart && cd calling-quickstart
安装包
使用 npm install 命令安装适用于 JavaScript 的 Azure 通信服务通话 SDK。
重要
本快速入门使用 Azure 通信服务呼叫 SDK 版本 next。
npm install @azure/communication-common@next --save
npm install @azure/communication-calling@next --save
设置应用框架
此快速入门使用 webpack 捆绑应用程序资产。 运行以下命令以安装 webpack、webpack-cli 和 webpack-dev-server npm 包并在 package.json 中将其列作开发依赖项:
npm install copy-webpack-plugin@^11.0.0 webpack@^5.88.2 webpack-cli@^5.1.4 webpack-dev-server@^4.15.1 --save-dev
在项目的根目录中创建一个 index.html 文件。 我们将使用此文件来配置可让用户发起 1:1 视频呼叫的基本布局。
代码如下:
<!-- index.html -->
<!DOCTYPE html>
<html>
    <head>
        <title>Azure Communication Services - Calling Web SDK</title>
    </head>
    <body>
        <h4>Azure Communication Services - Calling Web SDK</h4>
        <input id="user-access-token"
            type="text"
            placeholder="User access token"
            style="margin-bottom:1em; width: 500px;"/>
        <button id="initialize-teams-call-agent" type="button">Initialize Call Agent</button>
        <br>
        <br>
        <input id="application-object-id"
            type="text"
            placeholder="Enter application objectId identity in format: 'APP_GUID'"
            style="margin-bottom:1em; width: 500px; display: block;"/>
        <button id="start-call-button" type="button" disabled="true">Start Call</button>
        <button id="hangup-call-button" type="button" disabled="true">Hang up Call</button>
        <button id="accept-call-button" type="button" disabled="true">Accept Call</button>
        <button id="start-video-button" type="button" disabled="true">Start Video</button>
        <button id="stop-video-button" type="button" disabled="true">Stop Video</button>
        <br>
        <br>
        <div id="connectedLabel" style="color: #13bb13;" hidden>Call is connected!</div>
        <br>
        <div id="remoteVideoContainer" style="width: 40%;" hidden>Remote participants' video streams:</div>
        <br>
        <div id="localVideoContainer" style="width: 30%;" hidden>Local video stream:</div>
        <!-- points to the bundle generated from client.js -->
        <script src="./main.js"></script>
    </body>
</html>
Azure 通信服务呼叫 Web SDK 对象模型
以下类和接口用于处理 Azure 通信服务通话 SDK 的某些主要功能:
| 名称 | 说明 |
|---|---|
CallClient |
通话 SDK 的主入口点。 |
CallAgent |
用于启动和管理通话。 |
DeviceManager |
用于管理媒体设备。 |
Call |
用于表示呼叫。 |
LocalVideoStream |
用于为本地系统上的相机设备创建本地视频流。 |
RemoteParticipant |
用于表示呼叫中的远程参与者。 |
RemoteVideoStream |
用于表示来自远程参与者的远程视频流。 |
在名为 client.js 的项目的根目录中创建一个文件,以包含此快速入门的应用程序逻辑。 将下面的代码添加到 client.js:
// Make sure to install the necessary dependencies
const { CallClient, VideoStreamRenderer, LocalVideoStream } = require('@azure/communication-calling');
const { AzureCommunicationTokenCredential } = require('@azure/communication-common');
const { AzureLogger, setLogLevel } = require("@azure/logger");
// Set the log level and output
setLogLevel('verbose');
AzureLogger.log = (...args) => {
    console.log(...args);
};
// Calling web sdk objects
let callAgent;
let deviceManager;
let call;
let incomingCall;
let localVideoStream;
let localVideoStreamRenderer;
// UI widgets
let userAccessToken = document.getElementById('user-access-token');
let applicationObjectId = document.getElementById('application-object-id');
let initializeCallAgentButton = document.getElementById('initialize-teams-call-agent');
let startCallButton = document.getElementById('start-call-button');
let hangUpCallButton = document.getElementById('hangup-call-button');
let acceptCallButton = document.getElementById('accept-call-button');
let startVideoButton = document.getElementById('start-video-button');
let stopVideoButton = document.getElementById('stop-video-button');
let connectedLabel = document.getElementById('connectedLabel');
let remoteVideoContainer = document.getElementById('remoteVideoContainer');
let localVideoContainer = document.getElementById('localVideoContainer');
/**
 * Create an instance of CallClient. Initialize a CallAgent instance with a AzureCommunicationTokenCredential via created CallClient. CallAgent enables us to make outgoing calls and receive incoming calls.
 * You can then use the CallClient.getDeviceManager() API instance to get the DeviceManager.
 */
initializeCallAgentButton.onclick = async () => {
    try {
        const callClient = new CallClient();
        tokenCredential = new AzureCommunicationTokenCredential(userAccessToken.value.trim());
        callAgent = await callClient.createCallAgent(tokenCredential)
        // Set up a camera device to use.
        deviceManager = await callClient.getDeviceManager();
        await deviceManager.askDevicePermission({ video: true });
        await deviceManager.askDevicePermission({ audio: true });
        // Listen for an incoming call to accept.
        callAgent.on('incomingCall', async (args) => {
            try {
                incomingCall = args.incomingCall;
                acceptCallButton.disabled = false;
                startCallButton.disabled = true;
            } catch (error) {
                console.error(error);
            }
        });
        startCallButton.disabled = false;
        initializeCallAgentButton.disabled = true;
    } catch(error) {
        console.error(error);
    }
}
/**
 * Place a 1:1 outgoing video call to an Teams Auto attendant
 * Add an event listener to initiate a call when the `startCallButton` is selected.
 * Enumerate local cameras using the deviceManager `getCameraList` API.
 * In this quickstart, we're using the first camera in the collection. Once the desired camera is selected, a
 * LocalVideoStream instance will be constructed and passed within `videoOptions` as an item within the
 * localVideoStream array to the call method. When the call connects, your application will be sending a video stream to the other participant.
 */
startCallButton.onclick = async () => {
    try {
        const localVideoStream = await createLocalVideoStream();
        const videoOptions = localVideoStream ? { localVideoStreams: [localVideoStream] } : undefined;
        call = callAgent.startCall([{ teamsAppId: applicationObjectId.value.trim(), cloud:"public" }], { videoOptions: videoOptions });
        // Subscribe to the call's properties and events.
        subscribeToCall(call);
    } catch (error) {
        console.error(error);
    }
}
/**
 * Accepting an incoming call with a video
 * Add an event listener to accept a call when the `acceptCallButton` is selected.
 * You can accept incoming calls after subscribing to the `CallAgent.on('incomingCall')` event.
 * You can pass the local video stream to accept the call with the following code.
 */
acceptCallButton.onclick = async () => {
    try {
        const localVideoStream = await createLocalVideoStream();
        const videoOptions = localVideoStream ? { localVideoStreams: [localVideoStream] } : undefined;
        call = await incomingCall.accept({ videoOptions });
        // Subscribe to the call's properties and events.
        subscribeToCall(call);
    } catch (error) {
        console.error(error);
    }
}
// Subscribe to a call obj.
// Listen for property changes and collection updates.
subscribeToCall = (call) => {
    try {
        // Inspect the initial call.id value.
        console.log(`Call Id: ${call.id}`);
        //Subscribe to call's 'idChanged' event for value changes.
        call.on('idChanged', () => {
            console.log(`Call ID changed: ${call.id}`);
        });
        // Inspect the initial call.state value.
        console.log(`Call state: ${call.state}`);
        // Subscribe to call's 'stateChanged' event for value changes.
        call.on('stateChanged', async () => {
            console.log(`Call state changed: ${call.state}`);
            if(call.state === 'Connected') {
                connectedLabel.hidden = false;
                acceptCallButton.disabled = true;
                startCallButton.disabled = true;
                hangUpCallButton.disabled = false;
                startVideoButton.disabled = false;
                stopVideoButton.disabled = false;
            } else if (call.state === 'Disconnected') {
                connectedLabel.hidden = true;
                startCallButton.disabled = false;
                hangUpCallButton.disabled = true;
                startVideoButton.disabled = true;
                stopVideoButton.disabled = true;
                console.log(`Call ended, call end reason={code=${call.callEndReason.code}, subCode=${call.callEndReason.subCode}}`);
            }
        });

        call.on('isLocalVideoStartedChanged', () => {
            console.log(`isLocalVideoStarted changed: ${call.isLocalVideoStarted}`);
        });
        console.log(`isLocalVideoStarted: ${call.isLocalVideoStarted}`);
        call.localVideoStreams.forEach(async (lvs) => {
            localVideoStream = lvs;
            await displayLocalVideoStream();
        });
        call.on('localVideoStreamsUpdated', e => {
            e.added.forEach(async (lvs) => {
                localVideoStream = lvs;
                await displayLocalVideoStream();
            });
            e.removed.forEach(lvs => {
               removeLocalVideoStream();
            });
        });

        // Inspect the call's current remote participants and subscribe to them.
        call.remoteParticipants.forEach(remoteParticipant => {
            subscribeToRemoteParticipant(remoteParticipant);
        });
        // Subscribe to the call's 'remoteParticipantsUpdated' event to be
        // notified when new participants are added to the call or removed from the call.
        call.on('remoteParticipantsUpdated', e => {
            // Subscribe to new remote participants that are added to the call.
            e.added.forEach(remoteParticipant => {
                subscribeToRemoteParticipant(remoteParticipant)
            });
            // Unsubscribe from participants that are removed from the call
            e.removed.forEach(remoteParticipant => {
                console.log('Remote participant removed from the call.');
            });
        });
    } catch (error) {
        console.error(error);
    }
}
// Subscribe to a remote participant obj.
// Listen for property changes and collection updates.
subscribeToRemoteParticipant = (remoteParticipant) => {
    try {
        // Inspect the initial remoteParticipant.state value.
        console.log(`Remote participant state: ${remoteParticipant.state}`);
        // Subscribe to remoteParticipant's 'stateChanged' event for value changes.
        remoteParticipant.on('stateChanged', () => {
            console.log(`Remote participant state changed: ${remoteParticipant.state}`);
        });
        // Inspect the remoteParticipants's current videoStreams and subscribe to them.
        remoteParticipant.videoStreams.forEach(remoteVideoStream => {
            subscribeToRemoteVideoStream(remoteVideoStream)
        });
        // Subscribe to the remoteParticipant's 'videoStreamsUpdated' event to be
        // notified when the remoteParticipant adds new videoStreams and removes video streams.
        remoteParticipant.on('videoStreamsUpdated', e => {
            // Subscribe to newly added remote participant's video streams.
            e.added.forEach(remoteVideoStream => {
                subscribeToRemoteVideoStream(remoteVideoStream)
            });
            // Unsubscribe from newly removed remote participants' video streams.
            e.removed.forEach(remoteVideoStream => {
                console.log('Remote participant video stream was removed.');
            })
        });
    } catch (error) {
        console.error(error);
    }
}
/**
 * Subscribe to a remote participant's remote video stream obj.
 * You have to subscribe to the 'isAvailableChanged' event to render the remoteVideoStream. If the 'isAvailable' property
 * changes to 'true' a remote participant is sending a stream. Whenever the availability of a remote stream changes
 * you can choose to destroy the whole 'Renderer' a specific 'RendererView' or keep them. Displaying RendererView without a video stream will result in a blank video frame.
 */
subscribeToRemoteVideoStream = async (remoteVideoStream) => {
    // Create a video stream renderer for the remote video stream.
    let videoStreamRenderer = new VideoStreamRenderer(remoteVideoStream);
    let view;
    const renderVideo = async () => {
        try {
            // Create a renderer view for the remote video stream.
            view = await videoStreamRenderer.createView();
            // Attach the renderer view to the UI.
            remoteVideoContainer.hidden = false;
            remoteVideoContainer.appendChild(view.target);
        } catch (e) {
            console.warn(`Failed to createView, reason=${e.message}, code=${e.code}`);
        }
    }

    remoteVideoStream.on('isAvailableChanged', async () => {
        // Participant has switched video on.
        if (remoteVideoStream.isAvailable) {
            await renderVideo();
        // Participant has switched video off.
        } else {
            if (view) {
                view.dispose();
                view = undefined;
            }
        }
    });
    // Participant has video on initially.
    if (remoteVideoStream.isAvailable) {
        await renderVideo();
    }
}
// Start your local video stream.
// This will send your local video stream to remote participants so they can view it.
startVideoButton.onclick = async () => {
    try {
        const localVideoStream = await createLocalVideoStream();
        await call.startVideo(localVideoStream);
    } catch (error) {
        console.error(error);
    }
}
// Stop your local video stream.
// This will stop your local video stream from being sent to remote participants.
stopVideoButton.onclick = async () => {
    try {
        await call.stopVideo(localVideoStream);
    } catch (error) {
        console.error(error);
    }
}
/**
 * To render a LocalVideoStream, you need to create a new instance of VideoStreamRenderer, and then
 * create a new VideoStreamRendererView instance using the asynchronous createView() method.
 * You may then attach view.target to any UI element.
 */
// Create a local video stream for your camera device
createLocalVideoStream = async () => {
    const camera = (await deviceManager.getCameras())[0];
    if (camera) {
        return new LocalVideoStream(camera);
    } else {
        console.error(`No camera device found on the system`);
    }
}
// Display your local video stream preview in your UI
displayLocalVideoStream = async () => {
    try {
        localVideoStreamRenderer = new VideoStreamRenderer(localVideoStream);
        const view = await localVideoStreamRenderer.createView();
        localVideoContainer.hidden = false;
        localVideoContainer.appendChild(view.target);
    } catch (error) {
        console.error(error);
    }
}
// Remove your local video stream preview from your UI
removeLocalVideoStream = async() => {
    try {
        localVideoStreamRenderer.dispose();
        localVideoContainer.hidden = true;
    } catch (error) {
        console.error(error);
    }
}
// End the current call
hangUpCallButton.addEventListener("click", async () => {
    // end the current call
    await call.hangUp();
});
添加 webpack 本地服务器代码
在项目根目录中创建一个名为 webpack.config.js 的文件,以包含本快速入门使用的本地服务器逻辑。 在 webpack.config.js 中添加以下代码:
const path = require('path');
const CopyPlugin = require("copy-webpack-plugin");

module.exports = {
    mode: 'development',
    entry: './client.js',
    output: {
        filename: 'main.js',
        path: path.resolve(__dirname, 'dist'),
    },
    devServer: {
        static: {
            directory: path.join(__dirname, './')
        },
    },
    plugins: [
        new CopyPlugin({
            patterns: [
                './index.html'
            ]
        }),
    ]
};
运行代码
使用 webpack-dev-server 生成并运行应用。 运行以下命令,在本地 Web 服务器中捆绑应用程序主机:
npx webpack serve --config webpack.config.js
手动设置呼叫的步骤:
- 打开浏览器并导航到 http://localhost:8080/.
- 输入有效的用户访问令牌。 如果还没有可用的令牌,请参阅用户访问令牌文档。
- 单击“初始化呼叫代理”按钮。
- 输入自动助理对象 ID,然后选择“开始呼叫”按钮。 应用程序将使用给定的对象 ID 发起到自动助理的传出呼叫。
- 呼叫已连接到自动助理。
- 根据自动助理的配置通过自动助理路由通信服务用户。
在本快速入门中,你将了解如何发起从 Azure 通信服务用户到 Teams 自动助理的呼叫。 可通过以下步骤实现此目标:
- 启用 Azure 通信服务资源与 Teams 租户的联合。
- 通过 Teams 管理中心选择或创建 Teams 自动助理。
- 通过 Teams 管理中心获取自动助理的电子邮件地址。
- 通过图形 API 获取自动助理的对象 ID。
- 使用 Azure 通信服务呼叫 SDK 发起呼叫。
如果你要向前跳转到末尾,可以从 GitHub 下载此快速入门示例。
在 Teams 租户中实现互操作性
具有 Teams 管理员角色的 Microsoft Entra 用户可以通过 MicrosoftTeams 模块运行 PowerShell cmdlet,以在租户中启用通信服务资源。
1.准备 Microsoft Teams 模块
首先,打开 PowerShell,并使用以下命令验证 Teams 模块是否存在:
Get-module *teams*
如果未看到 MicrosoftTeams 模块,请先安装它。 要安装该模块,需要以管理员身份运行 PowerShell。 然后,运行以下命令:
Install-Module -Name MicrosoftTeams
系统会通知你将要安装的模块,你可以通过回复 Y 或 A 进行确认。 如果模块已安装但已过时,可以运行以下命令来更新模块:
Update-Module MicrosoftTeams
2.连接到 Microsoft Teams 模块
模块安装并就绪后,可以使用以下命令连接到 MicrosoftTeams 模块。 你将看到一个提示你进行登录的交互式窗口。 要使用的用户帐户需要具有 Teams 管理员权限。 否则,可能会在后续步骤中收到 access denied 响应。
Connect-MicrosoftTeams
3.启用租户配置
与通信服务资源的互操作性是通过租户配置和分配的策略来控制的。 Teams 租户具有单个租户配置,Teams 用户则已分配全局策略或自定义策略。 有关详细信息,请参阅在 Teams 中分配策略。
成功登录后,可以运行 cmdlet Set-CsTeamsAcsFederationConfiguration 以在租户中启用通信服务资源。 将文本 IMMUTABLE_RESOURCE_ID 替换为通信资源中的不可变资源 ID。 可在此处找到有关如何获取此信息的更多详细信息。
$allowlist = @('IMMUTABLE_RESOURCE_ID')
Set-CsTeamsAcsFederationConfiguration -EnableAcsUsers $True -AllowedAcsResources $allowlist
4.启用租户策略
每个 Teams 用户都分配了一个 External Access Policy,可用于确定通信服务用户是否可以呼叫此 Teams 用户。 使用 cmdlet Set-CsExternalAccessPolicy 确保分配给 Teams 用户的策略已将 EnableAcsFederationAccess 设置为 $true
Set-CsExternalAccessPolicy -Identity Global -EnableAcsFederationAccess $true
创建或选择 Teams 自动助理
Teams 自动助理是为传入呼叫提供自动呼叫处理系统的系统。 它充当虚拟接待员,允许呼叫者自动路由到合适的个人或部门,而无需人工操作员。 可通过 Teams 管理中心选择现有自动助理或创建新的自动助理。
在此处详细了解如何使用 Teams 管理中心创建自动助理。
查找自动助理的对象 ID
创建自动助理后,需要查找相关的对象 ID,以便稍后将其用于呼叫。 对象 ID 连接到自动助理上附加的资源帐户 - 在 Teams 管理中心打开“资源帐户”选项卡并查找帐户的电子邮件。
可在搜索中使用此电子邮件地址通过 Microsoft Graph 浏览器找到资源帐户所需的所有信息。
https://graph.microsoft.com/v1.0/users/lab-test2-cq-@contoso.com
在结果中,我们将能够找到“ID”字段
    "userPrincipalName": "lab-test2-cq@contoso.com",
    "id": "31a011c2-2672-4dd0-b6f9-9334ef4999db"
若要在调用应用中使用,我们需要向此 ID 添加前缀。 目前支持以下各项:
- 公有云自动助理:
28:orgid:<id> - 政府云自动助理:
28:gcch:<id>
先决条件
具有活动订阅的 Azure 帐户。 免费创建帐户。
Android Studio,用于创建 Android 应用程序。
已部署的通信服务资源。 创建通信服务资源。
Azure 通信服务的用户访问令牌。 可以使用 Azure CLI,并结合你的连接字符串运行命令来创建用户和访问令牌。
az communication identity token issue --scope voip --connection-string "yourConnectionString"有关详细信息,请参阅使用 Azure CLI 创建和管理访问令牌。
对 Teams 呼叫应用程序的最低支持:2.12.0-beta.1
设置
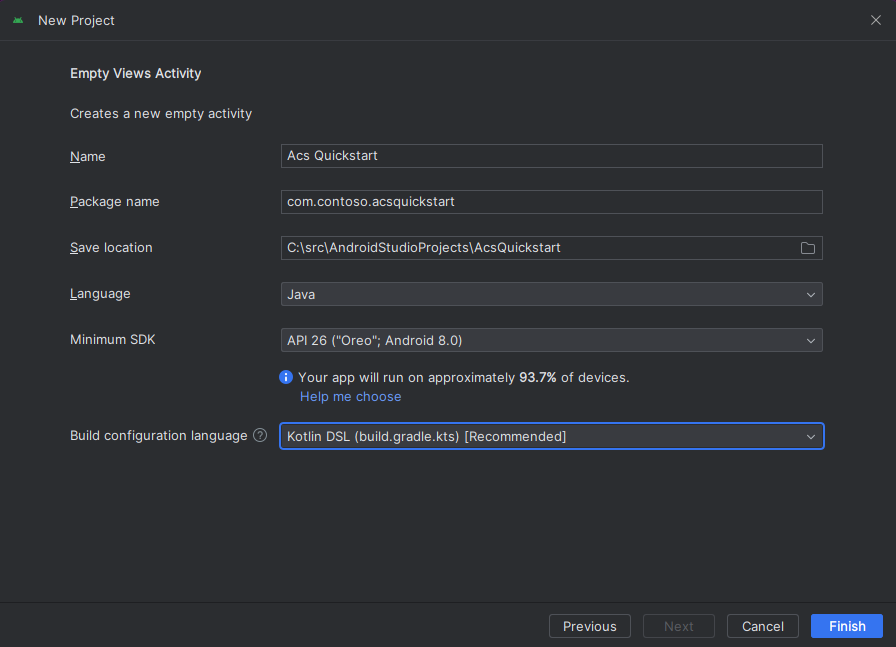
使用空活动创建 Android 应用
在 Android Studio 中,选择“启动新的 Android Studio 项目”。
在“手机和平板电脑”下选择“空视图活动”项目模板。

选择“API 26: Android 8.0 (Oreo)”最低 SDK 版本或更高版本。
安装包
找到项目 settings.gradle.kts,并确保能在 pluginManagement 和 dependencyResolutionManagement 下的存储库列表中看到 mavenCentral()
pluginManagement {
    repositories {
    ...
        mavenCentral()
    ...
    }
}

dependencyResolutionManagement {
    repositoriesMode.set(RepositoriesMode.FAIL_ON_PROJECT_REPOS)
    repositories {
    ...
        mavenCentral()
    }
}
然后,在模块级别 build.gradle 中,将以下行添加到 dependencies 和 android 节
android {
    ...

    compileOptions {
        sourceCompatibility JavaVersion.VERSION_1_8
        targetCompatibility JavaVersion.VERSION_1_8
    }
}

dependencies {
    ...
    implementation ("com.azure.android:azure-communication-calling:2.6.0")
    ...
}
将权限添加到应用程序清单
若要请求进行呼叫所需的权限,必须在应用程序清单 (app/src/main/AndroidManifest.xml) 中声明这些权限。 请将文件内容替换为以下代码。
    <?xml version="1.0" encoding="utf-8"?>
<manifest xmlns:android="http://schemas.android.com/apk/res/android"
    package="com.contoso.acsquickstart">

    <uses-permission android:name="android.permission.INTERNET" />
    <uses-permission android:name="android.permission.ACCESS_NETWORK_STATE" />
    <uses-permission android:name="android.permission.ACCESS_WIFI_STATE" />
    <uses-permission android:name="android.permission.RECORD_AUDIO" />
    <uses-permission android:name="android.permission.CAMERA" />
    <uses-permission android:name="android.permission.WRITE_EXTERNAL_STORAGE" />
    <uses-permission android:name="android.permission.READ_PHONE_STATE" />

    <application
        android:allowBackup="true"
        android:icon="@mipmap/ic_launcher"
        android:label="@string/app_name"
        android:roundIcon="@mipmap/ic_launcher_round"
        android:supportsRtl="true"
        android:theme="@style/AppTheme">
        <!--Our Calling SDK depends on the Apache HTTP SDK.
When targeting Android SDK 28+, this library needs to be explicitly referenced.
See https://developer.android.com/about/versions/pie/android-9.0-changes-28#apache-p-->
        <uses-library android:name="org.apache.http.legacy" android:required="false"/>
        <activity android:name=".MainActivity">
            <intent-filter>
                <action android:name="android.intent.action.MAIN" />

                <category android:name="android.intent.category.LAUNCHER" />
            </intent-filter>
        </activity>
    </application>

</manifest>
为应用设置布局
需要两个输入:被叫方 ID 的文本输入,以及用于进行呼叫的按钮。 可以通过设计器或通过编辑布局 xml 来添加这些输入。 使用 ID call_button 和文本输入 callee_id 创建一个按钮。 导航到 (app/src/main/res/layout/activity_main.xml) 并将文件内容替换为以下代码:
<?xml version="1.0" encoding="utf-8"?>
<androidx.constraintlayout.widget.ConstraintLayout xmlns:android="http://schemas.android.com/apk/res/android"
    xmlns:app="http://schemas.android.com/apk/res-auto"
    xmlns:tools="http://schemas.android.com/tools"
    android:layout_width="match_parent"
    android:layout_height="match_parent"
    tools:context="${launchApp}">

    <EditText
        android:id="@+id/callee_id"
        android:layout_width="match_parent"
        android:layout_height="wrap_content"
        android:ems="10"
        android:hint="Callee Id"
        android:inputType="textPersonName"
        android:layout_marginTop="100dp"
        android:layout_marginHorizontal="20dp"
        app:layout_constraintEnd_toEndOf="parent"
        app:layout_constraintStart_toStartOf="parent"
        app:layout_constraintTop_toTopOf="parent" />

    <LinearLayout
        android:layout_width="match_parent"
        android:layout_height="wrap_content"
        android:layout_marginBottom="46dp"
        android:gravity="center"
        app:layout_constraintBottom_toBottomOf="parent"
        app:layout_constraintEnd_toEndOf="parent"
        app:layout_constraintStart_toStartOf="parent">

        <Button
            android:id="@+id/call_button"
            android:layout_width="wrap_content"
            android:layout_height="wrap_content"
            android:text="Call" />

        <Button
            android:id="@+id/hangup_button"
            android:layout_width="wrap_content"
            android:layout_height="wrap_content"
            android:text="Hangup" />

    </LinearLayout>

    <TextView
        android:id="@+id/status_bar"
        android:layout_width="wrap_content"
        android:layout_height="wrap_content"
        android:layout_marginBottom="16dp"
        app:layout_constraintBottom_toBottomOf="parent"
        app:layout_constraintEnd_toEndOf="parent"
        app:layout_constraintStart_toStartOf="parent" />
</androidx.constraintlayout.widget.ConstraintLayout>
创建主活动基架和绑定
创建布局后,可以添加绑定以及活动的基本基架。 活动会处理请求运行时权限、创建呼叫代理以及在按下按钮时进行呼叫。
onCreate 方法被替代以调用 getAllPermissions 和 createAgent,并为通话按钮添加绑定。 此事件仅在创建活动时发生一次。 有关 onCreate 的详细信息,请参阅指南了解活动生命周期。
导航到 MainActivity.java 并将内容替换为以下代码:
package com.contoso.acsquickstart;

import androidx.annotation.NonNull;
import androidx.appcompat.app.AppCompatActivity;
import androidx.core.app.ActivityCompat;

import android.Manifest;
import android.content.pm.PackageManager;
import android.media.AudioManager;
import android.os.Bundle;
import android.widget.Button;
import android.widget.EditText;
import android.widget.TextView;
import android.widget.Toast;

import java.util.ArrayList;
import java.util.concurrent.ExecutionException;

import com.azure.android.communication.common.CommunicationIdentifier;
import com.azure.android.communication.common.CommunicationUserIdentifier;
import com.azure.android.communication.calling.Call;
import com.azure.android.communication.calling.CallAgent;
import com.azure.android.communication.calling.CallClient;
import com.azure.android.communication.calling.HangUpOptions;
import com.azure.android.communication.common.CommunicationTokenCredential;
import com.azure.android.communication.calling.StartCallOptions;

public class MainActivity extends AppCompatActivity {
    private static final String[] allPermissions = new String[] { Manifest.permission.RECORD_AUDIO, Manifest.permission.CAMERA, Manifest.permission.WRITE_EXTERNAL_STORAGE, Manifest.permission.READ_PHONE_STATE };
    private static final String UserToken = "<User_Access_Token>";

    TextView statusBar;

    private CallAgent agent;
    private Call call;
    private Button callButton;

    @Override
    protected void onCreate(Bundle savedInstanceState) {
        super.onCreate(savedInstanceState);
        setContentView(R.layout.activity_main);

        callButton = findViewById(R.id.call_button);

        getAllPermissions();
        createAgent();
        callButton.setOnClickListener(l -> startCall());

        Button hangupButton = findViewById(R.id.hangup_button);
        hangupButton.setOnClickListener(l -> endCall());

        statusBar = findViewById(R.id.status_bar);

        setVolumeControlStream(AudioManager.STREAM_VOICE_CALL);
    }

    /**
     * Start a call
     */
    private void startCall() {
        if (UserToken.startsWith("<")) {
            Toast.makeText(this, "Please enter token in source code", Toast.LENGTH_SHORT).show();
            return;
        }

        EditText calleeIdView = findViewById(R.id.callee_id);
        String calleeId = calleeIdView.getText().toString();
        if (calleeId.isEmpty()) {
            Toast.makeText(this, "Please enter callee", Toast.LENGTH_SHORT).show();
            return;
        }
        ArrayList<CommunicationIdentifier> participants = new ArrayList<>();
        participants.add(new MicrosoftTeamsAppIdentifier(calleeId));
        StartCallOptions options = new StartCallOptions();
        call = agent.startCall(
                getApplicationContext(),
                participants,
                options);
        call.addOnStateChangedListener(p -> setStatus(call.getState().toString()));
    }

    /**
     * Ends the call previously started
     */
    private void endCall() {
        try {
            call.hangUp(new HangUpOptions()).get();
        } catch (ExecutionException | InterruptedException e) {
            Toast.makeText(this, "Unable to hang up call", Toast.LENGTH_SHORT).show();
        }
    }

    /**
     * Create the call agent
     */
    private void createAgent() {
        try {
            CommunicationTokenCredential credential = new CommunicationTokenCredential(UserToken);
            agent = new CallClient().createCallAgent(getApplicationContext(), credential).get();
        } catch (Exception ex) {
            Toast.makeText(getApplicationContext(), "Failed to create call agent.", Toast.LENGTH_SHORT).show();
        }
    }

    /**
     * Ensure all permissions were granted, otherwise inform the user permissions are missing.
     */
    @Override
    public void onRequestPermissionsResult(int requestCode, @NonNull String[] permissions, int[] grantResults) {
        boolean allPermissionsGranted = true;
        for (int result : grantResults) {
            allPermissionsGranted &= (result == PackageManager.PERMISSION_GRANTED);
        }
        if (!allPermissionsGranted) {
            Toast.makeText(this, "All permissions are needed to make the call.", Toast.LENGTH_LONG).show();
            finish();
        }
    }

    /**
     * Shows message in the status bar
     */
    private void setStatus(String status) {
        runOnUiThread(() -> statusBar.setText(status));
    }
}
在运行时请求权限
对于 Android 6.0 及更高版本(API 级别 23)和 targetSdkVersion 23 或更高版本,在运行时(而不是在安装应用时)授予权限。 为了支持此功能,可以实施 getAllPermissions 以便为每个所需权限调用 ActivityCompat.checkSelfPermission 和 ActivityCompat.requestPermissions。
/**
 * Request each required permission if the app doesn't already have it.
 */
private void getAllPermissions() {
    ArrayList<String> permissionsToAskFor = new ArrayList<>();
    for (String permission : allPermissions) {
        if (ActivityCompat.checkSelfPermission(this, permission) != PackageManager.PERMISSION_GRANTED) {
            permissionsToAskFor.add(permission);
        }
    }
    if (!permissionsToAskFor.isEmpty()) {
        ActivityCompat.requestPermissions(this, permissionsToAskFor.toArray(new String[0]), 1);
    }
}
注意
设计应用时,请考虑何时应请求这些权限。 应在需要时请求权限,而不是提前请求。 有关详细信息,请参阅 Android 权限指南。
对象模型
以下类和接口用于处理 Azure 通信服务通话 SDK 的某些主要功能:
| 名称 | 说明 |
|---|---|
CallClient |
CallClient 是通话 SDK 的主入口点。 |
CallAgent |
CallAgent 用于启动和管理通话。 |
CommunicationTokenCredential |
CommunicationTokenCredential 用作实例化 CallAgent 的令牌凭据。 |
CommunicationIdentifier |
CommunicationIdentifier 用作可参与通话的不同类型的参与者。 |
从用户访问令牌创建代理
借助用户令牌,可以实例化经过身份验证的呼叫代理。 通常,此令牌从具有特定于应用程序的身份验证的服务生成。 有关用户访问令牌的详细信息,请查看用户访问令牌指南。
对于快速入门,请使用为你的 Azure 通信服务资源生成的用户访问令牌替换 <User_Access_Token>。
/**
 * Create the call agent for placing calls
 */
private void createAgent() {
    String userToken = "<User_Access_Token>";

    try {
            CommunicationTokenCredential credential = new CommunicationTokenCredential(userToken);
            callAgent = new CallClient().createCallAgent(getApplicationContext(), credential).get();
    } catch (Exception ex) {
        Toast.makeText(getApplicationContext(), "Failed to create call agent.", Toast.LENGTH_SHORT).show();
    }
}
运行代码
现在可以使用工具栏上的“运行应用”按钮启动应用。
手动设置呼叫的步骤:
- 使用 Android Studio 启动应用。
- 输入自动助理对象 ID(带前缀),然后选择“开始呼叫”按钮。 应用程序将使用给定的对象 ID 发起到自动助理的传出呼叫。
- 呼叫已连接到自动助理。
- 根据自动助理的配置通过自动助理路由通信服务用户。
在本快速入门中,你将了解如何发起从 Azure 通信服务用户到 Teams 自动助理的呼叫。 可通过以下步骤实现此目标:
- 启用 Azure 通信服务资源与 Teams 租户的联合。
- 通过 Teams 管理中心选择或创建 Teams 自动助理。
- 通过 Teams 管理中心获取自动助理的电子邮件地址。
- 通过图形 API 获取自动助理的对象 ID。
- 使用 Azure 通信服务呼叫 SDK 发起呼叫。
如果你要向前跳转到末尾,可以从 GitHub 下载此快速入门示例。
在 Teams 租户中实现互操作性
具有 Teams 管理员角色的 Microsoft Entra 用户可以通过 MicrosoftTeams 模块运行 PowerShell cmdlet,以在租户中启用通信服务资源。
1.准备 Microsoft Teams 模块
首先,打开 PowerShell,并使用以下命令验证 Teams 模块是否存在:
Get-module *teams*
如果未看到 MicrosoftTeams 模块,请先安装它。 要安装该模块,需要以管理员身份运行 PowerShell。 然后,运行以下命令:
Install-Module -Name MicrosoftTeams
系统会通知你将要安装的模块,你可以通过回复 Y 或 A 进行确认。 如果模块已安装但已过时,可以运行以下命令来更新模块:
Update-Module MicrosoftTeams
2.连接到 Microsoft Teams 模块
模块安装并就绪后,可以使用以下命令连接到 MicrosoftTeams 模块。 你将看到一个提示你进行登录的交互式窗口。 要使用的用户帐户需要具有 Teams 管理员权限。 否则,可能会在后续步骤中收到 access denied 响应。
Connect-MicrosoftTeams
3.启用租户配置
与通信服务资源的互操作性是通过租户配置和分配的策略来控制的。 Teams 租户具有单个租户配置,Teams 用户则已分配全局策略或自定义策略。 有关详细信息,请参阅在 Teams 中分配策略。
成功登录后,可以运行 cmdlet Set-CsTeamsAcsFederationConfiguration 以在租户中启用通信服务资源。 将文本 IMMUTABLE_RESOURCE_ID 替换为通信资源中的不可变资源 ID。 可在此处找到有关如何获取此信息的更多详细信息。
$allowlist = @('IMMUTABLE_RESOURCE_ID')
Set-CsTeamsAcsFederationConfiguration -EnableAcsUsers $True -AllowedAcsResources $allowlist
4.启用租户策略
每个 Teams 用户都分配了一个 External Access Policy,可用于确定通信服务用户是否可以呼叫此 Teams 用户。 使用 cmdlet Set-CsExternalAccessPolicy 确保分配给 Teams 用户的策略已将 EnableAcsFederationAccess 设置为 $true
Set-CsExternalAccessPolicy -Identity Global -EnableAcsFederationAccess $true
创建或选择 Teams 自动助理
Teams 自动助理是为传入呼叫提供自动呼叫处理系统的系统。 它充当虚拟接待员,允许呼叫者自动路由到合适的个人或部门,而无需人工操作员。 可通过 Teams 管理中心选择现有自动助理或创建新的自动助理。
在此处详细了解如何使用 Teams 管理中心创建自动助理。
查找自动助理的对象 ID
创建自动助理后,需要查找相关的对象 ID,以便稍后将其用于呼叫。 对象 ID 连接到自动助理上附加的资源帐户 - 在 Teams 管理中心打开“资源帐户”选项卡并查找帐户的电子邮件。
可在搜索中使用此电子邮件地址通过 Microsoft Graph 浏览器找到资源帐户所需的所有信息。
https://graph.microsoft.com/v1.0/users/lab-test2-cq-@contoso.com
在结果中,我们将能够找到“ID”字段
    "userPrincipalName": "lab-test2-cq@contoso.com",
    "id": "31a011c2-2672-4dd0-b6f9-9334ef4999db"
若要在调用应用中使用,我们需要向此 ID 添加前缀。 目前支持以下各项:
- 公有云自动助理:
28:orgid:<id> - 政府云自动助理:
28:gcch:<id>
先决条件
获取具有有效订阅的 Azure 帐户。 免费创建帐户。
一部运行 Xcode 的 Mac,以及一个安装到密钥链的有效开发人员证书。
已部署的通信服务资源。 创建通信服务资源。 需要为此快速入门记录连接字符串。
Azure 通信服务的用户访问令牌。 可以使用 Azure CLI,并结合你的连接字符串运行命令来创建用户和访问令牌。
az communication identity token issue --scope voip --connection-string "yourConnectionString"有关详细信息,请参阅使用 Azure CLI 创建和管理访问令牌。
对 Teams 呼叫应用程序的最低支持:2.14.0-beta.1
设置
创建 Xcode 项目
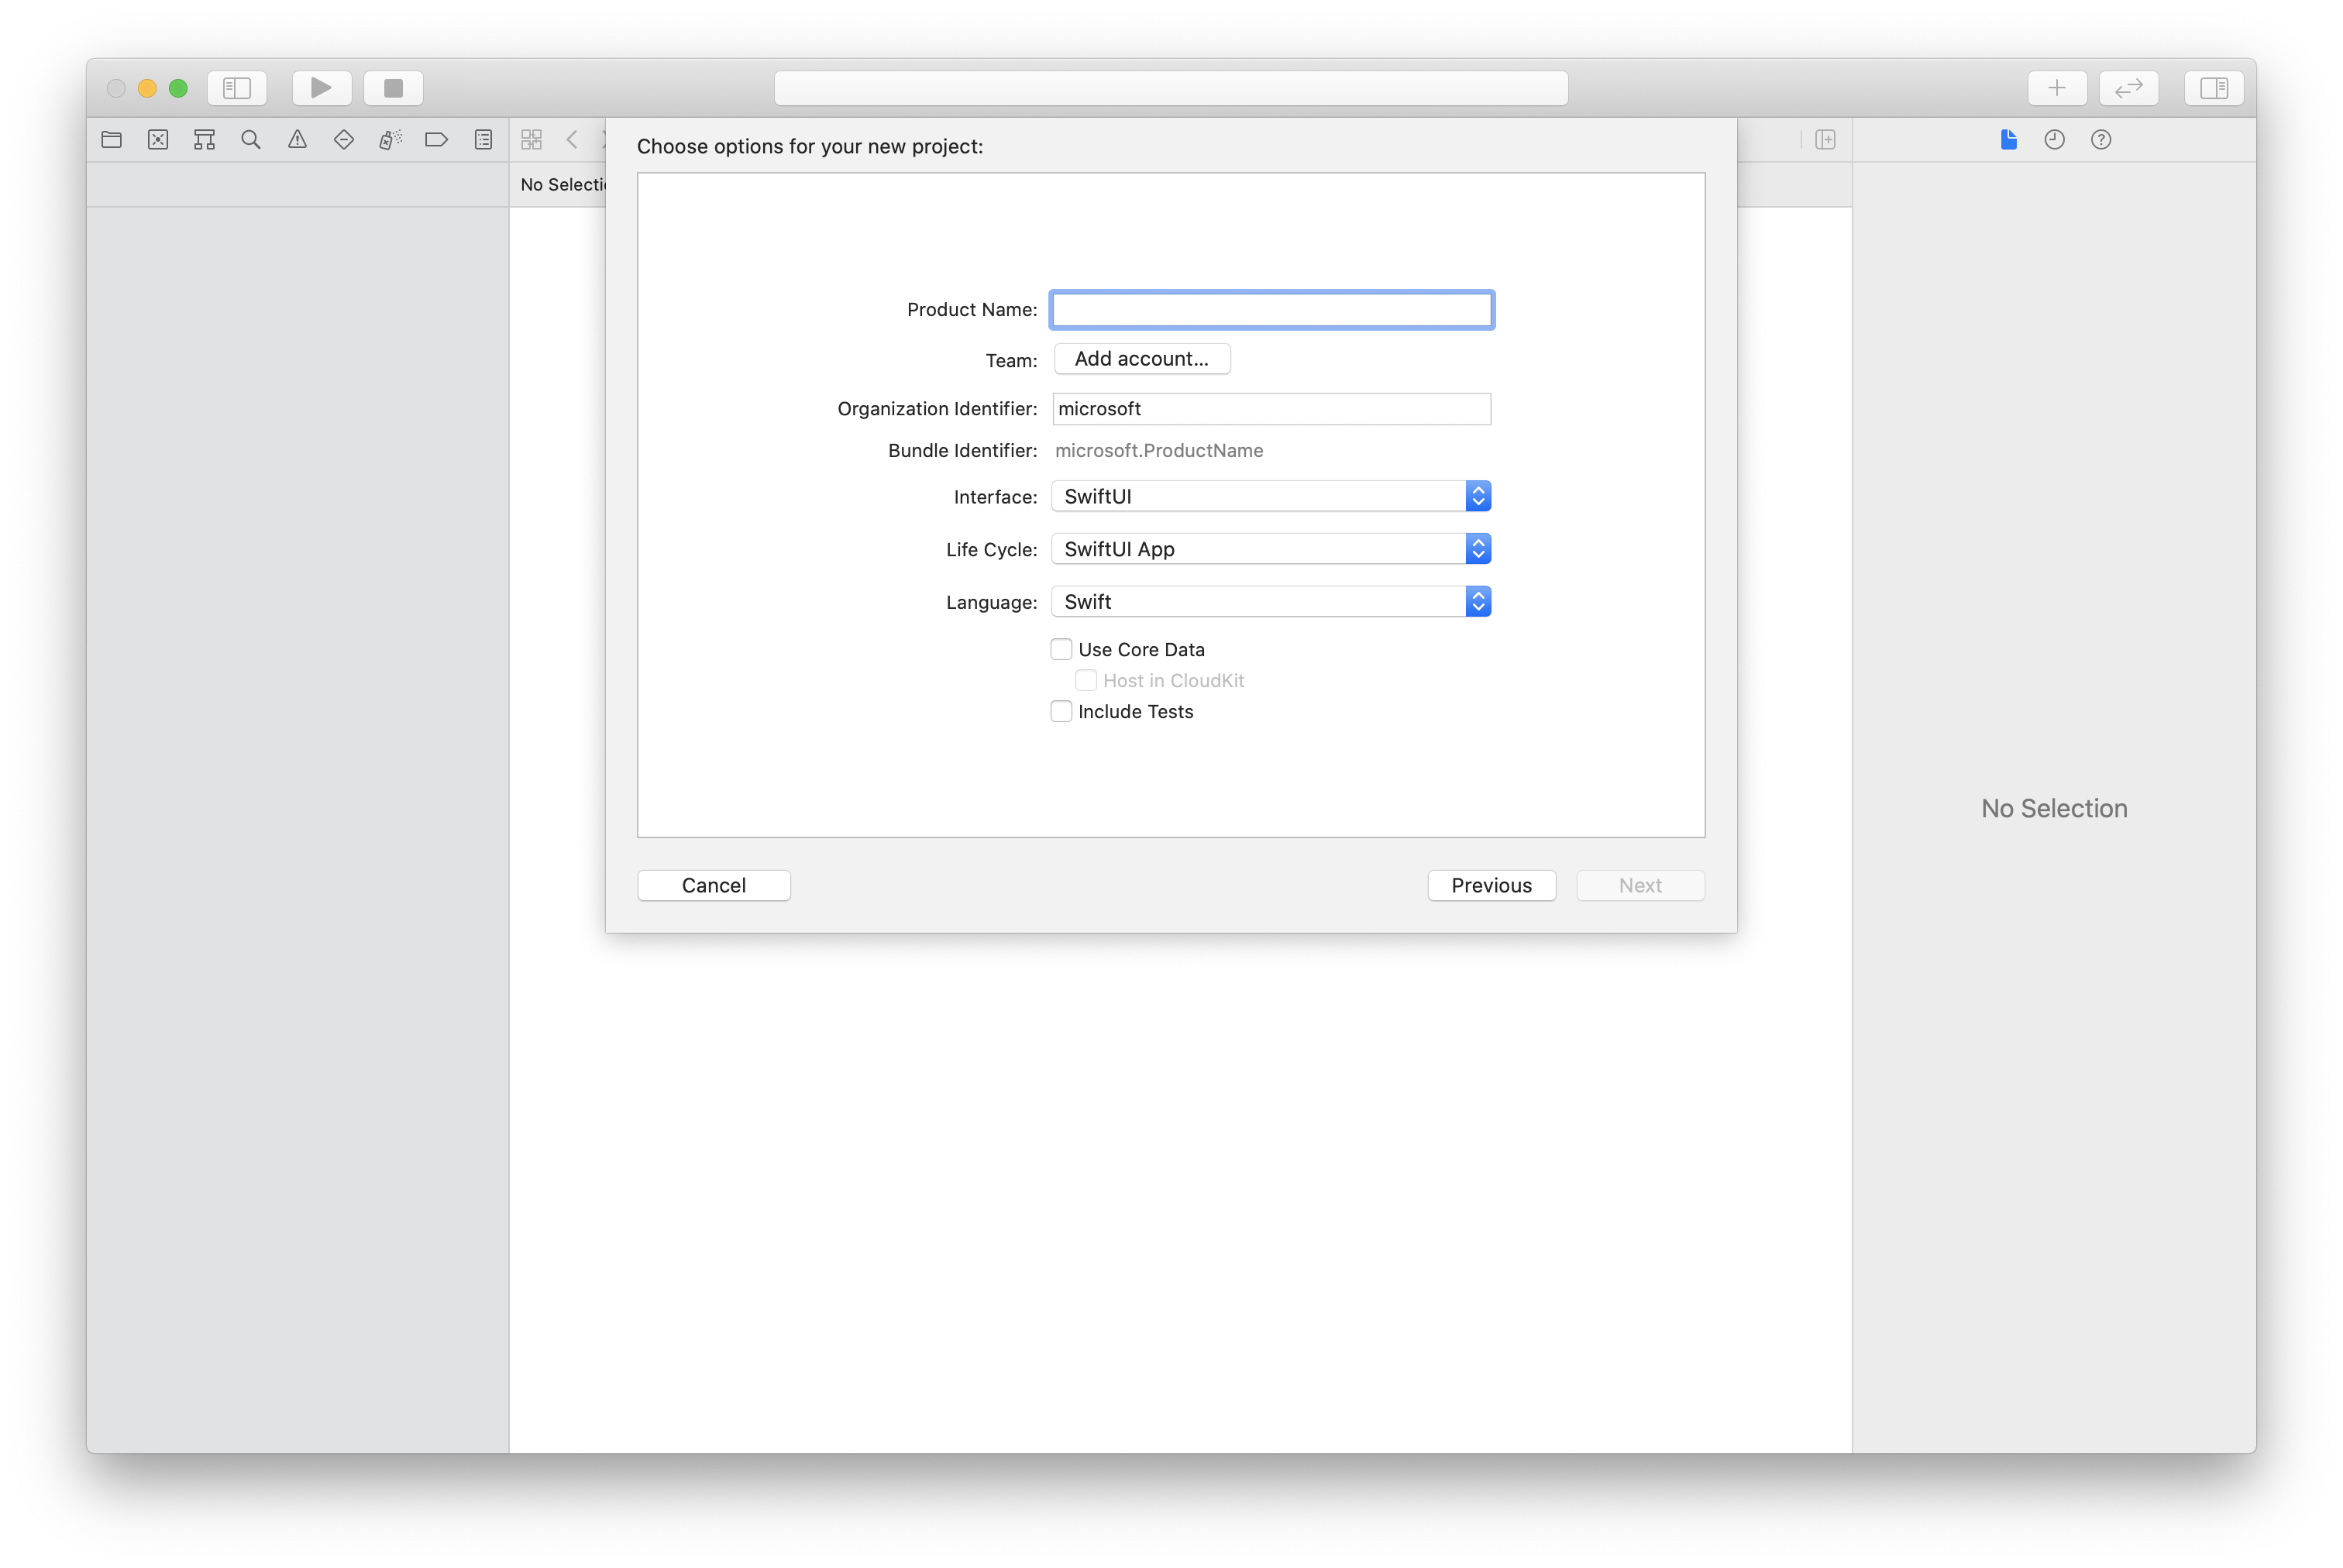
在 Xcode 中创建新的 iOS 项目,并选择“应用程序”模板。 本教程使用 SwiftUI 框架,因此应将“语言”设置为“Swift”,并将“用户界面”设置为“SwiftUI” 。 在此快速入门过程中,不会创建测试。 可以取消选中“包括测试”。
使用 CocoaPods 安装包和依赖项
若要为应用程序创建 Podfile,请打开终端并导航到项目文件夹,然后运行:
pod init将以下代码添加到 Podfile 并保存(确保“目标对象”与项目名称匹配):
platform :ios, '13.0'
use_frameworks!

target 'AzureCommunicationCallingSample' do
  pod 'AzureCommunicationCalling', '~> 2.14.0-beta.1'
end
运行
pod install。使用 Xcode 打开
.xcworkspace。
请求访问麦克风
若要访问设备的麦克风,需要使用 NSMicrophoneUsageDescription 更新应用的信息属性列表。 将关联的值设置为将要包含在系统用于向用户请求访问权限的对话框中的 string。
右键单击项目树的 Info.plist 条目,然后选择“打开为”>“源代码” 。 将以下代码行添加到顶层 <dict> 节,然后保存文件。
<key>NSMicrophoneUsageDescription</key>
<string>Need microphone access for VOIP calling.</string>
设置应用框架
打开项目的 ContentView.swift 文件,然后将 import 声明添加到文件顶部以导入 AzureCommunicationCalling library。 此外,导入 AVFoundation,我们需要使用此代码在代码中进行音频权限请求。
import AzureCommunicationCalling
import AVFoundation
将 ContentView 结构的实现替换为使用户可以启动和结束呼叫的一些简单 UI 控件。 我们会在本快速入门中将业务逻辑附加到这些控件。
struct ContentView: View {
    @State var callee: String = ""
    @State var callClient: CallClient?
    @State var callAgent: CallAgent?
    @State var call: Call?

    var body: some View {
        NavigationView {
            Form {
                Section {
                    TextField("Who would you like to call?", text: $callee)
                    Button(action: startCall) {
                        Text("Start Call")
                    }.disabled(callAgent == nil)
                    Button(action: endCall) {
                        Text("End Call")
                    }.disabled(call == nil)
                }
            }
            .navigationBarTitle("Calling Quickstart")
        }.onAppear {
            // Initialize call agent
        }
    }

    func startCall() {
        // Ask permissions
        AVAudioSession.sharedInstance().requestRecordPermission { (granted) in
            if granted {
                // Add start call logic
            }
        }
    }

    func endCall() {
        // Add end call logic
    }
}
对象模型
以下类和接口用于处理 Azure 通信服务通话 SDK 的某些主要功能:
| 名称 | 说明 |
|---|---|
CallClient |
CallClient 是通话 SDK 的主入口点。 |
CallAgent |
CallAgent 用于启动和管理通话。 |
CommunicationTokenCredential |
CommunicationTokenCredential 用作实例化 CallAgent 的令牌凭据。 |
CommunicationUserIdentifier |
CommunicationUserIdentifier 用于表示用户的身份,可以是以下选项之一:CommunicationUserIdentifier、PhoneNumberIdentifier 或 CallingApplication. |
验证客户端
通过用户访问令牌初始化 CallAgent 实例,这使我们可以发出和接收呼叫。
在以下代码中,需要将 <USER ACCESS TOKEN> 替换为资源的有效用户访问令牌。 如果还没有可用的令牌,请参阅用户访问令牌文档。
将以下代码添加到 ContentView.swift 中的 onAppear 回调:
var userCredential: CommunicationTokenCredential?
do {
    userCredential = try CommunicationTokenCredential(token: "<USER ACCESS TOKEN>")
} catch {
    print("ERROR: It was not possible to create user credential.")
    return
}

self.callClient = CallClient()

// Creates the call agent
self.callClient?.createCallAgent(userCredential: userCredential!) { (agent, error) in
    if error != nil {
        print("ERROR: It was not possible to create a call agent.")
        return
    }
    else {
        self.callAgent = agent
        print("Call agent successfully created.")
    }
}
开始呼叫
startCall 方法设置为在点击“开始呼叫”按钮时执行的操作。 更新实现,以便使用 ASACallAgent 开始呼叫:
func startCall()
{
    // Ask permissions
    AVAudioSession.sharedInstance().requestRecordPermission { (granted) in
        if granted {
            // start call logic
            let callees:[CommunicationIdentifier] = [MicrosoftTeamsAppIdentifier(self.callee)]
            self.callAgent?.startCall(participants: callees, options: StartCallOptions()) { (call, error) in
                if (error == nil) {
                    self.call = call
                } else {
                    print("Failed to get call object")
                }
            }
        }
    }
}
还可以使用 StartCallOptions 中的属性来设置呼叫的初始选项(例如,它允许在麦克风静音的情况下开始呼叫)。
结束呼叫
实现 endCall 方法,以便在点击“结束呼叫”按钮时结束当前呼叫。
func endCall()
{
    self.call!.hangUp(options: HangUpOptions()) { (error) in
        if (error != nil) {
            print("ERROR: It was not possible to hangup the call.")
        }
    }
}
运行代码
可以通过选择“产品”>“运行”或使用 (⌘-R) 键盘快捷方式,在 iOS 模拟器上生成并运行应用。
注意
首次发出呼叫时,系统将提示你提供麦克风访问权限。 在生产应用程序中,应使用 AVAudioSession API 检查权限状态,并在未授予权限时正常更新应用程序的行为。
手动设置呼叫的步骤:
- 使用 Xcode 启动应用
- 输入自动助理对象 ID(带前缀),然后选择“开始呼叫”按钮。 应用程序将使用给定的对象 ID 发起到自动助理的传出呼叫。
- 呼叫已连接到自动助理。
- 根据自动助理的配置通过自动助理路由通信服务用户。
在本快速入门中,你将了解如何发起从 Azure 通信服务用户到 Teams 自动助理的呼叫。 可通过以下步骤实现此目标:
- 启用 Azure 通信服务资源与 Teams 租户的联合。
- 通过 Teams 管理中心选择或创建 Teams 自动助理。
- 通过 Teams 管理中心获取自动助理的电子邮件地址。
- 通过图形 API 获取自动助理的对象 ID。
- 使用 Azure 通信服务呼叫 SDK 发起呼叫。
如果你要向前跳转到末尾,可以从 GitHub 下载此快速入门示例。
在 Teams 租户中实现互操作性
具有 Teams 管理员角色的 Microsoft Entra 用户可以通过 MicrosoftTeams 模块运行 PowerShell cmdlet,以在租户中启用通信服务资源。
1.准备 Microsoft Teams 模块
首先,打开 PowerShell,并使用以下命令验证 Teams 模块是否存在:
Get-module *teams*
如果未看到 MicrosoftTeams 模块,请先安装它。 要安装该模块,需要以管理员身份运行 PowerShell。 然后,运行以下命令:
Install-Module -Name MicrosoftTeams
系统会通知你将要安装的模块,你可以通过回复 Y 或 A 进行确认。 如果模块已安装但已过时,可以运行以下命令来更新模块:
Update-Module MicrosoftTeams
2.连接到 Microsoft Teams 模块
模块安装并就绪后,可以使用以下命令连接到 MicrosoftTeams 模块。 你将看到一个提示你进行登录的交互式窗口。 要使用的用户帐户需要具有 Teams 管理员权限。 否则,可能会在后续步骤中收到 access denied 响应。
Connect-MicrosoftTeams
3.启用租户配置
与通信服务资源的互操作性是通过租户配置和分配的策略来控制的。 Teams 租户具有单个租户配置,Teams 用户则已分配全局策略或自定义策略。 有关详细信息,请参阅在 Teams 中分配策略。
成功登录后,可以运行 cmdlet Set-CsTeamsAcsFederationConfiguration 以在租户中启用通信服务资源。 将文本 IMMUTABLE_RESOURCE_ID 替换为通信资源中的不可变资源 ID。 可在此处找到有关如何获取此信息的更多详细信息。
$allowlist = @('IMMUTABLE_RESOURCE_ID')
Set-CsTeamsAcsFederationConfiguration -EnableAcsUsers $True -AllowedAcsResources $allowlist
4.启用租户策略
每个 Teams 用户都分配了一个 External Access Policy,可用于确定通信服务用户是否可以呼叫此 Teams 用户。 使用 cmdlet Set-CsExternalAccessPolicy 确保分配给 Teams 用户的策略已将 EnableAcsFederationAccess 设置为 $true
Set-CsExternalAccessPolicy -Identity Global -EnableAcsFederationAccess $true
创建或选择 Teams 自动助理
Teams 自动助理是为传入呼叫提供自动呼叫处理系统的系统。 它充当虚拟接待员,允许呼叫者自动路由到合适的个人或部门,而无需人工操作员。 可通过 Teams 管理中心选择现有自动助理或创建新的自动助理。
在此处详细了解如何使用 Teams 管理中心创建自动助理。
查找自动助理的对象 ID
创建自动助理后,需要查找相关的对象 ID,以便稍后将其用于呼叫。 对象 ID 连接到自动助理上附加的资源帐户 - 在 Teams 管理中心打开“资源帐户”选项卡并查找帐户的电子邮件。
可在搜索中使用此电子邮件地址通过 Microsoft Graph 浏览器找到资源帐户所需的所有信息。
https://graph.microsoft.com/v1.0/users/lab-test2-cq-@contoso.com
在结果中,我们将能够找到“ID”字段
    "userPrincipalName": "lab-test2-cq@contoso.com",
    "id": "31a011c2-2672-4dd0-b6f9-9334ef4999db"
若要在调用应用中使用,我们需要向此 ID 添加前缀。 目前支持以下各项:
- 公有云自动助理:
28:orgid:<id> - 政府云自动助理:
28:gcch:<id>
先决条件
若要完成本教程,需要具备以下先决条件:
具有活动订阅的 Azure 帐户。 免费创建帐户。
安装带有通用 Windows 平台开发工作负载的 Visual Studio 2022。
已部署的通信服务资源。 创建通信服务资源。 需要为此快速入门记录连接字符串。
Azure 通信服务的用户访问令牌。 可以使用 Azure CLI,并结合你的连接字符串运行命令来创建用户和访问令牌。
az communication identity token issue --scope voip --connection-string "yourConnectionString"有关详细信息,请参阅使用 Azure CLI 创建和管理访问令牌。
对 Teams 呼叫应用程序的最低支持:1.10.0-beta.1
设置
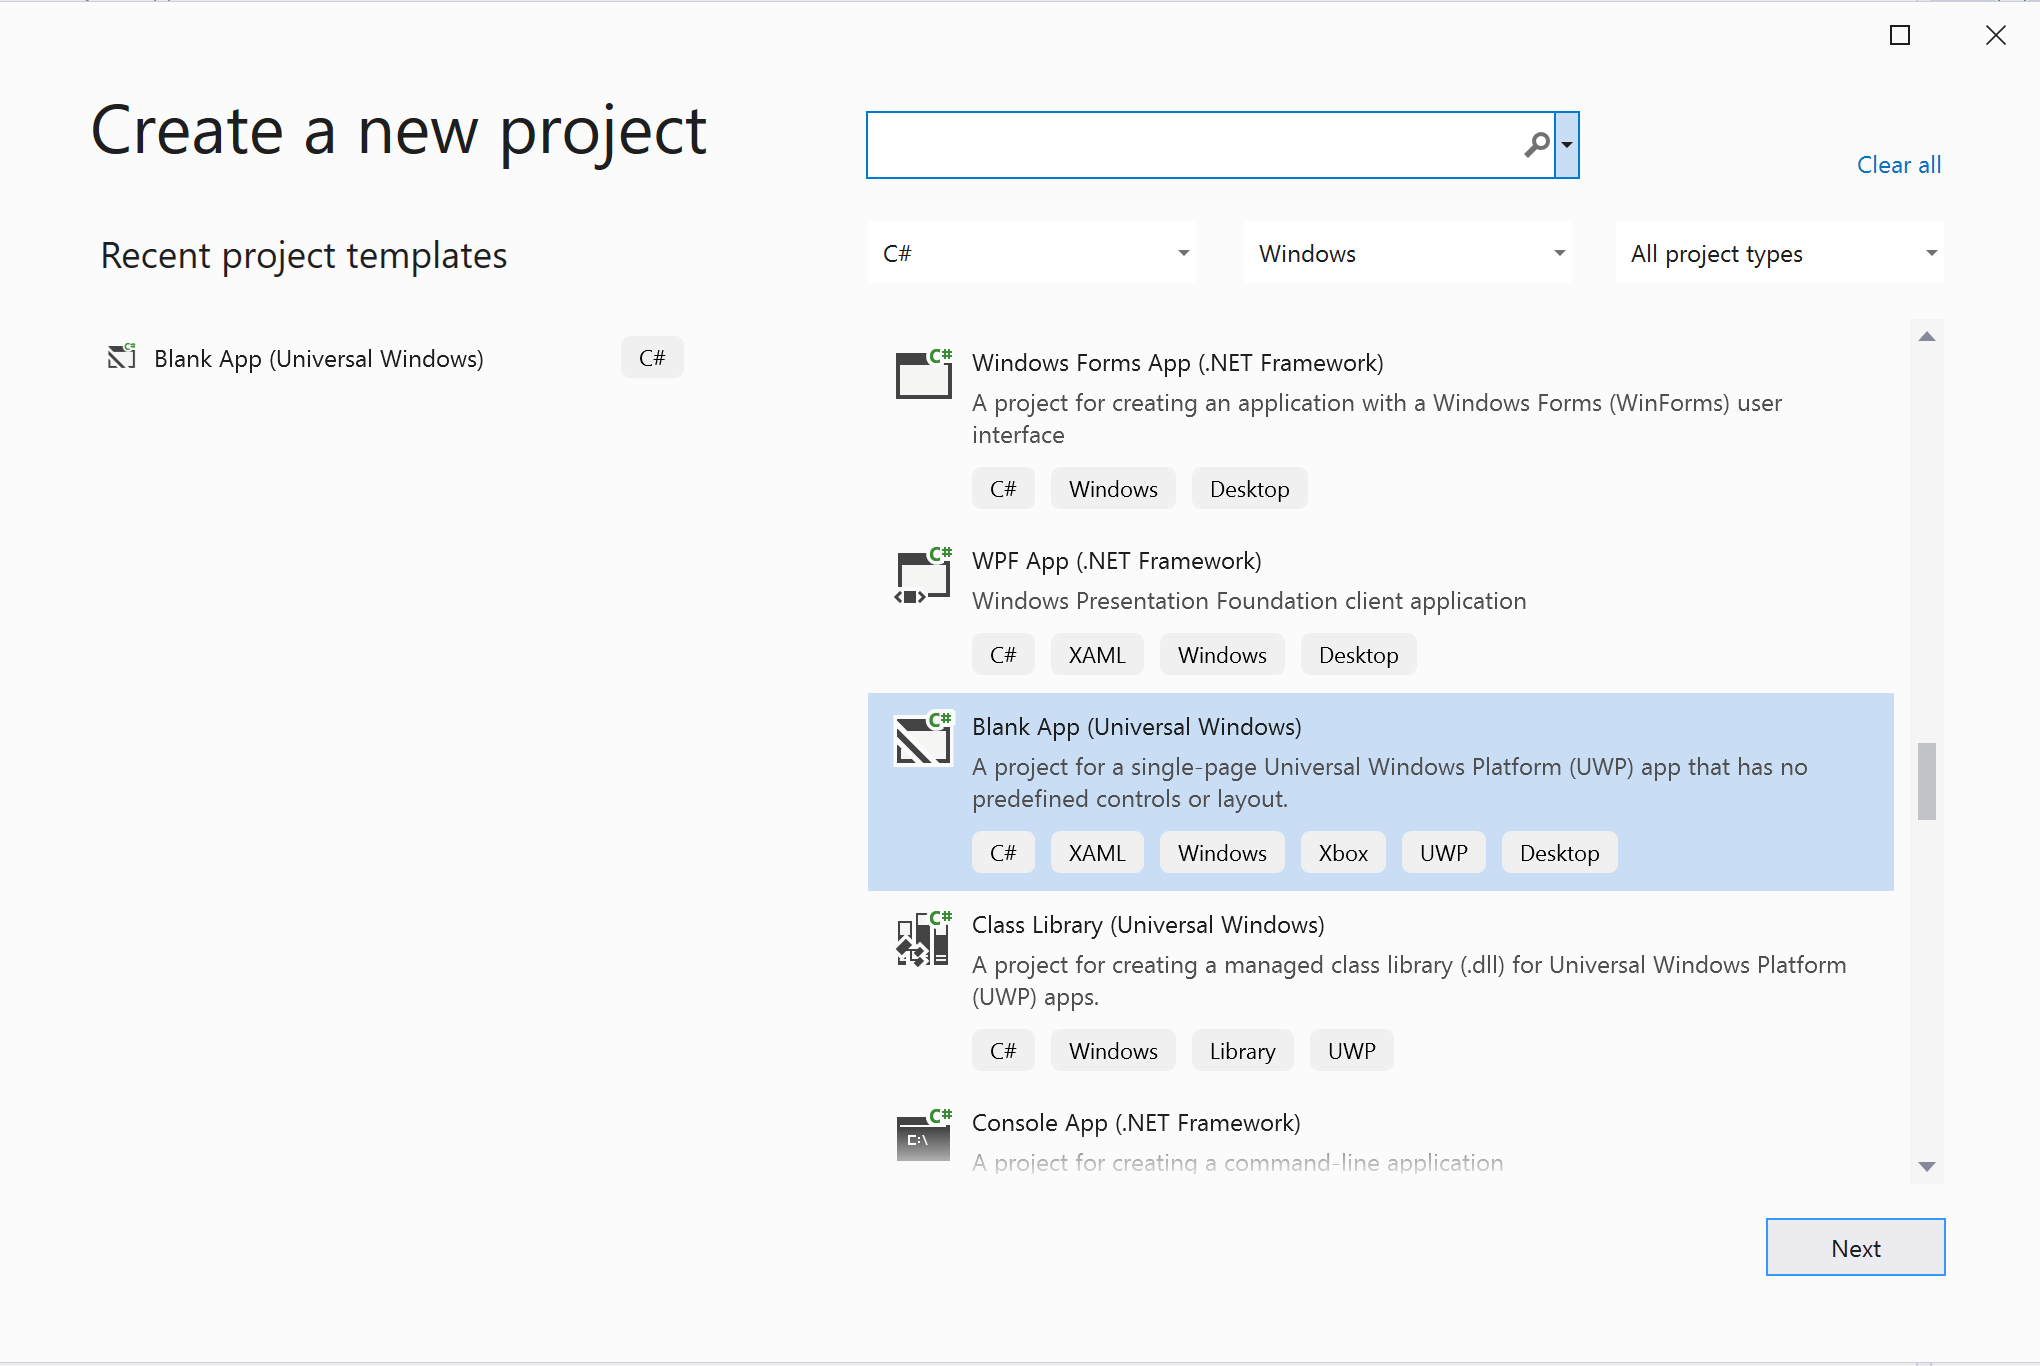
创建项目
在 Visual Studio 中,使用“空白应用(通用 Windows)”模板创建一个新项目,设置单页通用 Windows 平台 (UWP) 应用。
安装包
右键选择项目,然后转到 Manage Nuget Packages 来安装 Azure.Communication.Calling.WindowsClient1.4.0 或更高版本。 如果想要查看公共预览版的版本,请确保选中“Include Prerelease”。
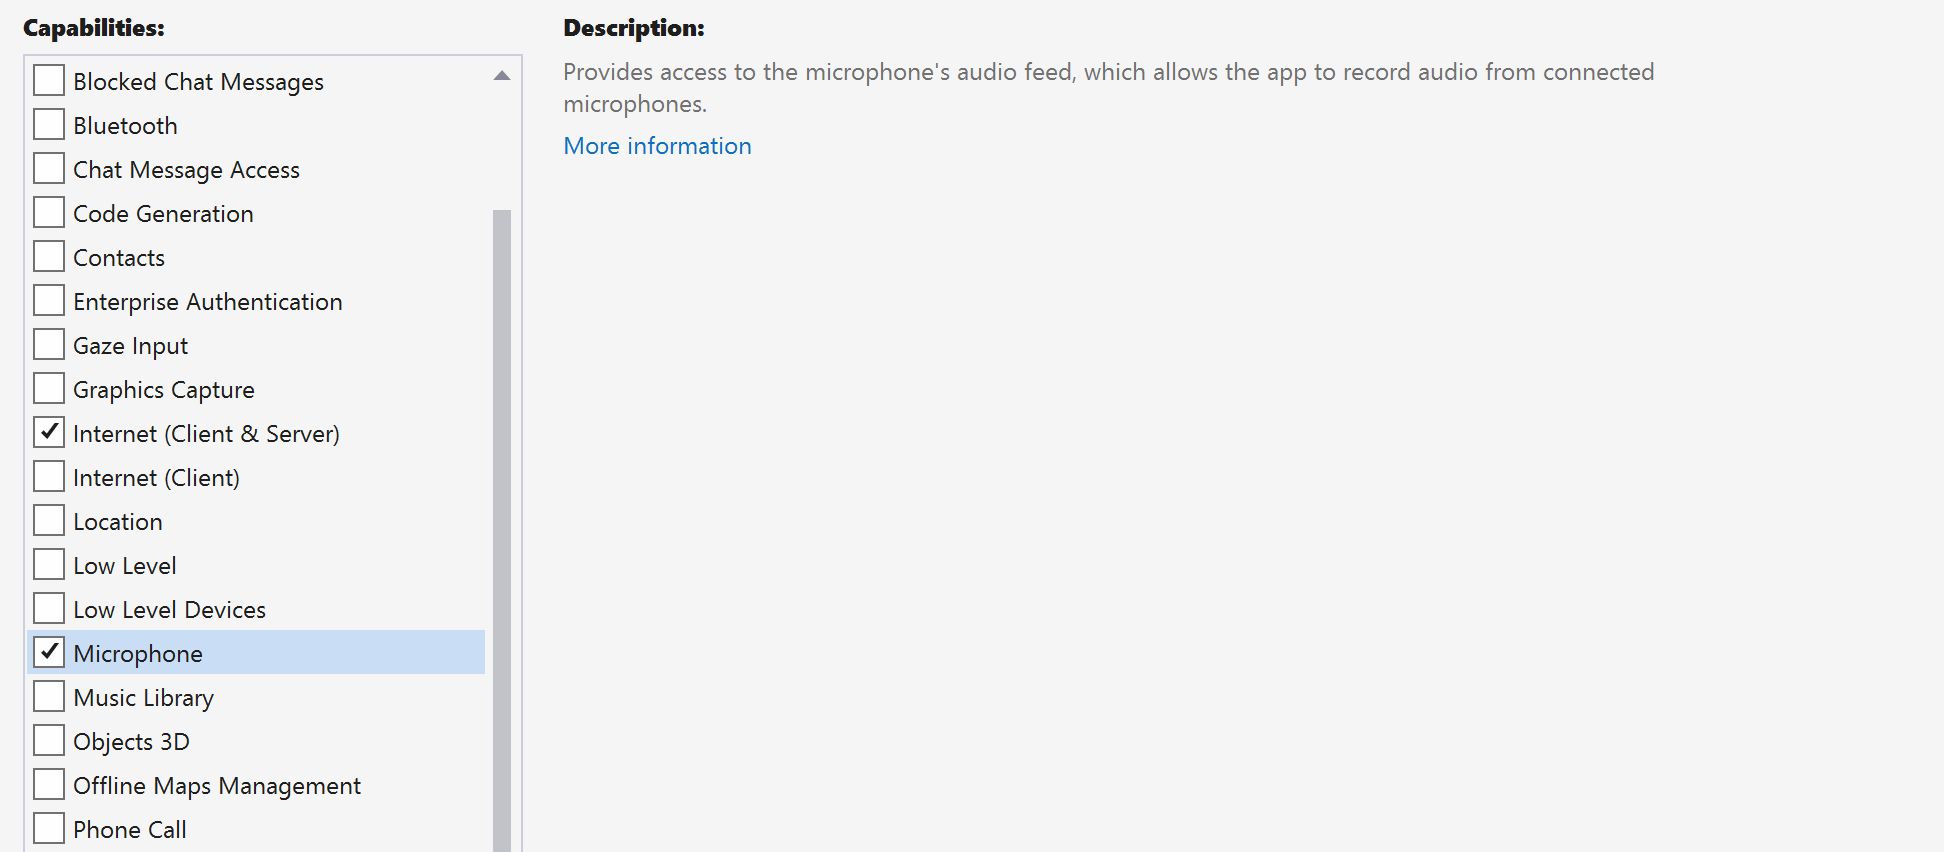
请求访问权限
转到 Package.appxmanifest 并选择 Capabilities。
选中 Internet (Client) 和 Internet (Client & Server),以获取 Internet 的入站和出站访问权限。 选中 Microphone 以访问麦克风的音频源,然后勾选 Webcam 以访问相机的视频源。
设置应用框架
我们需要配置基本布局来附加逻辑。 为了发起出站呼叫,需要通过 TextBox 提供被呼叫方的用户 ID。 还需要一个 Start/Join call 按钮和一个 Hang up 按钮。
Mute 和 BackgroundBlur 还包括在此示例中,用于演示切换音频状态和视频效果的功能。
打开你的项目的 MainPage.xaml,然后将 Grid 节点添加到 Page:
<Page
    x:Class="CallingQuickstart.MainPage"
    xmlns="http://schemas.microsoft.com/winfx/2006/xaml/presentation"
    xmlns:x="http://schemas.microsoft.com/winfx/2006/xaml"
    xmlns:local="using:CallingQuickstart"
    xmlns:d="http://schemas.microsoft.com/expression/blend/2008"
    xmlns:mc="http://schemas.openxmlformats.org/markup-compatibility/2006"
    mc:Ignorable="d"
    Background="{ThemeResource ApplicationPageBackgroundThemeBrush}" Width="800" Height="600">

        <!-- Don't forget to replace ‘CallingQuickstart’ with your project’s name -->


    <Grid>
        <Grid.RowDefinitions>
            <RowDefinition Height="16*"/>
            <RowDefinition Height="30*"/>
            <RowDefinition Height="200*"/>
            <RowDefinition Height="60*"/>
            <RowDefinition Height="16*"/>
        </Grid.RowDefinitions>
        <TextBox Grid.Row="1" x:Name="CalleeTextBox" PlaceholderText="Who would you like to call?" TextWrapping="Wrap" VerticalAlignment="Center" Height="30" Margin="10,10,10,10" />

        <Grid x:Name="AppTitleBar" Background="LightSeaGreen">
            <TextBlock x:Name="QuickstartTitle" Text="Calling Quickstart sample title bar" Style="{StaticResource CaptionTextBlockStyle}" Padding="7,7,0,0"/>
        </Grid>

        <Grid Grid.Row="2">
            <Grid.RowDefinitions>
                <RowDefinition/>
            </Grid.RowDefinitions>
            <Grid.ColumnDefinitions>
                <ColumnDefinition Width="*"/>
                <ColumnDefinition Width="*"/>
            </Grid.ColumnDefinitions>
            <MediaPlayerElement x:Name="LocalVideo" HorizontalAlignment="Center" Stretch="UniformToFill" Grid.Column="0" VerticalAlignment="Center" AutoPlay="True" />
            <MediaPlayerElement x:Name="RemoteVideo" HorizontalAlignment="Center" Stretch="UniformToFill" Grid.Column="1" VerticalAlignment="Center" AutoPlay="True" />
        </Grid>
        <StackPanel Grid.Row="3" Orientation="Vertical" Grid.RowSpan="2">
            <StackPanel Orientation="Horizontal">
                <Button x:Name="CallButton" Content="Start/Join call" Click="CallButton_Click" VerticalAlignment="Center" Margin="10,0,0,0" Height="40" Width="123"/>
                <Button x:Name="HangupButton" Content="Hang up" Click="HangupButton_Click" VerticalAlignment="Center" Margin="10,0,0,0" Height="40" Width="123"/>
                <CheckBox x:Name="MuteLocal" Content="Mute" Margin="10,0,0,0" Click="MuteLocal_Click" Width="74"/>
            </StackPanel>
        </StackPanel>
        <TextBox Grid.Row="5" x:Name="Stats" Text="" TextWrapping="Wrap" VerticalAlignment="Center" Height="30" Margin="0,2,0,0" BorderThickness="2" IsReadOnly="True" Foreground="LightSlateGray" />
    </Grid>
</Page>
打开 MainPage.xaml.cs ,并将内容替换为以下实现:
using Azure.Communication.Calling.WindowsClient;
using System;
using System.Collections.Generic;
using System.ComponentModel;
using System.Linq;
using System.Threading.Tasks;
using Windows.ApplicationModel;
using Windows.ApplicationModel.Core;
using Windows.Media.Core;
using Windows.Networking.PushNotifications;
using Windows.UI;
using Windows.UI.ViewManagement;
using Windows.UI.Xaml;
using Windows.UI.Xaml.Controls;
using Windows.UI.Xaml.Media;
using Windows.UI.Xaml.Navigation;

namespace CallingQuickstart
{
    public sealed partial class MainPage : Page
    {
        private const string authToken = "<AUTHENTICATION_TOKEN>";

        private CallClient callClient;
        private CallTokenRefreshOptions callTokenRefreshOptions = new CallTokenRefreshOptions(false);
        private CallAgent callAgent;
        private CommunicationCall call;

        private LocalOutgoingAudioStream micStream;

        #region Page initialization
        public MainPage()
        {
            this.InitializeComponent();
            // Additional UI customization code goes here
        }

        protected override async void OnNavigatedTo(NavigationEventArgs e)
        {
            await InitCallAgentAndDeviceManagerAsync();

            base.OnNavigatedTo(e);
        }
        #endregion

        #region UI event handlers
        private async void CallButton_Click(object sender, RoutedEventArgs e)
        {
            // Start a call
        }

        private async void HangupButton_Click(object sender, RoutedEventArgs e)
        {
            // Hang up a call
        }

        private async void MuteLocal_Click(object sender, RoutedEventArgs e)
        {
            // Toggle mute/unmute audio state of a call
        }
        #endregion

        #region API event handlers
        private async void OnIncomingCallAsync(object sender, IncomingCallReceivedEventArgs args)
        {
            // Handle incoming call event
        }

        private async void OnStateChangedAsync(object sender, PropertyChangedEventArgs args)
        {
            // Handle connected and disconnected state change of a call
        }
        #endregion

        #region Helper methods

        private async Task InitCallAgentAndDeviceManagerAsync()
        {
            //Initialize the call agent and search for devices
        }


        private async Task<CommunicationCall> StartCallAsync(string acsCallee)
        {
            // Start a call to an Azure Communication Services user using the CallAgent and the callee id
        }

        #endregion
    }
}
对象模型
下表列出了用于处理 Azure 通信服务通话 SDK 的某些主要功能的类和接口:
| 名称 | 说明 |
|---|---|
CallClient |
CallClient 是通话 SDK 的主入口点。 |
CallAgent |
CallAgent 用于启动和管理通话。 |
CommunicationCall |
CommunicationCall 用于管理正在进行的通话。 |
CallTokenCredential |
CallTokenCredential 用作实例化 CallAgent 的令牌凭据。 |
CallIdentifier |
CallIdentifier 用于表示用户的身份,这可以是以下选项之一:UserCallIdentifier、PhoneNumberCallIdentifier 等。 |
验证客户端
使用用户访问令牌初始化 CallAgent 实例,使我们可以发出和接收呼叫,并选择性地获取 DeviceManager 实例以查询客户端设备配置。
在代码中,将 <AUTHENTICATION_TOKEN> 替换为用户访问令牌。 如果还没有可用的令牌,请参阅用户访问令牌文档。
添加 InitCallAgentAndDeviceManagerAsync 函数,用于启动 SDK。 可以自定义此帮助程序以满足应用程序的要求。
        private async Task InitCallAgentAndDeviceManagerAsync()
        {
            this.callClient = new CallClient(new CallClientOptions() {
                Diagnostics = new CallDiagnosticsOptions() {

                    // make sure to put your project AppName
                    AppName = "CallingQuickstart",

                    AppVersion="1.0",

                    Tags = new[] { "Calling", "ACS", "Windows" }
                    }

                });

            // Set up local audio stream using the first mic enumerated
            var deviceManager = await this.callClient.GetDeviceManagerAsync();
            var mic = deviceManager?.Microphones?.FirstOrDefault();

            micStream = new LocalOutgoingAudioStream();

            var tokenCredential = new CallTokenCredential(authToken, callTokenRefreshOptions);

            var callAgentOptions = new CallAgentOptions()
            {
                DisplayName = $"{Environment.MachineName}/{Environment.UserName}",
            };

            this.callAgent = await this.callClient.CreateCallAgentAsync(tokenCredential, callAgentOptions);

            this.callAgent.IncomingCallReceived += OnIncomingCallAsync;
        }
开始调用
获得 StartCallOptions 对象后,可使用 CallAgent 发起 Azure 通信服务呼叫:
        private async Task<CommunicationCall> StartCallAsync(string acsCallee)
        {
            var options = new StartCallOptions();
            var call = await this.callAgent.StartCallAsync( new [] { new MicrosoftTeamsAppCallIdentifier(acsCallee) }, options);
            return call;
        }
结束呼叫
在单击 Hang up 按钮时结束当前通话。 将实现添加到 HangupButton_Click 以结束通话,并停止预览和视频流。
        private async void HangupButton_Click(object sender, RoutedEventArgs e)
        {
            var call = this.callAgent?.Calls?.FirstOrDefault();
            if (call != null)
            {
                await call.HangUpAsync(new HangUpOptions() { ForEveryone = false });
            }
        }
切换音频静音/取消静音
当单击“Mute”按钮时,静音传出呼叫。 将实现添加到 MuteLocal_Click 以将通话静音。
        private async void MuteLocal_Click(object sender, RoutedEventArgs e)
        {
            var muteCheckbox = sender as CheckBox;

            if (muteCheckbox != null)
            {
                var call = this.callAgent?.Calls?.FirstOrDefault();

                if (call != null)
                {
                    if ((bool)muteCheckbox.IsChecked)
                    {
                        await call.MuteOutgoingAudioAsync();
                    }
                    else
                    {
                        await call.UnmuteOutgoingAudioAsync();
                    }
                }

                // Update the UI to reflect the state
            }
        }
接听来电
IncomingCallReceived 事件接收器是在 SDK 启动帮助程序 InitCallAgentAndDeviceManagerAsync 中设置的。
this.callAgent.IncomingCallReceived += OnIncomingCallAsync;
应用程序有机会配置应如何接受传入呼叫,例如视频和音频流类型。
        private async void OnIncomingCallAsync(object sender, IncomingCallReceivedEventArgs args)
        {
            var incomingCall = args.IncomingCall;

            var acceptCallOptions = new AcceptCallOptions() { };

            call = await incomingCall.AcceptAsync(acceptCallOptions);
            call.StateChanged += OnStateChangedAsync;
        }
监视和响应呼叫状态更改事件
当正在进行的通话从一种状态转换到其他状态时,将会触发 CommunicationCall 对象上的 StateChanged 事件。 应用程序有机会反映 UI 上的状态更改或插入业务逻辑。
        private async void OnStateChangedAsync(object sender, PropertyChangedEventArgs args)
        {
            var call = sender as CommunicationCall;

            if (call != null)
            {
                var state = call.State;

                // Update the UI

                switch (state)
                {
                    case CallState.Connected:
                        {
                            await call.StartAudioAsync(micStream);

                            break;
                        }
                    case CallState.Disconnected:
                        {
                            call.StateChanged -= OnStateChangedAsync;

                            call.Dispose();

                            break;
                        }
                    default: break;
                }
            }
        }
使通话按钮可供使用
Callee ID 不为 null 或为空后,便可以发起通话。
通话状态必须使用 OnStateChangedAsync 操作进行更改。
    private async void CallButton_Click(object sender, RoutedEventArgs e)
    {
        var callString = CalleeTextBox.Text.Trim();

        if (!string.IsNullOrEmpty(callString))
        {
            call = await StartCallAsync(callString);

            call.StateChanged += OnStateChangedAsync;
        }


    }
运行代码
可在 Visual Studio 中生成并运行代码。 对于解决方案平台,我们支持 ARM64、x64 和 x86。
手动设置呼叫的步骤:
- 使用 Visual Studio 启动应用。
- 输入自动助理对象 ID(带前缀),然后选择“开始呼叫”按钮。 应用程序将使用给定的对象 ID 发起到自动助理的传出呼叫。
- 呼叫已连接到自动助理。
- 根据自动助理的配置通过自动助理路由通信服务用户。
清理资源
如果想要清理并删除通信服务订阅,可以删除资源或资源组。 删除资源组同时也会删除与之相关联的任何其他资源。 了解有关清理资源的详细信息。
后续步骤
有关详细信息,请参阅以下文章:
- 开始使用 Teams 语音应用的 UI 调用
- 了解如何调用 SDK 功能
- 了解有关呼叫工作原理的详细信息