你当前正在访问 Microsoft Azure Global Edition 技术文档网站。 如果需要访问由世纪互联运营的 Microsoft Azure 中国技术文档网站,请访问 https://docs.azure.cn。
为呼叫启用推送通知
推送通知可将信息从你的应用程序发送到用户的设备。 可以使用推送通知显示对话、播放声音或将传入呼叫显示到应用的 UI 层中。
在本文中,你将了解如何为 Azure 通信服务通话启用推送通知。 通信服务提供与 Azure 事件网格和 Azure 通知中心的集成,可支持你向应用添加推送通知。
TTL 令牌概述
生存时间 (TTL) 令牌是一种设置,用于确定通知令牌在变为无效之前保持有效状态的时间长度。 此设置对于用户参与不需要日常交互但长时间仍然重要的应用程序非常有用。
借助 TTL 配置,可以管理推送通知的生命周期。 它减少了频繁续订令牌的需求,同时帮助确保应用程序与其用户之间的通信通道在长时间内保持开放和可靠。
目前,TTL 的最大值为 180 天(15,552,000 秒),最小值为 5 分钟(300 秒)。 可以输入此值,并对其进行调整以满足你的需求。 如果未提供值,则默认值为24 小时(86,400 秒)。
调用注册推送通知 API 后,设备令牌信息会保存在注册器中。 TTL 持续时间结束后,将会删除设备终结点信息。 如果这些设备不再调用注册推送通知 API,则无法将这些设备上的任何传入呼叫传递到设备。
如果要撤销标识,请按照此过程操作。 撤销标识后,应删除注册器条目。
注意
对于 Microsoft Teams 用户,最大 TTL 值为 24 小时(86,400 秒)。 无法提供此值。 应在后台每隔 24 小时唤醒一次应用程序并注册设备令牌。
要唤醒应用程序、提取新令牌并执行注册,请按照iOS 平台 说明或 Android 平台说明进行操作。
先决条件
具有活动订阅的 Azure 帐户。 免费创建帐户。
已部署的通信服务资源。 创建通信服务资源。
用于启用通话客户端的用户访问令牌。 有关详细信息,请参阅创建和管理访问令牌。
可选:完成向应用程序添加语音呼叫的快速入门。
按照快速入门操作
通过 Azure 通信服务 Web 呼叫 SDK 进行的 Web 推送通知处于预览状态,并作为 1.12.0-beta.2+ 版本的一部分提供。
重要
Azure 通信服务的这一功能目前以预览版提供。
预览版 API 和 SDK 在没有服务级别协议的情况下提供。 建议不要将它们用于生产工作负荷。 某些功能可能不受支持或者已受限。
有关详细信息,请参阅 Microsoft Azure 预览版补充使用条款。
有关分步说明,请参阅 GitHub 上的快速入门。
启用了 Firebase Cloud Messaging (FCM) 并且 FCM 服务已连接到 Azure 通知中心实例的 Firebase 帐户。 有关详细信息,请参阅通信服务通知。
用于生成应用程序的 Android Studio 3.6 或更高版本。
用于启用 Android 应用程序以从 FCM 接收通知消息的一组权限。 在
AndroidManifest.xml文件中,在<manifest ...>后或在</application>标记下添加以下权限:<uses-permission android:name="android.permission.INTERNET"/> <uses-permission android:name="android.permission.GET_ACCOUNTS"/> <uses-permission android:name="com.google.android.c2dm.permission.RECEIVE" />
重要
2023 年 6 月 20 日,Google 宣布弃用通过使用 FCM 旧版 API 发送消息,并将于 2024 年 6 月开始从服务中移除旧版 FCM。 Google 建议从旧版 FCM API 迁移到 FCM HTTP v1。
如果通信服务资源仍在使用 FCM 旧版 API,请按照此迁移指南操作。
移动推送通知注意事项
移动推送通知是移动设备上显示的弹出通知。 在通话方面,本文重点介绍了 IP 语音通话 (VoIP) 推送通知。
注意
当应用程序注册推送通知并处理 Teams 用户的传入推送通知时,API 是相同的。 本文介绍的 API 也可在 CommonCallAgent 或 TeamsCallAgent 类上调用。
安装 SDK
找到项目级 build.gradle 文件,并将 mavenCentral() 添加到 buildscript 和 allprojects 下的存储库列表中:
buildscript {
    repositories {
    ...
        mavenCentral()
    ...
    }
}
allprojects {
    repositories {
    ...
        mavenCentral()
    ...
    }
}
然后,在模块级 build.gradle 文件中,将以下行添加到 dependencies 部分:
dependencies {
    ...
    implementation 'com.azure.android:azure-communication-calling:1.0.0'
    ...
}
初始化所需的对象
若要创建 CallAgent 实例,必须对 CallClient 实例调用 createCallAgent 方法。 此调用将异步返回 CallAgent 实例对象。
createCallAgent 方法采用 CommunicationUserCredential 作为参数来封装访问令牌。
若要访问 DeviceManager,必须先创建 callAgent 实例。 然后,可以使用 CallClient.getDeviceManager 方法获取 DeviceManager。
String userToken = '<user token>';
CallClient callClient = new CallClient();
CommunicationTokenCredential tokenCredential = new CommunicationTokenCredential(userToken);
android.content.Context appContext = this.getApplicationContext(); // From within an activity, for instance
CallAgent callAgent = callClient.createCallAgent(appContext, tokenCredential).get();
DeviceManager deviceManager = callClient.getDeviceManager(appContext).get();
若要为主叫方设置显示名称,请使用以下替代方法:
String userToken = '<user token>';
CallClient callClient = new CallClient();
CommunicationTokenCredential tokenCredential = new CommunicationTokenCredential(userToken);
android.content.Context appContext = this.getApplicationContext(); // From within an activity, for instance
CallAgentOptions callAgentOptions = new CallAgentOptions();
callAgentOptions.setDisplayName("Alice Bob");
DeviceManager deviceManager = callClient.getDeviceManager(appContext).get();
CallAgent callAgent = callClient.createCallAgent(appContext, tokenCredential, callAgentOptions).get();
注册推送通知
要注册推送通知,应用程序需要使用设备注册令牌在 CallAgent 实例上调用 registerPushNotification()。
要获取设备注册令牌,请通过在 dependencies 部分添加以下行(如果此处尚不存在该行)将 Firebase SDK 添加到应用程序模块的 build.gradle 文件中:
// Add the SDK for Firebase Cloud Messaging
implementation 'com.google.firebase:firebase-core:16.0.8'
implementation 'com.google.firebase:firebase-messaging:20.2.4'
在项目级别的 build.gradle 文件中,请在 dependencies 部分中添加以下行(如果此处尚不存在该行):
classpath 'com.google.gms:google-services:4.3.3'
在文件的开头添加以下插件(如果尚不存在):
apply plugin: 'com.google.gms.google-services'
在工具栏上选择“立即同步”。 添加以下代码片段,以获取由 Firebase Cloud Messaging SDK 为客户端应用程序实例生成的设备注册令牌。 请务必将以下导入内容添加到实例主活动的标头以检索令牌。
import com.google.android.gms.tasks.OnCompleteListener;
import com.google.android.gms.tasks.Task;
import com.google.firebase.iid.FirebaseInstanceId;
import com.google.firebase.iid.InstanceIdResult;
添加此代码片段以检索令牌:
FirebaseInstanceId.getInstance().getInstanceId()
    .addOnCompleteListener(new OnCompleteListener<InstanceIdResult>() {
        @Override
        public void onComplete(@NonNull Task<InstanceIdResult> task) {
            if (!task.isSuccessful()) {
                Log.w("PushNotification", "getInstanceId failed", task.getException());
                return;
            }

            // Get the new instance ID token
            String deviceToken = task.getResult().getToken();
            // Log
            Log.d("PushNotification", "Device Registration token retrieved successfully");
        }
    });
在通话服务 SDK 中注册设备注册令牌,以接收来电推送通知:
String deviceRegistrationToken = "<Device Token from previous section>";
try {
    callAgent.registerPushNotification(deviceRegistrationToken).get();
}
catch(Exception e) {
    System.out.println("Something went wrong while registering for Incoming Calls Push Notifications.")
}
处理推送通知
若要接收来电推送通知,请在具有有效负载的 CallAgent 实例上调用 handlePushNotification()。
要从 Firebase Cloud Messaging 获取有效负载,请首先创建一个新服务(选择“文件”>“新建”>“服务”>“服务”),以扩展 FirebaseMessagingService Firebase SDK 类并替代 onMessageReceived 方法。 此方法是在 Firebase Cloud Messaging 将推送通知传递到应用程序时调用的事件处理程序。
public class MyFirebaseMessagingService extends FirebaseMessagingService {
    private java.util.Map<String, String> pushNotificationMessageDataFromFCM;

    @Override
    public void onMessageReceived(RemoteMessage remoteMessage) {
        // Check if the message contains a notification payload.
        if (remoteMessage.getNotification() != null) {
            Log.d("PushNotification", "Message Notification Body: " + remoteMessage.getNotification().getBody());
        }
        else {
            pushNotificationMessageDataFromFCM = remoteMessage.getData();
        }
    }
}
将以下服务定义添加到 AndroidManifest.xml 文件的 <application> 标记内:
<service
    android:name=".MyFirebaseMessagingService"
    android:exported="false">
    <intent-filter>
        <action android:name="com.google.firebase.MESSAGING_EVENT" />
    </intent-filter>
</service>
检索到有效负载后,可以将其传递给通信服务 SDK 以分析为内部 IncomingCallInformation 对象。 此对象会处理对 CallAgent 实例调用 handlePushNotification 方法。 你将通过在 CallClient 类上调用 createCallAgent(...) 方法来创建 CallAgent 实例。
try {
    IncomingCallInformation notification = IncomingCallInformation.fromMap(pushNotificationMessageDataFromFCM);
    Future handlePushNotificationFuture = callAgent.handlePushNotification(notification).get();
}
catch(Exception e) {
    System.out.println("Something went wrong while handling the Incoming Calls Push Notifications.");
}
成功处理推送通知消息,且正确注册所有事件处理程序后,应用程序将发出振铃提醒。
取消注册推送通知
应用程序可以随时取消注册推送通知。 要取消注册,请对 callAgent 调用 unregisterPushNotification() 方法:
try {
    callAgent.unregisterPushNotification().get();
}
catch(Exception e) {
    System.out.println("Something went wrong while un-registering for all Incoming Calls Push Notifications.")
}
禁用传入呼叫的内部推送通知
可通过两种方式将传入呼叫的推送有效负载传递到被叫方:
- 使用 FCM 并将设备令牌注册到上述 API、
CallAgent或TeamsCallAgent上的registerPushNotification。 - 创建
CallAgent或TeamsCallAgent以传递推送有效负载时,将 SDK 注册到内部服务
使用 CallAgentOptions 或 TeamsCallAgentOptions 中的属性 setDisableInternalPushForIncomingCall,可能会指示 SDK 禁用通过内部推送服务传递推送有效负载。
CallAgentOptions callAgentOptions = new CallAgentOptions();
callAgentOptions.setDisableInternalPushForIncomingCall(true);
移动推送通知注意事项
移动推送通知是移动设备上显示的弹出通知。 在通话方面,本文重点介绍了 IP 语音通话 (VoIP) 推送通知。 有关 iOS 应用程序中 CallKit 集成的指南,请参阅与 CallKit 集成。
注意
当应用程序注册推送通知并处理 Teams 用户的传入推送通知时,API 是相同的。 本文介绍的 API 也可在 CommonCallAgent 或 TeamsCallAgent 类上调用。
设置系统
按照以下步骤设置系统。
创建 Xcode 项目
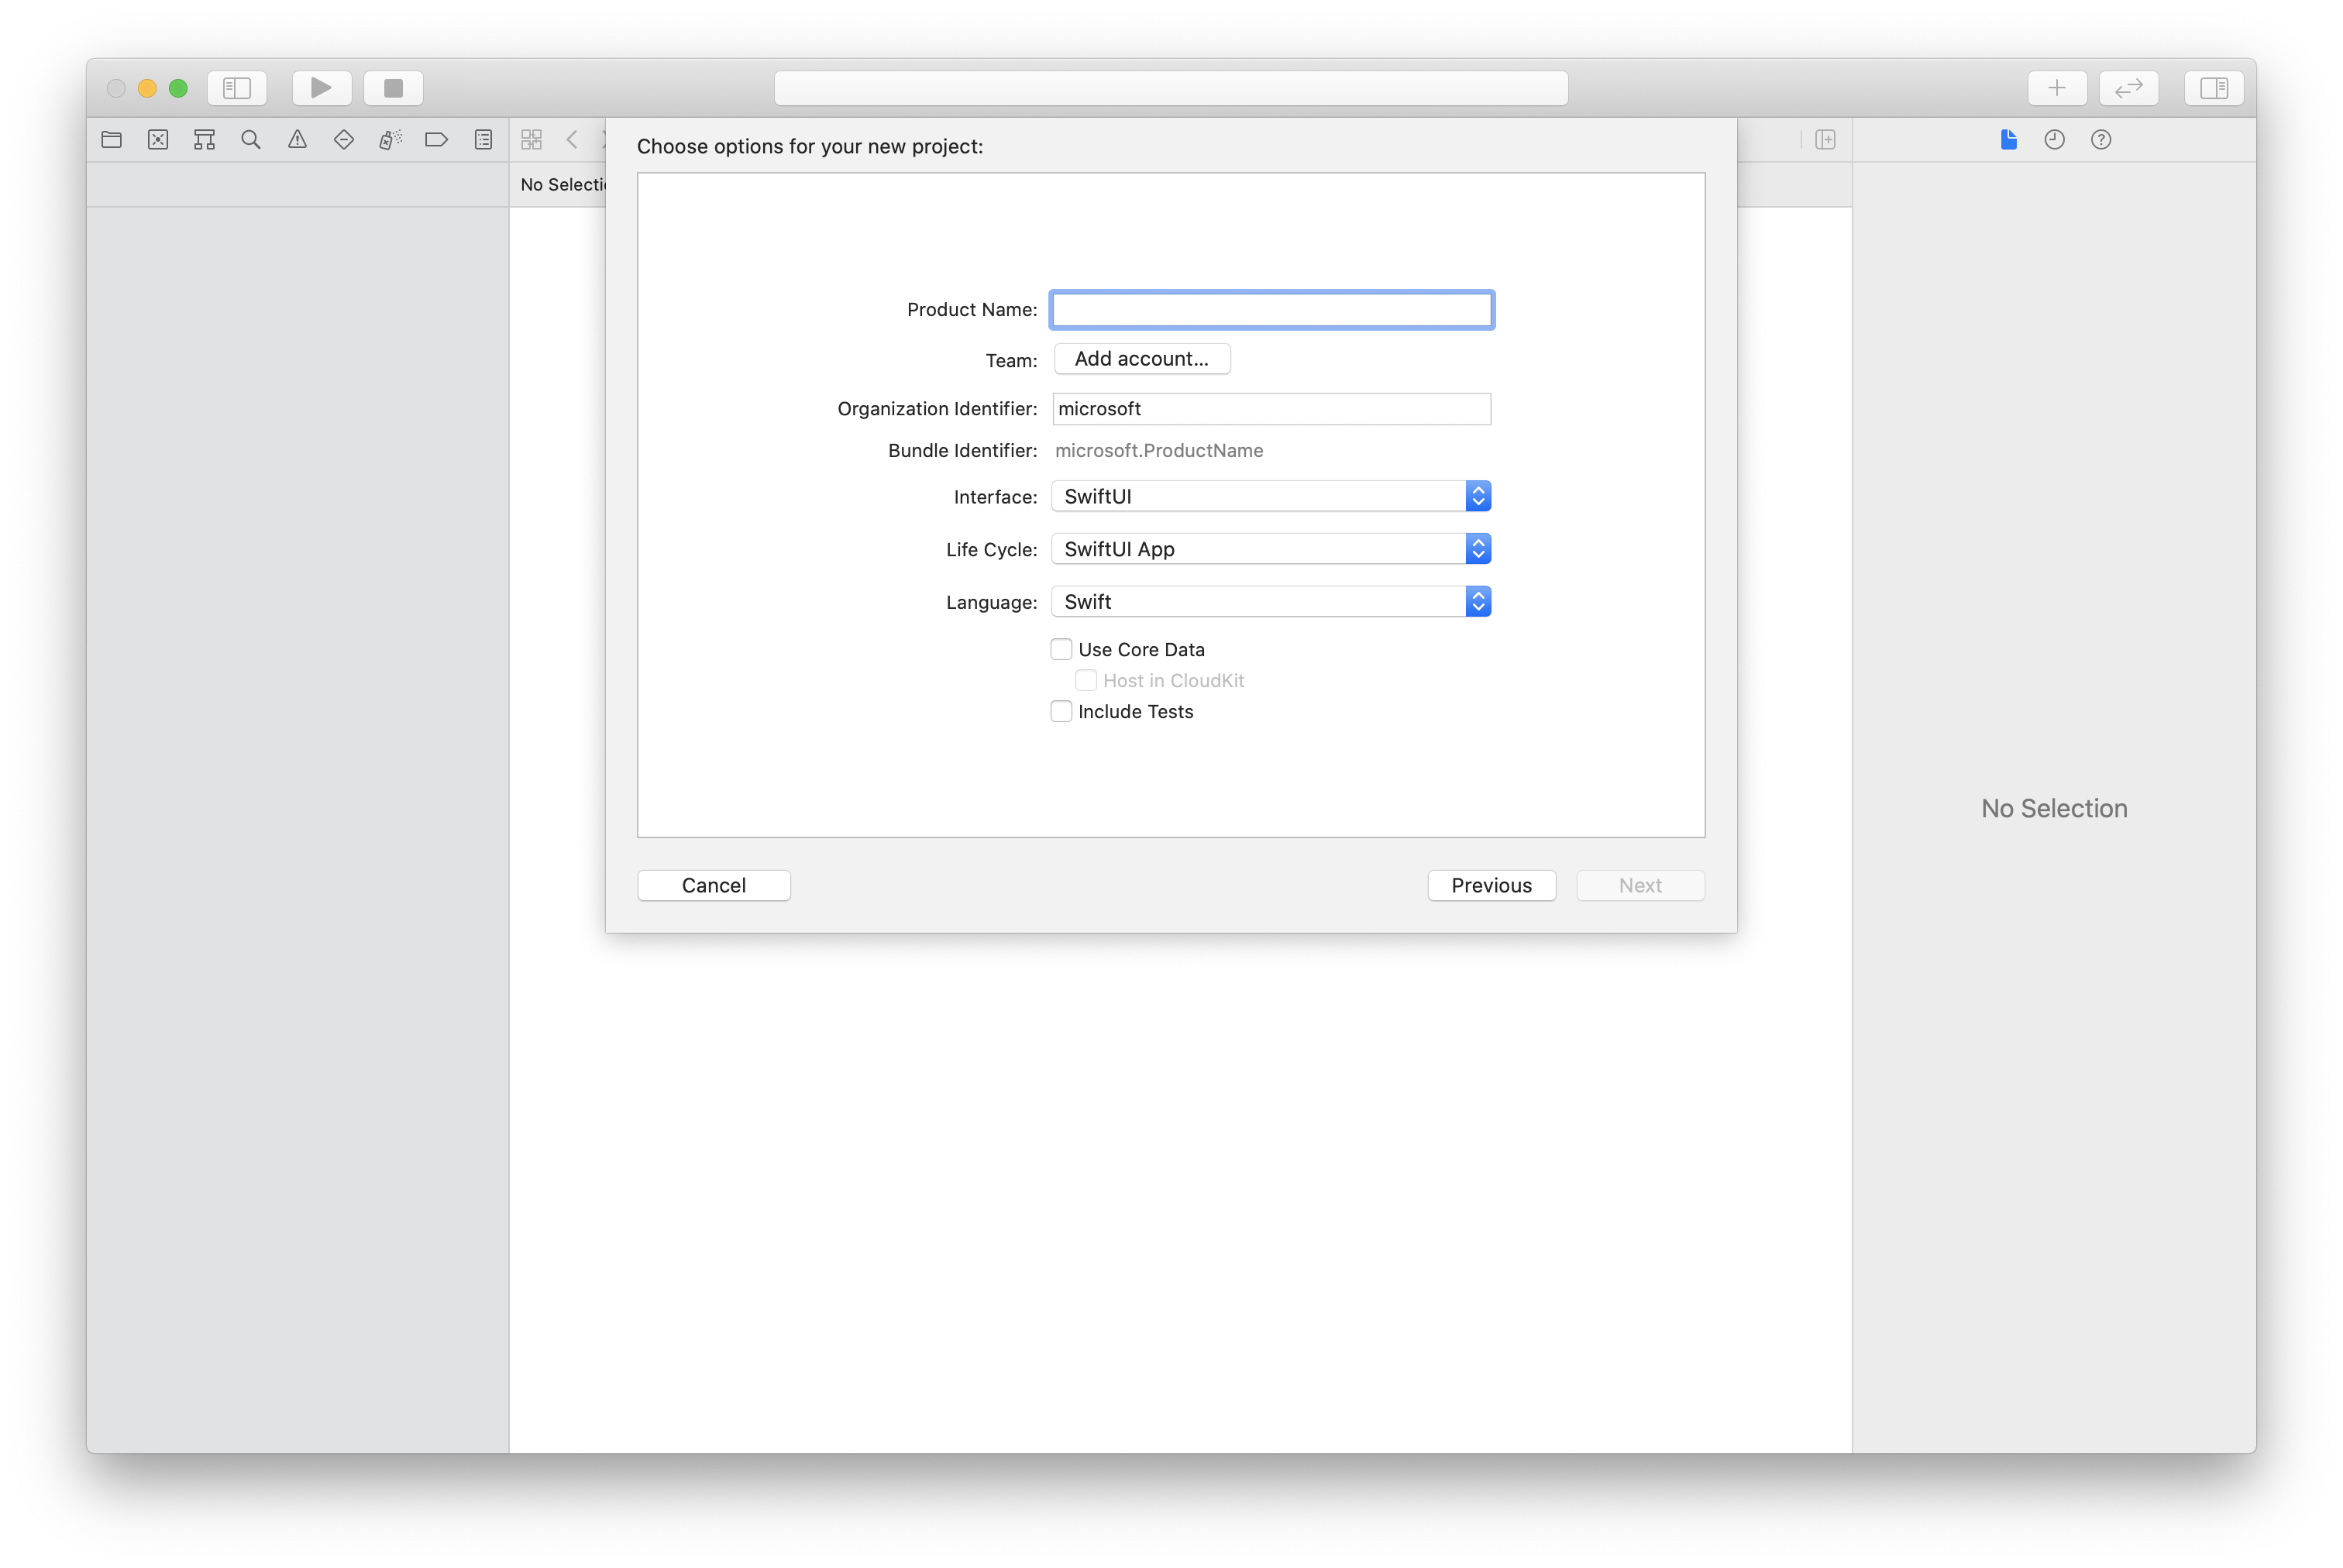
在 Xcode 中,创建新的 iOS 项目,并选择“单视图应用”模板。 本文使用 SwiftUI 框架,因此应将“语言”设置为“Swift”,并将“界面”设置为“SwiftUI”。
在本文中,无需创建测试。 请随意清除“包括测试”复选框。

使用 CocoaPods 安装包和依赖项
为应用程序创建 Podfile,如此示例所示:
platform :ios, '13.0'
use_frameworks!
target 'AzureCommunicationCallingSample' do
    pod 'AzureCommunicationCalling', '~> 1.0.0'
end
运行
pod install。使用 Xcode 打开
.xcworkspace。
请求访问麦克风
若要访问设备的麦克风,需要使用 NSMicrophoneUsageDescription 更新应用的信息属性列表。 将关联的值设置为一个字符串,该字符串将包含在系统用于向用户请求访问权限的对话框中。
右键单击项目树的 Info.plist 条目,然后选择“打开为...”>“源代码”。 将以下代码行添加到顶层 <dict> 节,然后保存文件。
<key>NSMicrophoneUsageDescription</key>
<string>Need microphone access for VOIP calling.</string>
设置应用框架
打开项目的 ContentView.swift 文件。 将 import 声明添加到文件顶部以导入 AzureCommunicationCalling 库。 此外,导入 AVFoundation。 你需要用它来处理代码中的音频权限请求。
import AzureCommunicationCalling
import AVFoundation
初始化 CallAgent
若要从 CallClient 创建 CallAgent 实例,必须使用 callClient.createCallAgent 方法,该方法在初始化后异步返回 CallAgent 对象。
若要创建通话客户端,请传递 CommunicationTokenCredential 对象:
import AzureCommunication

let tokenString = "token_string"
var userCredential: CommunicationTokenCredential?
do {
    let options = CommunicationTokenRefreshOptions(initialToken: token, refreshProactively: true, tokenRefresher: self.fetchTokenSync)
    userCredential = try CommunicationTokenCredential(withOptions: options)
} catch {
    updates("Couldn't created Credential object", false)
    initializationDispatchGroup!.leave()
    return
}

// tokenProvider needs to be implemented by Contoso, which fetches a new token
public func fetchTokenSync(then onCompletion: TokenRefreshOnCompletion) {
    let newToken = self.tokenProvider!.fetchNewToken()
    onCompletion(newToken, nil)
}
将创建的 CommunicationTokenCredential 对象传递给 CallClient 并设置显示名称:
self.callClient = CallClient()
let callAgentOptions = CallAgentOptions()
options.displayName = " iOS Azure Communication Services User"

self.callClient!.createCallAgent(userCredential: userCredential!,
    options: callAgentOptions) { (callAgent, error) in
        if error == nil {
            print("Create agent succeeded")
            self.callAgent = callAgent
        } else {
            print("Create agent failed")
        }
})
设置推送通知
在开始注册、处理和取消注册推送通知的任务之前,请完成此设置任务:
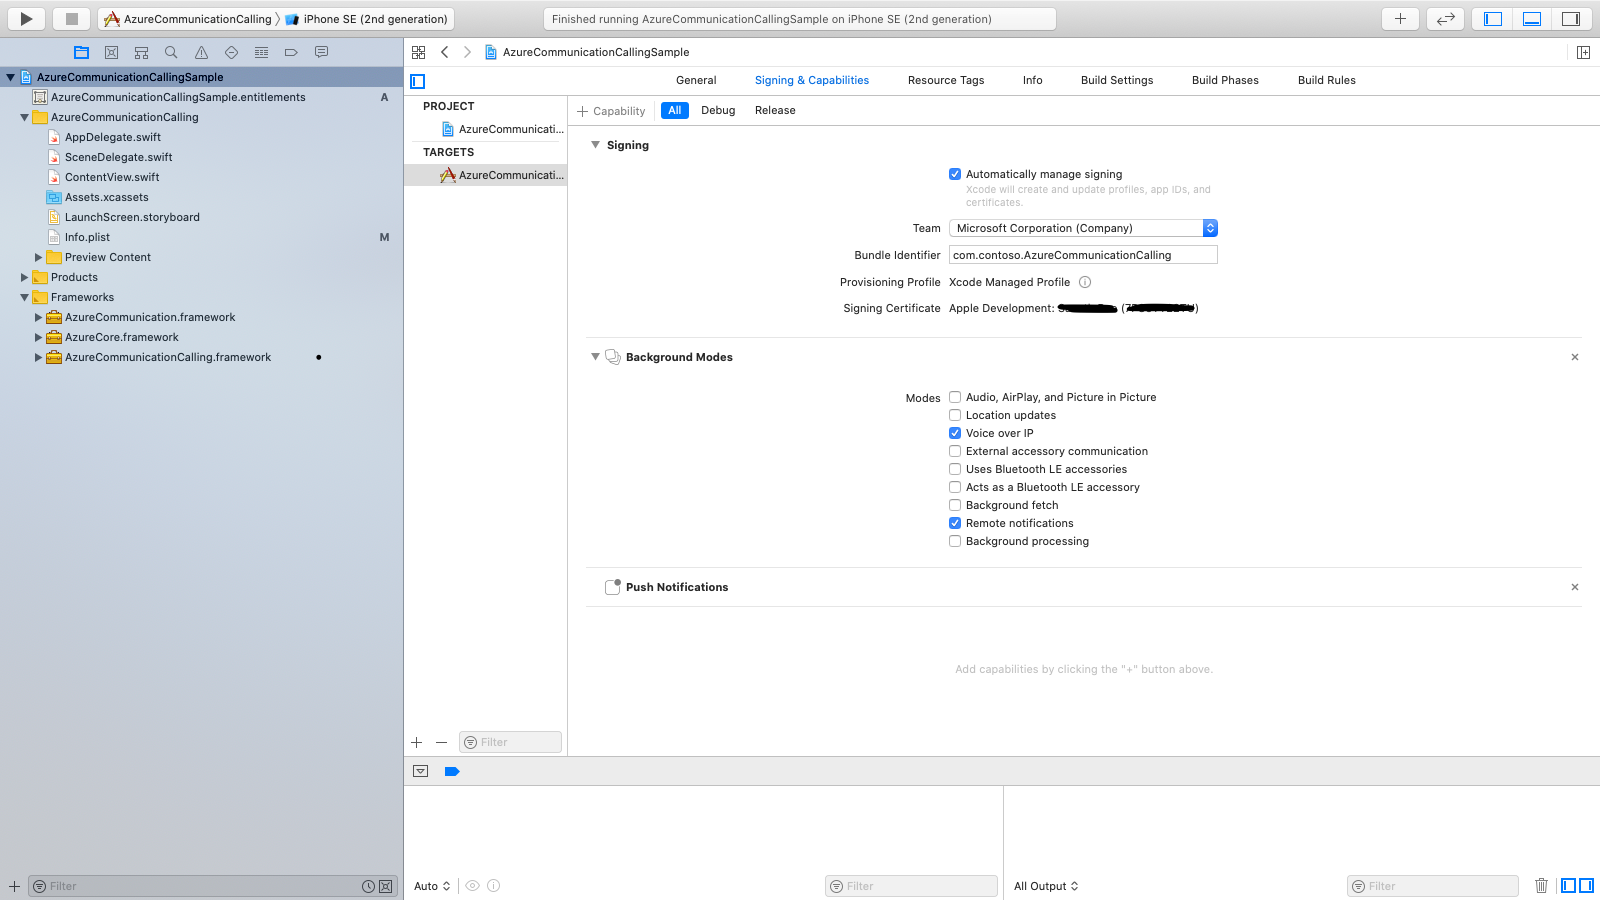
- 在 Xcode 中,转到“签名和功能”。 选择“+功能”来添加一项功能,然后选择“推送通知”。
- 选择“+功能”来再添加一项功能,然后选择“背景模式”。
- 在“背景模式”下,选中“IP 语音”和“远程通知”复选框。
注册推送通知
要注册推送通知,请使用设备注册令牌在 CallAgent 实例上调用 registerPushNotification()。
成功初始化后需要注册推送通知。 销毁 callAgent 对象时,将会调用 logout,这会自动取消注册推送通知。
let deviceToken: Data = pushRegistry?.pushToken(for: PKPushType.voIP)
callAgent.registerPushNotifications(deviceToken: deviceToken!) { (error) in
    if(error == nil) {
        print("Successfully registered to push notification.")
    } else {
        print("Failed to register push notification.")
    }
}
处理推送通知
要接收传入呼叫的推送通知,请使用字典有效负载在 CallAgent 实例上调用 handlePushNotification():
let callNotification = PushNotificationInfo.fromDictionary(pushPayload.dictionaryPayload)

callAgent.handlePush(notification: callNotification) { (error) in
    if (error == nil) {
        print("Handling of push notification was successful")
    } else {
        print("Handling of push notification failed")
    }
}
取消注册推送通知
应用程序可以随时取消注册推送通知。 要取消注册,请对 CallAgent 调用 unregisterPushNotification 方法。
注意
注销时,应用程序不会自动取消注册推送通知。
callAgent.unregisterPushNotification { (error) in
    if (error == nil) {
        print("Unregister of push notification was successful")
    } else {
       print("Unregister of push notification failed, please try again")
    }
}
禁用传入呼叫的内部推送通知
可通过两种方式将传入呼叫的推送有效负载传递到被叫方:
- 使用 Apple Push Notification 服务 (APNS),并将设备令牌注册到前面提到的 API,
CallAgent或TeamsCallAgent上的registerPushNotification - 创建
CallAgent或TeamsCallAgent以传递推送有效负载时,将 SDK 注册到内部服务
使用 CallAgentOptions 或 TeamsCallAgentOptions 中的属性 disableInternalPushForIncomingCall,可能会指示 SDK 禁用通过内部推送服务传递推送有效负载。
let options = CallAgentOptions()
options.disableInternalPushForIncomingCall = true
Windows 推送通知的注意事项
移动推送通知是移动设备上显示的弹出通知。 在通话方面,本文重点介绍了 IP 语音通话 (VoIP) 推送通知。
Windows 平台上的推送通知是通过 Windows 推送通知服务 (WNS) 传递的。
注意
在应用程序注册推送通知和处理自定义 Teams 终结点 (CTE) 的推送通知时,API 是相同的。 本文介绍的 API 也可在 CTE 的 CommonCallAgent 或 TeamsCallAgent 类上调用。
设置系统
按照以下步骤设置系统。
创建 Visual Studio 项目
对于通用 Windows 平台应用,请在 Visual Studio 2022 中创建新的“空白应用(通用 Windows)”项目。 输入项目名称后,可随意选择任何版本高于 10.0.17763.0 的 Windows SDK。
对于 WinUI 3 应用,请使用“已打包空白应用(桌面中的 WinUI 3)”模板创建新项目,以设置单页 WinUI 3 应用。 需要 Windows App SDK 版本 1.3 或更高版本。
使用 NuGet 包管理器安装包和依赖项
可通过 NuGet 包公开提供通话 SDK API 和库。
要查找、下载和安装通话 SDK NuGet 包,请执行以下操作:
- 选择“工具”>“NuGet 包管理器”>“管理解决方案的 NuGet 包”,以打开 NuGet 包管理器。
- 选择“浏览”,然后在搜索框中输入 Azure.Communication.Calling.WindowsClient。
- 确保已选中“包括预发行版”复选框。
- 选择 Azure.Communication.Calling.WindowsClient 包,然后选择 Azure.Communication.Calling.WindowsClient 1.4.0-beta.1 或更新版本。
- 在右侧窗格中选中与 Azure 通信服务项目对应的复选框。
- 选择“安装” 。
设置推送通知
在开始注册、处理和显示 Windows 通知以应答或拒绝传入呼叫之前,请完成以下设置任务:
按照教程:使用 Azure 通知中心向通用 Windows 平台应用发送通知中所述进行操作。 按照本教程操作后,你已具备:
- 包含
WindowsAzure.Messaging.Managed和Microsoft.Toolkit.Uwp.Notifications包的应用程序。 - 本文中按
<AZURE_PNH_HUB_NAME>引用的 Azure 通知中心中心名称,以及按<AZURE_PNH_HUB_CONNECTION_STRING>引用的 Azure 通知中心连接字符串。
- 包含
要在每个应用程序初始化中注册 WNS 通道,请务必在
App.xaml.cs文件中添加初始化代码:// App.xaml.cs protected override async void OnLaunched(LaunchActivatedEventArgs e) { await InitNotificationsAsync(); ... } private async Task InitNotificationsAsync() { if (AZURE_PNH_HUB_NAME != "<AZURE_PNH_HUB_NAME>" && AZURE_PNH_HUB_CONNECTION_STRING != "<AZURE_PNH_HUB_CONNECTION_STRING>") { var channel = await PushNotificationChannelManager.CreatePushNotificationChannelForApplicationAsync(); channel.PushNotificationReceived += Channel_PushNotificationReceived; var hub = new NotificationHub(AZURE_PNH_HUB_NAME, AZURE_PNH_HUB_CONNECTION_STRING); var result = await hub.RegisterNativeAsync(channel.Uri); if (result.ChannelUri != null) { PNHChannelUri = new Uri(result.ChannelUri); } else { Debug.WriteLine("Cannot register WNS channel"); } } }在
App.xaml.cs中注册新的推送通知消息到达时激活的事件处理程序:// App.xaml.cs private void Channel_PushNotificationReceived(PushNotificationChannel sender, PushNotificationReceivedEventArgs args) { switch (args.NotificationType) { case PushNotificationType.Toast: case PushNotificationType.Tile: case PushNotificationType.TileFlyout: case PushNotificationType.Badge: break; case PushNotificationType.Raw: var frame = (Frame)Window.Current.Content; if (frame.Content is MainPage) { var mainPage = frame.Content as MainPage; await mainPage.HandlePushNotificationIncomingCallAsync(args.RawNotification.Content); } break; } }
注册推送通知
要注册推送通知,请使用在应用程序初始化时获取的 WNS 注册通道对 CallAgent 实例调用 RegisterForPushNotificationAsync()。
成功初始化后需要注册推送通知。
// MainPage.xaml.cs

this.callAgent = await this.callClient.CreateCallAgentAsync(tokenCredential, callAgentOptions);

if ((Application.Current as App).PNHChannelUri != null)
{
    await this.callAgent.RegisterForPushNotificationAsync((Application.Current as App).PNHChannelUri.ToString());
}

this.callAgent.CallsUpdated += OnCallsUpdatedAsync;
this.callAgent.IncomingCallReceived += OnIncomingCallAsync;
处理推送通知
要接收传入呼叫的推送通知,请使用字典有效负载在 CallAgent 实例上调用 handlePushNotification():
// MainPage.xaml.cs

public async Task HandlePushNotificationIncomingCallAsync(string notificationContent)
{
    if (this.callAgent != null)
    {
        PushNotificationDetails pnDetails = PushNotificationDetails.Parse(notificationContent);
        await callAgent.HandlePushNotificationAsync(pnDetails);
    }
}
此呼叫会触发 CallAgent 上的传入呼叫事件,以显示传入呼叫通知:
// MainPage.xaml.cs

private async void OnIncomingCallAsync(object sender, IncomingCallReceivedEventArgs args)
{
    incomingCall = args.IncomingCall;
    (Application.Current as App).ShowIncomingCallNotification(incomingCall);
}
// App.xaml.cs

public void ShowIncomingCallNotification(IncomingCall incomingCall)
{
    string incomingCallType = incomingCall.IsVideoEnabled ? "Video" : "Audio";
    string caller = incomingCall.CallerDetails.DisplayName != "" ? incomingCall.CallerDetails.DisplayName : incomingCall.CallerDetails.Identifier.RawId;
    new ToastContentBuilder()
    .SetToastScenario(ToastScenario.IncomingCall)
    .AddText(caller + " is calling you.")
    .AddText("New Incoming " + incomingCallType + " Call")
      .AddButton(new ToastButton()
          .SetContent("Decline")
          .AddArgument("action", "decline"))
      .AddButton(new ToastButton()
          .SetContent("Accept")
          .AddArgument("action", "accept"))
      .Show();
}
在 OnActivated 方法中添加用于处理通知的按钮按下事件的代码:
// App.xaml.cs

protected override async void OnActivated(IActivatedEventArgs e)
{
    // Handle notification activation
    if (e is ToastNotificationActivatedEventArgs toastActivationArgs)
    {
      ToastArguments args = ToastArguments.Parse(toastActivationArgs.Argument);
      string action = args?.Get("action");

      if (!string.IsNullOrEmpty(action))
      {
          var frame = Window.Current.Content as Frame;
          if (frame.Content is MainPage)
          {
              var mainPage = frame.Content as MainPage;
              await mainPage.AnswerIncomingCall(action);
          }
      }
    }
}
// MainPage.xaml.cs

public async Task AnswerIncomingCall(string action)
{
    if (action == "accept")
    {
      var acceptCallOptions = new AcceptCallOptions()
      {
          IncomingVideoOptions = new IncomingVideoOptions()
          {
              StreamKind = VideoStreamKind.RemoteIncoming
          }
      };

      call = await incomingCall?.AcceptAsync(acceptCallOptions);
      call.StateChanged += OnStateChangedAsync;
      call.RemoteParticipantsUpdated += OnRemoteParticipantsUpdatedAsync;
    }
    else if (action == "decline")
    {
      await incomingCall?.RejectAsync();
    }
}
