你当前正在访问 Microsoft Azure Global Edition 技术文档网站。 如果需要访问由世纪互联运营的 Microsoft Azure 中国技术文档网站,请访问 https://docs.azure.cn。
教程:开始在 .NET 中使用中继混合连接 HTTP 请求
在本快速入门中,请创建 .NET 发送者和接收者应用程序,用于通过 HTTP 协议发送和接收消息。 这些应用程序使用 Azure 中继的混合连接功能。 若要了解 Azure 中继的常规信息,请参阅 Azure 中继。
在本快速入门中,你将执行以下步骤:
- 使用 Azure 门户创建中继命名空间。
- 使用 Azure 门户在该命名空间中创建混合连接。
- 编写服务器(侦听器)控制台应用程序,用于接收消息。
- 编写客户端(发送方)控制台应用程序,用于发送消息。
- 运行应用程序。
先决条件
若要完成本教程,需要具备以下先决条件:
- Visual Studio 2019 或更高版本。 本教程中的示例使用 Visual Studio 2022。
- Azure 订阅。 如果没有订阅,请在开始之前创建一个免费帐户。
创建命名空间
登录 Azure 门户。
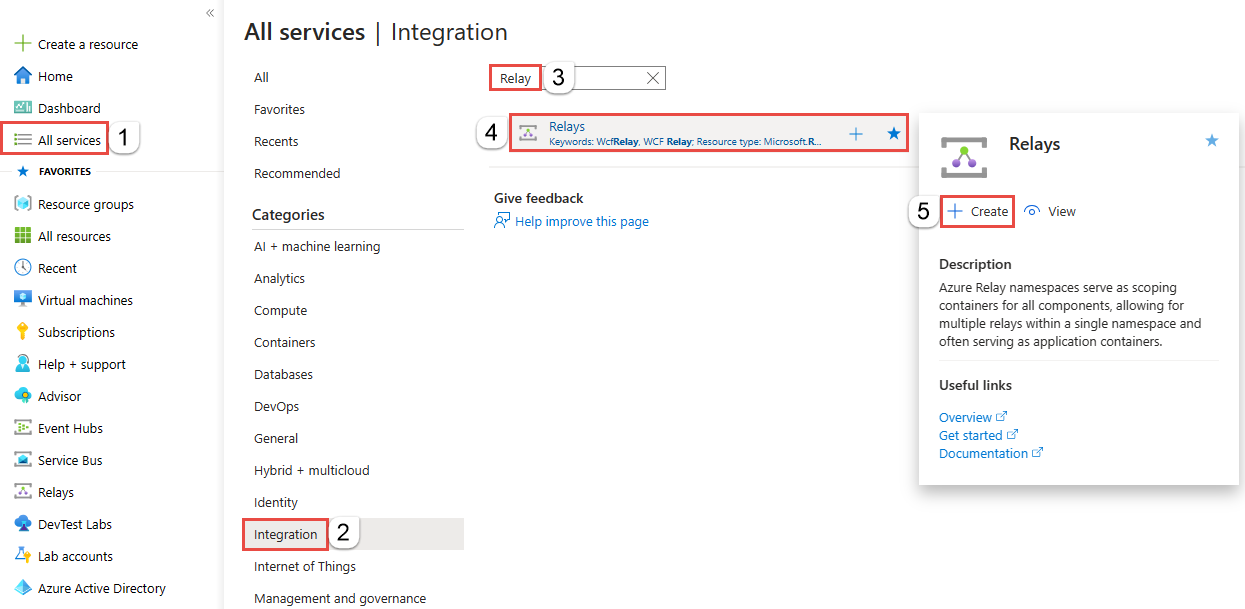
在左侧菜单中,选择“所有服务” 。 选择“集成”,搜索“中继”,将鼠标移到“中继”上方,然后选择“创建”。

在“创建命名空间”页上,执行以下步骤:
选择要在其中创建命名空间的 Azure 订阅。
对于资源组,选择一个要在其中放置命名空间的现有资源组,或创建一个新资源组。
输入中继命名空间的名称。
选择应托管该命名空间的区域。
在页面底部选择查看 + 创建。

在“查看 + 创建”页面上,选择“创建”。
几分钟后,将看到该命名空间的“中继”页面。

获取管理凭据
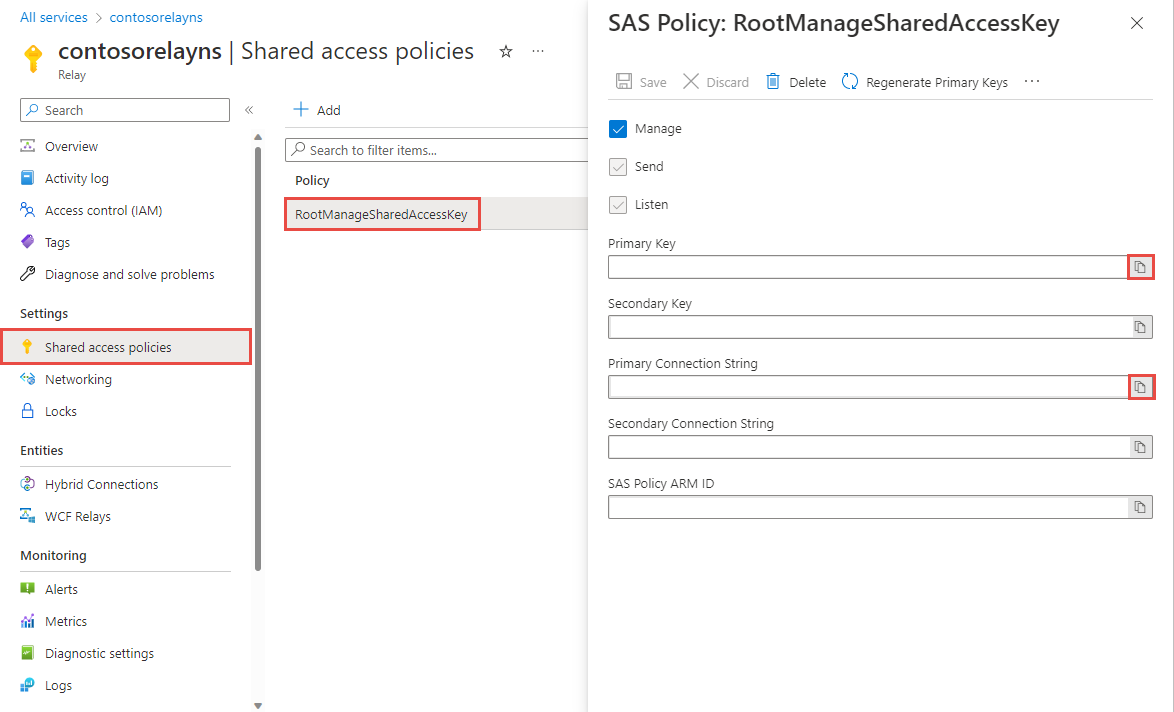
在“中继”页上,选择左侧菜单的“共享访问策略”。
在“共享访问策略”页,选择“RootManageSharedAccessKey” 。
在“SAS 策略:RootManageSharedAccessKey”下,选择“主连接字符串”旁边的“复制”按钮。 此操作会将连接字符串复制到剪贴板,供以后使用。 将此值粘贴到记事本或其他某个临时位置。
重复上述步骤,将主密钥的值复制和粘贴到临时位置,供以后使用。

创建混合连接
在命名空间的“中继”页上,按照以下步骤创建混合连接。
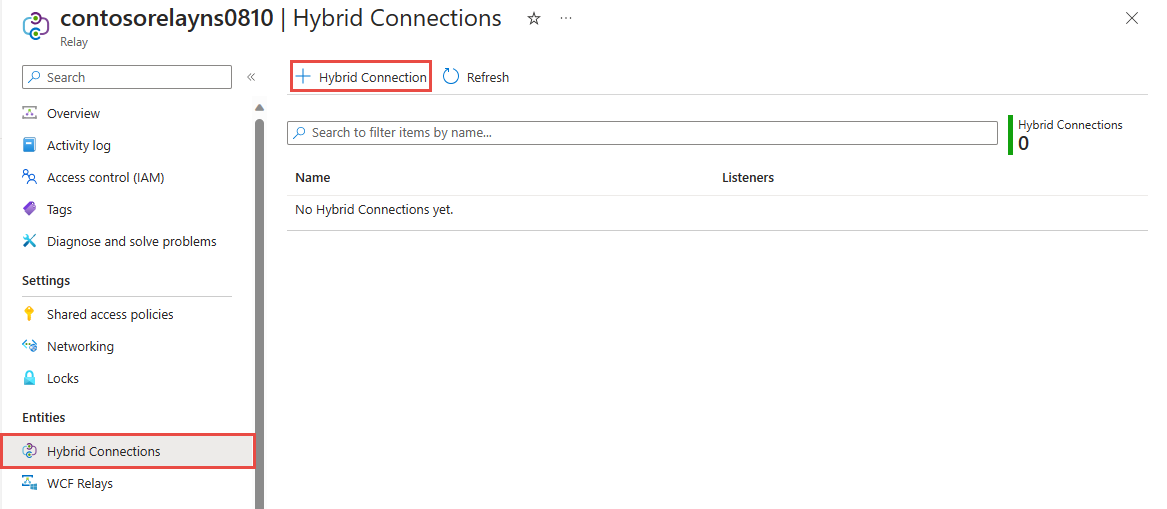
请在左侧菜单中的“实体”下选择“混合连接”,然后选择“+ 混合连接”。

在“创建混合连接”页上,输入混合连接的名称,然后选择“创建”。

创建服务器应用程序(侦听程序)
在 Visual Studio 中编写可侦听和接收来自中继的消息的 C# 控制台应用程序。
创建控制台应用程序
在 Visual Studio 中创建新的控制台应用 (.NET Framework) 项目。
添加中继 NuGet 包
- 右键单击新创建的项目,然后选择“管理 NuGet 包”。
- 选择“浏览”,然后搜索 Microsoft.Azure.Relay。 在搜索结果中,选择“Microsoft Azure 中继”。
- 选择“安装”即可完成安装。 关闭对话框。
编写接收消息的代码
将 Program.cs 文件顶部的现有
using语句替换为以下using语句:using System; using System.IO; using System.Threading; using System.Threading.Tasks; using Microsoft.Azure.Relay; using System.Net;将常量添加到
Program类,用于保存混合连接的连接详细信息。 将括号中的占位符替换为在创建混合连接时获得的值。 请务必使用完全限定的命名空间名称。// replace {RelayNamespace} with the name of your namespace private const string RelayNamespace = "{RelayNamespace}.servicebus.windows.net"; // replace {HybridConnectionName} with the name of your hybrid connection private const string ConnectionName = "{HybridConnectionName}"; // replace {SAKKeyName} with the name of your Shared Access Policies key, which is RootManageSharedAccessKey by default private const string KeyName = "{SASKeyName}"; // replace {SASKey} with the primary key of the namespace you saved earlier private const string Key = "{SASKey}";将
RunAsync方法添加到Program类:private static async Task RunAsync() { var cts = new CancellationTokenSource(); var tokenProvider = TokenProvider.CreateSharedAccessSignatureTokenProvider(KeyName, Key); var listener = new HybridConnectionListener(new Uri(string.Format("sb://{0}/{1}", RelayNamespace, ConnectionName)), tokenProvider); // Subscribe to the status events. listener.Connecting += (o, e) => { Console.WriteLine("Connecting"); }; listener.Offline += (o, e) => { Console.WriteLine("Offline"); }; listener.Online += (o, e) => { Console.WriteLine("Online"); }; // Provide an HTTP request handler listener.RequestHandler = (context) => { // Do something with context.Request.Url, HttpMethod, Headers, InputStream... context.Response.StatusCode = HttpStatusCode.OK; context.Response.StatusDescription = "OK, This is pretty neat"; using (var sw = new StreamWriter(context.Response.OutputStream)) { sw.WriteLine("hello!"); } // The context MUST be closed here context.Response.Close(); }; // Opening the listener establishes the control channel to // the Azure Relay service. The control channel is continuously // maintained, and is reestablished when connectivity is disrupted. await listener.OpenAsync(); Console.WriteLine("Server listening"); // Start a new thread that will continuously read the console. await Console.In.ReadLineAsync(); // Close the listener after you exit the processing loop. await listener.CloseAsync(); }在
Program类的Main方法中添加以下代码行:RunAsync().GetAwaiter().GetResult();完成的 Program.cs 文件应如下所示:
namespace Server
{
    using System;
    using System.IO;
    using System.Threading;
    using System.Threading.Tasks;
    using Microsoft.Azure.Relay;
    using System.Net;

    public class Program
    {
        private const string RelayNamespace = "{RelayNamespace}.servicebus.windows.net";
        private const string ConnectionName = "{HybridConnectionName}";
        private const string KeyName = "{SASKeyName}";
        private const string Key = "{SASKey}";

        public static void Main(string[] args)
        {
            RunAsync().GetAwaiter().GetResult();
        }

        private static async Task RunAsync()
        {
            var tokenProvider = TokenProvider.CreateSharedAccessSignatureTokenProvider(KeyName, Key);
            var listener = new HybridConnectionListener(new Uri(string.Format("sb://{0}/{1}", RelayNamespace, ConnectionName)), tokenProvider);

            // Subscribe to the status events.
            listener.Connecting += (o, e) => { Console.WriteLine("Connecting"); };
            listener.Offline += (o, e) => { Console.WriteLine("Offline"); };
            listener.Online += (o, e) => { Console.WriteLine("Online"); };

            // Provide an HTTP request handler
            listener.RequestHandler = (context) =>
            {
                // Do something with context.Request.Url, HttpMethod, Headers, InputStream...
                context.Response.StatusCode = HttpStatusCode.OK;
                context.Response.StatusDescription = "OK";
                using (var sw = new StreamWriter(context.Response.OutputStream))
                {
                    sw.WriteLine("hello!");
                }

                // The context MUST be closed here
                context.Response.Close();
            };

            // Opening the listener establishes the control channel to
            // the Azure Relay service. The control channel is continuously
            // maintained, and is reestablished when connectivity is disrupted.
            await listener.OpenAsync();
            Console.WriteLine("Server listening");

            // Start a new thread that will continuously read the console.
            await Console.In.ReadLineAsync();

            // Close the listener after you exit the processing loop.
            await listener.CloseAsync();
        }
    }
}
创建客户端应用程序(发送程序)
在 Visual Studio 中编写可将消息发送到中继的 C# 控制台应用程序。
创建控制台应用程序
如果创建中继时已禁用“需要客户端授权”选项,可使用任何浏览器向混合连接 URL 发送请求。 若要访问受保护的终结点,需在 ServiceBusAuthorization 标头中创建并传递令牌,如下所示。
在 Visual Studio 中创建新的控制台应用 (.NET Framework) 项目。
添加中继 NuGet 包
- 右键单击新创建的项目,然后选择“管理 NuGet 包”。
- 选择“包括预发行版”选项。
- 选择“浏览”,然后搜索 Microsoft.Azure.Relay。 在搜索结果中,选择“Microsoft Azure 中继”。
- 选择“安装”即可完成安装。 关闭对话框。
编写代码以发送请求
将 Program.cs 文件顶部的现有
using语句替换为以下using语句:using System; using System.IO; using System.Threading; using System.Threading.Tasks; using System.Net.Http; using Microsoft.Azure.Relay;将常量添加到
Program类,用于保存混合连接的连接详细信息。 将括号中的占位符替换为在创建混合连接时获得的值。 请务必使用完全限定的命名空间名称。// replace {RelayNamespace} with the name of your namespace private const string RelayNamespace = "{RelayNamespace}.servicebus.windows.net"; // replace {HybridConnectionName} with the name of your hybrid connection private const string ConnectionName = "{HybridConnectionName}"; // replace {SAKKeyName} with the name of your Shared Access Policies key, which is RootManageSharedAccessKey by default private const string KeyName = "{SASKeyName}"; // replace {SASKey} with the primary key of the namespace you saved earlier private const string Key = "{SASKey}";将以下方法添加到
Program类:private static async Task RunAsync() { var tokenProvider = TokenProvider.CreateSharedAccessSignatureTokenProvider( KeyName, Key); var uri = new Uri(string.Format("https://{0}/{1}", RelayNamespace, ConnectionName)); var token = (await tokenProvider.GetTokenAsync(uri.AbsoluteUri, TimeSpan.FromHours(1))).TokenString; var client = new HttpClient(); var request = new HttpRequestMessage() { RequestUri = uri, Method = HttpMethod.Get, }; request.Headers.Add("ServiceBusAuthorization", token); var response = await client.SendAsync(request); Console.WriteLine(await response.Content.ReadAsStringAsync()); Console.ReadLine(); }在
Program类的Main方法中添加以下代码行。RunAsync().GetAwaiter().GetResult();Program.cs 应如下所示:
using System; using System.IO; using System.Threading; using System.Threading.Tasks; using System.Net.Http; using Microsoft.Azure.Relay; namespace Client { class Program { private const string RelayNamespace = "{RelayNamespace}.servicebus.windows.net"; private const string ConnectionName = "{HybridConnectionName}"; private const string KeyName = "{SASKeyName}"; private const string Key = "{SASKey}"; static void Main(string[] args) { RunAsync().GetAwaiter().GetResult(); } private static async Task RunAsync() { var tokenProvider = TokenProvider.CreateSharedAccessSignatureTokenProvider( KeyName, Key); var uri = new Uri(string.Format("https://{0}/{1}", RelayNamespace, ConnectionName)); var token = (await tokenProvider.GetTokenAsync(uri.AbsoluteUri, TimeSpan.FromHours(1))).TokenString; var client = new HttpClient(); var request = new HttpRequestMessage() { RequestUri = uri, Method = HttpMethod.Get, }; request.Headers.Add("ServiceBusAuthorization", token); var response = await client.SendAsync(request); Console.WriteLine(await response.Content.ReadAsStringAsync()); } } }
注意
本文中的示例代码使用连接字符串对 Azure 中继命名空间进行身份验证,以简化教程。 建议在生产环境中使用 Microsoft Entra ID 身份验证,而不要使用更容易泄密的连接字符串或共享访问签名。 有关使用 Microsoft Entra ID 身份验证的详细信息和示例代码,请参阅使用 Microsoft Entra ID 对访问 Azure 中继实体的应用程序进行身份验证和授权和使用 Microsoft Entra ID 对访问 Azure 中继资源的托管标识进行身份验证。
运行应用程序
运行服务器应用程序。 可以在控制台窗口中看到以下文本:
Online
Server listening
运行客户端应用程序。 你将在客户端窗口中看到
hello!。 客户端向服务器发送了一个 HTTP 请求,服务器以hello!进行响应。现在,若要关闭控制台窗口,请在两个控制台窗口中按 ENTER。
相关内容
在本快速入门中,你创建了 .NET 客户端和服务器应用程序,此类程序使用 HTTP 来发送和接收消息。 Azure 中继的混合连接功能也支持使用 WebSocket 发送和接收消息。 若要了解如何将 WebSocket 与 Azure 中继混合连接配合使用,请参阅 WebSocket 快速入门。
在本快速入门中,你使用了 .NET Framework 来创建客户端和服务器应用程序。 若要了解如何使用 Node.js 编写客户端和服务器应用程序,请参阅 Node.js WebSocket 快速入门或 Node.js HTTP 快速入门。