你当前正在访问 Microsoft Azure Global Edition 技术文档网站。 如果需要访问由世纪互联运营的 Microsoft Azure 中国技术文档网站,请访问 https://docs.azure.cn。
教程:将 GeoJSON 数据加载到 Azure Maps Android SDK 中
本教程将指导你完成将位置数据的 GeoJSON 文件导入 Azure Maps Android SDK 的过程。 在本教程中,你将了解如何执行以下操作:
- 将 Azure Maps 添加到 Android 应用程序。
- 从本地文件或 Web 创建数据源并将其加载到 GeoJSON 文件中。
- 在地图上显示数据。
- 与地图上的数据进行交互以查看详细信息。
注意
Azure Maps Android SDK 停用
适用于 Android 的 Azure Maps 本机 SDK 现已弃用,将于 2025 年 3 月 31 日停用。 为了避免服务中断,请在 2025 年 3 月 31 日之前迁移到 Azure Maps Web SDK。 有关详细信息,请参阅 Azure Maps Android SDK 迁移指南。
先决条件
- 完成快速入门:创建 Android 应用。 此教程扩展了快速入门中使用的代码。
- 下载示例兴趣点 GeoJSON 文件。
从 Web 或资产文件夹导入 GeoJSON 数据
大多数 GeoJSON 文件将所有数据包装在 FeatureCollection 中。 考虑到这一点,如果将 GeoJSON 文件作为字符串加载到应用程序中,则可将其传递到功能集合的静态 fromJson 方法中,该方法将字符串反序列化为可以添加到地图中的 GeoJSON FeatureCollection 对象。
以下步骤显示如何将 GeoJSON 文件导入应用程序并将其反序列化为 GeoJSON FeatureCollection 对象。
- 完成快速入门:创建 Android 应用,因为以下步骤基于此应用程序构建。
- 在 Android Studio 的项目面板中,右键单击“app”文件夹,然后转到
New > Folder > Assets Folder。 - 将示例兴趣点 GeoJSON 文件拖放到 assets 文件夹中。
- 打开 MainActivity.java 文件,并在
mapControl.onReady事件的回调(位于onCreate方法内)中添加以下代码。 此代码使用importDataFromUrl方法将资产文件夹中的 SamplePoiDataSet.json 文件加载到数据源中,然后再将其添加到地图中。
//Create a data source and add it to the map.
DataSource source = new DataSource();

//Import the geojson data and add it to the data source.
source.importDataFromUrl("asset://SamplePoiDataSet.json");

//Add data source to the map.
map.sources.add(source);
- 打开 MainActivity.kt 文件,并在
mapControl.onReady事件的回调(位于onCreate方法内)中添加以下代码。 此代码使用importDataFromUrl方法将资产文件夹中的 SamplePoiDataSet.json 文件加载到数据源中,然后再将其添加到地图中。
//Create a data source and add it to the map.
DataSource source = new DataSource();

//Import the geojson data and add it to the data source.
source.importDataFromUrl("asset://SamplePoiDataSet.json");

//Add data source to the map.
map.sources.add(source);
- 使用此代码将 GeoJSON 数据加载到数据源,我们现在需要指定该数据在地图上的显示方式。 点数据有多个不同的渲染层;气泡层、符号层和热度地图层是最常用的层。 在用于导入数据的代码后面,添加以下代码,以在
mapControl.onReady事件的回调的气泡层中呈现数据。
//Create a layer and add it to the map.
BubbleLayer layer = new BubbleLayer(source);
map.layers.add(layer);
//Create a layer and add it to the map.
val layer = new BubbleLayer(source)
map.layers.add(layer)
- 在 Android Studio 的项目面板中,在路径
app > res > layout下右键单击“布局”文件夹,然后转到New > File。 创建名为 popup_text.xml 的新文件。 - 打开 popup_text.xml 文件。 如果该文件在设计器视图中打开,请右键单击屏幕并选择“转到 XML”。 复制以下 XML 并将其粘贴到此文件中。 此 XML 将创建一个简单的布局,该布局通过弹出窗口使用并包含文本视图。
<?xml version="1.0" encoding="utf-8"?>
<RelativeLayout xmlns:android="http://schemas.android.com/apk/res/android"
    android:layout_width="match_parent"
    android:orientation="vertical"
    android:background="#ffffff"
    android:layout_margin="8dp"
    android:padding="10dp"

    android:layout_height="match_parent">

    <TextView
        android:id="@+id/message"
        android:layout_width="wrap_content"
        android:text=""
        android:textSize="18dp"
        android:textColor="#222"
        android:layout_height="wrap_content"
        android:width="200dp"/>

</RelativeLayout>
- 返回到 MainActivity.java 文件,然后在气泡层的代码后面添加以下代码,以创建可重用的弹出窗口。
//Create a popup and add it to the map.
Popup popup = new Popup();
map.popups.add(popup);

//Close it initially.
popup.close();
- 返回到 MainActivity.kt 文件,然后在气泡图层的代码后面添加以下代码,以创建可重用的弹出窗口。
//Create a popup and add it to the map.
val popup = Popup()
map.popups.add(popup)

//Close it initially.
popup.close()
- 添加以下代码,将
click事件附加到气泡层。 单击气泡层中的气泡时,该事件会触发并从所选特征的属性中检索详细信息,使用 popup_text.xml 布局文件创建一个视图,将其作为内容传递到弹出窗口中,然后在特征位置显示该弹出窗口。
//Add a click event to the layer.
map.events.add((OnFeatureClick)(feature) -> {
    //Get the first feature and it's properties.
    Feature f = feature.get(0);
    JsonObject props = f.properties();

    //Retrieve the custom layout for the popup.
    View customView = LayoutInflater.from(this).inflate(R.layout.popup_text, null);

    //Display the name and entity type information of the feature into the text view of the popup layout.
    TextView tv = customView.findViewById(R.id.message);
    tv.setText("%s\n%s",
        f.getStringProperty("Name"),
        f.getStringProperty("EntityType")
    );

    //Get the position of the clicked feature.
    Position pos = MapMath.getPosition((Point)f.geometry());

    //Set the options on the popup.
    popup.setOptions(
            //Set the popups position.
            position(pos),

            //Set the anchor point of the popup content.
            anchor(AnchorType.BOTTOM),

            //Set the content of the popup.
            content(customView)
    );

    //Open the popup.
    popup.open();

    //Return a boolean indicating if event should be consumed or continue to bubble up.
    return false;
}, layer);
//Add a click event to the layer.
map.events.add(OnFeatureClick { feature: List<Feature> ->
    //Get the first feature and it's properties.
    val f = feature[0]
    val props = f.properties()

    //Retrieve the custom layout for the popup.
    val customView: View = LayoutInflater.from(this).inflate(R.layout.popup_text, null)

    //Display the name and entity type information of the feature into the text view of the popup layout.
    val tv = customView.findViewById<TextView>(R.id.message)
    tv.text = String.format(
        "%s\n%s",
        f.getStringProperty("Name"),
        f.getStringProperty("EntityType")
    )

    //Get the position of the clicked feature.
    val pos = MapMath.getPosition(f.geometry() as Point?)

    //Set the options on the popup.
    popup.setOptions( //Set the popups position.
        position(pos),  //Set the anchor point of the popup content.
        anchor(AnchorType.BOTTOM),  //Set the content of the popup.
        content(customView)
    )

    //Open the popup.
    popup.open()

    //Return a boolean indicating if event should be consumed or continue to bubble up.
    false
} as OnFeatureClick, layer)
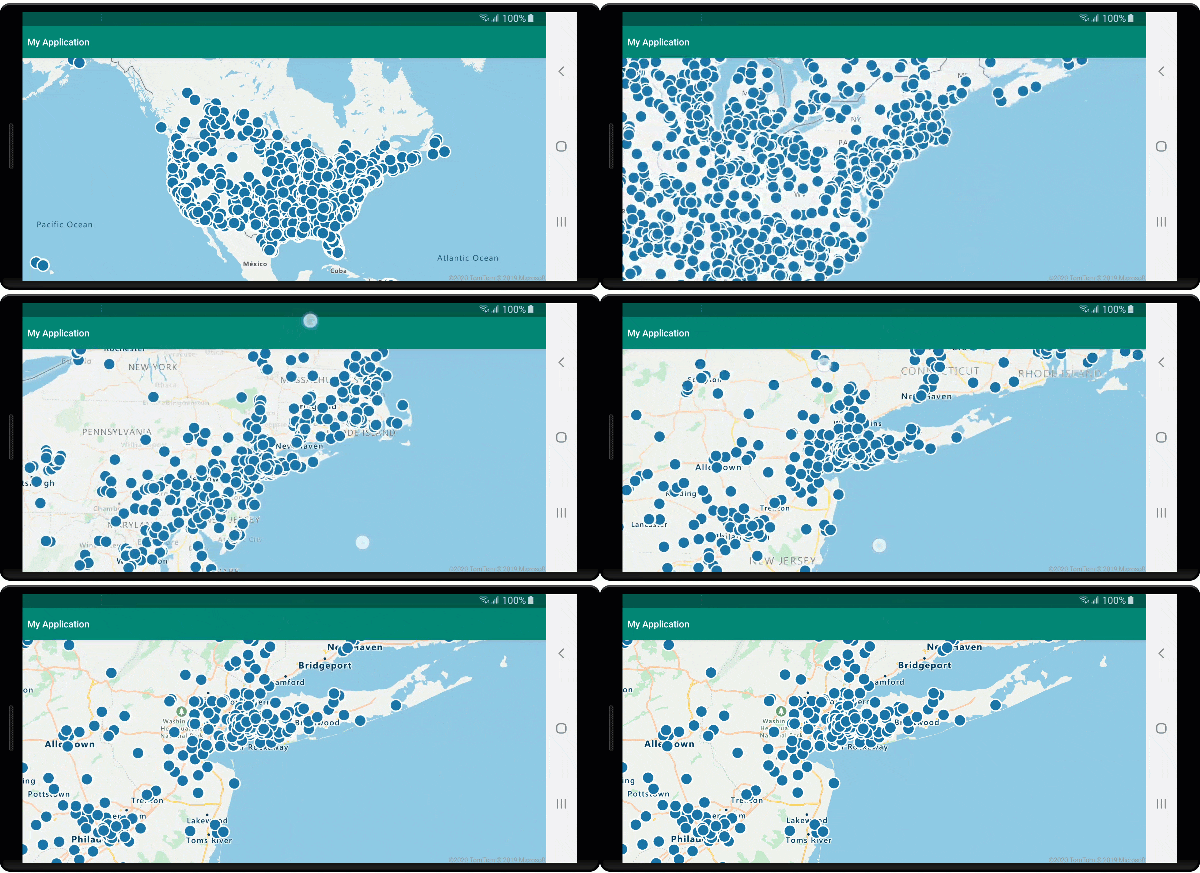
运行应用程序。 所显示地图中的气泡即代表 GeoJSON 文件中的每一个位置。 单击任意气泡将显示一个弹出窗口,其中包含所单击特征的名称和实体类型。

清理资源
请按照以下步骤清理本教程中的资源:
- 关闭 Android Studio 并删除你创建的应用程序。
- 如果在外部设备上测试了应用程序,请从该设备上卸载它。
后续步骤
若要查看更多代码示例和交互式编码体验,请参阅: