Creating a Xamarin.iOS application using the Reflection API
The MT.D Reflection API allows classes to be decorated with attributes that MT.D uses to create screens automatically. The reflection API provides a binding between these classes and what is displayed on screen. Although this API doesn’t provide the fine-grained control that the elements API does, it reduces complexity by automatically building out the element hierarchy based on class decoration.
Setting up MT.D
MT.D is distributed with Xamarin.iOS. To use it, right-click on the
References node of a Xamarin.iOS project in Visual Studio 2017 or
Visual Studio for Mac and add a reference to the MonoTouch.Dialog-1
assembly. Then, add using MonoTouch.Dialog statements in your source
code as necessary.
Getting started with the Reflection API
Using the Reflection API is as simple as:
- Creating a class decorated with MT.D attributes.
- Creating a
BindingContextinstance, passing it an instance of the above class. - Creating a
DialogViewController, passing it theBindingContext’sRootElement.
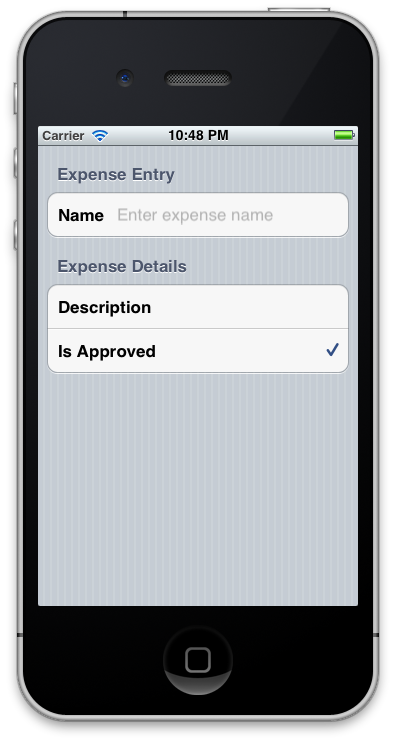
Let’s look at an example to illustrate how to use the Reflection API. In this example, we’ll build a simple data entry screen as shown below:
Creating a class with MT.D attributes
The first thing we need to use the Reflection API is a class decorated with attributes. These attributes will be used by MT.D internally to create objects from the Elements API. For example, consider the following class definition:
public class Expense
{
    [Section("Expense Entry")]

    [Entry("Enter expense name")]
    public string Name;

    [Section("Expense Details")]

    [Caption("Description")]
    [Entry]
    public string Details;

    [Checkbox]
    public bool IsApproved = true;
}
The SectionAttribute will result in sections of the UITableView being created, with the string argument used to
populate the section’s header. Once a section is declared, every field that
follows it will be included in that section, until another section is declared.
The type of user interface element created for the field will depend upon the
field’s type and the MT.D attribute decorating it.
For example, the Name field is a string and it is
decorated with an EntryAttribute. This results in a row being added
to the table with a text entry field and the specified caption. Similarly, the IsApproved field is a bool with a CheckboxAttribute, resulting in a table row with a checkbox on the
right of the table cell. MT.D uses the field name, automatically adding a space,
to create the caption in this case, since it is not specified in an
attribute.
Adding the BindingContext
To use the Expense class, we need to create a BindingContext. A BindingContext is a class that will
bind the data from the attributed class to create the hierarchy of elements. To
create one, we simply instantiate it and pass in an instance of the attributed
class to the constructor.
For example, to add UI that we declared using attribute in the Expense class, include the following code in the FinishedLaunching method of the AppDelegate:
var expense = new Expense ();
var bctx = new BindingContext (null, expense, "Create a task");
Then all we have to do to create the UI is add the BindingContext to the DialogViewController and set it
as the RootViewController of the window, as shown below:
UIWindow window;

public override bool FinishedLaunching (UIApplication app, NSDictionary options)
{
    window = new UIWindow (UIScreen.MainScreen.Bounds);

    var expense = new Expense ();
    var bctx = new BindingContext (null, expense, "Create a task");
    var dvc = new DialogViewController (bctx.Root);

    window.RootViewController = dvc;
    window.MakeKeyAndVisible ();

    return true;
}
Running the application now results in the screen shown above being displayed.
Adding a UINavigationController
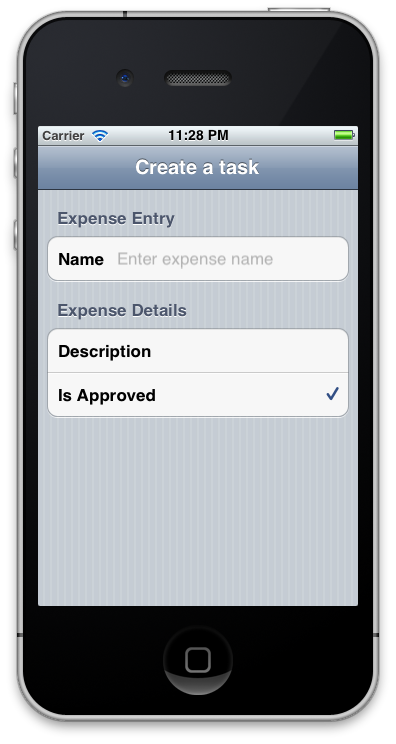
Notice however that the title “Create a task” that we passed to the BindingContext is not displayed. This is because the DialogViewController is not part of a UINavigatonController. Let’s change the code to add a UINavigationController as the window’s RootViewController, and add the DialogViewController
as the root of the UINavigationController as shown below:
nav = new UINavigationController(dvc);
window.RootViewController = nav;
Now when we run the application, the title appears in the UINavigationController’s navigation bar as the screenshot below
shows:
By including a UINavigationController, we can now take advantage
of other features of MT.D for which navigation is necessary. For example, we can
add an enumeration to the Expense class to define the category for
the expense, and MT.D will create a selection screen automatically. To
demonstrate, modify the Expense class to include an ExpenseCategory field as follows:
public enum Category
{
    Travel,
    Lodging,
    Books
}

public class Expense
{
    …

    [Caption("Category")]
    public Category ExpenseCategory;
}
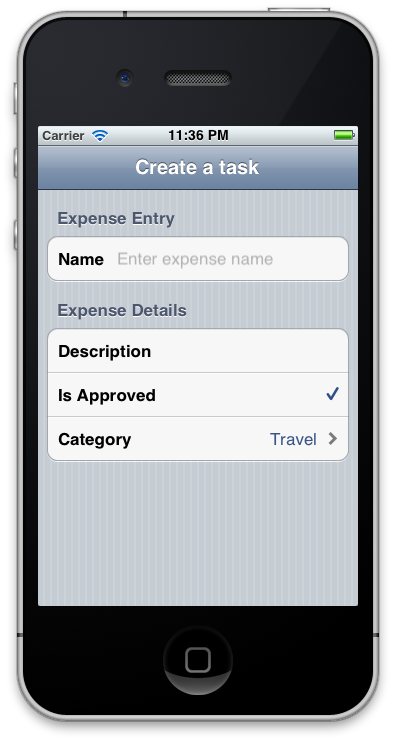
Running the application now results in a new row in the table for the category as shown:
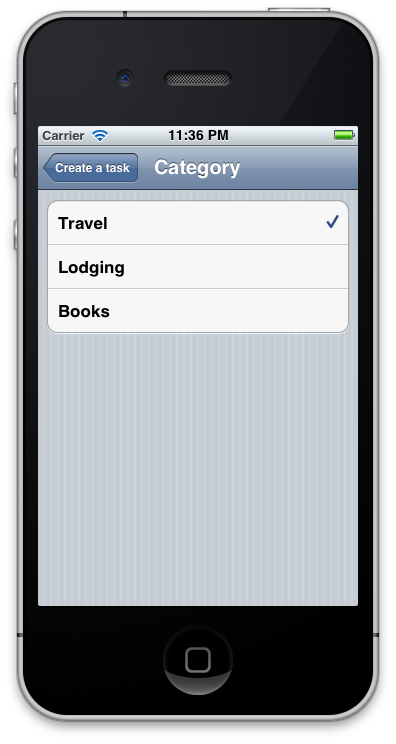
Selecting the row results in the application navigating to a new screen with rows corresponding to the enumeration, as shown below:
Summary
This article presented a walkthrough of the Reflection API. We showed how to
add attributes to a class to control what is displayed. We also discussed how to
use a BindingContext to bind data from a class to the element
hierarchy that is created, as well as how to use MT.D with a UINavigationController.


