Creating a Xamarin.iOS application using the Elements API
This article builds upon the information presented in the Introduction to MonoTouch Dialog article. It presents a walkthrough that shows how to use the MonoTouch.Dialog (MT.D) Elements API to quickly get started building an application with MT.D.
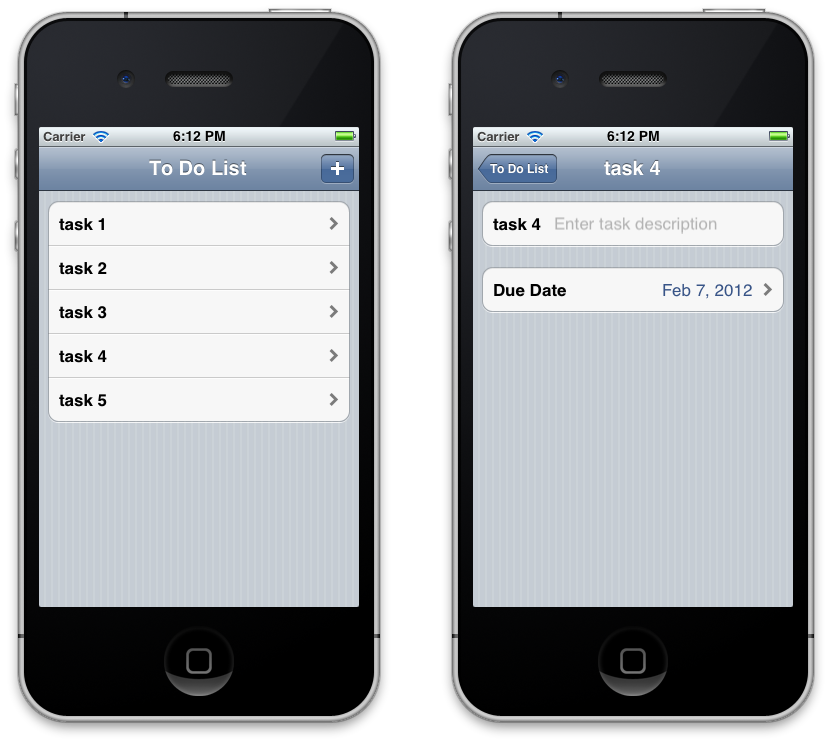
In this walkthrough, we’ll use the MT.D Elements API to create a master-detail style of application that displays a task list. When the user selects the + button in the navigation bar, a new row will be added to the table for the task. Selecting the row will navigate to the detail screen that allows us to update the task description and the due date, as illustrated below:
Setting up MT.D
MT.D is distributed with Xamarin.iOS. To use it, right-click on the
References node of a Xamarin.iOS project in Visual Studio 2017 or
Visual Studio for Mac and add a reference to the MonoTouch.Dialog-1
assembly. Then, add using MonoTouch.Dialog statements in your source
code as necessary.
Elements API walkthrough
In the Introduction to MonoTouch Dialog article, we gained a solid understanding of the different parts of MT.D. Let’s use the Elements API to put them all together into an application.
Setting up the multi-screen application
To start the screen creation process, MonoTouch.Dialog creates a DialogViewController, and then adds a RootElement.
To create a multi-screen application with MonoTouch.Dialog, we need to:
- Create a
UINavigationController. - Create a
DialogViewController. - Add the
DialogViewControlleras the root of theUINavigationController. - Add a
RootElementto theDialogViewController. - Add
SectionsandElementsto theRootElement.
Using A UINavigationController
To create a navigation-style application, we need to create a UINavigationController, and then add it as the RootViewController in the FinishedLaunching method of
the AppDelegate. To make the UINavigationController
work with MonoTouch.Dialog, we add a DialogViewController to the UINavigationController as shown below:
public override bool FinishedLaunching (UIApplication app, NSDictionary options)
{
    _window = new UIWindow (UIScreen.MainScreen.Bounds);

    _rootElement = new RootElement ("To Do List"){new Section ()};

    // code to create screens with MT.D will go here …

    _rootVC = new DialogViewController (_rootElement);
    _nav = new UINavigationController (_rootVC);
    _window.RootViewController = _nav;
    _window.MakeKeyAndVisible ();

    return true;
}
The code above creates an instance of a RootElement and passes
it into the DialogViewController. The DialogViewController always has a RootElement at the
top of its hierarchy. In this example, the RootElement is created
with the string “To Do List,” which serves as the title in the navigation
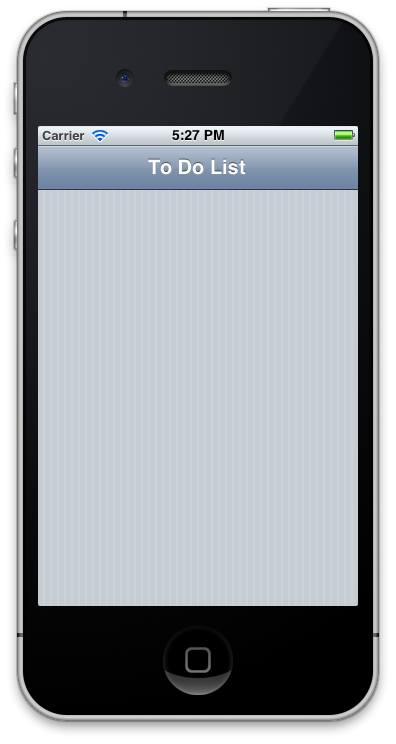
controller’s navigation bar. At this point, running the application would
present the screen shown below:
Let’s see how to use MonoTouch.Dialog’s hierarchical structure of Sections and Elements to add more screens.
Creating the Dialog screens
A DialogViewController is a UITableViewController
subclass that MonoTouch.Dialog uses to add screens. MonoTouch.Dialog creates
screens by adding a RootElement to a DialogViewController, as we saw above. The RootElement
can have Section instances that represent the sections of a table.
The sections are made up of elements, other sections, or even other RootElements. By nesting RootElements,
MonoTouch.Dialog automatically creates a navigation-style application, as
we’ll see next.
Using DialogViewController
The DialogViewController, being a UITableViewController subclass, has a UITableView as
its view. In this example, we want to add items to the table each time the + button is tapped. Since the DialogViewController was added to a UINavigationController, we can use the NavigationItem’s RightBarButton property to add the + button, as shown below:
_addButton = new UIBarButtonItem (UIBarButtonSystemItem.Add);
_rootVC.NavigationItem.RightBarButtonItem = _addButton;
When we created the RootElement earlier, we passed it a single Section instance so that we could add elements as the + button is tapped by the user. We can use the following code
to accomplish this in the event handler for the button:
_addButton.Clicked += (sender, e) => {
    ++n;

    var task = new Task{Name = "task " + n, DueDate = DateTime.Now};

    var taskElement = new RootElement (task.Name) {
        new Section () {
            new EntryElement (task.Name, "Enter task description", task.Description)
        },
        new Section () {
            new DateElement ("Due Date", task.DueDate)
        }
    };
    _rootElement [0].Add (taskElement);
};
This code creates a new Task object each time the button is
tapped. The following shows the simple implementation of the Task
class:
public class Task
{
    public Task ()
    {
    }

    public string Name { get; set; }

    public string Description { get; set; }

    public DateTime DueDate { get; set; }
}
The task’s Name property is used to create the RootElement’s caption along with a counter variable named n that is incremented for each new task. MonoTouch.Dialog turns the
elements into the rows that are added to the TableView when each taskElement is added.
Presenting and managing Dialog Screens
We used a RootElement so that MonoTouch.Dialog would
automatically create a new screen for each task’s details and navigate to it
when a row is selected.
The task detail screen itself is composed of two sections; each of these
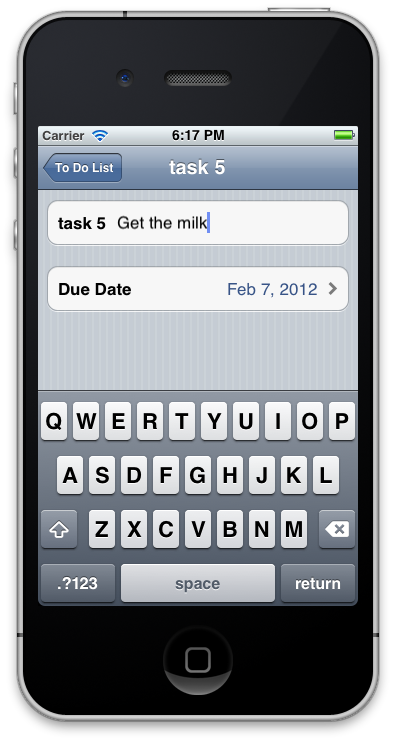
sections contains a single element. The first element is created from an EntryElement to provide an editable row for the task’s Description property. When the element is selected, a keyboard for
text editing is presented as shown below:
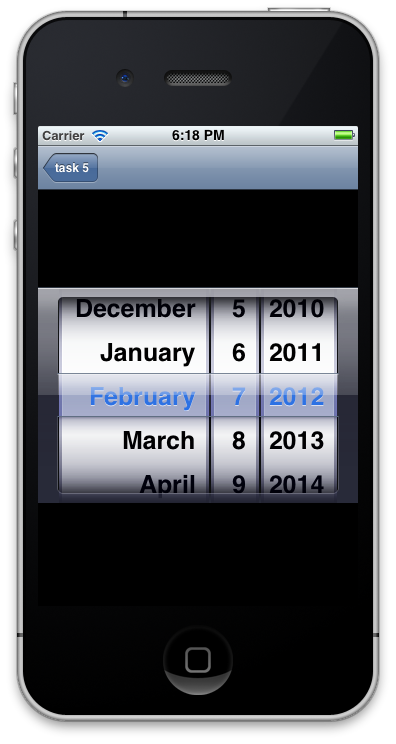
The second section contains a DateElement that lets us manage
the task’s DueDate property. Selecting the date automatically
loads a date picker as shown:
In both the EntryElement and DateElement cases (or
for any data-entry element in MonoTouch.Dialog), any changes to the values are
preserved automatically. We can demonstrate this by editing the date and then
navigating back and forth between the root screen and various task details,
where the values in the detail screens are preserved.
Summary
This article presented a walkthrough that showed how to use the
MonoTouch.Dialog Elements API. It covered the basic steps to create a
multi-screen application with MT.D, including how to use a DialogViewController and how to add Elements and Sections to create
screens. In addition, it showed how to use MT.D in conjunction with a UINavigationController.


