Tutorial part 1: Display an image in a pop-up
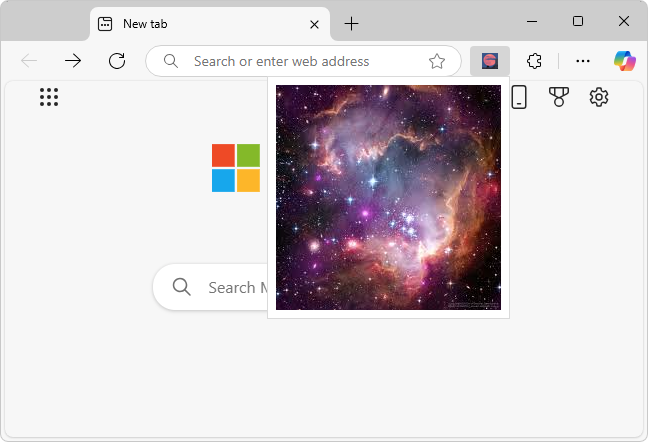
The Part 1 sample: Display an image in a pop-up is a simple static extension, without JavaScript, that displays the stars.jpeg image in a small webpage in a pop-up in any Microsoft Edge tab:

You create this type of extension by doing the following:
- Create a manifest.json file.
- Add icons for launching the extension.
- Open a default pop-up dialog.
Along the way, you install (or update) and test the extension.
If you want to immediately install and run the completed extension, or view its finished code, either:
- Clone the MicrosoftEdge-Extensions repo to your local drive. Use the directory
/extension-getting-started-part1/. - Download the source code from the /part1/ folder of the MicrosoftEdge-Extensions repo.
Then you can install and run the finished extension that's in the repo, per Sideload an extension to install and test it locally.
Step 1: Create a manifest.json file
Every extension package must have a manifest.json file at the root. The manifest provides details of your extension, the extension package version, the extension name and description, and so on.
All the coding steps in this article have already been done in the Part 1 demo in the MicrosoftEdge-Extensions repo. We recommend first cloning the repo and installing and running the Part 1 demo, before (or instead of) starting with an empty directory and then manually creating directories, creating files, and pasting code into the files.
This step has already been done in manifest.json in the MicrosoftEdge-Extensions repo. If you want to manually create the Part 1 extension by starting with an empty directory:
In a directory on your machine, using an editor, such as Visual Studio Code, create a
manifest.jsonfile that contains the following lines:{ "name": "NASA picture of the day pop-up", "version": "0.0.0.1", "manifest_version": 3, "description": "A basic extension that displays an image in a pop-up.", }
Step 2: Add icons for launching the extension
This step has already been done in the Part 1 demo in the MicrosoftEdge-Extensions repo. If you want to manually create the Part 1 extension, continue with the following steps.
Create an
iconsdirectory in your project, in the same directory as the manifest file, to store the icon image files. The icons are used as the background image for the button that the user clicks to launch the extension:
For icons:
- We recommend using
PNGformat, but you can also useBMP,GIF,ICOorJPEGformats. - We recommend using images that are 128 x 128 px, which are resized by the browser if necessary.
- We recommend using
Make sure the directories of your project are similar to the following structure:
└── part1
    ├── manifest.json
    └── icons
        ├── nasapod16x16.png
        ├── nasapod32x32.png
        ├── nasapod48x48.png
        └── nasapod128x128.png
Obtain the
.pngfiles from the repo:nasapod16x16.pngnasapod32x32.pngnasapod48x48.pngnasapod128x128.png
For example, individually download the files from the /icons/ folder of the MicrosoftEdge-Extensions repo and place them in your
/icons/directory.List the icons in the
manifest.jsonfile, as follows:{ "name": "NASA picture of the day pop-up", "version": "0.0.0.1", "manifest_version": 3, "description": "A basic extension that displays an image in a pop-up.", "icons": { "16": "icons/nasapod16x16.png", "32": "icons/nasapod32x32.png", "48": "icons/nasapod48x48.png", "128": "icons/nasapod128x128.png" } }
Step 3: Open a default pop-up dialog
This step has already been done in popup.html in the MicrosoftEdge-Extensions repo. If you want to manually create the Part 1 extension, continue with the following steps.
Create a HTML file to run when the user launches your extension. When the user clicks the icon to launch the extension, this file will be displayed as a modal dialog.
Create the HTML file named
popup.htmlin a directory namedpopup.Add the following code to
popup.html, to display the stars image:<html lang="en"> <head> <meta charset="UTF-8" /> <title>NASA picture of the day</title> </head> <body> <div> <img src="/images/stars.jpeg" alt="Stars" /> </div> </body> </html>Add the file
stars.jpegin theimagesfolder. For example, download stars.jpeg from the MicrosoftEdge-Extensions repo.Make sure the directories of your project are similar to the following structure:
└── part1
    ├── manifest.json
    ├── icons
    │   ├── nasapod16x16.png
    │   ├── nasapod32x32.png
    │   ├── nasapod48x48.png
    │   └── nasapod128x128.png
    ├── images
    │   └── stars.jpeg
    └── popup
        └── popup.html
Register the pop-up in
manifest.jsonunderaction, as follows:{ "name": "NASA picture of the day pop-up", "version": "0.0.0.1", "manifest_version": 3, "description": "A basic extension that displays an image in a pop-up.", "icons": { "16": "icons/nasapod16x16.png", "32": "icons/nasapod32x32.png", "48": "icons/nasapod48x48.png", "128": "icons/nasapod128x128.png" }, "action": { "default_popup": "popup/popup.html" } }
That's everything you need to develop a simple extension.
Step 4: Install and test the extension
Install and run the extension; see Sideload an extension to install and test it locally. The extension displays popup.html, containing stars.jpeg, in a pop-up:

You can open this Part 1 demo extension in any tab, including an empty tab or the Manage Extensions tab.
After running and testing the extension, you can continue on to Tutorial part 2: Use JavaScript to insert an image in the webpage.
See also
- Sideload an extension to install and test it locally
- Tutorial part 2: Use JavaScript to insert an image in the webpage
GitHub:
- MicrosoftEdge-Extensions repo.
- /part1/ - source code of the Part 1 sample.