Import data with the Emissions Impact Dashboard for Azure connector
The Sustainability dashboard includes a connector to the Emissions Impact Dashboard for Azure. The Emissions Impact Dashboard gives you visibility into the carbon emissions that are generated through Azure services. Microsoft's carbon accounting extends across all three scopes of emissions, and uses a third party-validated methodology. It uses consistent and accurate carbon accounting to quantify the impact of Microsoft cloud services on customers' environmental footprint. Microsoft is the only cloud provider that provides this level of transparency to customers when they compile reports for voluntary or statutory reporting requirements. With the Emissions Impact Dashboard, users can complete the following tasks:
- Track direct and indirect greenhouse gas emissions that are related to their cloud usage.
- Understand emissions that have been avoided over time through Microsoft data center efficiency.
- Easily share findings through cloud data export. Findings are shown in CO2-equivalent metric tons.
Sustainability Manager provides the connected experience by integrating with the Emissions Impact Dashboard through its connector framework. Azure customers can use Sustainability Manager not only to determine their overall carbon emissions across the different scopes but also to gain insight into their scope 3 emissions from Azure services. Access to the Emissions Impact Dashboard requires an Enterprise Agreement (EA) enrollment number or billing account ID and admin access. After credentials are validated, it can take up to 24 hours to connect and calculate usage data.
Prerequisites for the Emissions Impact Dashboard
Azure emissions are directly related to Azure costs. As a result, both the service principal used to read Azure emissions and the user creating the connection in Sustainability Manager must have permission to read billing account data from your Azure subscription.
In addition, you need to understand enrollment accounts and billing accounts, which are separate, based on your Azure subscription:
If you're using a billing account of your Azure subscription, you need read permission/access at a minimum. The billing account needs to be on the same tenant as Sustainability Manager. For more information about billing account roles and permissions, go to Understand Microsoft Customer Agreement administrative roles in Azure.
If you're using an Enterprise Agreement (EA) account of your Azure subscription, you need to assign the EnrollmentReader role to the service principal. For more information about permissions and assigning roles for an EA, go to Assign roles to Azure Enterprise Agreement service principal names.
Before you can connect to the Emissions Impact Dashboard, perform the following steps:
Set up a service principal.
- Create a new service principal in the same tenant as Sustainability Manager.
- Assign the Billing Account Reader role to the new service principal (or EnrollmentReader if you're using an EA account).
Ensure that the user creating the connection in Sustainability Manager also has the Billing Account Reader role (or EnrollmentReader if you're using an EA account).
Important
Ensure that the right permissions have been applied across billing or enrollment accounts.
You can't create a single connection for multiple billing accounts and must create one connection per billing account.
Sustainability Manager doesn't support cross-tenant access to Emissions Impact Dashboard information in Azure.
Connect to the Emissions Impact Dashboard
To import data from the Emissions Impact Dashboard, follow these steps.
In the left navigation pane, under Data management, select Data imports.
Select the DATA PROVIDER CONNECTORS tile.
Under Choose a data source, select Emissions Impact Dashboard for Azure to connect your data, and then select Next.
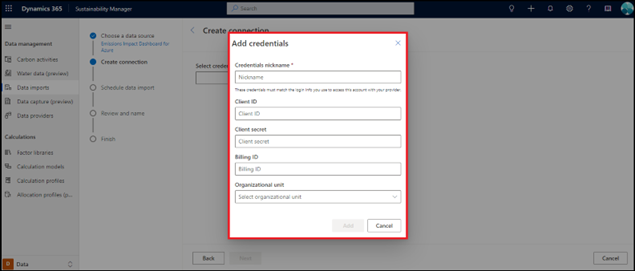
If you're connecting to the Emissions Impact Dashboard for the first time, enter the sign-in credentials for the Emissions Impact Dashboard for Azure. In the Select credential dropdown list, select +Add credential. Complete the fields with the following information:
Field Description Credentials nickname User-friendly nickname. Client ID Client ID of the service principal. Client secret Client secret of the service principal. Billing ID Billing ID of the billing account to your Azure subscription. You can find the billing ID in the Azure portal under Cost Management & Billing. Organizational unit Select the organizational unit that Azure emissions should be associated with. 
Select Add. The system might require up to 45 seconds to validate the credentials. At that point, you can add more credentials, or you can move on to the next step by selecting Next.
Schedule the data refresh. The refresh can be automatic at a defined frequency or on a defined schedule.
Enter a name, and then select Connect.
Select Done.
Add credentials from the Data provider page
Sustainability Manager lets users enter credentials directly on the Data Provider page for connectors such as the Emissions Impact Dashboard. As a result, users don't have to enter credentials when they set up an import. A user can just select the entered credentials in the dropdown list and proceed to adding the import.
To add credentials from the Data Providers page, follow these steps.
In the left navigation pane under Data management, select Data providers.
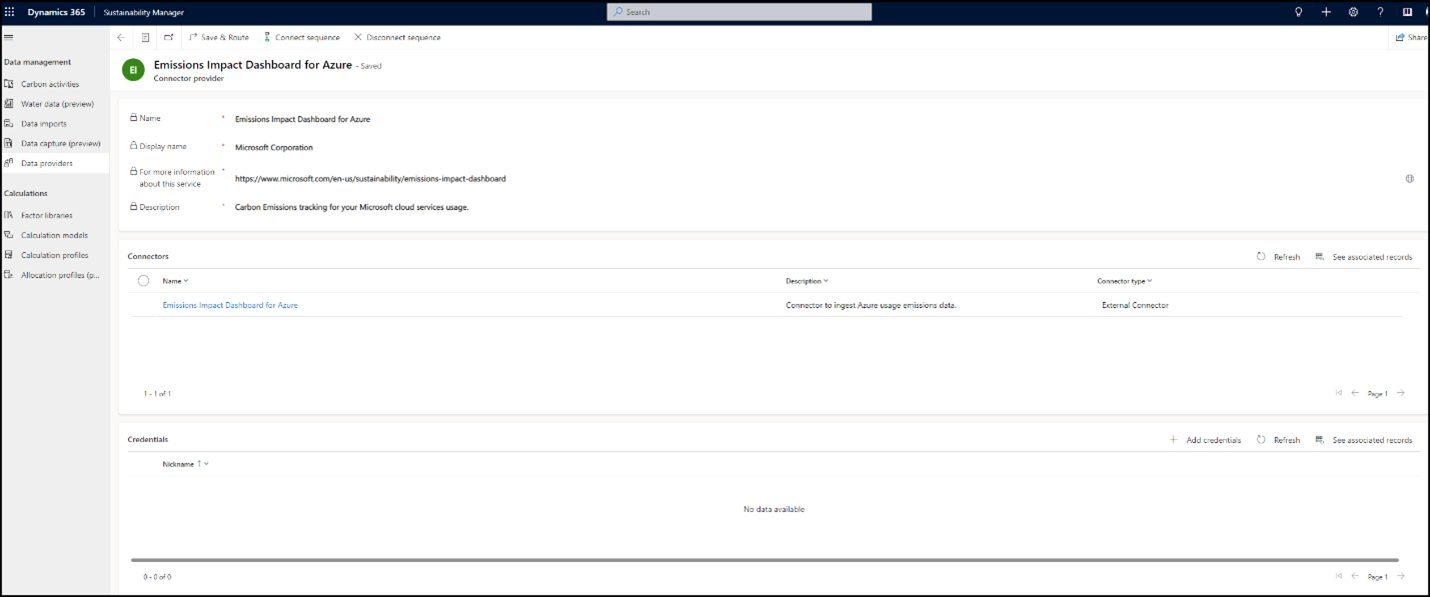
In the list of providers, select Emissions Impact Dashboard for Azure. A details page opens.

At the bottom of the page, under Credentials, select Add credentials. The same dialog box that was used in the import experience appears.
Enter the credential details for Emissions Impact Dashboard. These details include a credential nickname, client ID, client secret, billing ID, tenant ID, and organizational unit.
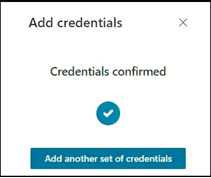
When you've finished, select Add. The system confirms the credentials and asks whether you want to add another set of credentials.

If you don't want to add more credentials, close the Add credentials page. You're taken to the Create import page.
Select the credentials that you entered, and then select Next.
Schedule the data refresh. The refresh can be automatic at a defined frequency or on a defined schedule.
Enter a name, and select Create import.
Select Done.
When you add a new Emissions Impact Dashboard import, these credentials are available for selection under the dropdown list under the specified nickname.
Edit an Emissions Impact Dashboard import
Sustainability Manager lets users update a previously created Emissions Impact Dashboard connection and add new credentials, change the scheduled refresh, or update the connection name.
To edit an existing Emissions Impact Dashboard connection, follow these steps.
In the left navigation pane, under Data Management, select Data imports.
Select the existing Emissions Impact Dashboard data import.
Select Edit import at the top of the page.
To add new credentials, select Add credential in the dropdown list.
Enter the details that are required to create the new credentials, and then select Add. Then select Next at the bottom of the page.
If you plan to update only the data refresh schedule, select Next at the bottom of the page. You can then update the data refresh or import name. When you've finished, select Save.
Select Done.
Related information
- Overview of data import
- Incremental data refresh
- Import data with Excel templates
- Import data with Power Query
- Import data with data provider connectors
- Import data manually
- Change data import connection ownership (preview)
- Review data imports
- Considerations and FAQ
- Integration
