Tutorial: Receive device messages through Azure IoT Hub
Important
As of 2/26/2025 the MedTech service will no longer be available in the following regions: UK West, UAE North, South Africa North, Qatar Central.
The MedTech service can receive messages from devices you create and manage through an IoT hub in Azure IoT Hub. This tutorial uses an Azure Resource Manager template (ARM template) and a Deploy to Azure button to deploy a MedTech service. The template also deploys an IoT hub to create and manage devices, and message routes device messages to an event hub for the MedTech service to read and process. After device data processing, the FHIR® resources are persisted in the FHIR service, which is also included in the template.
Tip
To learn how the MedTech service transforms and persists device data into the FHIR service as FHIR resources, see Overview of the MedTech service device data processing stages.
In this tutorial, learn how to:
- Open an ARM template in the Azure portal.
- Configure the template for your deployment.
- Create a device.
- Send a test message.
- Review metrics for the test message.
Tip
To learn about ARM templates, see What are ARM templates?
Prerequisites
To begin your deployment and complete the tutorial, you must have the following prerequisites:
An active Azure subscription account. If you don't have an Azure subscription, see the subscription decision guide.
Owner or Contributor and User Access Administrator role assignments in the Azure subscription. For more information, see What is Azure role-based access control (Azure RBAC)?
Microsoft.HealthcareApis, Microsoft.EventHub, and Microsoft.Devices resource providers registered with your Azure subscription. To learn more, see Azure resource providers and types.
Visual Studio Code installed locally.
Azure IoT Tools installed in Visual Studio Code. Azure IoT Tools is a collection of extensions that makes it easy to connect to IoT hubs, create devices, and send messages. In this tutorial, you use the Azure IoT Hub extension in Visual Studio Code to connect to your deployed IoT hub, create a device, and send a test message from the device to your IoT hub.
When you have these prerequisites, you're ready to configure the ARM template by using the Deploy to Azure button.
Review the ARM template
The ARM template used to deploy the resources in this tutorial is available at Azure Quickstart Templates by using the azuredeploy.json file on GitHub.
Use the Deploy to Azure button
To begin deployment in the Azure portal, select the Deploy to Azure button:
Configure the deployment
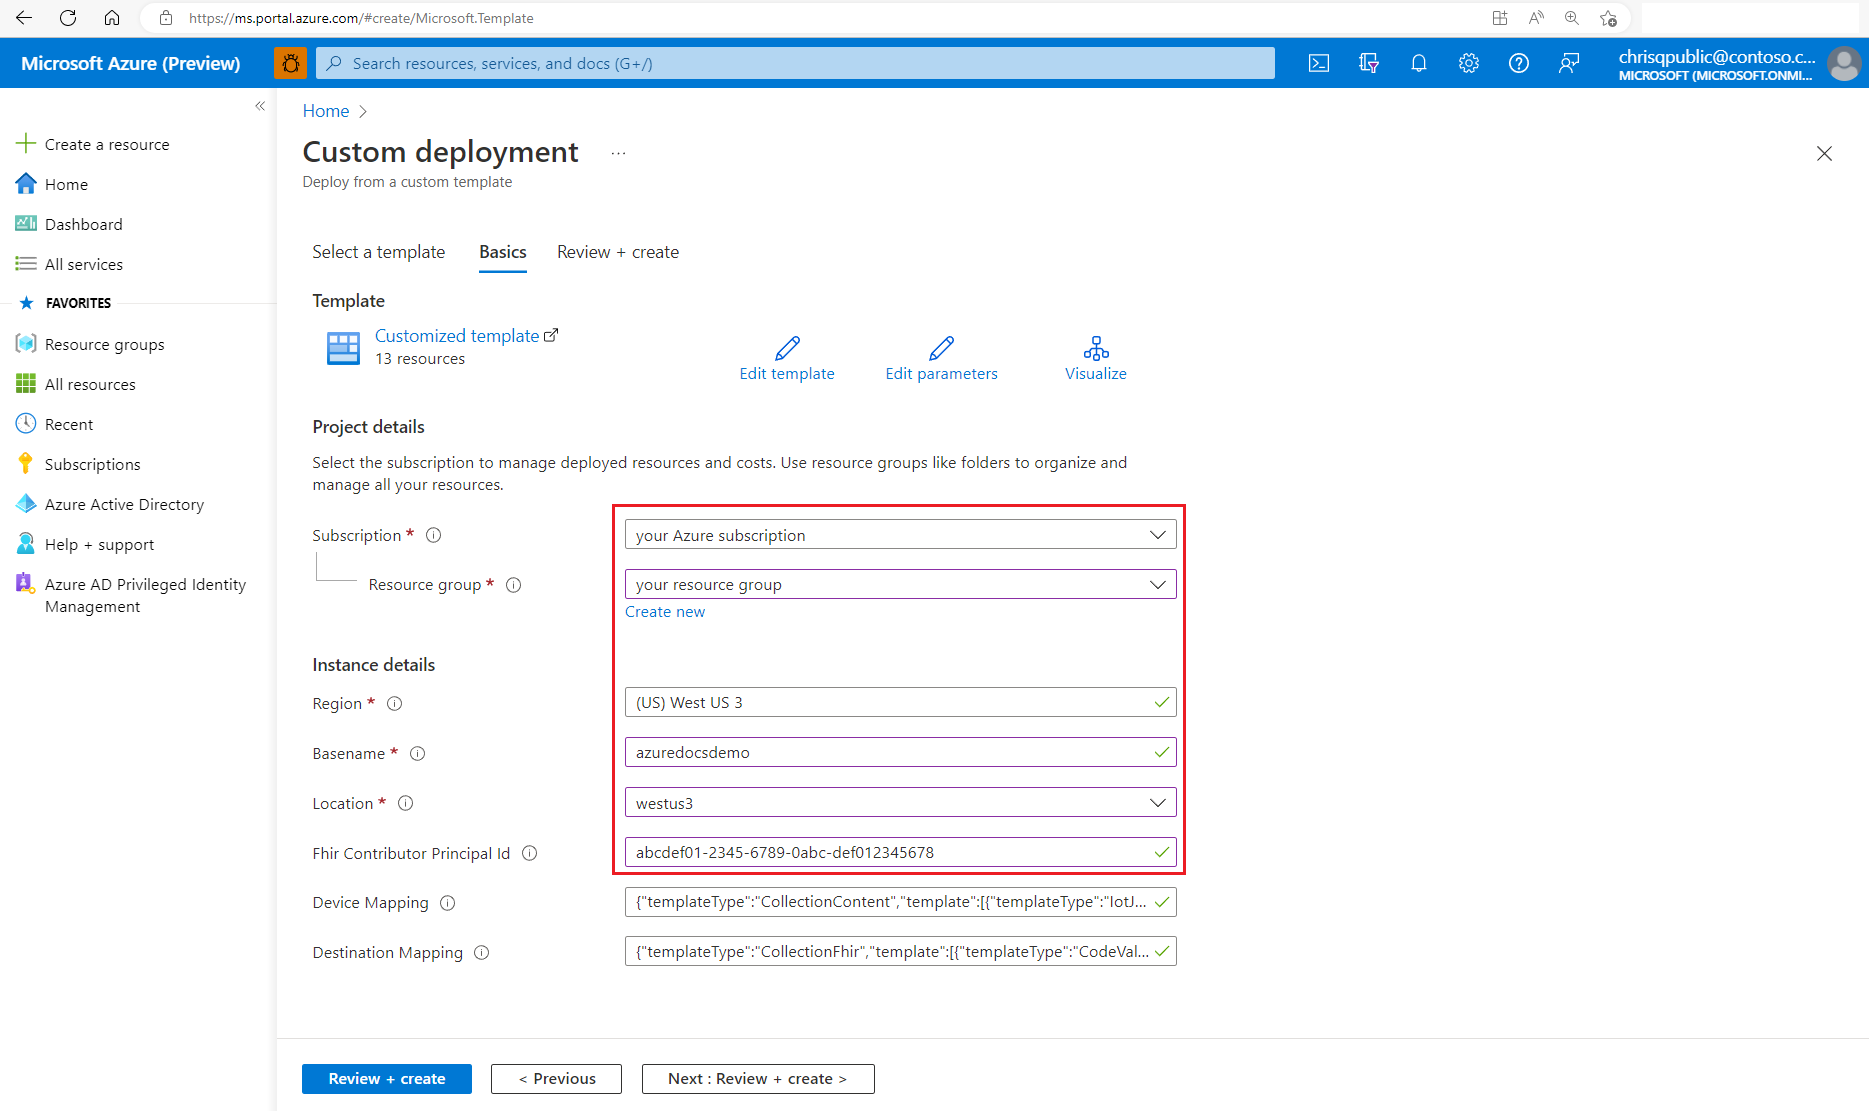
In the Azure portal, on the Basics tab of the Azure Quickstart Template, select or enter the following information for your deployment:
Subscription: The Azure subscription to use for the deployment.
Resource group: An existing resource group, or you can create a new resource group.
Region: The Azure region of the resource group used for the deployment. Region autofills by using the resource group region.
Basename: A value appended to the name of the Azure resources and services that are deployed. The examples in this tutorial use the basename azuredocsdemo. You can choose your own basename value.
Location: A supported Azure region for Azure Health Data Services (the value can be the same as or different from the region your resource group is in). For a list of Azure regions where Health Data Services is available, see Products available by regions.
Fhir Contributor Principal Id (optional): A Microsoft Entra user object ID to provide FHIR service read/write permissions.
You can use this account to give access to the FHIR service to view the FHIR Observations that are generated in this tutorial. We recommend that you use your own Microsoft Entra user object ID so you can access the messages in the FHIR service. If you choose not to use the Fhir Contributor Principal Id option, clear the text box.
To learn how to get a Microsoft Entra user object ID, see Find the user object ID. The user object ID used in this tutorial is only an example. If you use this option, use your own user object ID or the object ID of another person who you want to be able to access the FHIR service.
Device mapping: Leave the default values for this tutorial.
Destination mapping: Leave the default values for this tutorial.
To validate your configuration, select Review + create.

In Review + create, check the template validation status. If validation is successful, the template displays Validation Passed. If validation fails, fix the issue indicated in the error message, and then select Review + create again.

After a successful validation, to begin the deployment, select Create.

In a few minutes, the Azure portal displays the message that your deployment is completed.

Important
If you're going to allow access from multiple services to the event hub, it's required that each service has its own event hub consumer group.
Consumer groups enable multiple consuming applications to have a separate view of the event stream, and to read the stream independently at their own pace and with their own offsets. For more information, see Consumer groups.
Examples:
Two MedTech services accessing the same event hub.
A MedTech service and a storage writer application accessing the same event hub.
Review deployed resources and access permissions
When the deployment completes, the following resources and access roles are created:
Event Hubs namespace and event hub. In this deployment, the event hub is named devicedata.
Event hub consumer group. In this deployment, the consumer group is named $Default.
Azure Event Hubs Data Sender role. In this deployment, the sender role is named devicedatasender and can be used to provide access to the event hub using a shared access signature (SAS). To learn more about authorizing access using a SAS, see Authorizing access to Event Hubs resources using Shared Access Signatures. The Azure Event Hubs Data Sender role isn't used in this tutorial.
IoT hub with message routing configured to route device messages to the event hub.
User-assigned managed identity, which provides send access from the IoT hub to the event hub. The managed identity has the Azure Event Hubs Data Sender role in the Access control section (IAM) of the event hub.
Health Data Services workspace.
Health Data Services FHIR service.
Health Data Services MedTech service with the system-assigned managed identity enabled and granted the following access roles:
For the event hub, the Azure Event Hubs Data Receiver access role is assigned in the Access control section (IAM) of the event hub.
For the FHIR service, the FHIR Data Writer access role is assigned in the Access control section (IAM) of the FHIR service.
Conforming and valid MedTech service device and FHIR destination mappings. Resolution type is set to Create.
Important
In this tutorial, the ARM template configures the MedTech service to operate in Create mode. A Patient resource and a Device resource are created for each device that sends data to your FHIR service.
To learn about the MedTech service resolution types Create and Lookup, see Configure the Destination tab.
Create a device and send a test message
With your resources successfully deployed, you next connect to your IoT hub, create a device, and send a test message to the IoT hub. After you complete these steps, your MedTech service can:
- Read the IoT hub-routed test message from the event hub.
- Transform the test message into five FHIR Observations.
- Persist the FHIR Observations into your FHIR service.
You complete the steps by using Visual Studio Code with the Azure IoT Hub extension:
Open Visual Studio Code with Azure IoT Tools installed.
In Explorer, under Azure IoT Hub, select … and choose Select IoT Hub.
Select the Azure subscription where your IoT hub was provisioned.
Select your IoT hub. The name of your IoT hub is the basename you provided when you provisioned the resources prefixed with ih-. An example hub name is ih-azuredocsdemo.
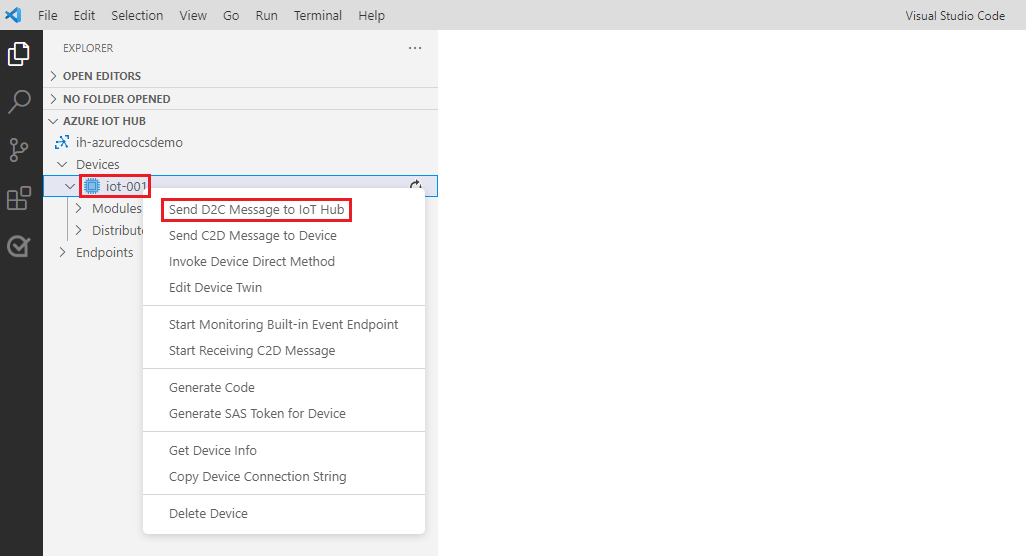
In Explorer, in Azure IoT Hub, select … and choose Create Device. An example device name is iot-001.
To send a test message from the device to your IoT hub, right-click the device and select Send D2C Message to IoT Hub.
Note
In this device-to-cloud (D2C) example, cloud is the IoT hub in the Azure IoT Hub that receives the device message. Azure IoT Hub supports two-way communications. To set up a cloud-to-device (C2D) scenario, select Send C2D Message to Device Cloud.
In Send D2C Messages, select or enter the following values:
Device(s) to send messages from: The name of the device you created.
Message(s) per device: 1.
Interval between two messages: 1 second(s).
Message: Plain Text.
Edit: Clear any existing text, and then copy/paste the following test message JSON.
Tip
You can use the Copy option in the right corner of the below test message, and then paste it within the Edit window.
{
    "PatientId": "patient1",
    "HeartRate": 78,
    "RespiratoryRate": 12,
    "HeartRateVariability": 30,
    "BodyTemperature": 98.6,
    "BloodPressure": {
       "Systolic": 120,
       "Diastolic": 80
    }
}
To begin the process of sending a test message to your IoT hub, select Send.
After you select Send, it might take up to five minutes for the FHIR resources to be available in the FHIR service.
Important
To avoid device spoofing in device-to-cloud (D2C) messages, Azure IoT Hub enriches all device messages with additional properties before routing them to the event hub. For example: SystemProperties:
iothub-connection-device-idand Properties:iothub-creation-time-utc. For more information, see Anti-spoofing properties and How to use IotJsonPathContent templates with the MedTech service device mapping.You do not want to send this example device message to your IoT hub as the enrichments will be duplicated by the IoT hub and cause an error with your MedTech service. This is only an example of how your device messages are enriched by the IoT hub.
Example:
patientIdExpressionis only required for MedTech services in the Create mode, however, if Lookup is being used, a Device resource with a matching Device Identifier must exist in the FHIR service. This example assumes your MedTech service is in a Create mode. The Resolution type for this tutorial set to Create. For more information on the Destination properties: Create and Lookup, see Configure the Destination tab.
Review metrics from the test message
After successfully sending a test message to your IoT hub, you can now review your MedTech service metrics. Review metrics to verify that your MedTech service received, grouped, transformed, and persisted the test message into your FHIR service. To learn more, see How to use the MedTech service monitoring and health checks tabs.
For your MedTech service metrics, you can see that your MedTech service completed the following steps for the test message:
- Number of Incoming Messages: Received the incoming test message from the event hub.
- Number of Normalized Messages: Created five normalized messages.
- Number of Measurements: Created five measurements.
- Number of FHIR resources: Created five FHIR resources that are persisted into your FHIR service.
View test data in the FHIR service
If you provided your own Microsoft Entra user object ID as the optional value for the Fhir Contributor Principal ID option in the deployment template, you can query for FHIR resources in your FHIR service. You can expect to see the following FHIR Observation resources in the FHIR service based on the test message that was sent to the IoT hub and processed by the MedTech service:
- HeartRate
- RespiratoryRate
- HeartRateVariability
- BodyTemperature
- BloodPressure
To learn how to get a Microsoft Entra access token and view FHIR resources in your FHIR service, see Access by using REST Client. You need to use the following values GET request to view the FHIR Observation resources created by the test message: {{fhirurl}}/Observation
Next steps
Choose a deployment method for the MedTech service
Overview of the MedTech service device data processing stages
Frequently asked questions about the MedTech service
Note
FHIR® is a registered trademark of HL7 and is used with the permission of HL7.


