Configure email notifications for alerts and attack paths
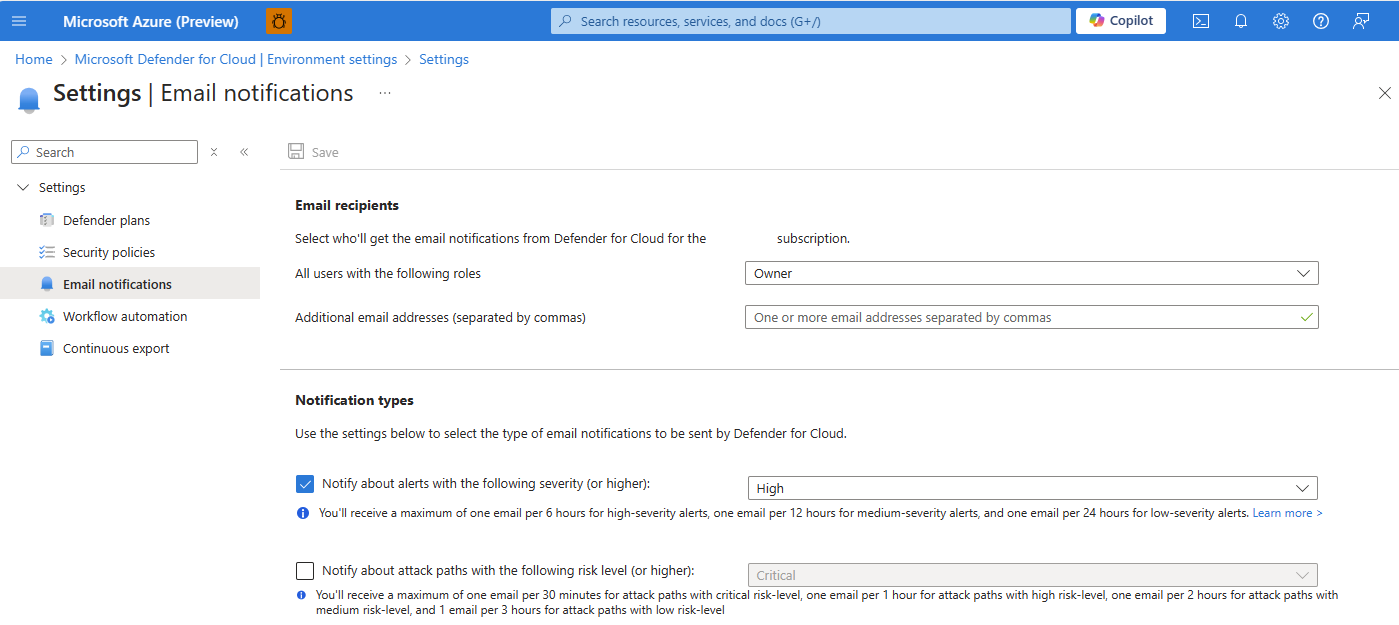
Microsoft Defender for Cloud allows you to configure email notifications for alerts and attack paths. Configuring email notifications allows for the delivery of timely notifications to the appropriate recipients. By modifying the email notification settings, preferences can be defined for the severity levels of alerts and the risk level of attack paths that trigger notifications. By default, subscription owners receive email notifications for high-severity alerts and attack paths.
Defender for Cloud's Email notifications settings page allows you to define preferences for notification emails including:
- who should be notified - Emails can be sent to select individuals or to anyone with a specified Azure role for a subscription.
- what they should be notified about - Modify the severity levels for which Defender for Cloud should send out notifications.
Email frequency
To avoid alert fatigue, Defender for Cloud limits the volume of outgoing emails. For each email address, Defender for Cloud sends:
| Alert type | Severity/Risk level | Email volume |
|---|---|---|
| Alert | High | Four emails per day |
| Alert | Medium | Two emails per day |
| Alert | Low | One email per day |
| Attack path | Critical | One email per 30 minutes |
| Attack path | High | One email per hour |
| Attack path | Medium | One email per two hours |
| Attack path | Low | One email per three hours |
Availability
Required roles and permissions: Security Admin, Subscription Owner or Contributor.
Customize the email notifications in the portal
You can send email notifications to individuals or to all users with specific Azure roles.
Sign in to the Azure portal.
Navigate to Microsoft Defender for Cloud > Environment settings.
Select the relevant subscription.
Select email notifications.
Define the recipients for your notifications with one or both of these options:
- From the dropdown list, select from the available roles.
- Enter specific email addresses separated by commas. There's no limit to the number of email addresses that you can enter.
Select the notification types:
- Notify about alerts with the following severity (or higher) and select a severity level.
- Notify about attack paths with the following risk level (or higher) and select a risk level.
Select Save.
Customize the email notifications with an API
You can also manage your email notifications through the supplied REST API. For full details, see the SecurityContacts API documentation.
This is an example request body for the PUT request when creating a security contact configuration:
URI: https://management.azure.com/subscriptions/<SubscriptionId>/providers/Microsoft.Security/securityContacts/default?api-version=2020-01-01-preview
{
    "properties": {
        "emails": "admin@contoso.com;admin2@contoso.com",
        "notificationsByRole": {
            "state": "On",
            "roles": ["AccountAdmin", "Owner"]
        },
        "alertNotifications": {
            "state": "On",
            "minimalSeverity": "Medium"
        },
        "phone": ""
    }
}
Related content
- Security alerts - a reference guide - Learn about the security alerts you might see in Microsoft Defender for Cloud's Threat Protection module.
- Manage and respond to security alerts in Microsoft Defender for Cloud - Learn how to manage and respond to security alerts.
- Identify and remediate attack paths.
- Investigating risk with security explorer/attack paths
- Workflow automation - Automate responses to alerts with custom notification logic.
