Manage requests for your data product in Databricks Marketplace
This article describes how to manage and monitor consumer requests for your data product in Databricks Marketplace. This article is intended for data providers.
There are two types of Databricks Marketplace listings:
- Listings that are instantly available and free of charge.
- Listings that require your approval because they involve a commercial transaction or require customization (such as a specific geography or demographic sample set, for example).
Manage instantly available listings
You don’t need to do anything to let a Databricks Marketplace consumer get access to the data you’ve shared in your instantly available listings.
To monitor the consumers (recipients, in Delta Sharing terminology) who are using your instantly available listings, you can use the Delta Sharing interfaces. As long as you know the name of the share, you can view all of the recipients who have accessed that share. See View the recipients who have permissions on a share.
You can also use Delta Sharing interfaces to revoke a consumer’s access to shared data. See Revoke recipient access to a share.
Manage requests that require your approval
To manage requests that require your approval, use the Consumer requests tab in the Provider console.
Permissions required: Marketplace admin role. To fulfill a request, you must have the CREATE RECIPIENT and USE RECIPIENT privileges. See Unity Catalog privileges and securable objects.
To manage a new request:
Log into your Azure Databricks workspace.
In the sidebar, click
 Marketplace.
On the upper-right corner of the Marketplace page, click Provider console.
The most recent new requests are listed on the Overview tab. To see all requests, go to the Consumer requests tab.
New requests are listed before All other requests, which includes those that are fulfilled, pending, or denied.
Client type can be Databricks (Databricks-to-Databricks sharing) or Open client (Databricks-to-external-platform using a credential file).
Click the Review button on the request row.
Review the requester details.
Select an action:
- Mark as pending if your communications with the consumer are still ongoing and any required commercial transactions are incomplete.
- Fulfill if your communication with the consumer and all transactions are complete and you are ready to share the data product. You must Select a share, and that share must already be created. See Create and manage shares for Delta Sharing. When you add a share and mark the request fulfilled:
- If the consumer is on a Unity Catalog-enabled Databricks workspace, they gain access to that share as a catalog in their Databricks workspace in near-real time.
- If the consumer is not on a Unity Catalog-enabled Databricks workspace, a credential file is generated and made available for them to download. See Access data products in Databricks Marketplace using external platforms.
- Deny if you will not share a data product with the consumer. Optionally, you can select a Reason for denial. Select Other to enter a free-form reason.
Click Update request.
To manage pending, fulfilled, or denied requests, scroll down to the All other requests list. You can view requester details and advance pending requests to another state. You cannot change the status of fulfilled or denied requests.
Monitor listing usage metrics using dashboards
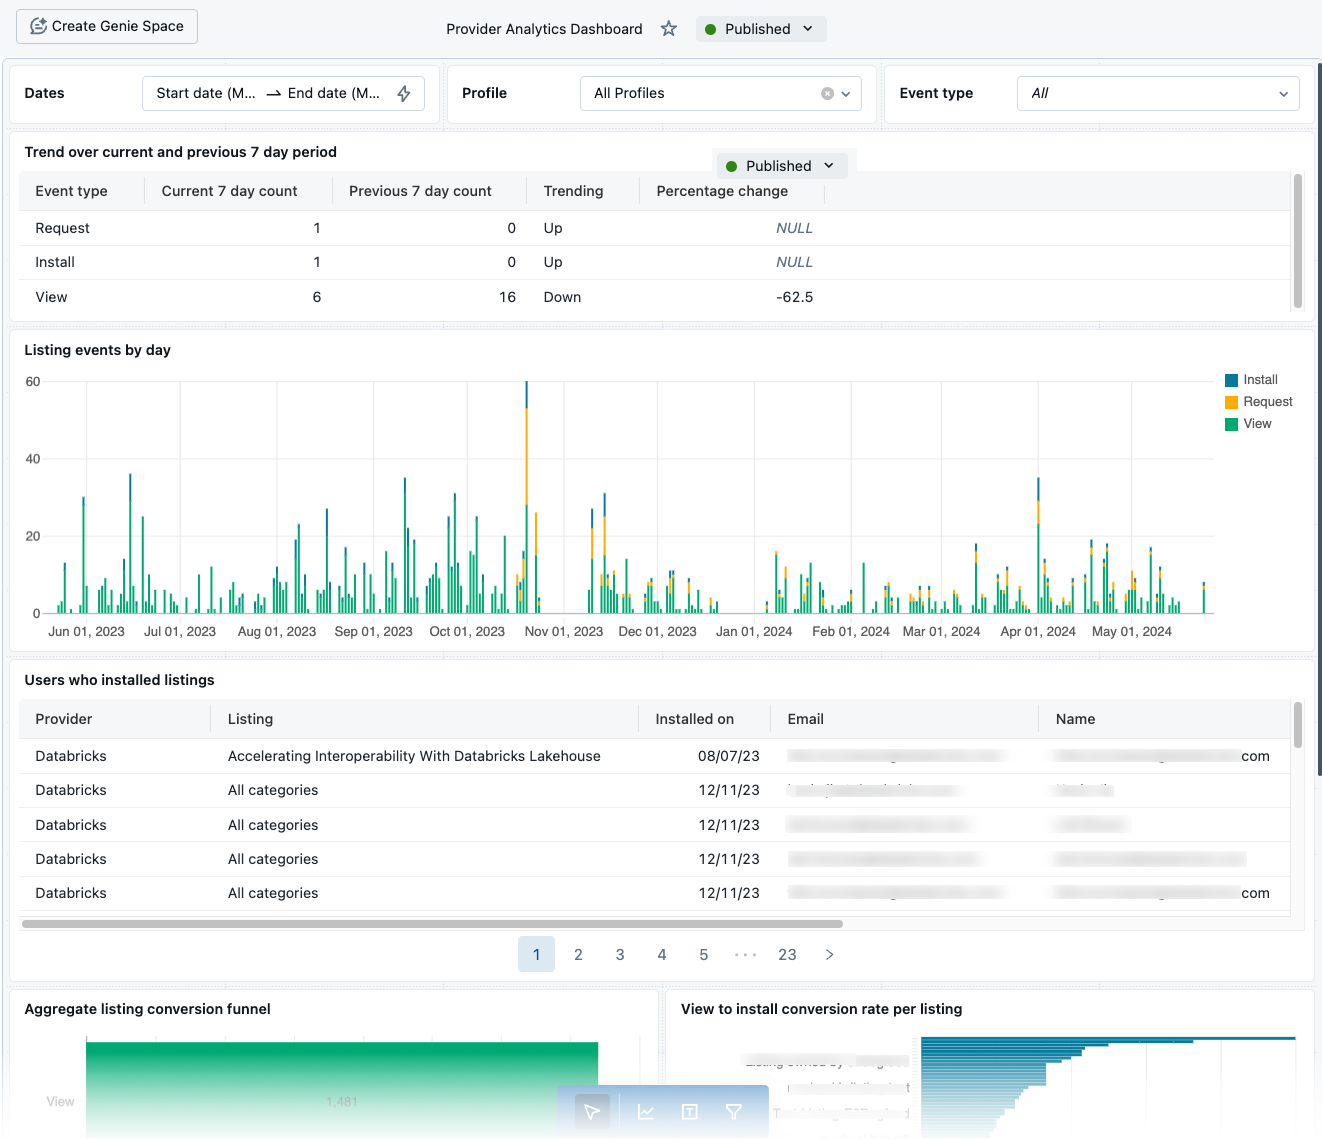
You can use the Provider Analytics Dashboard to monitor consumer usage metrics.

Standard widgets show:
- Listing events (views, requests, and installs) by day over a specified period.
- Seven-day over seven-day trends of views, requests, and installs.
- All listings installed over a specified period, with consumer email address and company.
- Conversions from view to request to install over a specified period
- Conversion rates by listing.
The dashboard pulls data from the Marketplace system tables. You must enable system tables for your workspace in order to use the dashboard. See Marketplace system tables reference.
Requirements
To view and work with the dashboard, you must have:
- The
USE SCHEMAprivilege on thesystem.marketplaceschema. - Access to a compute resource that supports dashboards (compute with standard or dedicated access mode, or a SQL warehouse).
Generate the dashboard in your workspace for the first time
To make the dashboard available in your workspace for the first time, you must open it from the Provider console. In addition to the requirements listed above, you must have the Marketplace admin role.
- In your Azure Databricks workspace, click
 Marketplace.
 - On the upper-right corner of the Marketplace page, click Provider console.
- Click the View Analytics button.
- Attach the dashboard to a compute resource that supports dashboards.
For more information about working with dashboards, see Dashboards.
Access the dashboard
Once the dashboard is available in your workspace, you can access it from the Provider console or the Dashboards page:
- To access the dashboard from the Provider console (see navigation in the previous section), click the View Analytics button.
- To access the dashboard on the Dashboards page, go to the sidebar in your workspace and click
 Dashboards. Search for and select Provider Analytics Dashboard.
Edit the dashboard
You can edit the dashboard as needed. However, Databricks can update the dashboard at any time, and might overwrite your changes. For that reason, Databricks recommends that you make a copy and edit the copy rather than edit the original.
Monitor listing usage metrics using system tables
If you have system tables enabled in your account, you can use the Marketplace system tables to analyze consumer activity on your listings. For more information, see Marketplace system tables reference.