List your data product in Databricks Marketplace
This article describes how to become a Databricks Marketplace provider and how to create a Databricks Marketplace listing for your data products.
Before you begin
To list products in the Databricks Marketplace, you must agree to provider policies, and your account and workspaces must meet certain requirements.
Policies:
To list data products on the Marketplace exchange, you must agree to the Marketplace provider policies.
Account and workspace requirements:
Databricks Marketplace uses Delta Sharing to manage secure sharing of data products. Delta Sharing, in turn, requires that your Databricks workspace is enabled for Unity Catalog. Your Azure Databricks account and workspaces must therefore meet the following requirements:
- Azure Databricks account on the Premium plan.
- An Azure Databricks workspace enabled for Unity Catalog. See Enable a workspace for Unity Catalog. You do not need to enable all of your workspaces for Unity Catalog. You can create one simply to manage Marketplace listings.
If you have workspaces that meet these criteria, your users will be able to view the Marketplace home page. Additional permissions are required to create and manage listings. These are enumerated in the sections that follow. If you don’t want your users to be able to view the Marketplace home page at all, contact your Azure Databricks account team.
Permission requirements:
To sign up as a private-exchange-only provider, you must be an Azure Databricks account admin. See Sign up to be a Databricks Marketplace provider.
Sign up to be a Databricks Marketplace provider
The way you sign up to be a Databricks Marketplace provider depends on whether you intend to create listings in the public marketplace or only through private exchanges. In private exchanges, only consumers who are members of the exchange can browse, view, and request access to a listing. See Create and manage private exchanges in Databricks Marketplace.
To be a private-exchange-only provider, you can sign up using the provider console. To create public listings, you apply through the Databricks Data Partner Program.
Apply to be a provider that can create public listings
Note
If your organization is already in the Databricks Partner Program and you’re interested in becoming a Marketplace provider, skip the following instructions and contact partnerops@databricks.com instead.
On the Databricks Data Partner Program page, click Apply Now.
On the next page, click Apply now.
Enter your email address and click Apply Now.
Fill out the application form.
Towards the bottom of the application form, you’re asked which Databricks Partner program interests you. Select Marketplace.
The Databricks Partner team will reach out to you to complete the application process. When you’re approved, the Provider console will become available in your Unity-Catalog-enabled Azure Databricks workspaces. To access the Provider console, a user must have the Marketplace admin role.
Sign up as a private exchange provider
To sign up as a private-exchange-only provider, use the Get started as a provider page in the provider console.
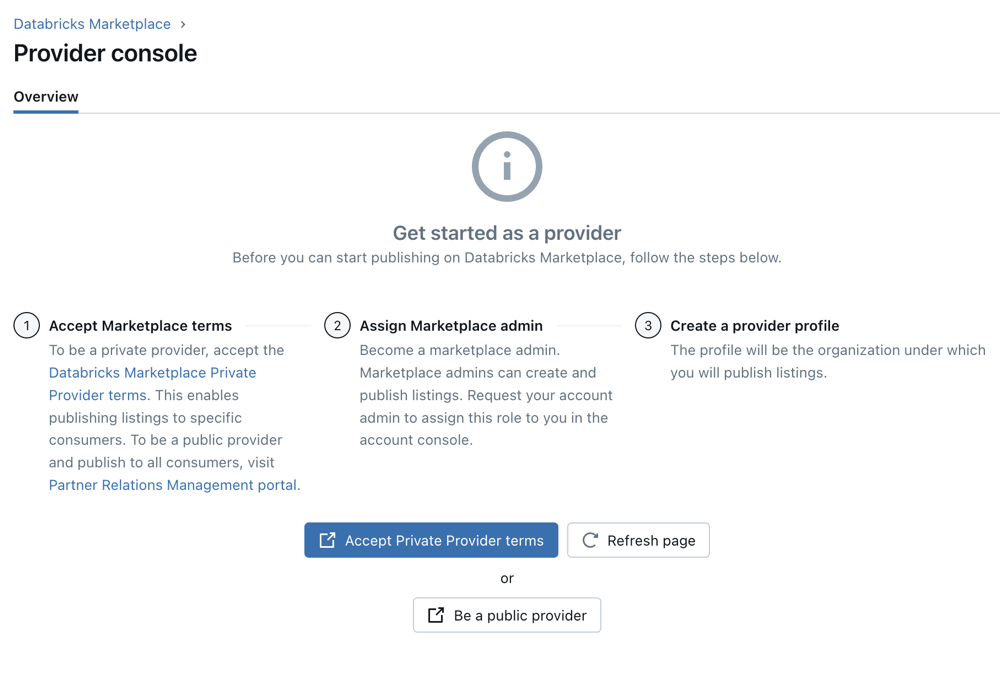
To sign up as a private exchange provider:
As an Azure Databricks account admin, sign in to your Azure Databricks workspace.
In the sidebar, click
 Marketplace.
On the upper-right corner of the Marketplace page, click Provider console.
If your account has not been onboarded as a provider, the provider console displays the Get started as a provider page, which walks you through the process of enabling your account as a private exchange provider.
Under Accept Marketplace terms, click the Databricks Marketplace Private Provider terms link to review the terms.
To accept the terms, click the Accept Private Provider terms button.
This takes you to the Azure Databricks account console in a new browser tab and opens the Settings > Feature enablement tab. You might need to log to the account console if you aren’t logged in already.
Note
If you have multiple Azure Databricks accounts, you should confirm that you are logging into the account that contains the workspace in which you are accessing the provider console.
On the Feature enablement tab, enable the Marketplace Private Exchange Provider option.
Return to the Provider console in the workspace and click Refresh page. Do not use your browser’s refresh page functionality.
After a few minutes, the Assign Marketplace admin button appears. Click it to open your user page in the account console. On the Roles tab, enable Marketplace admin.
You can choose to assign the Marketplace admin role to another user or users. If you do, they can continue the process from this point. If you assign the role to yourself, you can continue the process.
Return to the Provider console in the workspace and click Refresh page. Do not use your browser’s refresh page functionality.
After a few minutes, the Create provider profile button appears. Click it to open the Create Profile page.
Note
It might take a few minutes for the system to finish assigning the Marketplace admin role. If you proceed to create a provider profile and see an error indicating that you don’t have the Marketplace admin role, wait a few more minutes, refresh the page, and retry.
To create your provider profile, follow the instructions in Create your Marketplace provider profile, starting at step 5.
Create your first private exchange. See Create and manage private exchanges in Databricks Marketplace.
Assign the Marketplace admin role
If you signed up as a private exchange provider, you performed this task as part of the sign-up process. You can skip the instructions in this section, unless you want to enable other users in your Azure Databricks account as Marketplace admins.
Once you’ve been approved as a Marketplace provider, you must grant at least one user the Marketplace admin role. This role is required for accessing the Marketplace Provider console and for creating and managing your Marketplace provider profile and listings. An Azure Databricks account admin can grant the role.
- As an account admin, log in to the account console.
- Click
 User management.
 - Find and click the username.
- On the Roles tab, turn on Marketplace admin.
Create your Marketplace provider profile
Your provider profile gives you the opportunity to tell prospective consumers who you are and to group your data products under a single brand or identity. Typically, a data provider has one profile but can list multiple data products. If you want more than one profile, reach out to your Azure Databricks account team.
If you are a public provider, you can create your profile after your provider application has been approved. If you are a private-exchange-only provider, you create your profile as the final step of the signup process, starting at step 5 in the procedure provided here.
Permission required: Marketplace admin role
To create a profile:
- Log in to the Azure Databricks workspace you will use for creating shares and listings.
- In the sidebar, click Marketplace.
- On the upper-right corner of the Marketplace page, click Provider console.
- On the Provider console page Profiles tab, click Create profile.
- Enter the following information. All fields are required:
- Provider name: Use a name that consumers will recognize. Consumers can filter listings by provider name.
- Logo: drag and drop or browse to an image file for the logo you want to use in your listing.
- Description: Describe your organization clearly and accurately. Include details such as industries you typically serve or represent and the types of data assets that you typically list. Consumers can see this description when they view your profile and on all of your listings.
- Organization website: Link to your organization’s website. Consumers can follow this link to learn more about your organization. This link appears on all of your listings.
- Business email: Enter an email address that Databricks can use to send you notifications. Consumers do not see this information.
- Support email: Enter an email address that consumers can use to request support. This link appears on all of your listings.
- Terms of service link: This link appears on all of your listings. You can override this link by entering a different one at the listing level.
- Privacy policy: This link appears on all of your listings. You can override this link by entering a different one at the listing level.
- Save the profile.
If any of this information changes while you are a Marketplace provider, update your profile. Your profile must be accurate and kept up to date.
Create shares
After you have an Azure Databricks account enabled for Delta Sharing and an Azure Databricks workspace enabled for Unity Catalog, you can create the shares that you will use to share your data in the Marketplace.
A share is a Delta Sharing object. It’s a collection of tables, views, volumes, and AI models that are shareable and securable as a unit. Tables can be shared with any consumer. Volumes, AI models, and notebooks can only be shared with consumers who have access to a Azure Databricks workspace that is enabled for Unity Catalog.
Note
To list a data product that is free and instantly available to consumers, you must include a share when you create the listing. Listings that require you to approve a consumer request, on the other hand, don’t require that you include a share in the listing. You can create the share later, after any business agreements are complete and you’ve approved the consumer’s request. If that’s what you want to do, skip ahead to Create listings.
Add data tables, views, or volumes to your Unity Catalog metastore.
To learn how to create these data assets in Unity Catalog, see:
Create a share and add these data assets to the share.
To learn how to create and update shares, see Create and manage shares for Delta Sharing.
Permissions required:
- To create a share, you must be a metastore admin or user with the
CREATE SHAREprivilege for the Unity Catalog metastore where the data you want to share is registered. - To add a table, volume, or view to a share, you must be the share owner, have the
USE SCHEMAprivilege on the schema that contains the data asset, and have theSELECTprivilege on the data asset. You must keep theSELECTprivilege in order for the asset to continue to be shared. If you lose it, the recipient cannot access the asset through the share. Databricks, therefore, recommends that you use a group as the share owner.
For more details about requirements for sharing tables, volumes, and views, including compute and data type requirements, see Create and manage shares for Delta Sharing.
- To create a share, you must be a metastore admin or user with the
After your share is created, you can create or update a Marketplace listing that references it.
Notebook example: Sample notebook
In addition to tables, volumes, and views, Databricks highly recommends that you also share Azure Databricks notebooks. A notebook is a great way to demonstrate example use cases and visualize table properties. Your listing can include sample notebook previews that consumers can import into their workspaces.
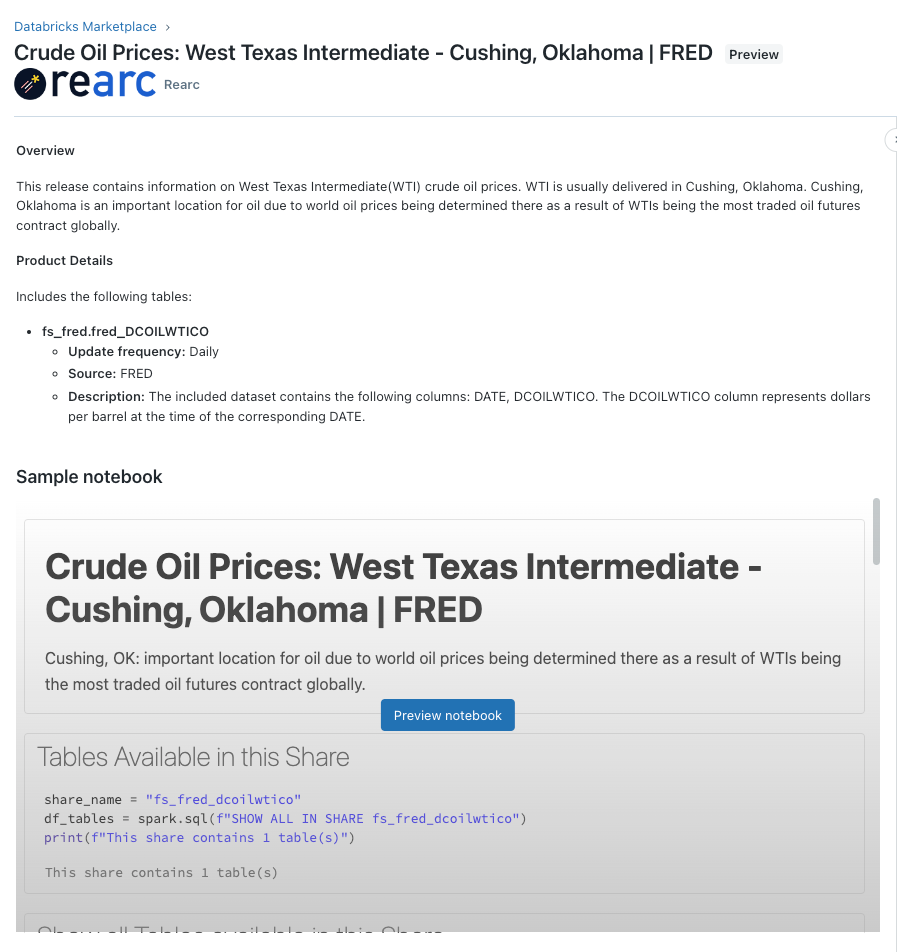
For more information about creating notebooks, see Introduction to Databricks notebooks. If you need help creating an effective sample notebook, contact dataproviders@databricks.com.
Note
The Sample notebooks display and preview in the listings UI does not work in Chrome Incognito mode.
The following example shows how to create an effective sample notebook. It includes guidance for creating effective sample notebooks for your listings.
Marketplace starter notebook for data providers
Create listings
Marketplace listings enable consumers to browse, select, and access your data products. All dataset listings are automatically shareable with both consumers on Azure Databricks workspaces and consumers on third-party platforms like Power BI, pandas, and Apache Spark.
Note
Some data assets, like Databricks volumes, can only be shared with consumers who have access to a Unity Catalog-enabled Databricks workspace. Tables, however, are shareable with all consumers. If you include both tables and volumes in a share, consumers who don’t have access to a Unity Catalog-enabled workspace will only be able to access the tabular data.
Permissions required: Marketplace admin role. If you are creating and managing personalized listings (those that require provider approval before they’re fulfilled), you must also have the CREATE RECIPIENT and USE RECIPIENT privileges. See Unity Catalog privileges and securable objects.
To create a listing:
Log into your Azure Databricks workspace.
In the sidebar, click
Marketplace.On the upper-right corner of the Marketplace page, click Provider console.
On the Provider console page Listings tab, click Create listing.
On the New listing page, enter your listing information.
For instructions, see Listing fields and options.
You can save a draft and view a preview before you publish. When you click Publish, the listing appears in the Marketplace immediately.
Listing fields and options
This section describes each New listing page field and option. It also provides recommendations for creating an effective listing.
Listing name: Each listing should have a unique name that helps consumers understand what it offers.
Recommendations:
- Fewer than 100 characters.
- Title case (capitalize primary words).
Example
US Census 2022
Short description: A short, informative explanation of the dataset that expands on the listing name. This field appears in listing tiles and consumer search results.
Recommendations:
- Fewer than 100 characters. Cannot exceed 160 characters.
- Sentence case (capitalize only the first word an any proper nouns or acronyms).
Example
General information about US population count and demography in 2020
Provider profile: Your organization or company name. Select from the drop-down menu. Your profile is created by Azure Databricks as part of the partner organization approval process.
Terms of service: A URL that links to your terms of service for the appropriate use of the shared data assets.
Terms of service must be publicly accessible and require no login.
Public Marketplace: All consumers can browse and view the listing in the public Databricks Marketplace.
Private exchange: Only consumers who are members of a private exchange, created by you or another marketplace admin, can browse, view, and request the listing. See Create and manage private exchanges in Databricks Marketplace.
You must select at least one private exchange from the drop-down list.
Data is available instantly: Select this option to let consumers gain access to the shared data directly from the Marketplace, without requiring your approval (but requiring acceptance of terms of service). Choose a share from the drop-down menu. This option is typically used for sample and public datasets.
If you have not yet created the share that you want to include, click + Create new share at the bottom of the drop-down menu. You are taken to the Create a new share dialog box.
If a share that you select or create here contains no data or assets, a message appears with an Add data button. Click it to go to Catalog Explorer, where you can add tables to the share.
For more information about creating shares and adding tables to shares, including required permissions, see Create and manage shares for Delta Sharing.
Require approval of consumer requests: Select this option to require your approval before a consumer can access the shared data. Use this option if you require a business agreement before you make the data product available to consumers. You must manage the business agreement with consumers outside of Databricks Marketplace. You can initiate communications using the consumer email address.
You can view and handle consumer requests on the Provider Console > Consumer requests tab. See Manage requests for your data product in Databricks Marketplace.
Categories: Select up to five categories that consumers can use to filter listings. Categories also appear as tags on listing tiles and detail pages.
Add attribute: Attributes are optional. They include fields such as geographic coverage, update frequency, time range, data source, and dataset size. Adding attributes helps consumers understand more about your data product. Select as many attributes as you like.
Description: The detailed description of your data should include a summary of the data and assets being offered in the listing.
Basic rich text formatting is supported (that is, bold, italics, bullets, and numbered lists), using Markdown syntax. To preview your content, use the buttons at the far right of the Description field toolbar.
Recommendations:
- Include benefits and use cases.
- Provide brief guidance about how to use the data and sample use cases.
- Include sample datasets and field names.
- Specify schemas, tables, and columns.
- Use consistent punctuation and syntax.
- Add an extra line break between paragraphs.
- Check your spelling and grammar.
- Don’t repeat the attributes that you defined under Add Attribute.
Example
Overview:
The US Census of Population and Dwellings is the official count of people and houses in the US in 2020. It provides a social and economic snapshot. The 2020 Census, held on March 6, 2021, is the 23th census.
Use cases:
Group customers based on demographic variables like age and gender.
Customize product offerings to specific consumer groups.
Information included in this dataset:
- Population estimates
- Demographic components (births, deaths, migration)
- This data can be sorted by characteristics such as age, sex, and race, as well as by national, state, and county location
Sample notebook: Databricks highly recommends that you share sample notebooks to demonstrate how best to use the data. Add up to ten notebooks. You must save the listing and return to it in order to upload sample notebooks.
For more information about creating notebooks, see Notebook example: Sample notebook and Introduction to Databricks notebooks.
Documentation: A URL that links to documentation that can help consumers use or understand your data set (for example, a dataset dictionary).
Privacy policy: A URL that links to your privacy policy.
The privacy policy must be publicly accessible and require no login.
Analyze consumer activity using system tables (Public Preview) and dashboards
If you have system tables enabled in your account, you can use the Marketplace system tables to analyze consumer activity on your listings. For more information, see Marketplace system tables reference.
You can also use the Provider Analytics Dashboard to monitor listing views, requests, and installs. The dashboard pulls data from the system tables. See Monitor listing usage metrics using dashboards.
Resource quotas
Unity Catalog enforces resource quotas on all securable objects, including Marketplace listings per metastore and providers per account. These quotas are listed in Resource limits. If you expect to exceed these resource limits, contact your Azure Databricks account team.
You can monitor your quota usage using the Unity Catalog resource quotas APIs. See Monitor your usage of Unity Catalog resource quotas.