Tutorial: Improved exports experience - Preview
This tutorial helps you create automatic exports using the improved exports experience that can be enabled from Cost Management labs by selecting Exports (preview) button. The improved Exports experience is designed to streamline your FinOps practice by automating the export of other cost-impacting datasets. The updated exports are optimized to handle large datasets while enhancing the user experience.
Review Azure updates to see when the feature becomes available generally available.
Improved functionality
The improved exports feature supports new datasets including price sheets, reservation recommendations, reservation details, and reservation transactions. Also, you can download cost and usage details using the open-source FinOps Open Cost and Usage Specification FOCUS format. It combines actual and amortized costs and reduces data processing times and storage and compute costs. FinOps datasets are often large and challenging to manage. Exports improve file manageability, reduce download latency, and help save on storage and network charges with the following functionality:
- File partitioning, which breaks the file into manageable smaller chunks.
- File overwrite, which replaces the previous day's file with an updated file each day in daily export.
The exports feature has an updated user interface, which helps you to easily create multiple exports for various cost management datasets to Azure storage using a single, simplified create experience. Exports let you choose the latest or any of the earlier dataset schema versions when you create a new export. Supporting multiple versions ensures that the data processing layers that you built on for existing datasets are reused while you adopt the latest API functionality. You can selectively export historical data by rerunning an existing export job for a historical period. So, you don't have to create a new one-time export for a specific date range. You can enhance security and compliance by configuring exports to storage accounts behind a firewall. The Azure Storage firewall provides access control for the public endpoint of the storage account.
Prerequisites
Data export is available for various Azure account types, including Enterprise Agreement (EA) and Microsoft Customer Agreement (MCA) customers. To view the full list of supported account types, see Understand Cost Management data. The following Azure permissions, or scopes, are supported per subscription for data export by user and group. For more information about scopes, see Understand and work with scopes.
- Owner - Can create, modify, or delete scheduled exports for a subscription.
- Contributor - Can create, modify, or delete their own scheduled exports. Can modify the name of scheduled exports created by others.
- Reader - Can schedule exports that they have permission to.
- For more information about scopes, including access needed to configure exports for Enterprise Agreement and Microsoft Customer agreement scopes, see Understand and work with scopes.
For Azure Storage accounts:
Write permissions are required to change the configured storage account, independent of permissions on the export.
Your Azure storage account must be configured for blob or file storage.
Don't configure exports to a storage container that is configured as a destination in an object replication rule.
To export to storage accounts with firewall rules, you need additional privileges on the storage account. These privileges are only required during export creation or modification:
Owner role on the storage account or
A custom role that includes:
Microsoft.Authorization/roleAssignments/writeMicrosoft.Authorization/permissions/read
When you configure the firewall, ensure that Allow trusted Azure service access is enabled on the storage account. If you want to use the Exports REST API to write to a storage account behind a firewall, use API version 2023-08-01 or later. All newer API versions continue to support exports behind firewalls.
A system-assigned managed identity is created for a new export if the user has
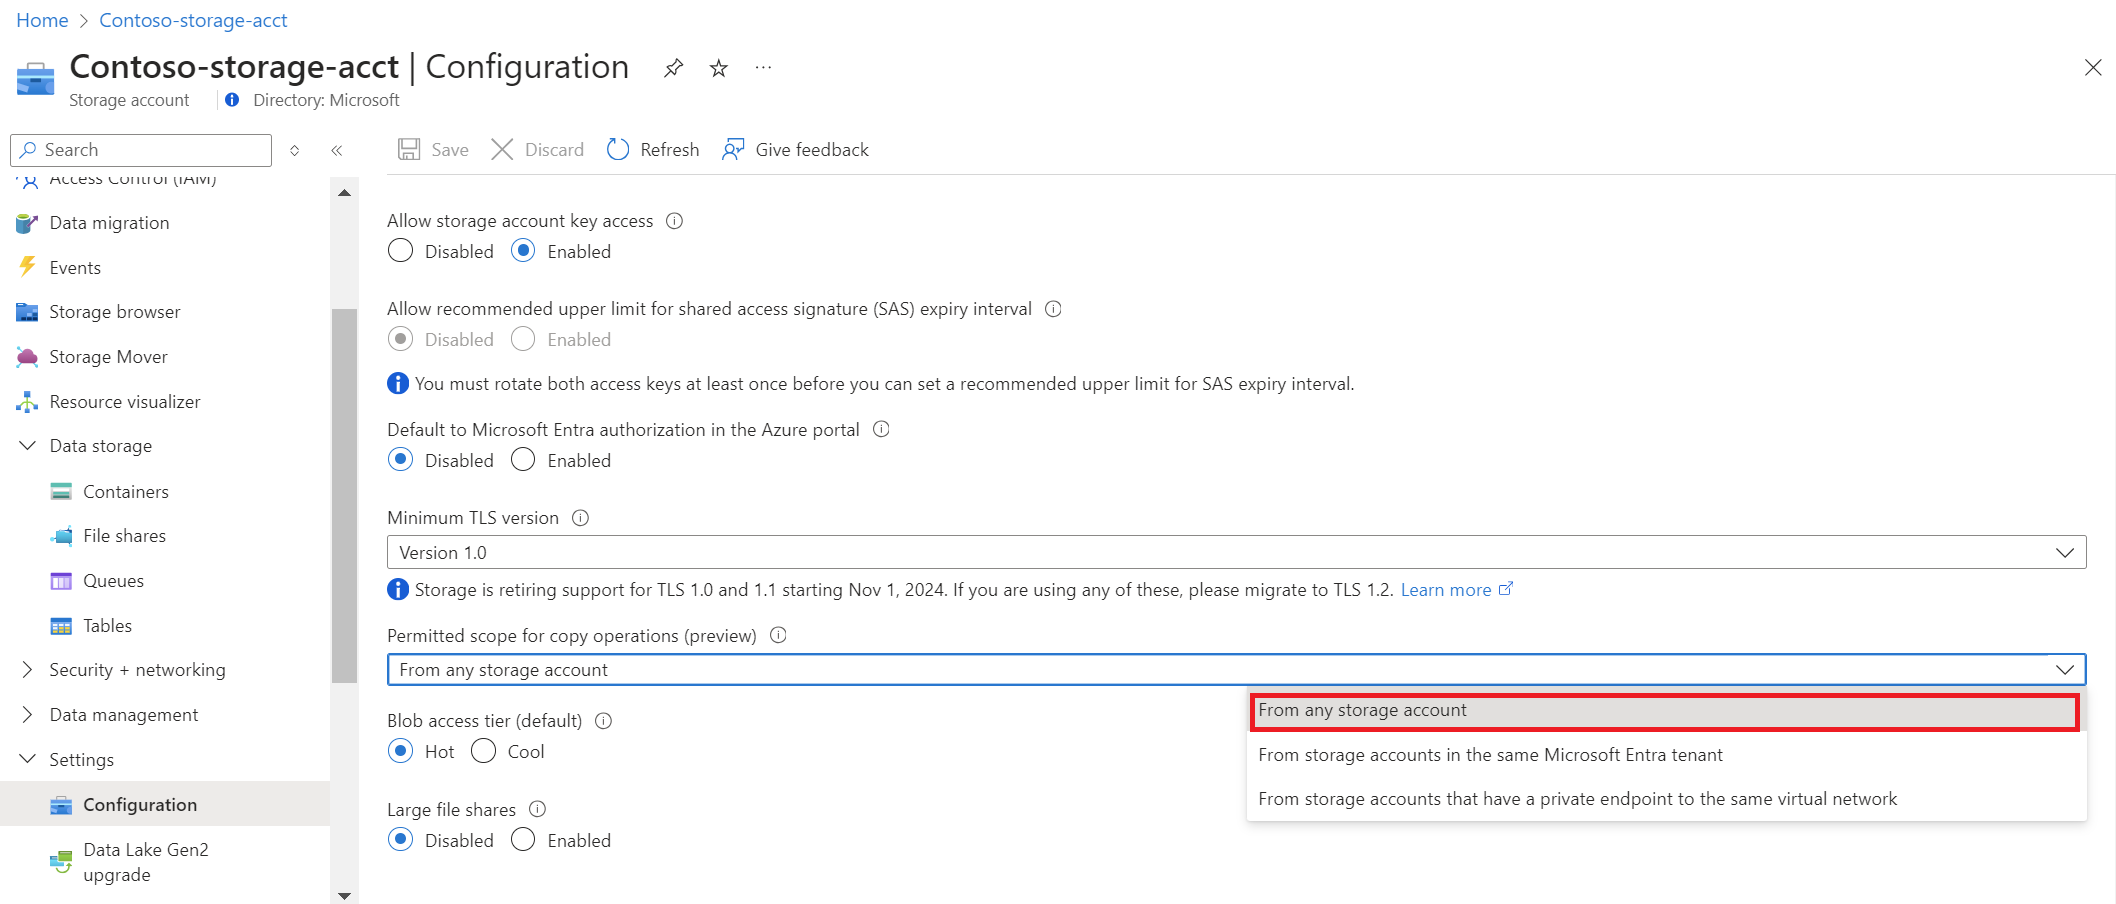
Microsoft.Authorization/roleAssignments/writepermissions on the storage account. This setup ensures that the export will continue to work if you enable a firewall in the future. After the export is created or updated, the user no longer needs the Owner role for routine operations.The storage account configuration must have the Permitted scope for copy operations (preview) option set to From any storage account.
If you have a new subscription, you can't immediately use Cost Management features. It might take up to 48 hours before you can use all Cost Management features.
Enable the new exports experience from Cost Management labs by selecting Exports (preview). For more information about how to enable Exports (preview), see Explore preview features. The preview feature is being deployed progressively.
Create exports
You can create multiple exports of various data types using the following steps.
Choose a scope and navigate to Exports
- Sign in to the Azure portal at https://portal.azure.com.
- Search for Cost Management.
- Select a billing scope.
- In the left navigation menu, select Exports.
Note
- You can create exports on subscription, resource group, management group, department, and enrollment scopes. For more information about scopes, see Understand and work with scopes.
- When you're signed in as a partner at the billing account scope or on a customer's tenant, you can export data to an Azure Storage account that's linked to your partner storage account. However, you must have an active subscription in your CSP tenant.
Create new exports
On the Exports page, at the top of the page, select + Create.
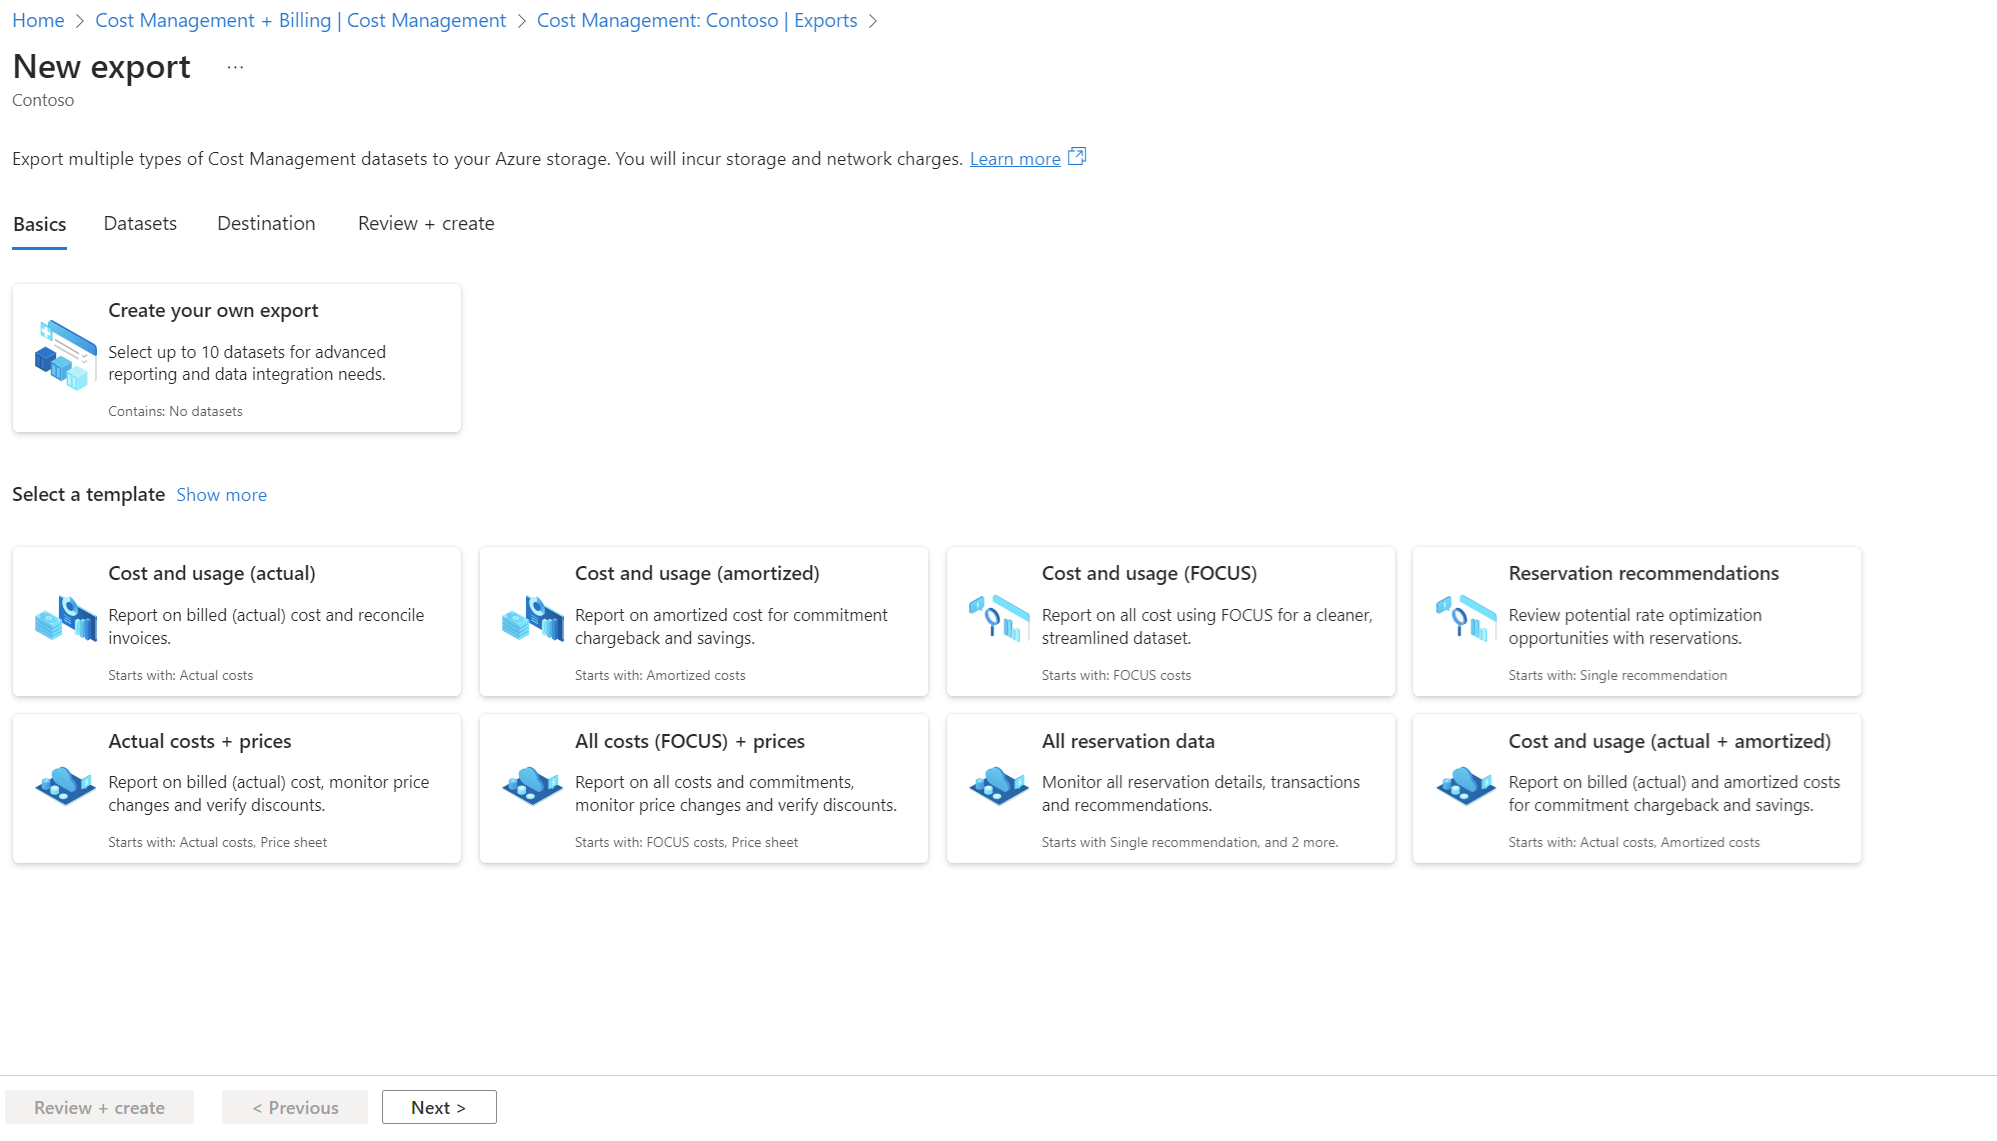
Select the export template
On the Basics tab, select a template that meets your scenario and then select Next.
Note: A template simplifies export creation by preselecting a set of commonly used datasets and their configurations.Once you select a template, you see the Datasets tab where you can customize your export name by entering a common Export prefix, edit the preselected configuration, and add or remove exports from the list.
You can change the template and discard your export configurations by navigating back to the Basics tab and selecting a new template.
Optionally add more exports
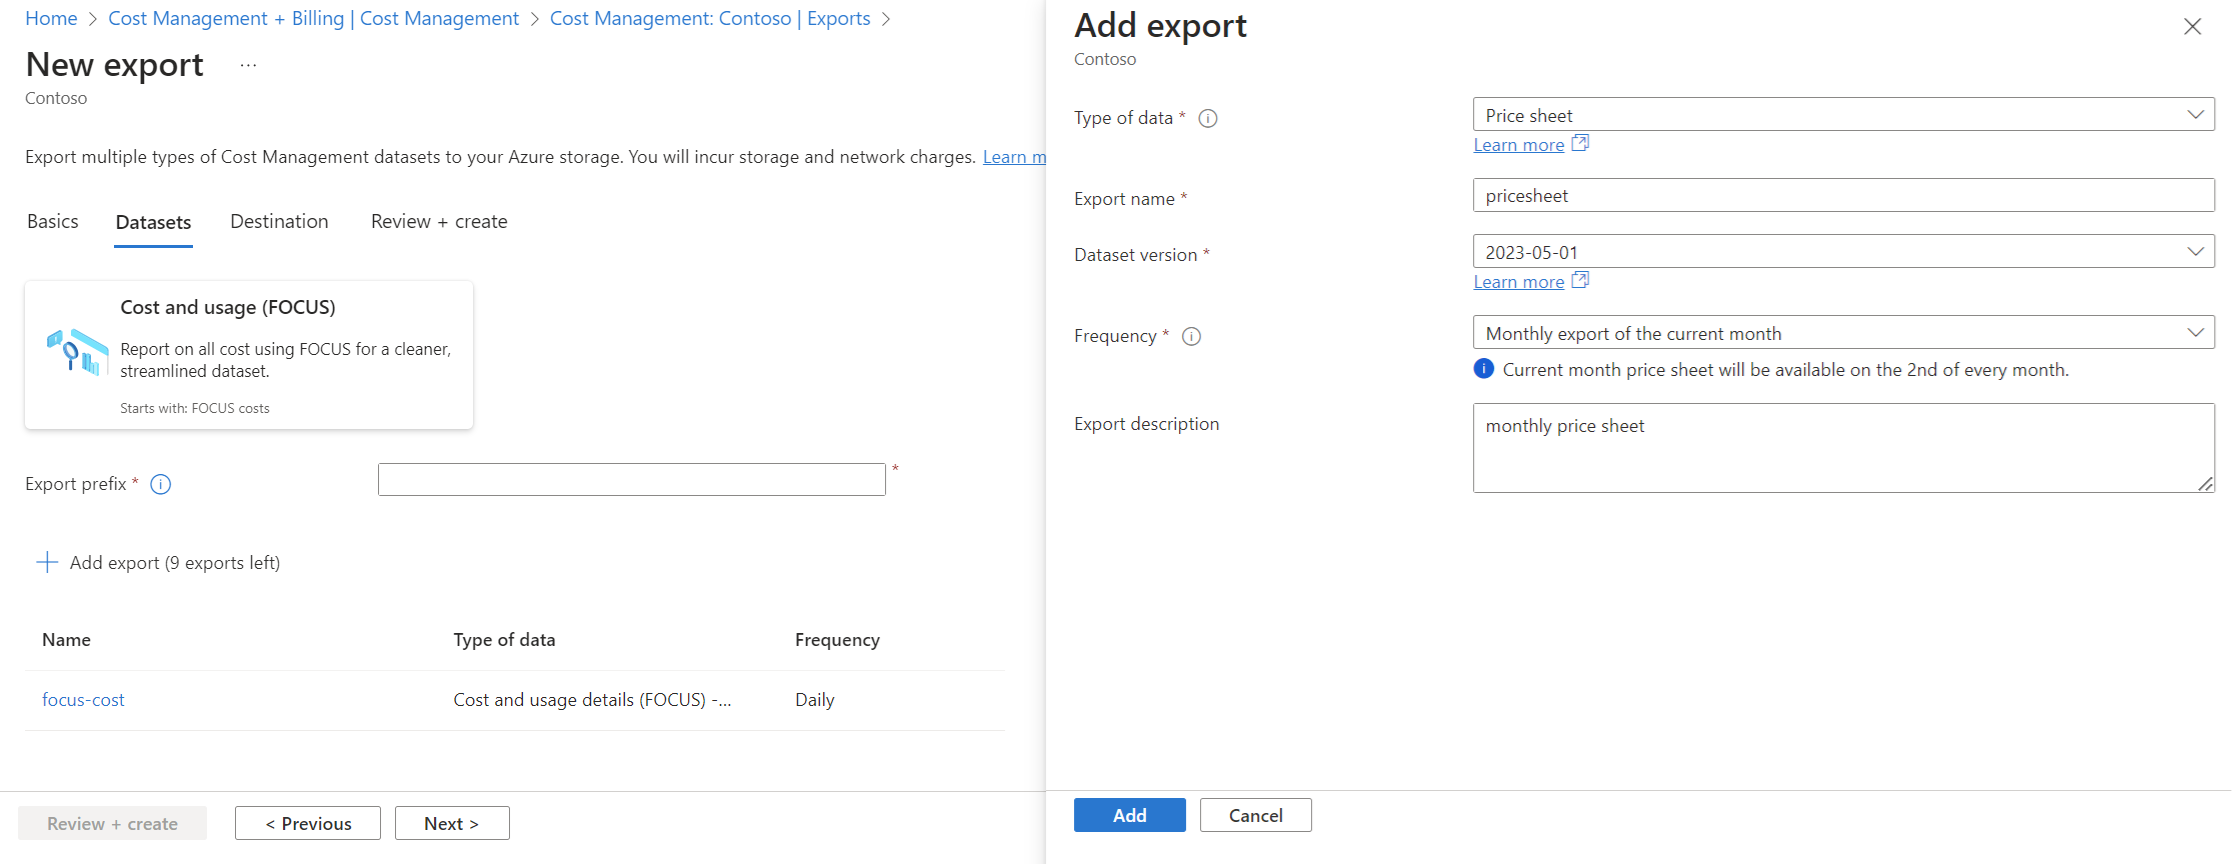
- On the Datasets tab, you can add another export by selecting + Add export.
- Select the Type of data, the Dataset version, and enter an Export name. Optionally, you can enter an Export description.
- For Type of data, when you select Reservation recommendations, select values for the other fields that appear:
- Reservation scope
- Resource type
- Look back period
- Depending on the Type of data and Frequency that you select, you might need to specify more fields to define the date range in UTC format.
- Select Add to see the export listed on the Datasets tab.
- You can create up to 10 exports when you select + Add new exports.
- Select Next when you're ready to define the destination.
Define the export destination
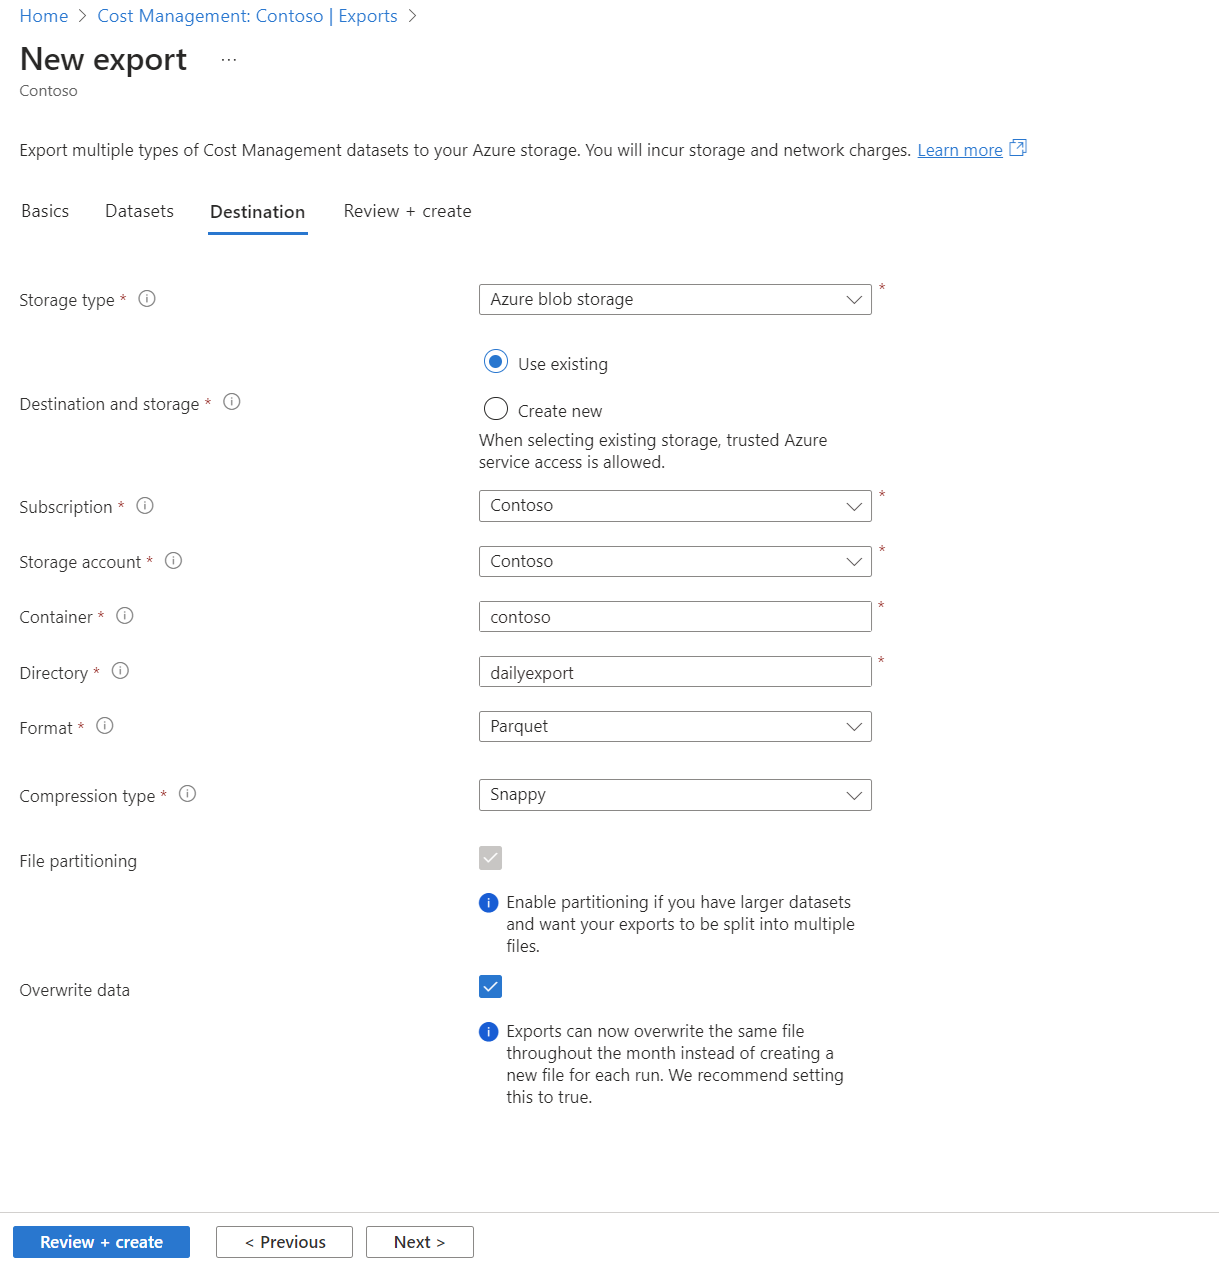
- On the Destination tab, select the Storage type. The default is Azure blob storage.
- Specify your Azure storage account subscription. Choose an existing resource group or create a new one.
- Select the Storage account name or create a new one.
- If you create a new storage account, choose an Azure region.
- Specify the storage container and directory path for the export file.
- Choose the Format as CSV or Parquet.
- Choose the Compression type as None, Gzip for CSV file format, or Snappy for the parquet file format.
- File partitioning is enabled by default. It splits large files into smaller ones and can't be disabled.
- Overwrite data is enabled by default. For daily exports, it replaces the previous day's file with an updated file.
- Select Next to move to the Review + create tab.
Review and create
Review your export configuration and make any necessary changes. When done, select Review + create to complete the process.
Manage exports
You can view and manage your exports by navigating to the Exports page where a summary of details for each export appears, including:
- Type of data
- Schedule status
- Data version
- Last run time
- Frequency
- Storage account
- Estimated next run date and time
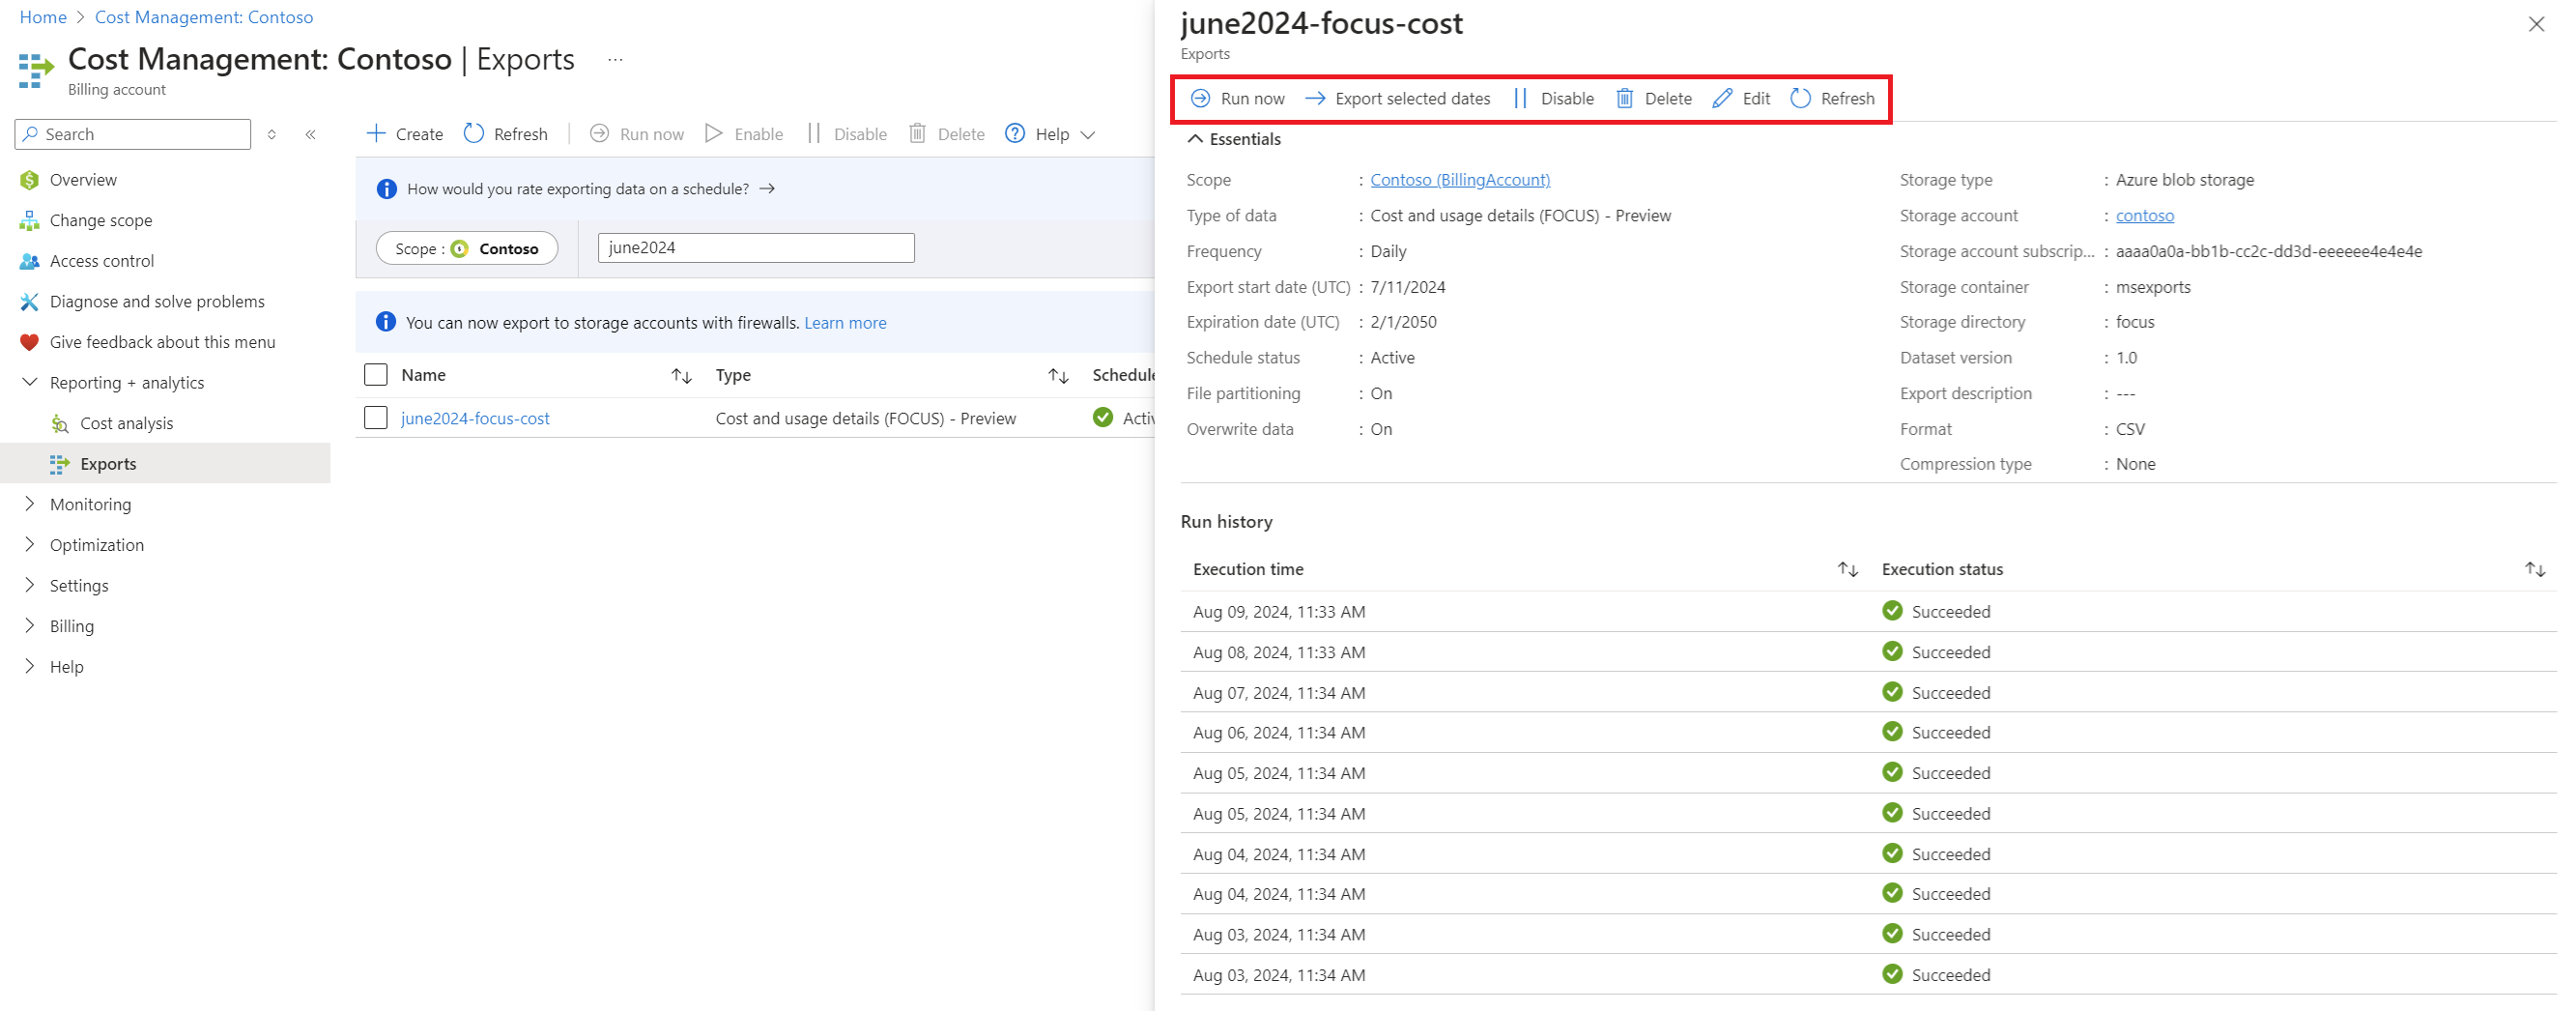
You can perform the following actions by selecting the ellipsis (…) on the right side of the page or by selecting the individual export.
Run now - Queues an unplanned export to run at the next available moment, regardless of the scheduled run time.
Export selected dates - Reruns an export for a historical date range instead of creating a new one-time export. You can extract up to 13 months of historical data in three-month chunks. This option isn't available for price sheets.
Disable - Temporarily suspends the export job.
Delete - Permanently removes the export.
Refresh - Updates the Run history.
Schedule frequency
All types of data support various schedule frequency options, as described in the following table.
| Type of data | Frequency options |
|---|---|
| Price sheet | • One-time export • Current month • Daily export of the current month |
| Reservation details | • One-time export • Daily export of month-to-date costs • Monthly export of last month's costs |
| Reservation recommendations | • One-time export • Daily export |
| Reservation transactions | • One-time export • Daily export • Monthly export of last month's data |
| Cost and usage details (actual) Cost and usage details (amortized) Cost and usage details (FOCUS) Cost and usage details (usage only) |
• One-time export • Daily export of month-to-date costs • Monthly export of last month's costs • Monthly export of last billing month's costs |
Understand data types
For a comprehensive reference of all available datasets, including the schema for current and historical versions, see Cost Management dataset schema index.
- Cost and usage details (actual) - Select this option to export standard usage and purchase charges.
- Cost and usage details (amortized) - Select this option to export amortized costs for purchases like Azure reservations and Azure savings plan for compute.
- Cost and usage details (FOCUS) - Select this option to export cost and usage details using the open-source FinOps Open Cost and Usage Specification (FOCUS) format. It combines actual and amortized costs.
- This format reduces data processing time and storage and compute charges for exports.
- The management group scope isn't supported for Cost and usage details (FOCUS) exports.
- You can use the FOCUS-formatted export as the input for a Microsoft Fabric workspace for FinOps. For more information, see Create a Fabric workspace for FinOps.
- Cost and usage details (usage only) - Select this option to export standard usage charges without purchase information. Although you can't use this option when creating new exports, existing exports using this option are still supported.
- Price sheet – Select this option to export your download your organization's Azure pricing.
- Reservation details – Select this option to export the current list of all available reservations.
- Reservation recommendations – Select this option to export the list of reservation recommendations, which help with rate optimization.
- Reservation transactions – Select this option to export the list of all reservation purchases, exchanges, and refunds.
Agreement types, scopes, and required roles are explained at Understand and work with scopes.
| Data types | Supported agreement | Supported scopes |
|---|---|---|
| Cost and usage (actual) | • EA • MCA that you bought through the Azure website • MCA enterprise • MCA that you buy through a Microsoft partner • Azure internal |
• EA - Enrollment, department, account, subscription, and resource group • MCA - Billing account, billing profile, Invoice section, subscription, and resource group • Microsoft Partner Agreement (MPA) - Customer, subscription, and resource group |
| Cost and usage (amortized) | • EA • MCA that you bought through the Azure website • MCA enterprise • MCA that you buy through a Microsoft partner • Azure internal |
• EA - Enrollment, department, account, subscription, and resource group • MCA - Billing account, billing profile, Invoice section, subscription, and resource group • MPA - Customer, subscription, and resource group |
| Cost and usage (FOCUS) | • EA • MCA that you bought through the Azure website • MCA enterprise • MCA that you buy through a Microsoft partner |
• EA - Enrollment, department, account, subscription, and resource group. NOTE: The management group scope isn't supported for Cost and usage details (FOCUS) exports. • MCA - Billing account, billing profile, invoice section, subscription, and resource group • MPA - Customer, subscription, resource group. |
| All available prices | • EA • MCA that you bought through the Azure website • MCA enterprise • MCA that you buy through a Microsoft partner |
• EA - Billing account • All other supported agreements - Billing profile |
| Reservation recommendations | • EA • MCA that you bought through the Azure website • MCA enterprise • MCA that you buy through a Microsoft partner |
• EA - Billing account • All other supported agreements - Billing profile |
| Reservation transactions | • EA • MCA that you bought through the Azure website • MCA enterprise • MCA that you buy through a Microsoft partner |
• EA - Billing account • All other supported agreements - Billing profile |
| Reservation details | • EA • MCA that you bought through the Azure website • MCA enterprise • MCA that you buy through a Microsoft partner |
• EA - Billing account • All other supported agreements - Billing profile |
Limitations
The improved exports experience currently has the following limitations.
The new exports experience doesn't fully support the management group scope, and it has feature limitations.
Azure internal accounts and the Microsoft Online Service Program (MOSP), commonly referred to as pay-as-you-go, support only the 'Cost and Usage Details (Usage Only)' dataset for billing scopes and subscriptions.
Shared access service (SAS) key-based cross tenant export is only supported for Microsoft partners at the billing account scope. It isn't supported for other partner scenarios like any other scope, EA indirect contract, or Azure Lighthouse.
EA price sheet: Reservation prices are only available for the current month price sheet and can't be retrieved for historical exports. To retain historical reservation prices, set up recurring exports.
FAQ
Why is file partitioning enabled in exports?
The file partitioning is a feature that is activated by default to facilitate the management of large files. This functionality divides larger files into smaller segments, which enhances the ease of file transfer, download, ingestion, and overall readability. It's advantageous for customers whose cost files increase in size over time. The specifics of the file partitions are described in a manifest.json file provided with each export run, enabling you to rejoin the original file.
How does the enhanced export experience handle missing attributes like subscription IDs?
In the new export experience, missing attributes such as subscription IDs are set to null or empty rather than using a default empty GUID (00000000-0000-0000-0000-000000000000). The null or empty values more accurately indicate the absence of a value. It affects charges pertaining to unused reservations, unused savings plan, and rounding adjustments.
How much historical data can I retrieve using Exports?
You can retrieve up to 13 months of historical data through the Azure portal for all datasets, except for reservation recommendations, which are limited to the current recommendation snapshot. To access data older than 13 months, you can use the REST API.
Cost and usage (Actual), Cost and usage (Amortized), and Cost and usage (FOCUS): Up to seven years of data.
Reservation transactions: Up to seven years of data across all channels.
Reservation recommendations, Reservation details: Up to 13 months of data.
All available prices:
MCA/MPA: Up to 13 months.
EA: Up to 25 months (starting from December 2022).
Which datasets support Parquet format and compression?
The following table captures the supported formats and compression formats for each of the exported datasets. If you're creating an export with multiple datasets, Parquet & compression options only appear in the dropdown if all of the selected datasets support them.
| Dataset | Format supported | Compression supported |
|---|---|---|
| Cost and usage details (Actual) | CSV | None, Gzip |
| Parquet | None, Snappy | |
| Cost and usage details (Amortized) | CSV | None, Gzip |
| Parquet | None, Snappy | |
| Cost and usage details (Usage only) | CSV | None, Gzip |
| Parquet | None, Snappy | |
| Cost and usage details (FOCUS) | CSV | None, Gzip |
| Parquet | None, Snappy | |
| Reservation details | CSV | None |
| Reservation recommendations | CSV | None |
| Reservation transactions | CSV | None |
| Price Sheet | CSV | None, Gzip |
| Parquet | None, Snappy |
Why do I get the 'Unauthorized' error while trying to create an Export?
When attempting to create an Export to a storage account with a firewall, the user must have the Owner role or a custom role with Microsoft.Authorization/roleAssignments/write and Microsoft.Authorization/permissions/read permissions. If these permissions are missing, you encounter an error similar to:
{
	"error":{
	"code":"Unauthorized",
	"message":"The user does not have authorization to perform 'Microsoft.Authorization/roleAssignments/write' action on specified storage account, please use a storage account with sufficient permissions. If the permissions have changed recently then retry after some time."
	}
}
You can check for the permissions on the storage account by referring to the steps in Check access for a user to a single Azure resource.
What is the maximum number of subscriptions allowed within a management group (MG) when creating an export?
The maximum limit is 3,000 subscriptions per management group in Cost Management, including exports.
To manage more than 3,000 subscriptions:
Organize them into smaller management groups. For example, if you have a total of 12,500 subscriptions, create five management groups with approximately 2,500 subscriptions each. Create separate exports for each management group scope and combine the exported data for a complete view.
Alternatively, if all subscriptions are under the same billing account, create an export at the billing account scope to get combined data.
How are the exported files organized in the blob storage folders?
The exported files are organized in a structured hierarchy within the storage folders. The naming and hierarchy of the folders are as follows:
StorageContainer/StorageDirectory/ExportName/[YYYYMMDD-YYYYMMDD]/[RunID]/
This path contains the CSV files and a manifest file.
For example:
StorageContainer/StorageDirectory/ExportName/[20240401-20240430]/[RunID1]/
This folder contains the CSV files and the manifest file for all export runs during the April 2024 time period.
StorageContainer/StorageDirectory/ExportName/[20241101-20241130]/[RunID2]/
This folder contains the CSV files and the manifest file for all export runs during the November 2024 time period.
Azure ensures that the cost file for a particular month is available within that month's folder. For example, [20240401-20240430], [20241101-20241130] and so on.
Without file overwrite: You see multiple RunIDs within the month folder, representing different export runs. For example, 30 different RunIDs for 30 days.
With file overwrite: You see only one RunID within the month folder, representing the latest run.
At the time of export creation, you can name the StorageContainer, StorageDirectory, and ExportName.
Next steps
- Learn more about exports at Tutorial: Create and manage exported data.
