Create a Fabric workspace for FinOps
This article walks you through creating and configuring a Microsoft Fabric workspace for FinOps. It provides a step-by-step guide to create and configure Azure Data Lake storage (ADLS) setup, data export, workspace creation, and data ingestion. When completed, you can use Power BI to build reports.
Prerequisites
Before you begin, you must have:
- A paid Azure subscription with cost and usage information
- Owner of a storage account or have access to grant permissions to the storage account
- You must have the Storage Blob Data Contributor role when you use Organizational account authentication. If you don't have the required permission, you can use other authentication types like Account key. Otherwise, you get an
Invalid credentialserror.
To complete this walkthrough, you create the following resources that incur costs:
- An Azure Data Lake Storage Gen2 account
- A Power BI workspace
- A Fabric workspace
Create and configure Azure Data Lake Storage
Microsoft Fabric is optimized to work with storage accounts with hierarchical namespace enabled, also known as Azure Data Lake Storage Gen2. You have two options to get a Data Lake storage account:
- Option 1: To create a Data Lake storage account, see Create a storage account for Azure Data Lake Storage Gen2.
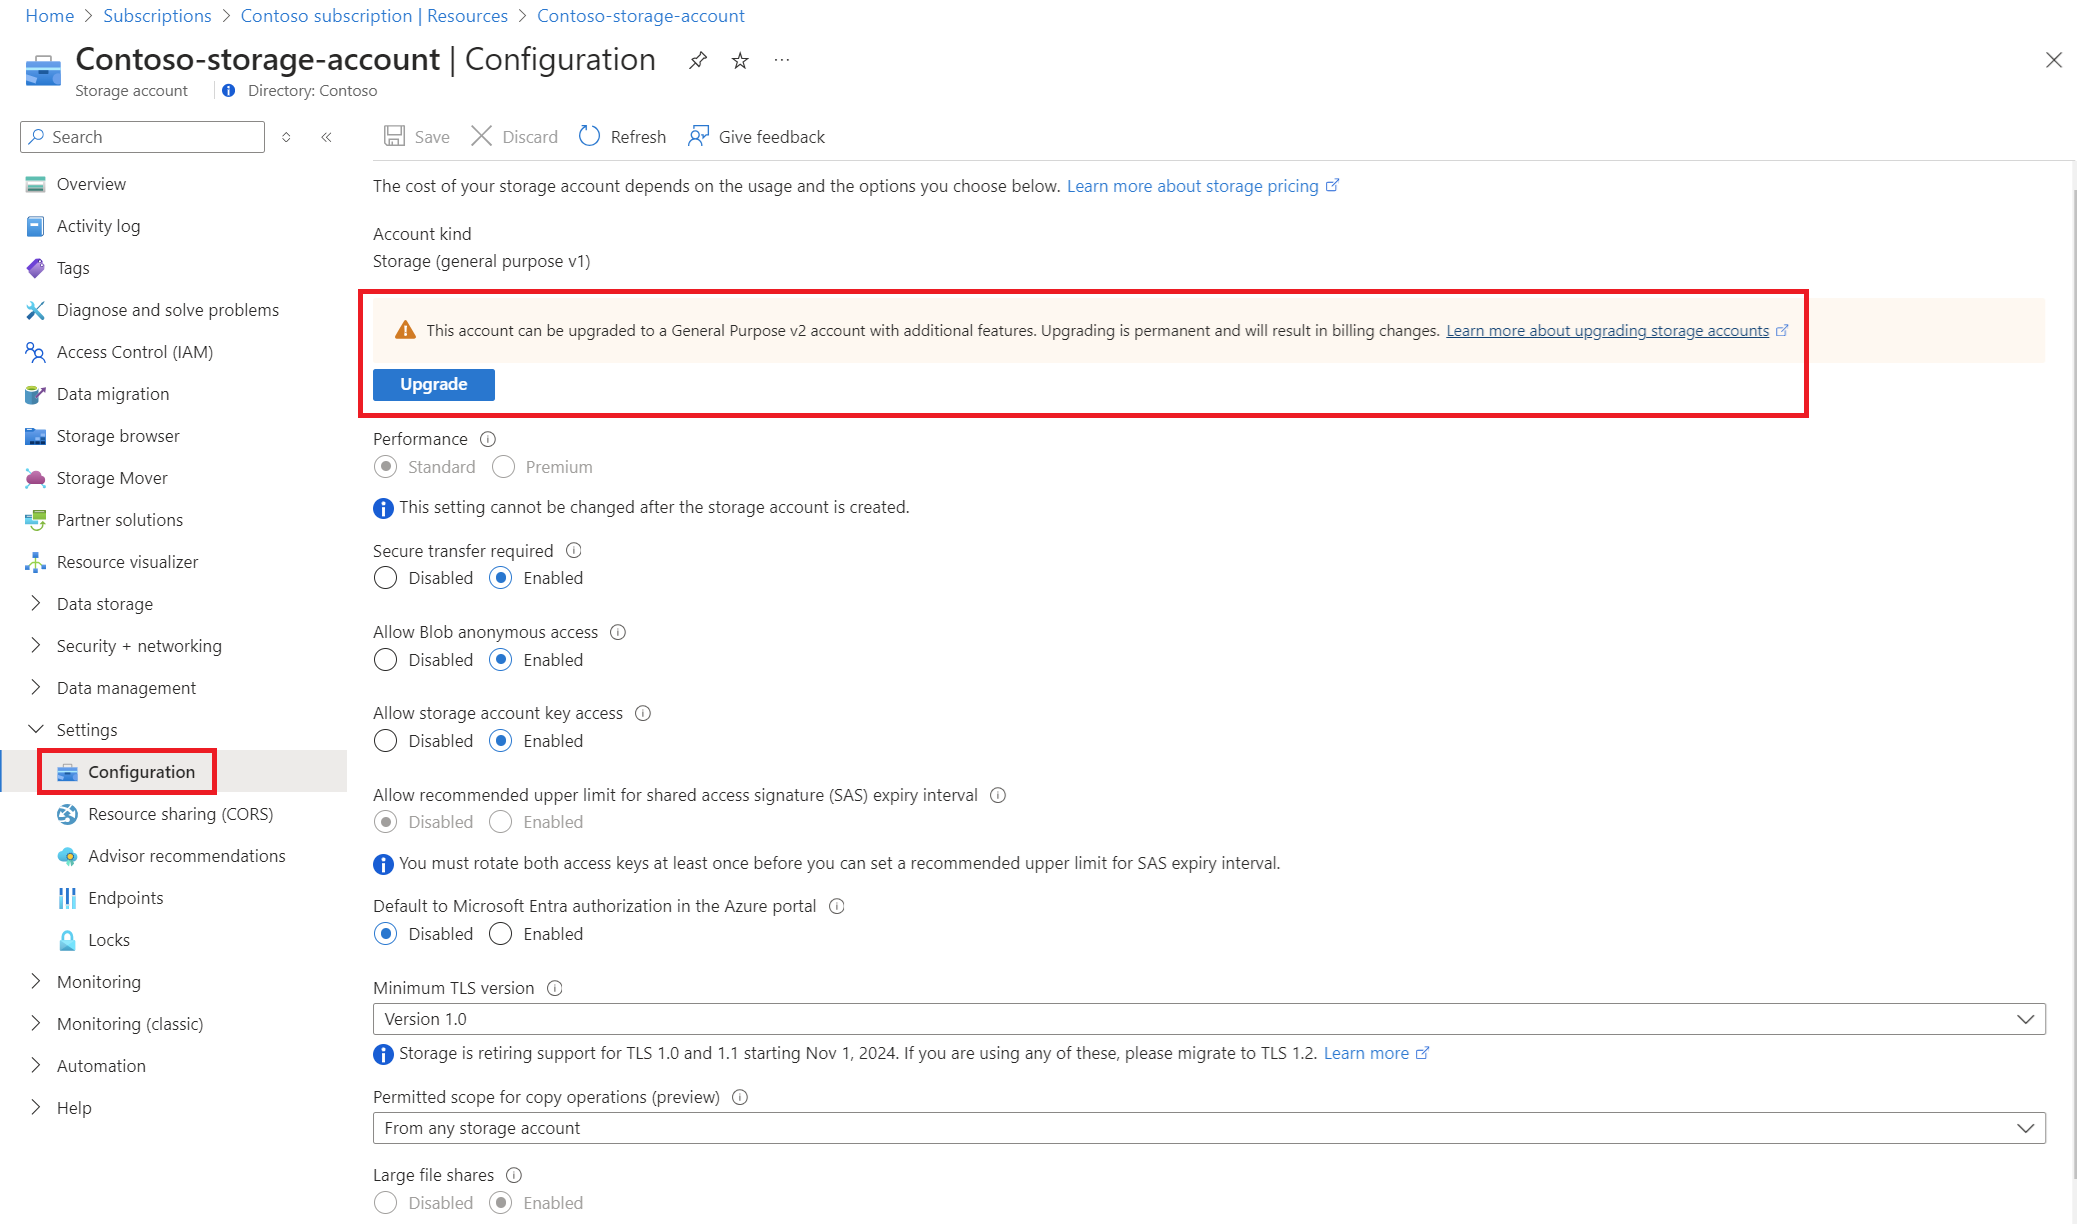
- Option 2: To enable hierarchical namespace on an existing storage account, see Upgrade Azure Blob Storage with Azure Data Lake Storage Gen2 capabilities.
Tip
If you deployed FinOps hubs, you can use the storage account created as part of the hub resource group.
For the following example, we used the following Data Lake Gen 2 storage account. You use your own storage account and subscription details.
- Subscription = Contoso subscription.
- Storage account = Contoso-storage-account.
Export cost data
Since we're creating a workspace optimized for FinOps, we export cost data using the FinOps Open Cost and Usage Specification (FOCUS), a provider-agnostic data format for cost details. All our examples use FOCUS but you can also use existing actual or amortized cost exports that have file overwriting enabled.
For more information about FOCUS and its benefits, see What is FOCUS. The FinOps Foundation also offers a free Introduction to FOCUS course. Microsoft’s Power BI solutions for FinOps are aligned to FOCUS.
To create an export, see Create exports.
Here are the high-level steps to create an export:
- Sign in to the Azure portal at https://portal.azure.com, search for Cost Management.
- Select the required scope and select Exports in the left navigation menu.
- Select + Create
- On the Basics tab, select the template = Cost and usage (FOCUS)
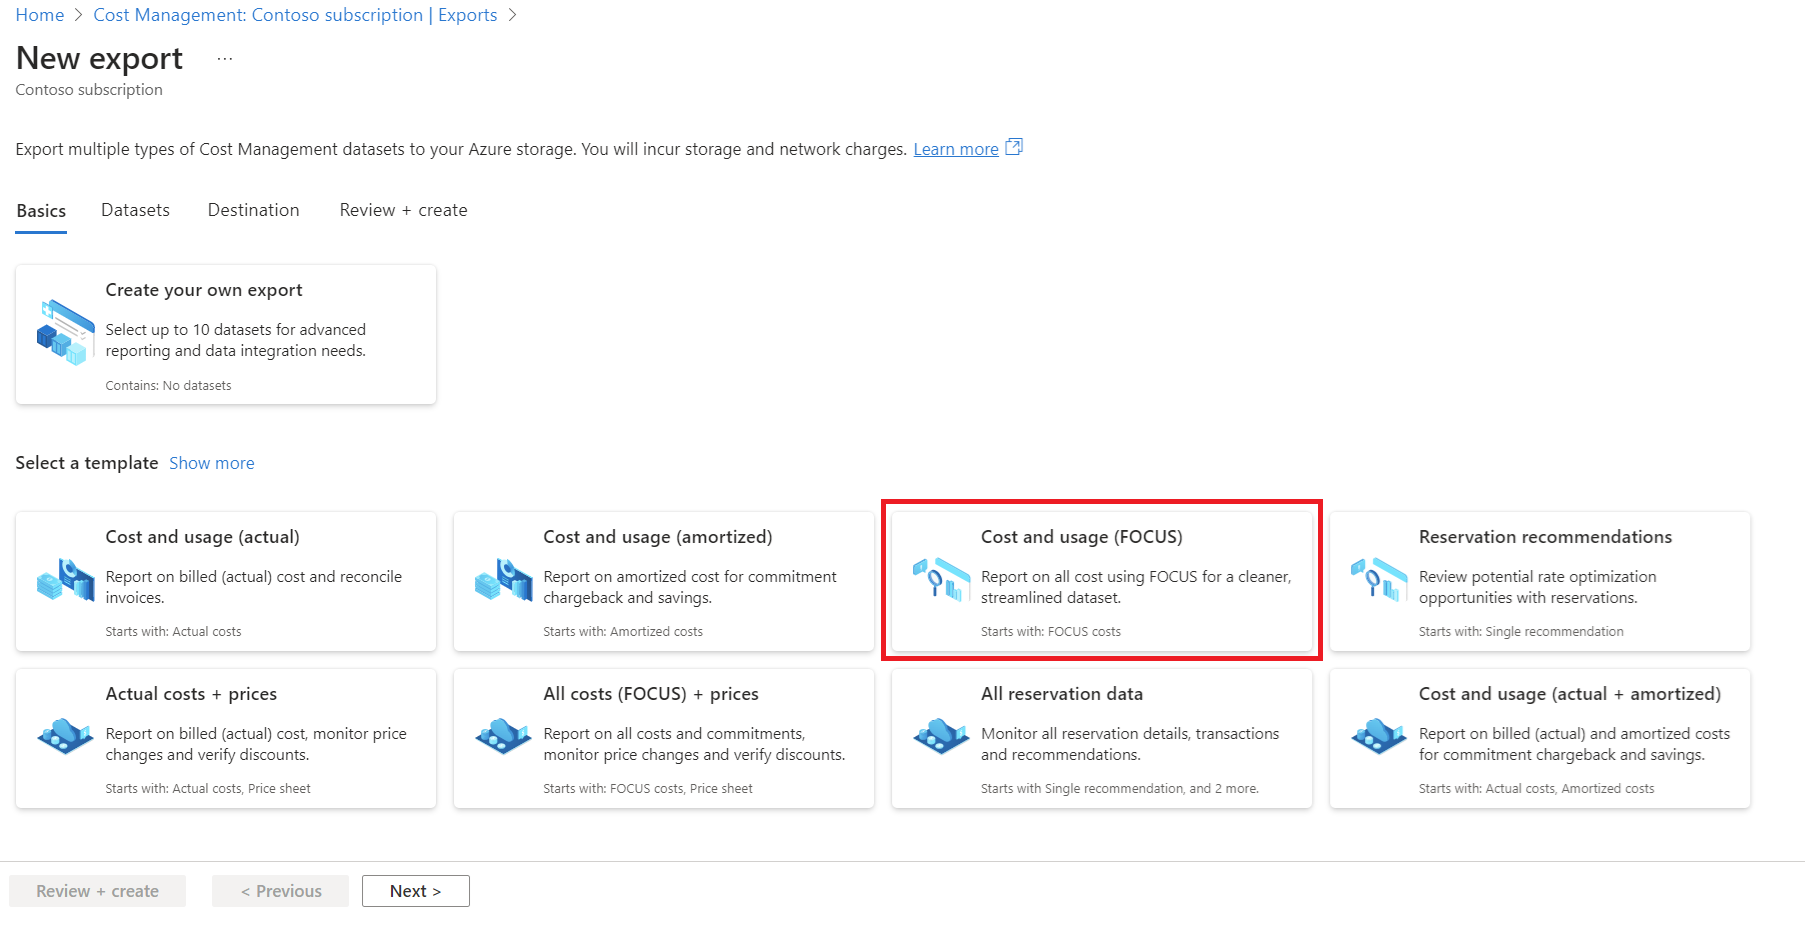
- On the Datasets tab, fill in Export prefix to ensure you have a unique name for the export. For example, june2024focus.
- On the Destination tab, select:
- Storage type = Azure blob storage
- Destination and storage = Use existing
- Subscription = Contoso subscription
- Storage account = Contoso-storage-account
- Container = msexports
- Directory = focuscost/<scope-id>
- Compression type = None.
- Overwrite data = Enabled
- On the Review + Create tab, select Create.
- Run the export by selecting Run now on the export page.
Ensure that your export completed and that the file is available before moving to the next step.
Important
Cost Management exports utilize managed identity. To create an export, you must be an Owner of the storage account or have access to grant permissions to the storage account. To see all required permissions, see Prerequisites.
If you want to automate export creation, consider using the New-FinOpsCostExport command in the FinOps toolkit PowerShell module.
If you deployed FinOps hubs, you can skip this step and use the processed data in hub storage.
Create a Fabric workspace
If you already have a Microsoft Fabric workspace, you can skip creating a new workspace, unless you want to keep your FinOps resources separate from others.
If you didn't set up Microsoft Fabric, see Enable Microsoft Fabric for your organization.
- Sign in to the Fabric app using your Fabric free account or Microsoft Power BI account.
- You can create a new workspace for your FinOps resources or choose to use an existing workspace. To create a workspace, see Create a workspace.
If you’re new to Microsoft Fabric or don’t have Fabric capacity enabled, see Fabric trial. If Fabric trials are disabled, you might need to create a new Fabric capacity.
Nontrial Fabric capacity incurs charges for your organization. See Microsoft Fabric pricing.
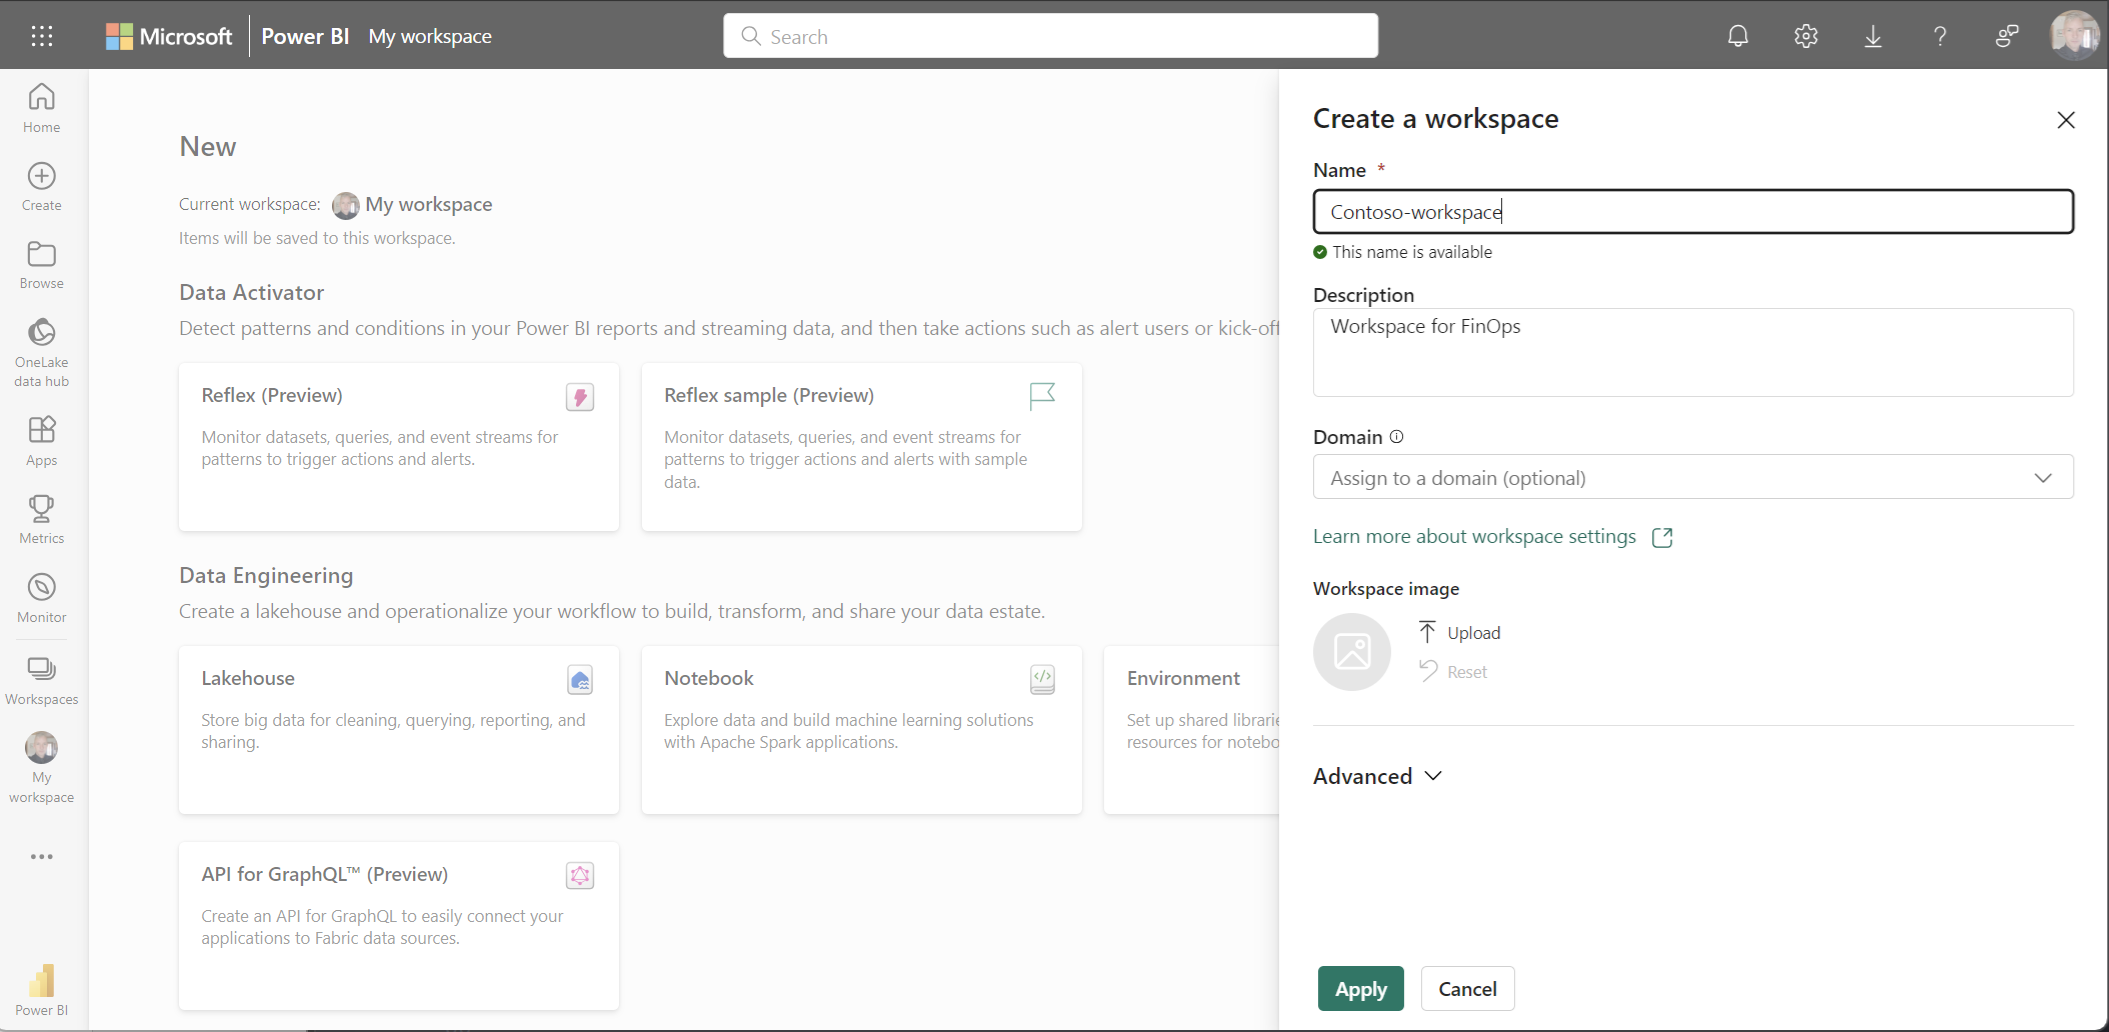
Here's an example screenshot showing a new Fabric workspace getting created.
Create a lakehouse
Microsoft Fabric lakehouses are data architectures that allow organizations to store and manage structured and unstructured data in a single location. They use various tools and frameworks to process and analyze that data. These tools and frameworks can include SQL-based queries and analytics, machine learning, and other advanced analytics techniques.
You can either create a new lakehouse or use an existing one. Lakehouses are interoperable so we would generally recommend using a single lakehouse for all your FinOps datasets. A single lakehouse keeps related information together to share data models, pipelines, and security measures.
To create a new lakehouse in the Fabric workspace of your choice:
- Sign in to the Fabric app using your Fabric free account or Microsoft Power BI account.
- Select the workspace where you want to create the lakehouse.
- Near the top left of the page, select + New and then select More options.
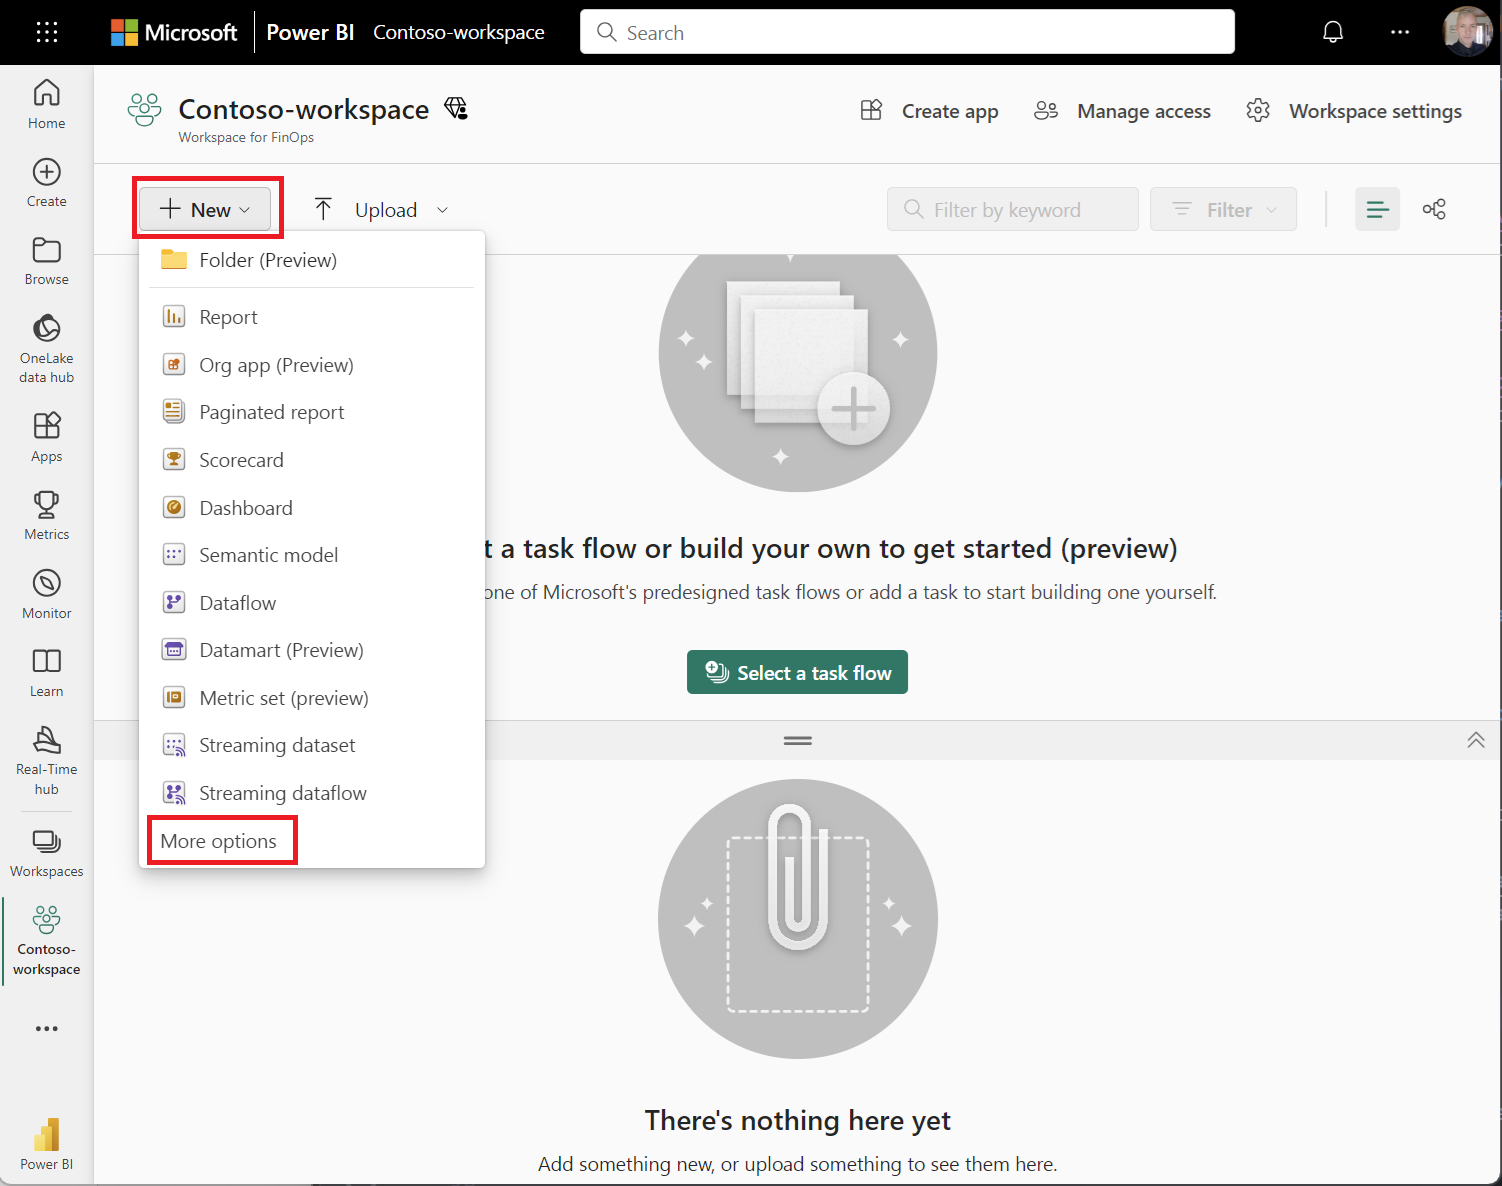
- Select Lakehouse
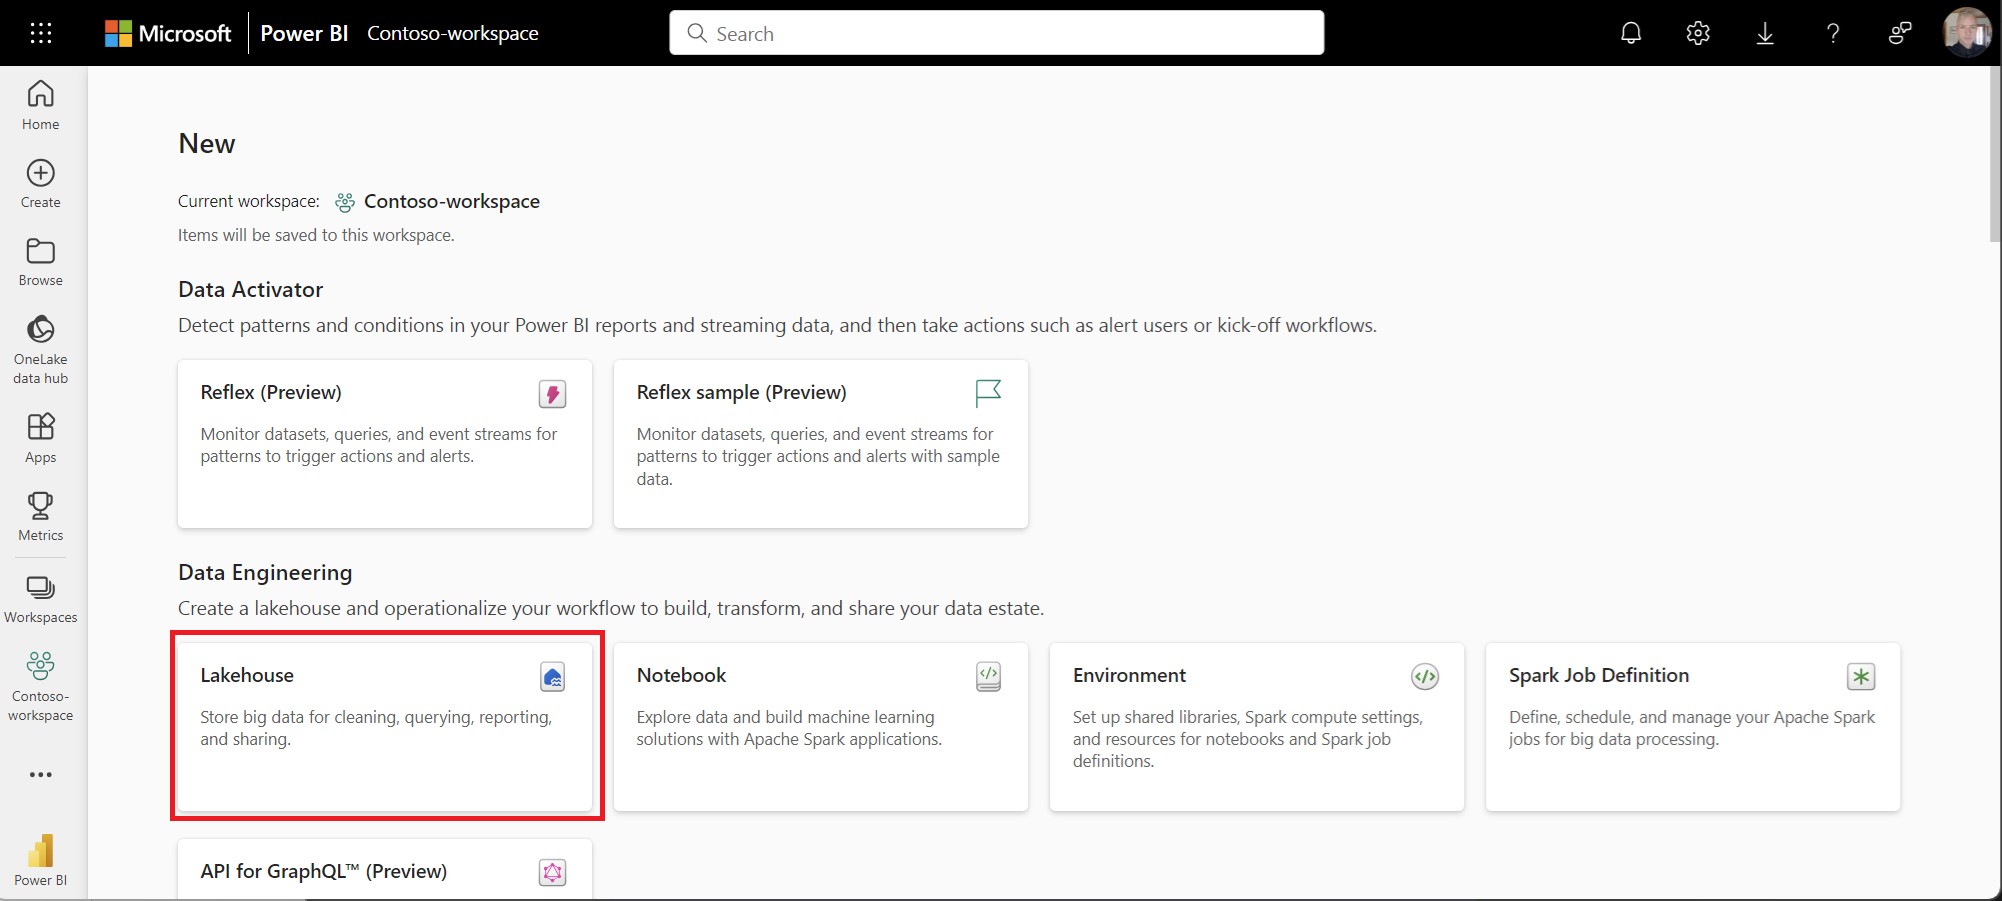
For more information, see Create a lakehouse.
Create a shortcut to storage
Shortcuts in lakehouse allow you to reference data without copying it. It unifies data from different lakehouses, workspaces, or external storage, such as Data Lake Gen2 or Amazon Web Services (AWS) S3. You can quickly make large amounts of data available in your lakehouse locally without the latency of copying data from the source.
To create a shortcut, see Create an Azure Data Lake Storage Gen2 shortcut.
- Sign in to the Fabric app using your Fabric free account or Microsoft Power BI account.
- Select the lakehouse of your choice.
- Select the ellipsis (...) next to Files.
You add CSV and Parquet files under Files. Delta tables get added under Tables. - Select New shortcut.
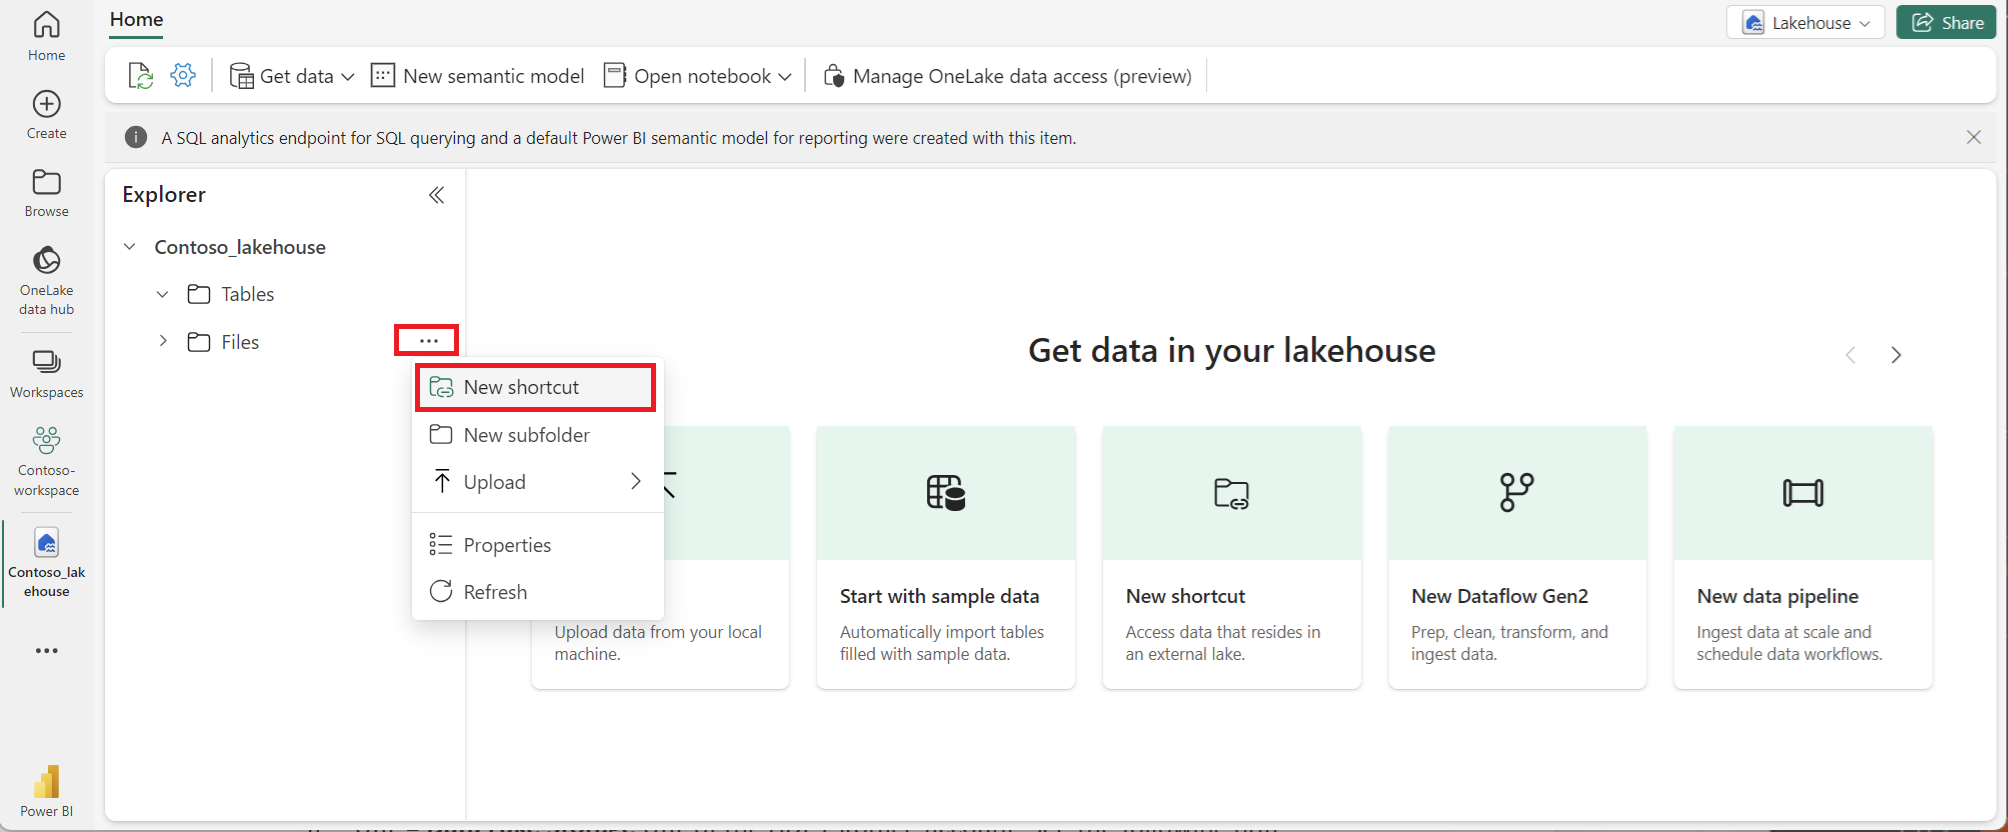
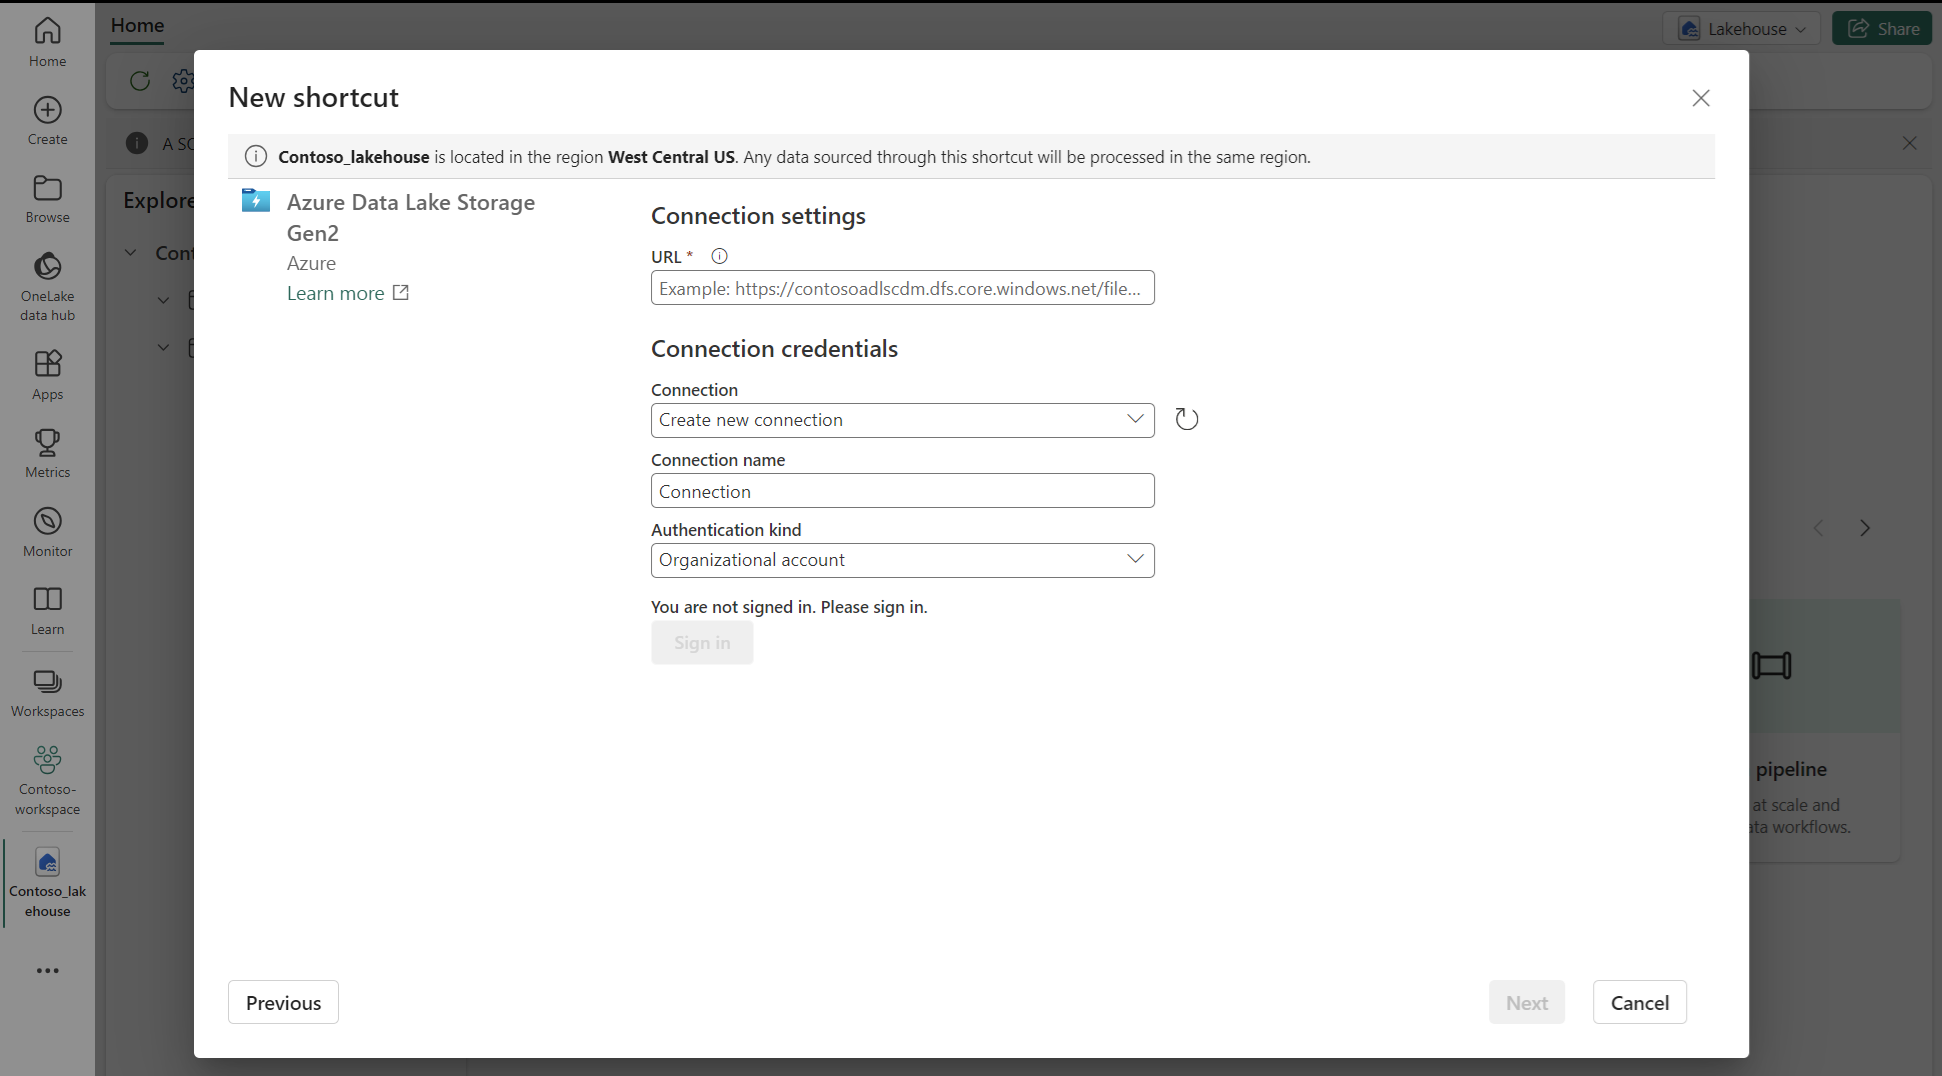
- Select Azure Data Lake Storage Gen 2 and provide the following settings:
- URL = Data Lake Storage URL of the Data Lake storage account. See the following note about authentication.
- Connection = Create a new connection
- Connection name = <Any name of your choice>
- Authentication kind = Organizational account
- Sign in when prompted.
Here’s an example screenshot showing the New shortcut connection settings.
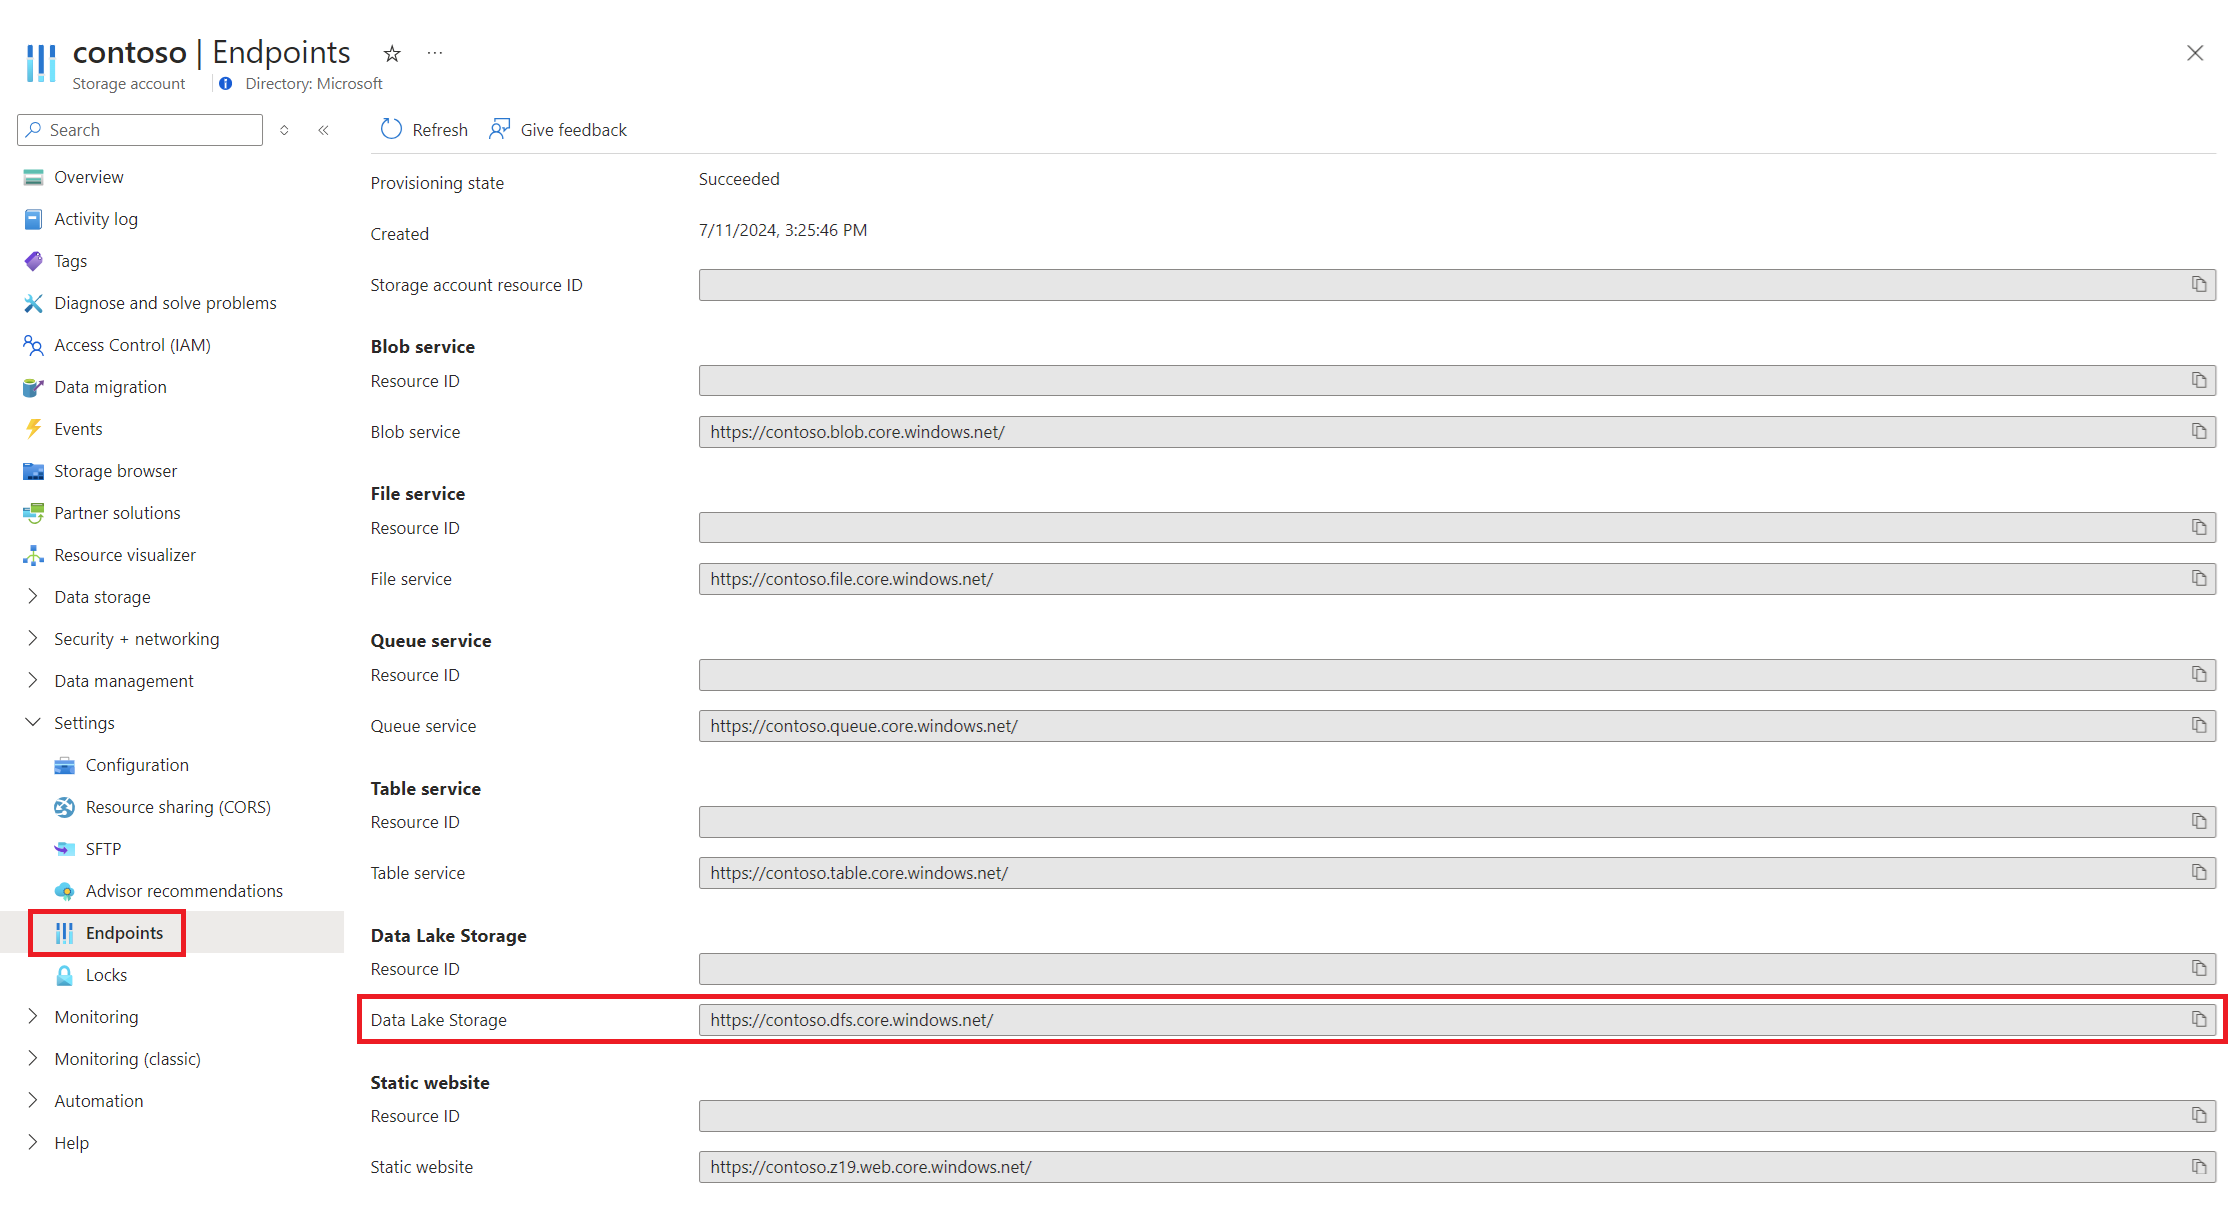
To get the Data Lake Storage URL, view the storage account where the export created a directory and the FOCUS cost file. Under Settings, select Endpoints. Copy the URL marked as Data Lake Storage.
Here’s an example screenshot showing the Data Lake Storage URL on the Endpoints page.
Copy data into Fabric
After you create the shortcut, you can view the FOCUS cost data inside Files. You can load the data directly into a Fabric with one of the following methods, based on your requirements. The following tabs provide two options:
After the shortcut gets created, you can view the FOCUS cost data inside Files. You can load the data directly into a Fabric table by using the following steps.
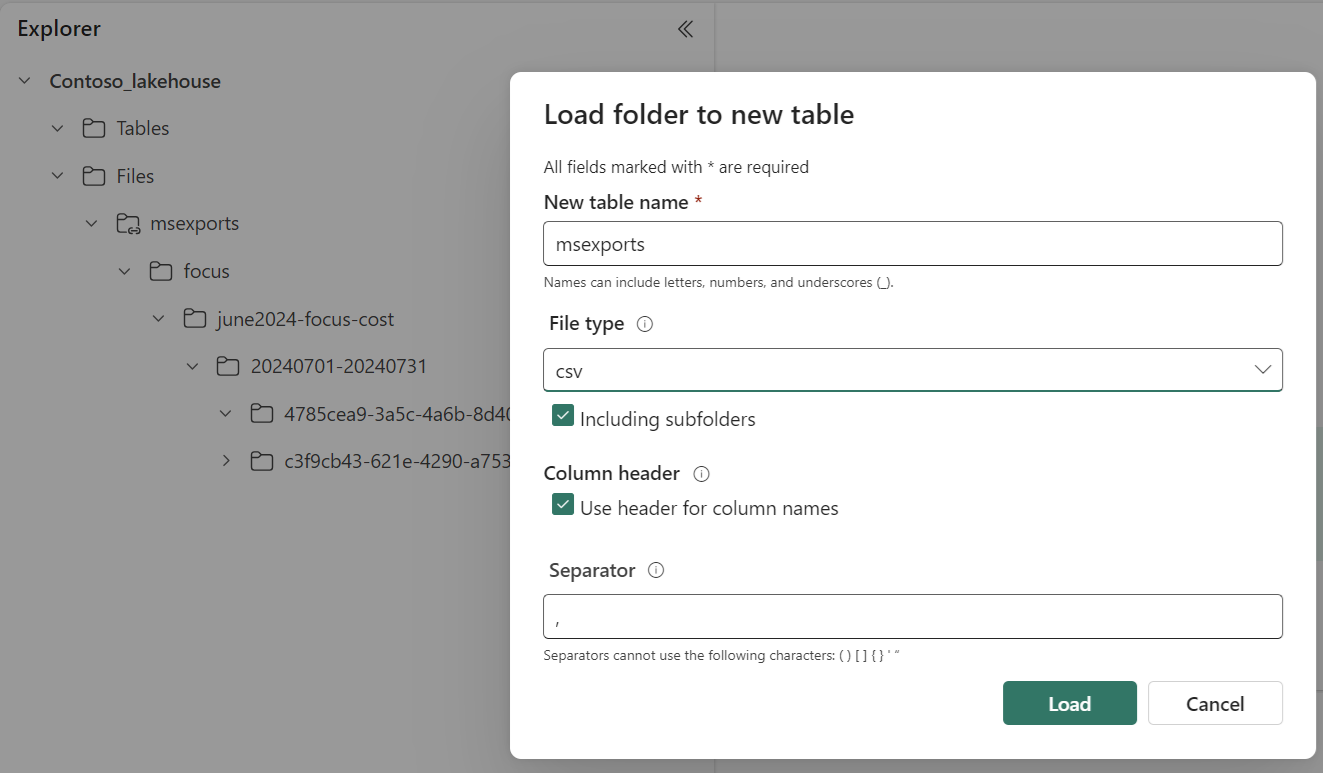
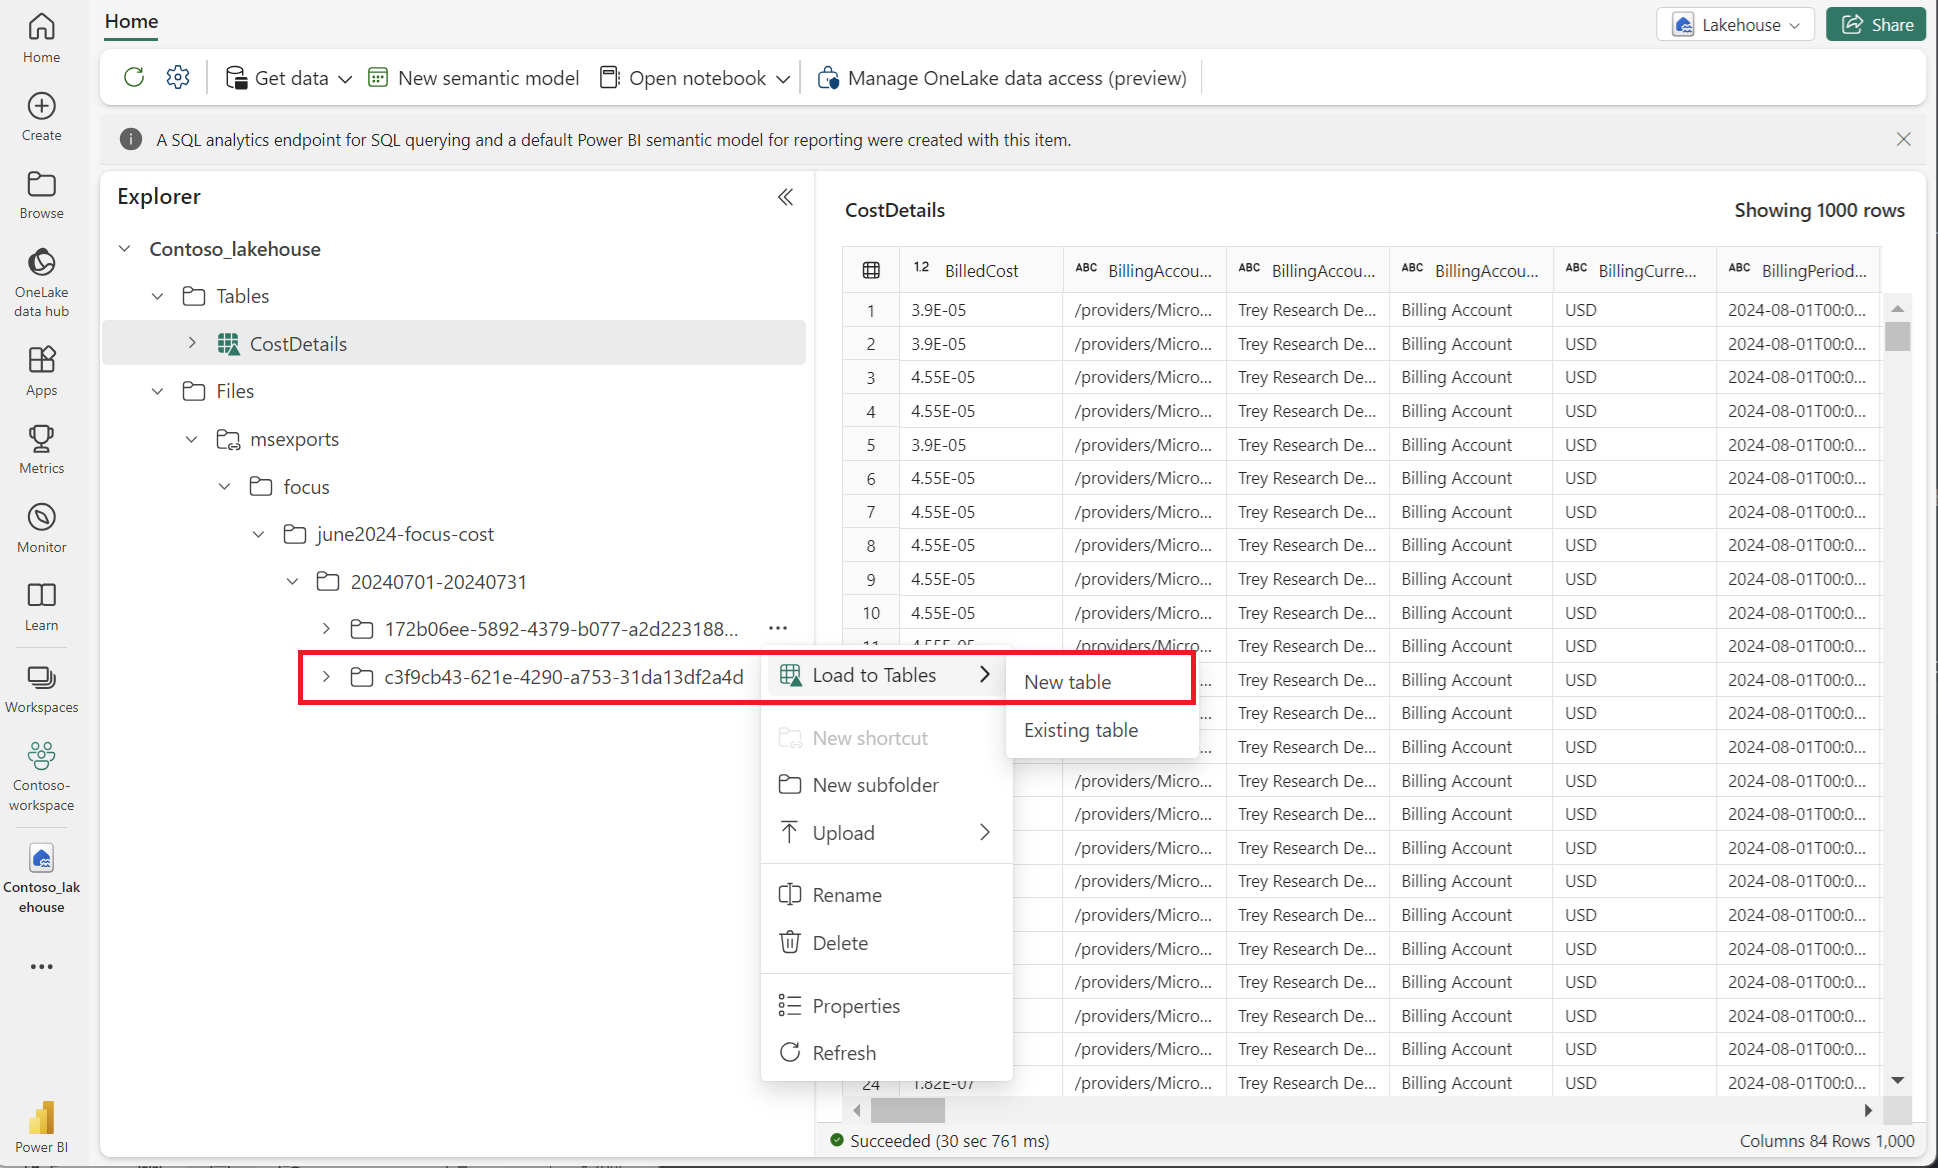
- In the lakehouse, find the directory that you created when you set up the export. The Directory is in the Files section.
- Next to the directory, select the ellipsis (...), and then select Load to Tables > New table.
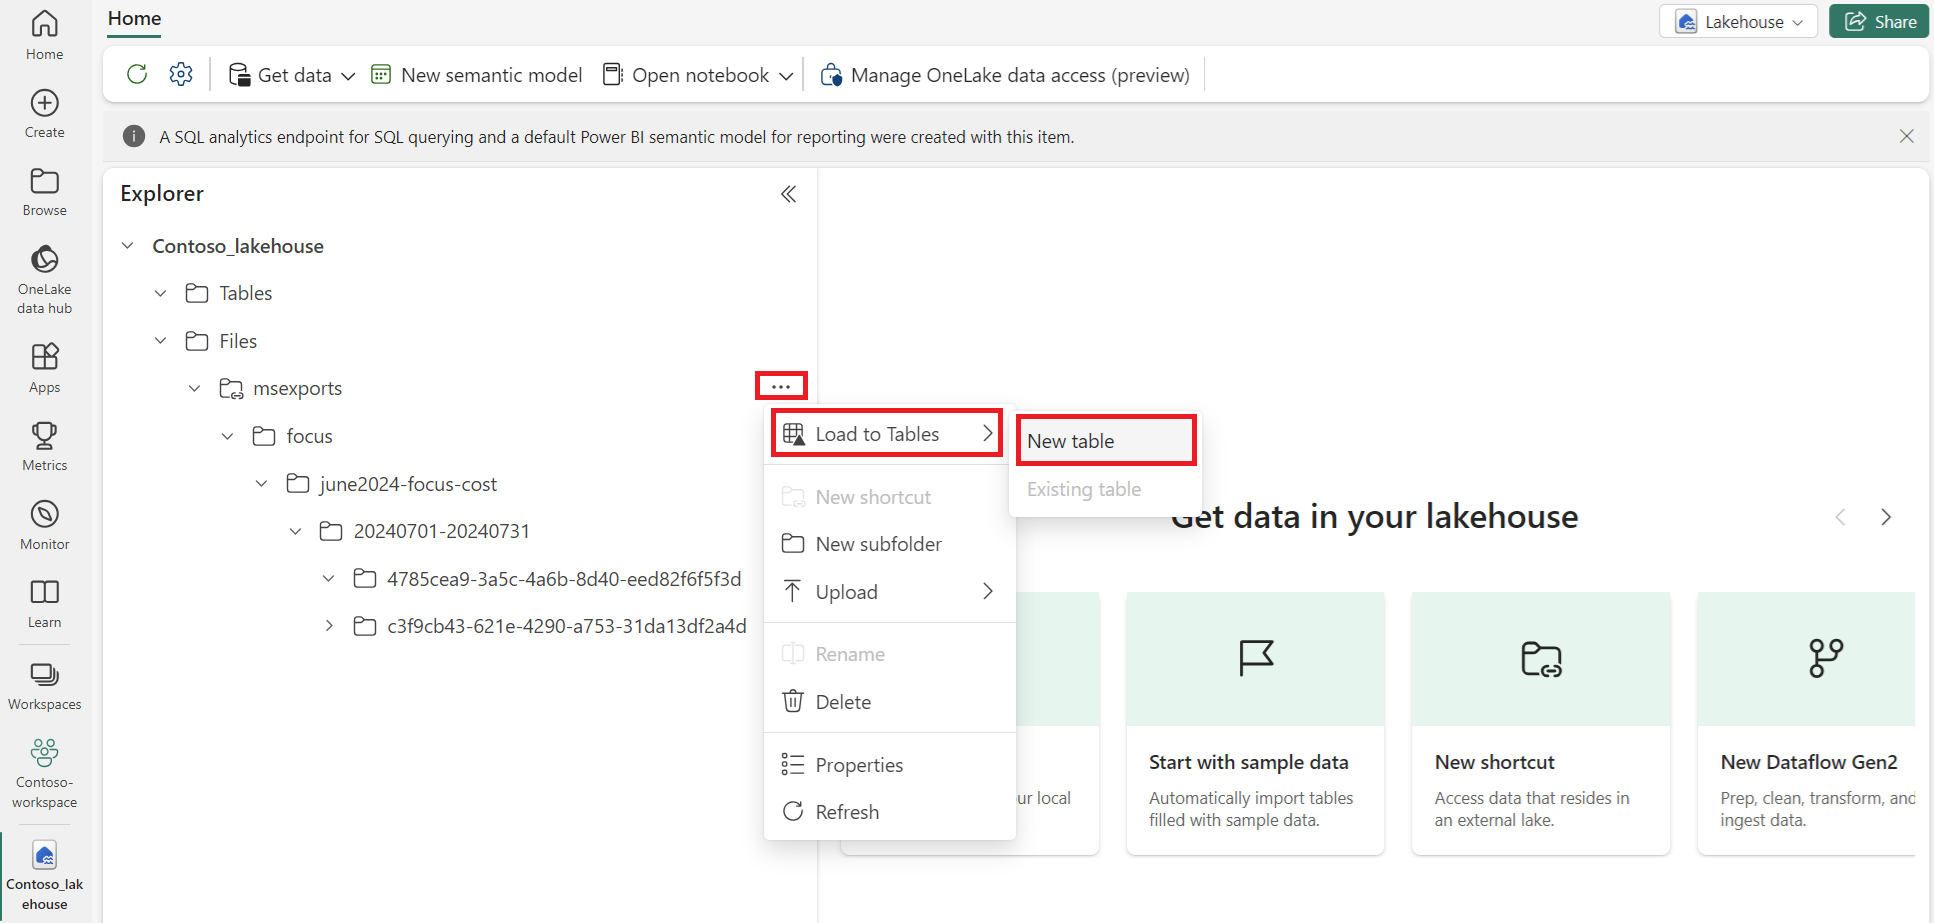
- Table name = <Any valid name>
- File type =
CSV - Including subfolders = Enabled
- Use header for column names = Enabled
- Separator =
, - Select Load
For more information, see Lakehouse Load to Delta Lake tables.
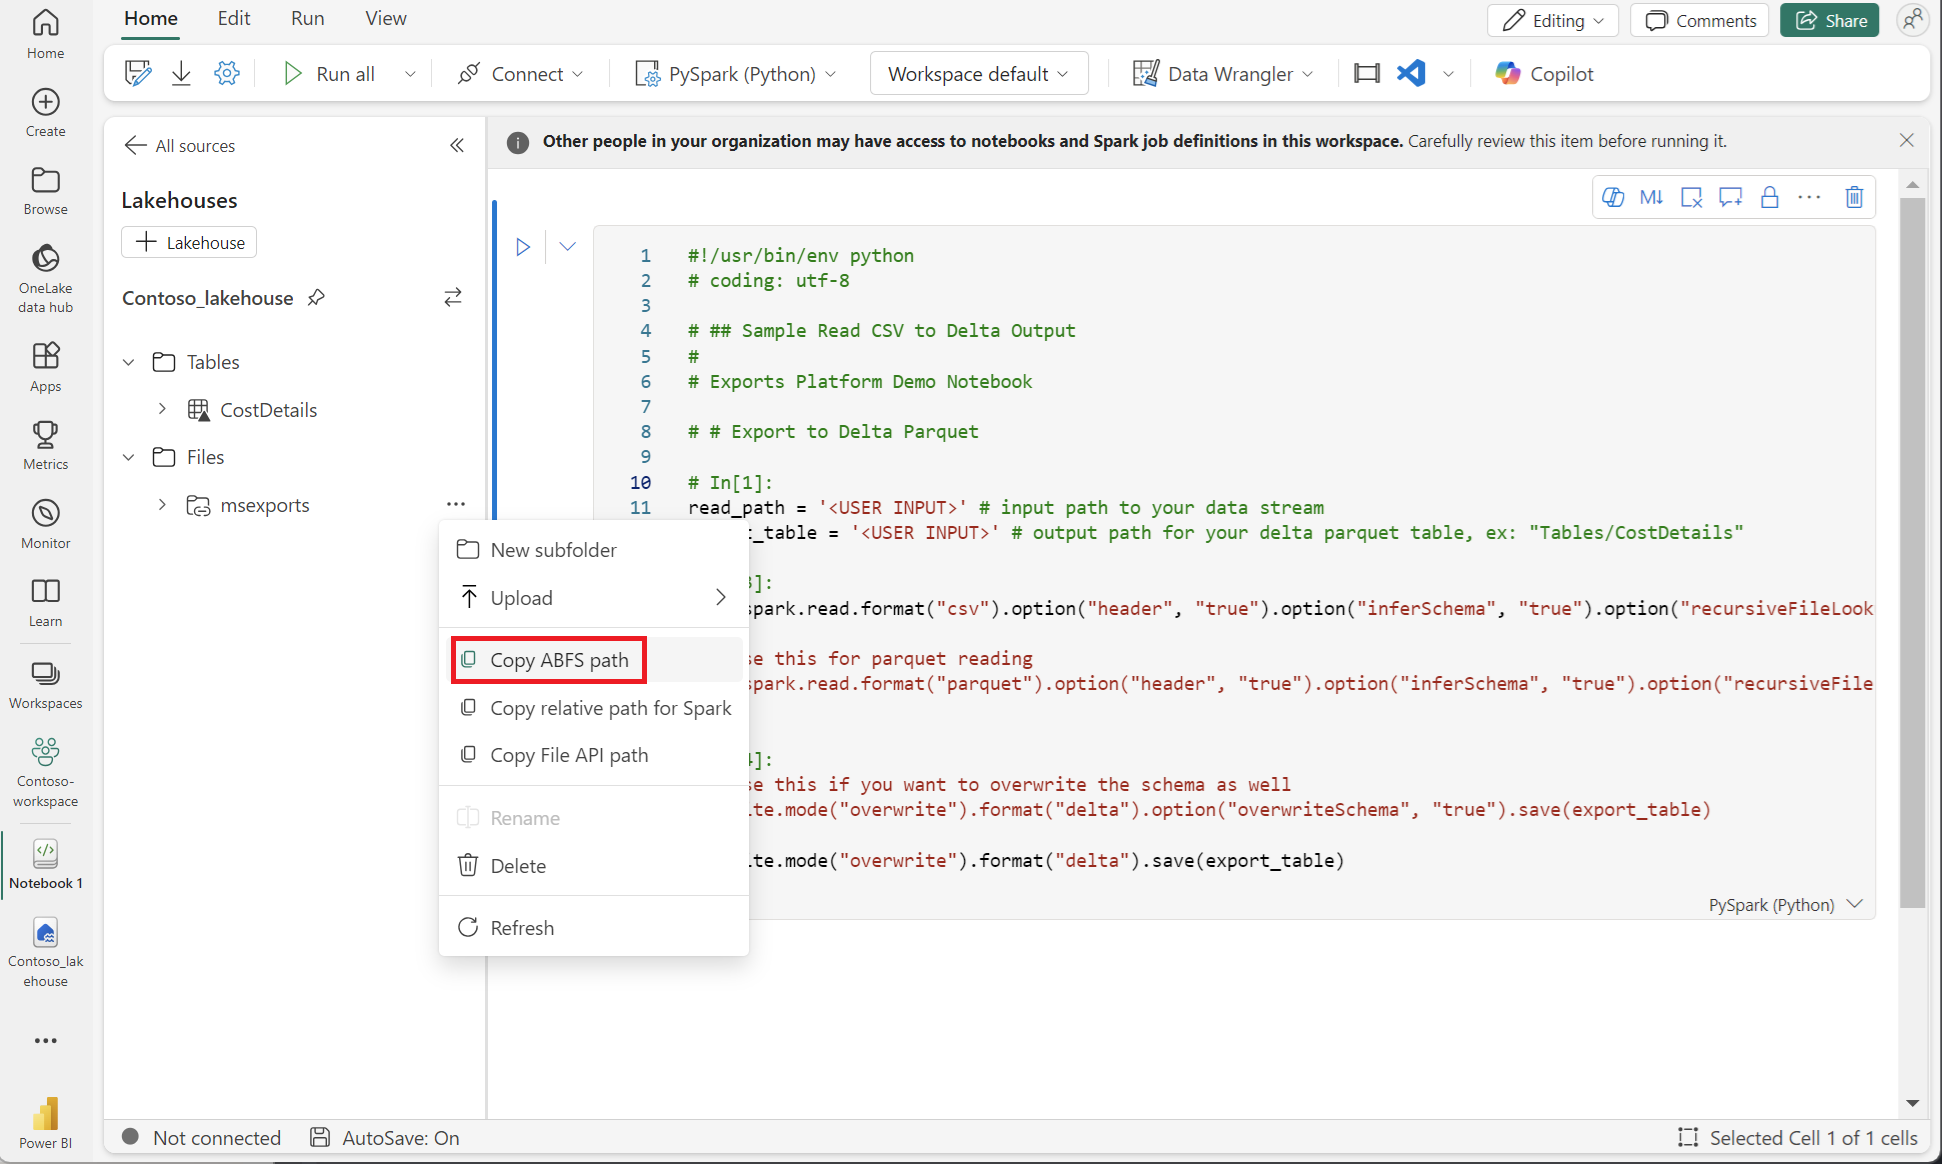
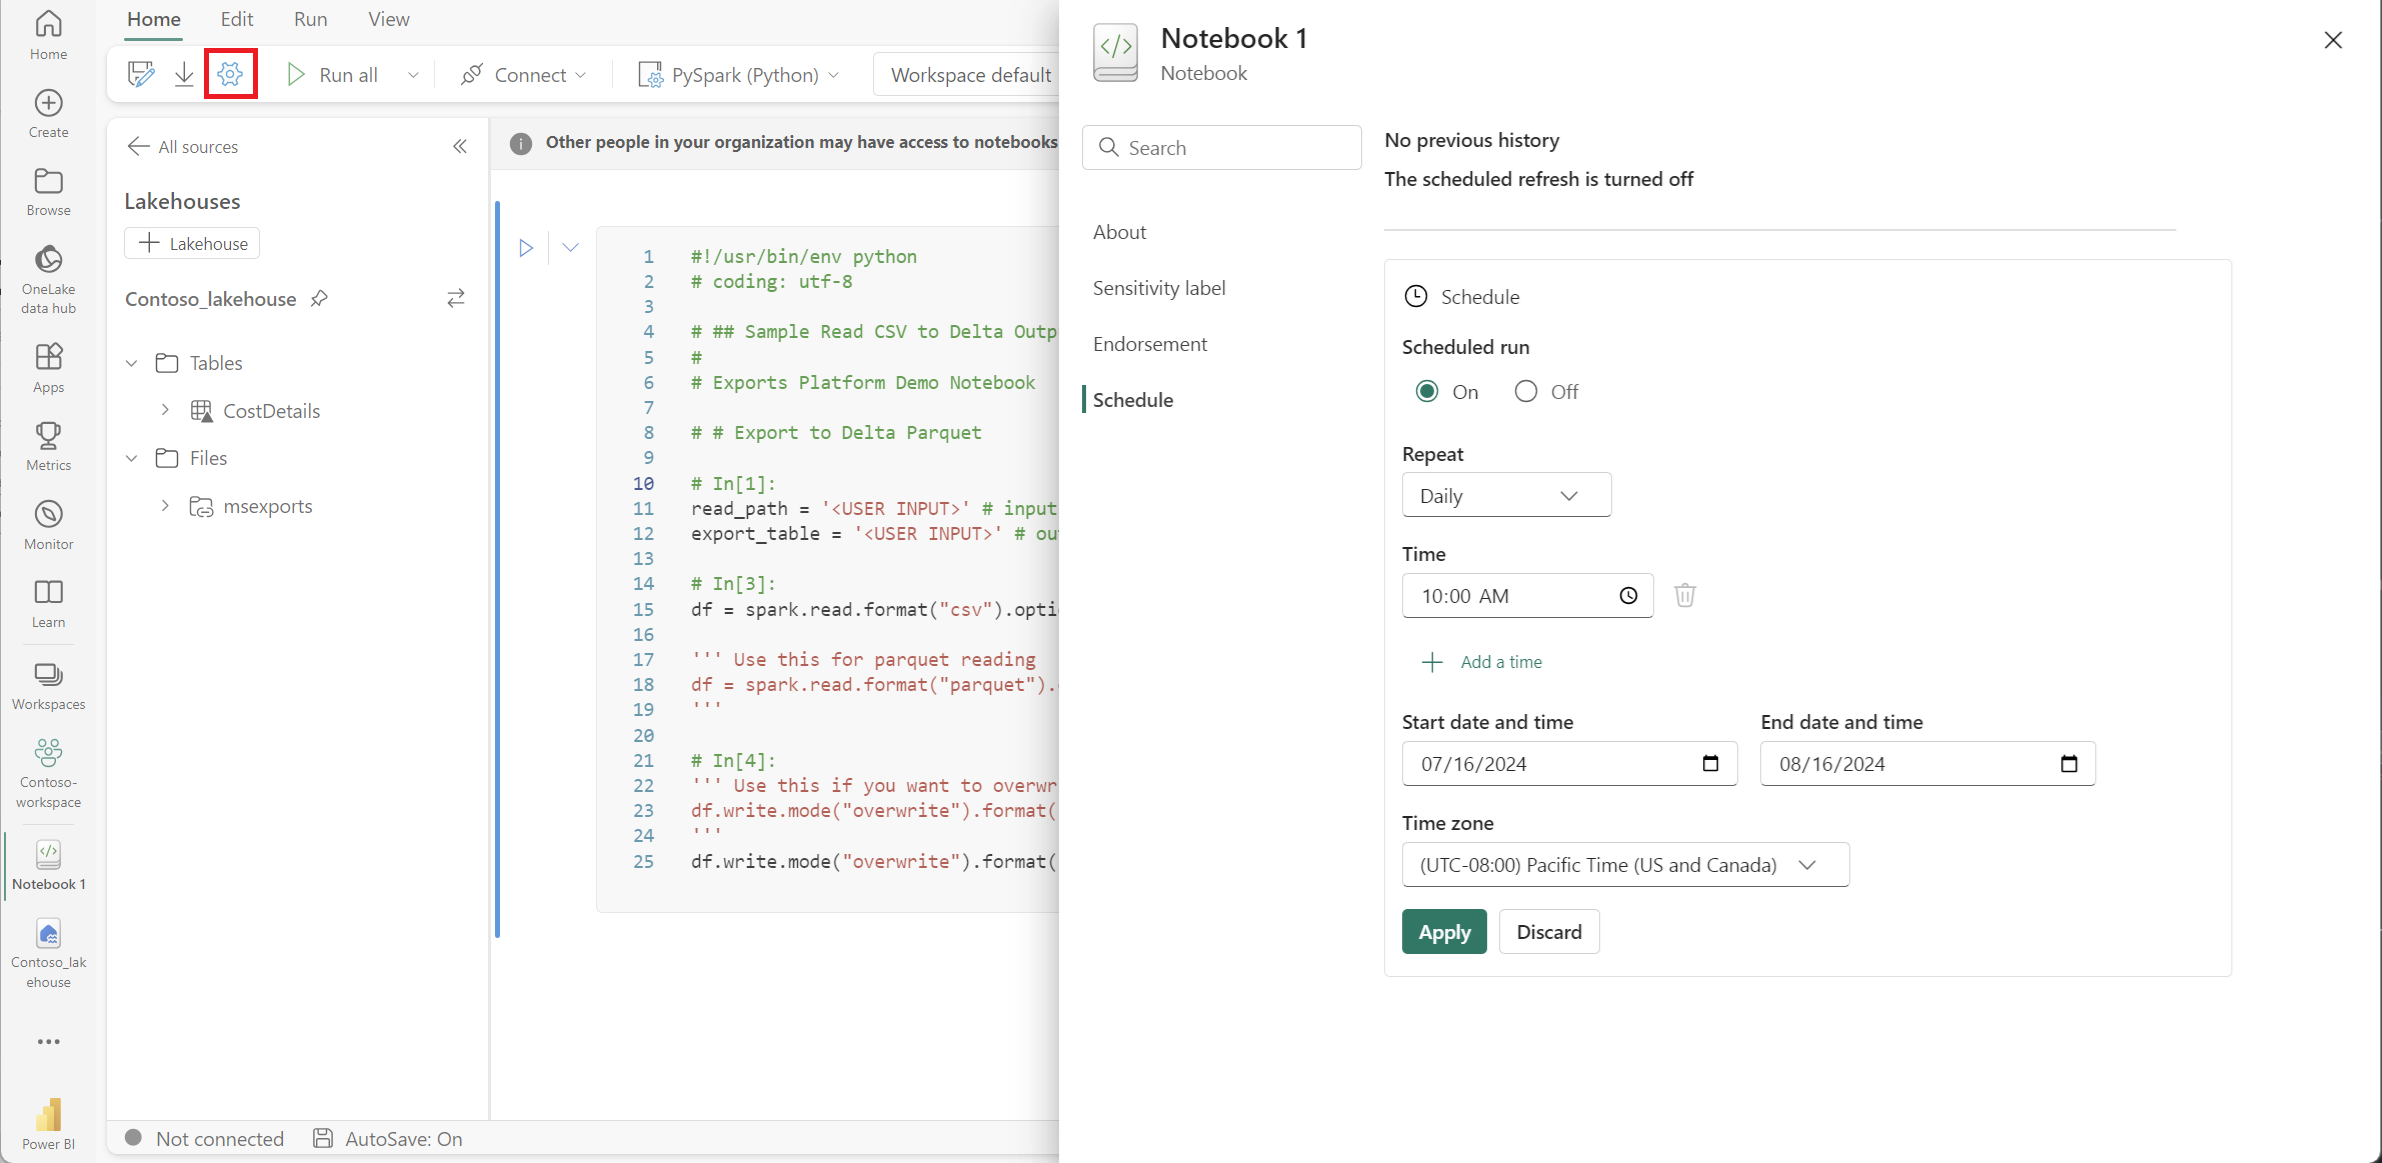
This process creates a table based on the CSV/Parquet file. For an automated process to ingest data using notebooks, see the Automate data ingestion tab.
Here’s an example screenshot showing data in the Lakehouse table.
Create a Power BI report
After the data is ingested into Fabric and tables are ready, you can move on to reporting.
- Sign in to the Fabric app using your Fabric free account or Microsoft Power BI account.
- Select the workspace where you created the lakehouse and then select the lakehouse.
- In the Explorer pane, select Tables and then select the table that you created.
- At the top of the page, select New semantic model and name the model. For more information, see Default Power BI semantic models.
- Select the Power BI symbol at the bottom left.
- Select the same semantic model to build reports and then use Copilot to generate insights from your ingested data.
Note
The Power BI demo uses simulated cost data for illustration purposes.
Related content
Related products:
Related solutions:
