Get started with Azure CDN development
Important
Azure CDN Standard from Microsoft (classic) will be retired on September 30, 2027. To avoid any service disruption, it's important that you migrate your Azure CDN Standard from Microsoft (classic) profiles to Azure Front Door Standard or Premium tier by September 30, 2027. For more information, see Azure CDN Standard from Microsoft (classic) retirement.
Azure CDN from Edgio was retired on January 15, 2025. For more information, see Azure CDN from Edgio retirement FAQ.
You can use the Azure CDN SDK for JavaScript to automate creation and management of CDN profiles and endpoints. This tutorial walks through the creation of a simple Node.js console application that demonstrates several of the available operations. This tutorial is not intended to describe all aspects of the Azure CDN SDK for JavaScript in detail.
To complete this tutorial, you should already have Node.js 6.x.x or higher installed and configured. You can use any text editor you want to create your Node.js application. To write this tutorial, I used Visual Studio Code.
Prerequisites
Before writing CDN management code, you must do some preparation to enable the code to interact with the Azure Resource Manager. To do this preparation, you need to:
- Create a resource group to contain the CDN profile created in this tutorial
- Configure Microsoft Entra ID to provide authentication for the application
- Apply permissions to the resource group so that only authorized users from your Microsoft Entra tenant can interact with the CDN profile
Creating the resource group
Sign in to the Azure Portal.
Click Create a resource.
Search for Resource group and in the Resource group pane, click Create.
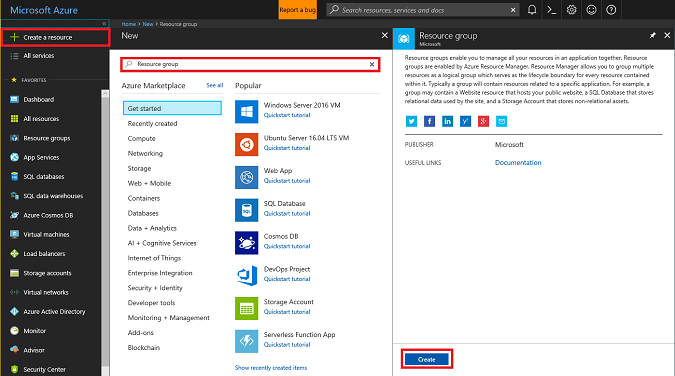
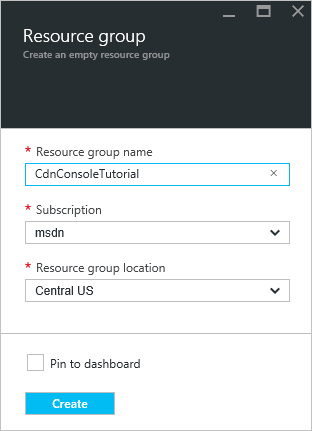
Name your resource group CdnConsoleTutorial. Select your subscription and choose a location near you. If you wish, you can click the Pin to dashboard checkbox to pin the resource group to the dashboard in the portal. Pinning makes it easier to find later. After you've made your selections, click Create.
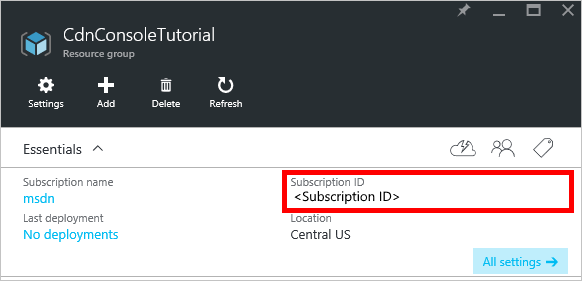
After the resource group is created, if you didn't pin it to your dashboard, you can find it by clicking Browse, then Resource Groups. To open it, click the resource group. Make a note of your Subscription ID. We need it later.
Creating the Microsoft Entra application and applying permissions
There are two approaches to app authentication with Microsoft Entra ID: Individual users or a service principal. A service principal is similar to a service account in Windows. Instead of granting a particular user permissions to interact with the CDN profiles, permissions are instead granted to the service principal. Service principals are typically used for automated, non-interactive processes. Even though this tutorial is writing an interactive console app, we'll focus on the service principal approach.
Creating a service principal consists of several steps, including creating a Microsoft Entra application. To create it, we're going to follow this tutorial.
Important
Be sure to follow all the steps in the linked tutorial. It is important that you complete it exactly as described. Make sure to note your tenant ID, tenant domain name (commonly a .onmicrosoft.com domain unless you've specified a custom domain), client ID, and client authentication key, as we need this information later. Be careful to guard your client ID and client authentication key, as these credentials can be used by anyone to execute operations as the service principal.
When you get to the step named Configure multi-tenant application, select No.
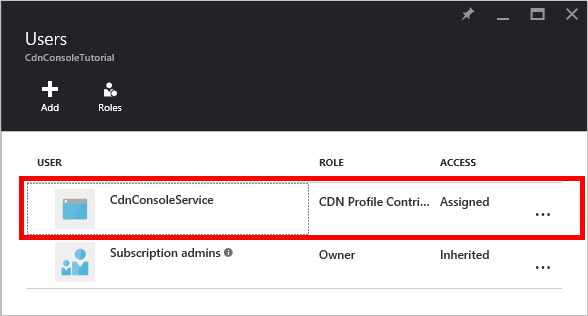
When you get to the step Assign the application to a role, use the resource group created earlier, CdnConsoleTutorial, but instead of the Reader role, assign the CDN Profile Contributor role. After you assign the application the CDN Profile Contributor role on your resource group, return to this tutorial.
Once you've created your service principal and assigned the CDN Profile Contributor role, the Users blade for your resource group should look similar to the following image.
Interactive user authentication
If, instead of a service principal, you'd rather have interactive individual user authentication, the process is similar to that for a service principal. In fact, you need to follow the same procedure, but make a few minor changes.
Important
Only follow these next steps if you are choosing to use individual user authentication instead of a service principal.
When creating your application, instead of Web Application, choose Native application.
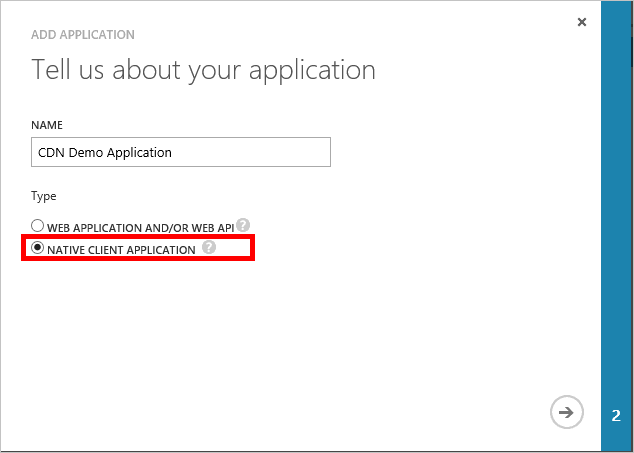
On the next page, you are prompted for a redirect URI. The URI won't be validated, but remember what you entered. You need it later.
There is no need to create a client authentication key.
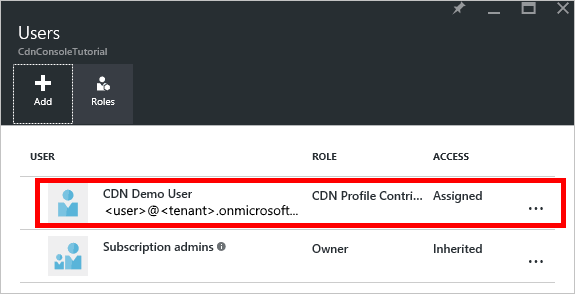
Instead of assigning a service principal to the CDN Profile Contributor role, we're going to assign individual users or groups. In this example, you can see that I've assigned CDN Demo User to the CDN Profile Contributor role.
Create your project and add npm dependencies
Now that we've created a resource group for our CDN profiles and given our Microsoft Entra application permission to manage CDN profiles and endpoints within that group, we can start creating our application.
Create a folder to store your application. From a console with the Node.js tools in your current path, set your current location to this new folder and initialize your project by executing:
npm init
You will then be presented a series of questions to initialize your project. For entry point, this tutorial uses app.js. You can see my other choices in the following example.
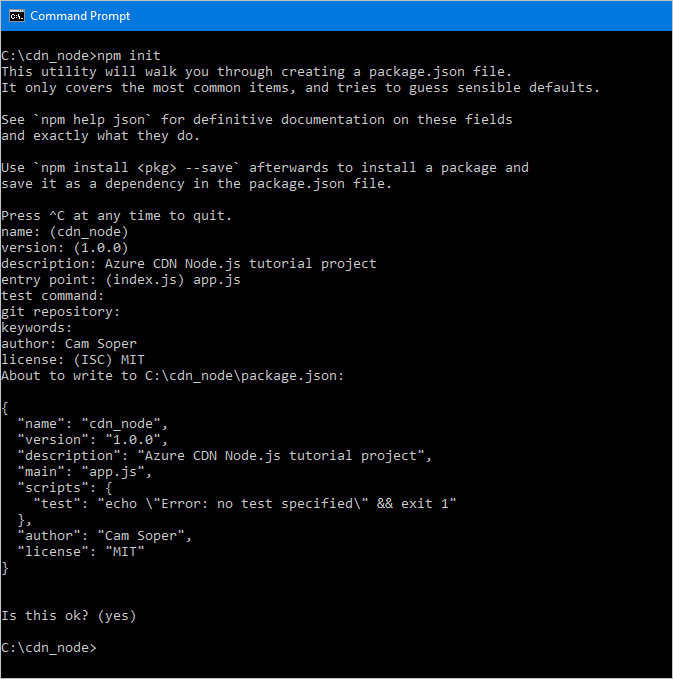
Our project is now initialized with a packages.json file. Our project is going to use some Azure libraries contained in npm packages. We'll use the library for Microsoft Entra authentication in Node.js (@Azure/identity) and the Azure CDN Client Library for JavaScript (@Azure/Azure Resource Manager-cdn). Let's add those to the project as dependencies.
npm install --save @azure/identity
npm install --save @azure/arm-cdn
After the packages are done installing, the package.json file should look similar to this example (version numbers may differ):
{
  "name": "cdn_node",
  "version": "1.0.0",
  "description": "Azure CDN Node.js tutorial project",
  "main": "app.js",
  "scripts": {
    "test": "echo \"Error: no test specified\" && exit 1"
  },
  "author": "Cam Soper",
  "license": "MIT",
  "dependencies": {
    "@azure/arm-cdn": "^7.0.1",
    "@azure/identity": "^2.0.4"
  }
}
Finally, using your text editor, create a blank text file and save it in the root of our project folder as app.js. We're now ready to begin writing code.
Requires, constants, authentication, and structure
With app.js open in our editor, let's get the basic structure of our program written.
Add the "requires" for our npm packages at the top with the following:
const { DefaultAzureCredential } = require("@azure/identity");
const { CdnManagementClient } = require('@azure/arm-cdn');
We need to define some constants our methods will use. Add the following. Be sure to replace the placeholders, including the <angle brackets>, with your own values as needed.
//Tenant app constants
const clientId = "<YOUR CLIENT ID>";
const clientSecret = "<YOUR CLIENT AUTHENTICATION KEY>"; //Only for service principals
const tenantId = "<YOUR TENANT ID>";

//Application constants
const subscriptionId = "<YOUR SUBSCRIPTION ID>";
const resourceGroupName = "CdnConsoleTutorial";
const resourceLocation = "<YOUR PREFERRED AZURE LOCATION, SUCH AS Central US>";
Next, we'll instantiate the CDN management client and give it our credentials.
var credentials = new DefaultAzureCredential();
var cdnClient = new CdnManagementClient(credentials, subscriptionId);
Our Node.js console application is going to take some command-line parameters. Let's validate that at least one parameter was passed.
//Collect command-line parameters
var parms = process.argv.slice(2);

//Do we have parameters?
if(parms == null || parms.length == 0)
{
    console.log("Not enough parameters!");
    console.log("Valid commands are list, delete, create, and purge.");
    process.exit(1);
}
That brings us to the main part of our program, where we branch off to other functions based on what parameters were passed.
switch(parms[0].toLowerCase())
{
    case "list":
        cdnList();
        break;

    case "create":
        cdnCreate();
        break;

    case "delete":
        cdnDelete();
        break;

    case "purge":
        cdnPurge();
        break;

    default:
        console.log("Valid commands are list, delete, create, and purge.");
        process.exit(1);
}
At several places in our program, we'll need to make sure the right number of parameters were passed in and display some help if they don't look correct. Let's create functions to do that.
function requireParms(parmCount) {
    if(parms.length < parmCount) {
        usageHelp(parms[0].toLowerCase());
        process.exit(1);
    }
}

function usageHelp(cmd) {
    console.log("Usage for " + cmd + ":");
    switch(cmd)
    {
        case "list":
            console.log("list profiles");
            console.log("list endpoints <profile name>");
            break;

        case "create":
            console.log("create profile <profile name>");
            console.log("create endpoint <profile name> <endpoint name> <origin hostname>");
            break;

        case "delete":
            console.log("delete profile <profile name>");
            console.log("delete endpoint <profile name> <endpoint name>");
            break;

        case "purge":
            console.log("purge <profile name> <endpoint name> <path>");
            break;

        default:
            console.log("Invalid command.");
    }
}
Finally, the functions we'll be using on the CDN management client are asynchronous, so they need a method to call back when they're done. Let's make one that can display the output from the CDN management client (if any) and exit the program gracefully.
function callback(err, result, request, response) {
    if (err) {
        console.log(err);
        process.exit(1);
    } else {
        console.log((result == null) ? "Done!" : result);
        process.exit(0);
    }
}
Now that the basic structure of our program is written, we should create the functions called based on our parameters.
List CDN profiles and endpoints
Let's start with code to list our existing profiles and endpoints. My code comments provide the expected syntax so we know where each parameter goes.
// list profiles
// list endpoints <profile name>
function cdnList(){
    requireParms(2);
    switch(parms[1].toLowerCase())
    {
        case "profiles":
            console.log("Listing profiles...");
            cdnClient.profiles.listByResourceGroup(resourceGroupName, callback);
            break;

        case "endpoints":
            requireParms(3);
            console.log("Listing endpoints...");
            cdnClient.endpoints.listByProfile(resourceGroupName, parms[2], callback);
            break;

        default:
            console.log("Invalid parameter.");
            process.exit(1);
    }
}
Create CDN profiles and endpoints
Next, we'll write the functions to create profiles and endpoints.
function cdnCreate() {
    requireParms(2);
    switch(parms[1].toLowerCase())
    {
        case "profile":
            cdnCreateProfile();
            break;

        case "endpoint":
            cdnCreateEndpoint();
            break;

        default:
            console.log("Invalid parameter.");
            process.exit(1);
    }
}

// create profile <profile name>
async function cdnCreateProfile() {
    requireParms(3);
    console.log("Creating profile...");
    var standardCreateParameters = {
        location: resourceLocation,
        sku: {
            name: 'Standard_Verizon'
        }
    };

    await cdnClient.profiles.beginCreateAndWait( resourceGroupName, parms[2], standardCreateParameters, callback);
}

// create endpoint <profile name> <endpoint name> <origin hostname>
async function cdnCreateEndpoint() {
    requireParms(5);
    console.log("Creating endpoint...");
    var endpointProperties = {
        location: resourceLocation,
        origins: [{
            name: parms[4],
            hostName: parms[4]
        }]
    };

    await cdnClient.endpoints.beginCreateAndWait(resourceGroupName, parms[2], parms[3], endpointProperties, callback);
}
Purge an endpoint
Assuming the endpoint has been created, one common task that we might want to perform in our program is purging content in our endpoint.
// purge <profile name> <endpoint name> <path>
async function cdnPurge() {
    requireParms(4);
    console.log("Purging endpoint...");
    var purgeContentPaths = [ parms[3] ];
    await cdnClient.endpoints.beginPurgeContentAndWait(resourceGroupName, parms[2], parms[3], purgeContentPaths, callback);
}
Delete CDN profiles and endpoints
The last function we will include deletes endpoints and profiles.
async function cdnDelete() {
    requireParms(2);
    switch(parms[1].toLowerCase())
    {
        // delete profile <profile name>
        case "profile":
            requireParms(3);
            console.log("Deleting profile...");
            await cdnClient.profiles.beginDeleteAndWait(resourceGroupName, parms[2], callback);
            break;

        // delete endpoint <profile name> <endpoint name>
        case "endpoint":
            requireParms(4);
            console.log("Deleting endpoint...");
            await cdnClient.endpoints.beginDeleteAndWait(resourceGroupName, parms[2], parms[3], callback);
            break;

        default:
            console.log("Invalid parameter.");
            process.exit(1);
    }
}
Running the program
We can now execute our Node.js program using our favorite debugger or at the console.
Tip
If you're using Visual Studio Code as your debugger, you'll need to set up your environment to pass in the command-line parameters. Visual Studio Code does this in the launch.json file. Look for a property named args and add an array of string values for your parameters, so that it looks similar to this: "args": ["list", "profiles"].
Let's start by listing our profiles.
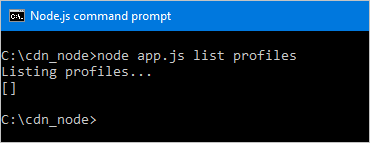
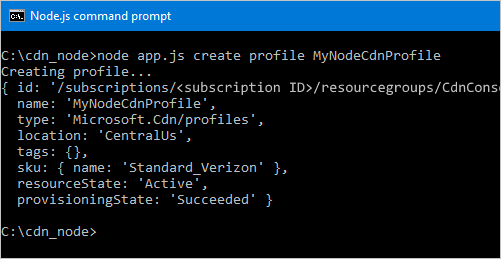
We got back an empty array. Since we don't have any profiles in our resource group, that's expected. Let's create a profile now.
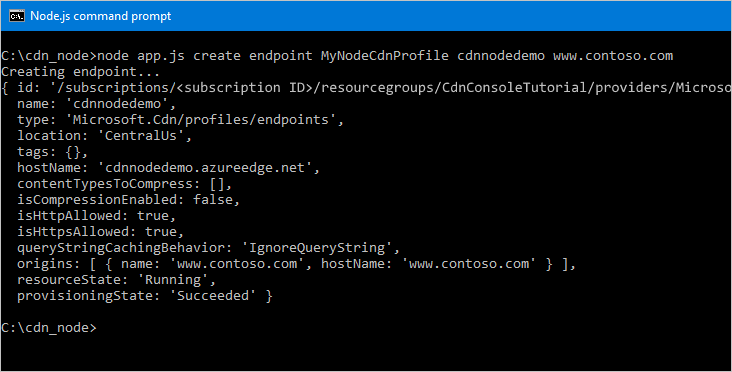
Now, let's add an endpoint.
Finally, let's delete our profile.

Next Steps
To see the reference for the Azure CDN SDK for JavaScript, view the reference.
To find additional documentation on the Azure SDK for JavaScript, view the full reference.
Manage your CDN resources with PowerShell.