Install Log Analytics agent on Windows computers
This article provides information on how to install the Log Analytics agent on Windows computers by using the following methods:
- Manual installation using the setup wizard or command line.
- Azure Automation Desired State Configuration (DSC).
The installation methods described in this article are typically used for virtual machines on-premises or in other clouds. For more efficient options that you can use for Azure virtual machines, see Installation options.
Important
The legacy Log Analytics agent is deprecated as of August 31, 2024. Microsoft will no longer provide any support for the Log Analytics agent. If you use the Log Analytics agent to ingest data to Azure Monitor, migrate now to Azure Monitor agent.
Note
Installing the Log Analytics agent typically won't require you to restart the machine.
Requirements
Supported operating systems
For a list of Windows versions supported by the Log Analytics agent, see Overview of Azure Monitor agents.
SHA-2 code signing support requirement
The Windows agent began to exclusively use SHA-2 signing on August 17, 2020. This change affected customers using the Log Analytics agent on a legacy OS as part of any Azure service, such as Azure Monitor, Azure Automation, Azure Update Management, Azure Change Tracking, Microsoft Defender for Cloud, Microsoft Sentinel, and Windows Defender Advanced Threat Protection.
The change doesn't require any customer action unless you're running the agent on a legacy OS version, such as Windows 7, Windows Server 2008 R2, and Windows Server 2008. Customers running on a legacy OS version were required to take the following actions on their machines before August 17, 2020, or their agents stopped sending data to their Log Analytics workspaces:
Install the latest service pack for your OS. The required service pack versions are:
- Windows 7 SP1
- Windows Server 2008 SP2
- Windows Server 2008 R2 SP1
Install the SHA-2 signing Windows updates for your OS as described in 2019 SHA-2 code signing support requirement for Windows and WSUS.
Update to the latest version of the Windows agent (version 10.20.18067).
We recommend that you configure the agent to use TLS 1.2.
Network requirements
See Log Analytics agent overview for the network requirements for the Windows agent.
Configure Agent to use TLS 1.2
TLS 1.2 protocol ensures the security of data in transit for communication between the Windows agent and the Log Analytics service. If you're installing on an operating system without TLS enabled by default, configure TLS 1.2 using the steps below.
Locate the following registry subkey: HKEY_LOCAL_MACHINE\System\CurrentControlSet\Control\SecurityProviders\SCHANNEL\Protocols.
Create a subkey under Protocols for TLS 1.2: HKLM\System\CurrentControlSet\Control\SecurityProviders\SCHANNEL\Protocols\TLS 1.2.
Create a Client subkey under the TLS 1.2 protocol version subkey you created earlier. For example, HKLM\System\CurrentControlSet\Control\SecurityProviders\SCHANNEL\Protocols\TLS 1.2\Client.
Create the following DWORD values under HKLM\System\CurrentControlSet\Control\SecurityProviders\SCHANNEL\Protocols\TLS 1.2\Client:
- Enabled [Value = 1]
- DisabledByDefault [Value = 0]
Configure .NET Framework 4.6 or later to support secure cryptography because by default it's disabled. The strong cryptography uses more secure network protocols like TLS 1.2 and blocks protocols that aren't secure.
- Locate the following registry subkey: HKEY_LOCAL_MACHINE\SOFTWARE\Microsoft\.NETFramework\v4.0.30319.
- Create the DWORD value SchUseStrongCrypto under this subkey with a value of 1.
- Locate the following registry subkey: HKEY_LOCAL_MACHINE\SOFTWARE\WOW6432Node\Microsoft\.NETFramework\v4.0.30319.
- Create the DWORD value SchUseStrongCrypto under this subkey with a value of 1.
- Restart the system for the settings to take effect.
Workspace ID and key
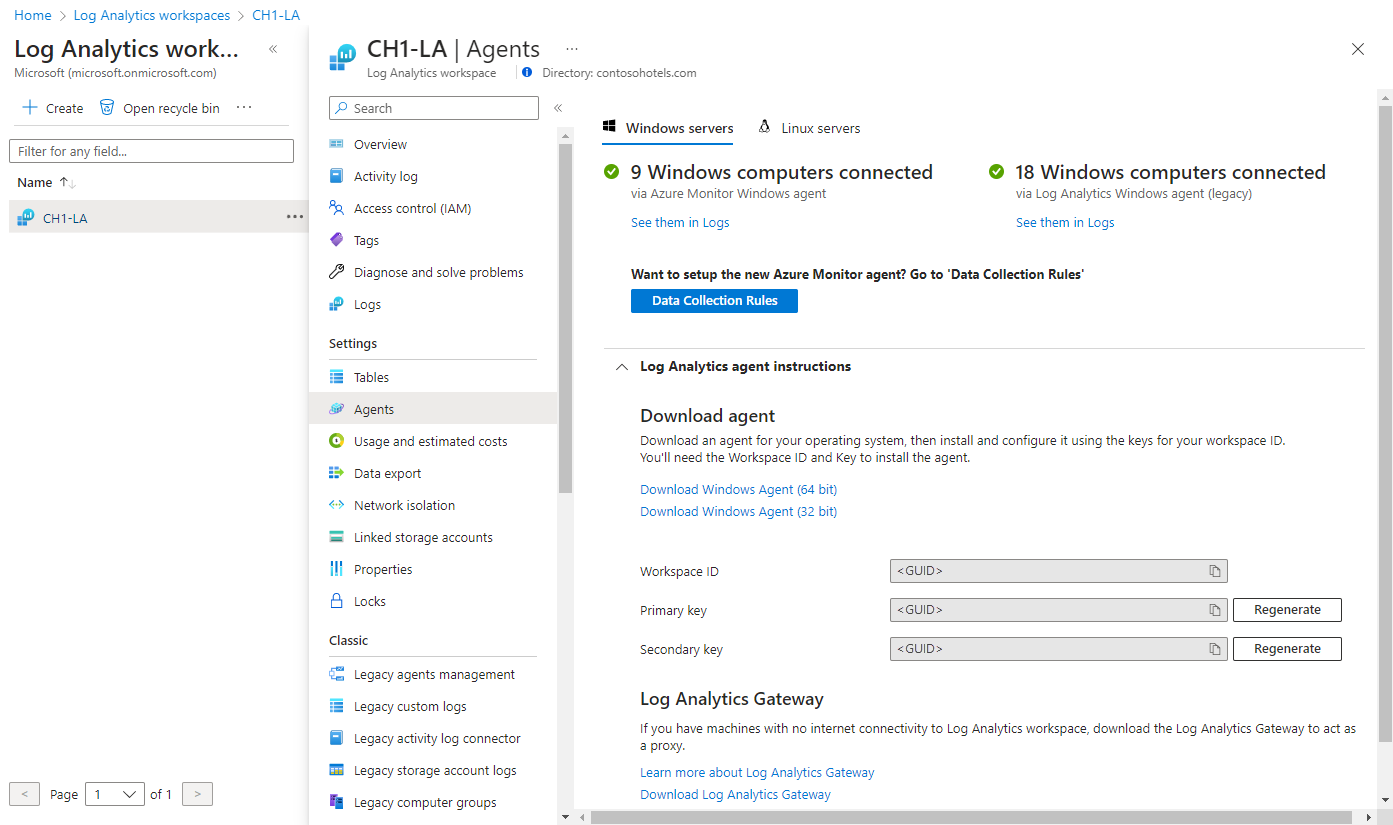
Regardless of the installation method used, you'll require the workspace ID and key for the Log Analytics workspace that the agent will connect to. Select the workspace from the Log Analytics workspaces menu in the Azure portal. Then in the Settings section, select Agents.
Note
You can't configure the agent to report to more than one workspace during initial setup. Add or remove a workspace after installation by updating the settings from Control Panel or PowerShell.
Note
While regenerating the Log Analytics Workspace shared keys is possible, the intention for this is not to immediately restrict access to any agents currently using those keys. Agents use the key to generate a certificate that expires after three months. Regenerating the shared keys will only prevent agents from renewing their certificates, not continuing to use those certificates until they expire.
Install the agent
Important
The legacy Log Analytics agent is deprecated as of August 31, 2024. Microsoft will no longer provide any support for the Log Analytics agent. If you use the Log Analytics agent to ingest data to Azure Monitor, migrate now to Azure Monitor agent.
The following steps install and configure the Log Analytics agent in Azure and Azure Government cloud by using the setup wizard for the agent on your computer. If you want to learn how to configure the agent to also report to a System Center Operations Manager management group, see deploy the Operations Manager agent with the Agent Setup Wizard.
- In your Log Analytics workspace, from the Windows Servers page you navigated to earlier, select the appropriate Download Windows Agent version to download depending on the processor architecture of the Windows operating system.
- Run Setup to install the agent on your computer.
- On the Welcome page, click Next.
- On the License Terms page, read the license and then click I Agree.
- On the Destination Folder page, change or keep the default installation folder and then click Next.
- On the Agent Setup Options page, choose to connect the agent to Azure Log Analytics and then click Next.
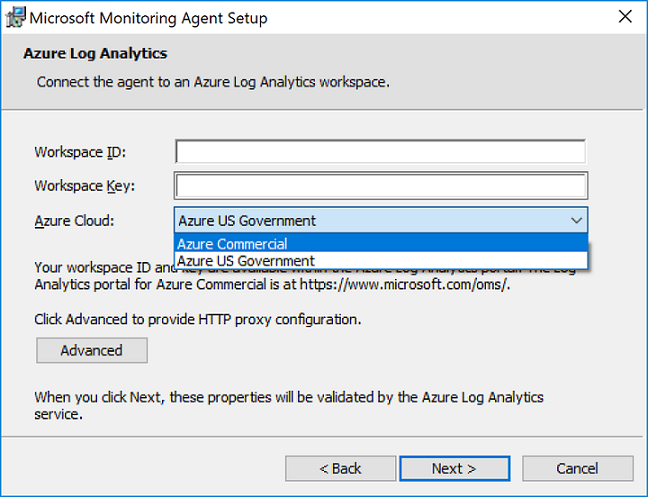
- On the Azure Log Analytics page, perform the following:
- Paste the Workspace ID and Workspace Key (Primary Key) that you copied earlier. If the computer should report to a Log Analytics workspace in Azure Government cloud, select Azure US Government from the Azure Cloud drop-down list.
- If the computer needs to communicate through a proxy server to the Log Analytics service, click Advanced and provide the URL and port number of the proxy server. If your proxy server requires authentication, type the username and password to authenticate with the proxy server and then click Next.
- Click Next once you have completed providing the necessary configuration settings.

- On the Ready to Install page, review your choices and then click Install.
- On the Configuration completed successfully page, click Finish.
When complete, the Microsoft Monitoring Agent appears in Control Panel. To confirm it is reporting to Log Analytics, review Verify agent connectivity to Log Analytics.
Verify agent connectivity to Azure Monitor
After installation of the agent is finished, you can verify that it's successfully connected and reporting in two ways.
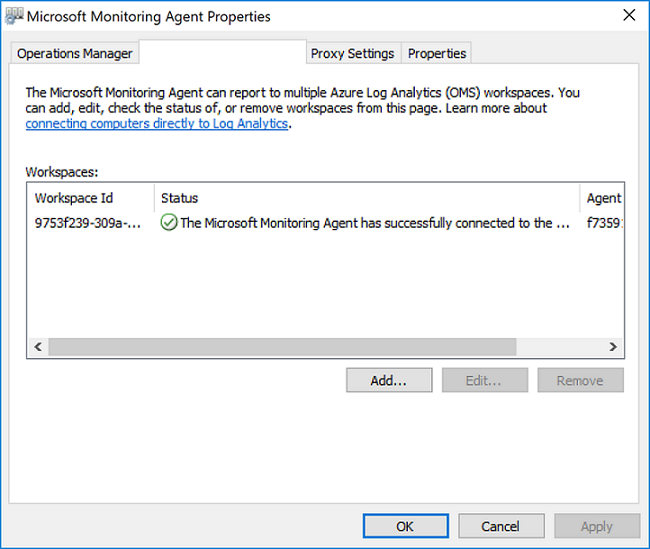
From System and Security in Control Panel, find the item Microsoft Monitoring Agent. Select it, and on the Azure Log Analytics tab, the agent should display a message stating The Microsoft Monitoring Agent has successfully connected to the Microsoft Operations Management Suite service.
You can also perform a log query in the Azure portal:
In the Azure portal, search for and select Monitor.
Select Logs on the menu.
On the Logs pane, in the query field, enter:
Heartbeat
| where Category == "Direct Agent"
| where TimeGenerated > ago(30m)
In the search results that are returned, you should see heartbeat records for the computer that indicate it's connected and reporting to the service.
Cache information
Data from the Log Analytics agent is cached on the local machine at C:\Program Files\Microsoft Monitoring Agent\Agent\Health Service State before it's sent to Azure Monitor. The agent attempts to upload every 20 seconds. If it fails, it will wait an exponentially increasing length of time until it succeeds. It will wait 30 seconds before the second attempt, 60 seconds before the next, 120 seconds, and so on to a maximum of 8.5 hours between retries until it successfully connects again. This wait time is slightly randomized to avoid all agents simultaneously attempting connection. Oldest data is discarded when the maximum buffer is reached.
The default cache size is 50 MB, but it can be configured between a minimum of 5 MB and maximum of 1.5 GB. It's stored in the registry key HKEY_LOCAL_MACHINE\SYSTEM\CurrentControlSet\Services\HealthService\Parameters\Persistence Cache Maximum. The value represents the number of pages, with 8 KB per page.
Next steps
- Review Managing and maintaining the Log Analytics agent for Windows and Linux to learn about how to reconfigure, upgrade, or remove the agent from the virtual machine.
- Review Troubleshooting the Windows agent if you encounter issues while you install or manage the agent.

