Electronic invoicing for Poland
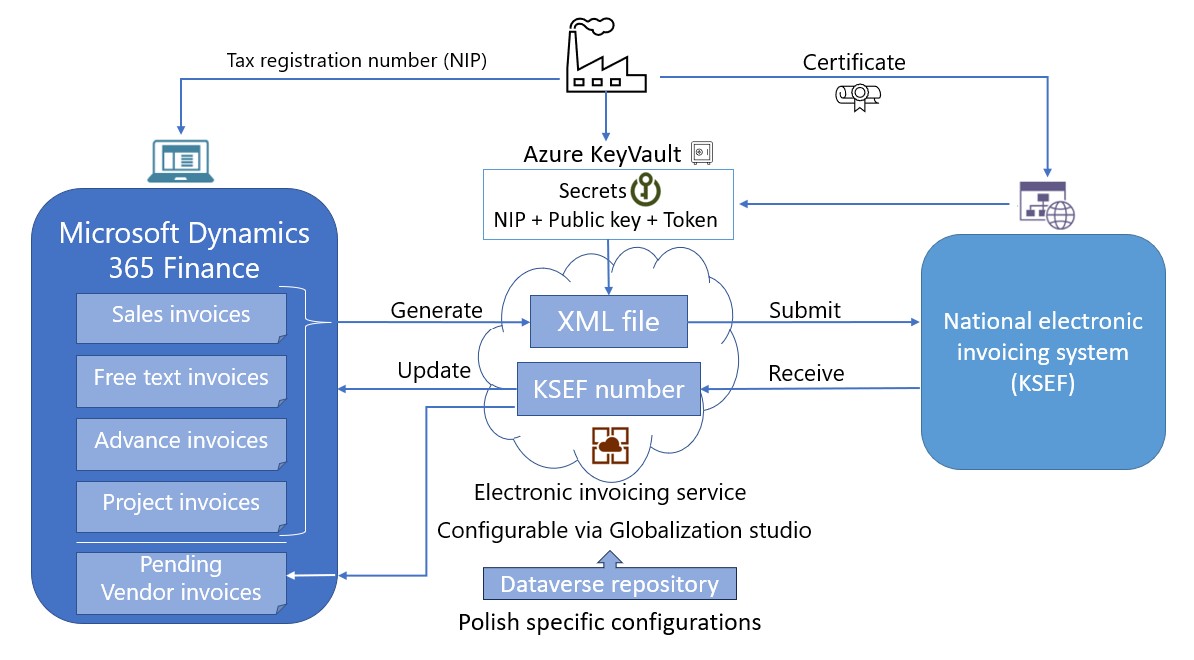
This article provides information that will help you get started with Electronic invoicing for Poland. It guides you through the configuration steps that are country/region-dependent in Microsoft Dynamics 365 Finance or Dynamics 365 Supply Chain Management.
After you configure electronic invoicing, you can submit and receive the XML files of electronic invoices according to the regulatory requirements in Poland.

Note
The electronic invoicing approach that this article describes is implemented by using an invoicing service that's applicable only to cloud deployments of Finance or Supply Chain Management.
Prerequisites
Before you begin the procedures in this article, complete the following prerequisites:
- The primary address of the legal entity must be in Poland.
- The legal entity must be registered as a taxpayer in Poland and must have a valid tax identification number (Numer identyfikacji podatkowej [NIP]).
- Sign in to the Polish National system for electronic invoicing (Krajowy System e-Faktur [KSeF]) via a trusted profile, qualified signature, or qualified seal. Obtain a non-expiring token that the Invoicing Service can use to securely communicate with KSeF.
- Obtain the public key (in PEM format) from the appropriate KSeF environment. The environment can be of the test, pre-production, or production type.
- Become familiar with electronic invoicing as it's described in Electronic invoicing overview.
- Do the common part of electronic invoicing service configuration as described in Set up electronic invoicing.
Create the Azure Key Vault configuration
Create an Azure key vault to store the required secrets that are issued for your company. For more information, see Configure Azure resources for Electronic invoicing.
Add the following required elements in the key vault:
The secret for the obtained token.
The secret for the client ID, which must equal the taxpayer's tax identification number (NIP).
The secret for the obtained public key.
Note
The value of the public key must be wrapped in the following commands.
----BEGIN PUBLIC KEY----
…
----END PUBLIC KEY----
Configure electronic invoicing Key Vault parameters
To configure electronic invoicing Key Vault parameters, follow these steps.
Go to Organization administration > Setup > Electronic document parameters.
On the Electronic invoicing tab, in the Key Vault settings section, in the Key Vault field, select the reference to the key vault that you created in the previous section of this article.
In the SAS token secret field, select the name of the storage account secret URL that must be used to authenticate access to the storage account.
Select Key Vault parameters.
On the Key Vault parameters page, in the Certificates section, select Add to create new elements of the appropriate type for each secret that is described in the previous section.
- The token element of the Secret type.
- The Client ID element of the Secret type.
- The Public key element of the Secret type.
Note
The values in the Name column should match the names of the secrets that are described in the previous section.
Import the electronic invoicing feature
Go to Globalization Studio, and select the Electronic invoicing tile. Then import the latest version of the Polish electronic invoice (PL) Globalization feature as described in Import features from the repository.
In the Electronic reporting workspace, on the Reporting configurations tile, make sure that the following Electronic reporting configurations are successfully imported as result of the Polish electronic invoice (PL) Globalization feature import.
- Invoice model
- Invoice model mapping
- Advance invoice model mapping
- Sales e-invoice (PL)
- Project e-invoice (PL)
- Advance e-invoice (PL)
- Customer invoice context model
- Response message model
- Response message model mapping to destination (PL)
- KSeF response data import format (PL)
Note
If due to some reason the mentioned Electronic reporting configurations were not imported then import them manually as described in Import Electronic reporting (ER) configurations from Dataverse.
In the Electronic reporting workspace, on the Reporting configurations tile, additionally import the latest versions of the following Electronic reporting configurations required for receiving incoming vendor invoices.
- Vendor invoice import (PL)
- Vendor invoice Mapping to destination (PL)
Configure the import channel
In the Electronic reporting workspace, on the Reporting configurations tile, select the Customer invoice context model configuration.
Select Create configuration, and then, in the dropdown dialog box, select Derive from Name: Customer invoice context model, Microsoft to create a derived configuration.
Open the derived configuration for editing in the designer, and then select Map model to datasource.
Open the DataChannel definition for editing in the designer.
In the Data sources tree, expand the $Context_Channel container.
In the Value field, select Edit, and then enter the name of the data channel. Make a note of the value, because you will use it in later configuration steps.

Save your changes and complete the derived configuration.
Configure the electronic invoicing feature
Some of the parameters from the Polish electronic invoice (PL) electronic invoicing feature are published with default values. Before you deploy the electronic invoicing feature to the service, review the default values, and update them as required, so that they better reflect your business operations.
To review and update the Polish electronic invoice (PL) electronic invoicing feature configuration, follow these steps.
Go to Globalization Studio, and select the Electronic invoicing tile. Then import the latest version of the Polish electronic invoice (PL) Globalization feature as described in Import features from the repository.
Create a copy of the imported Globalization feature, and select your configuration provider for it, as described in Create a Globalization feature.
On the Versions tab, verify that the Draft version is selected.
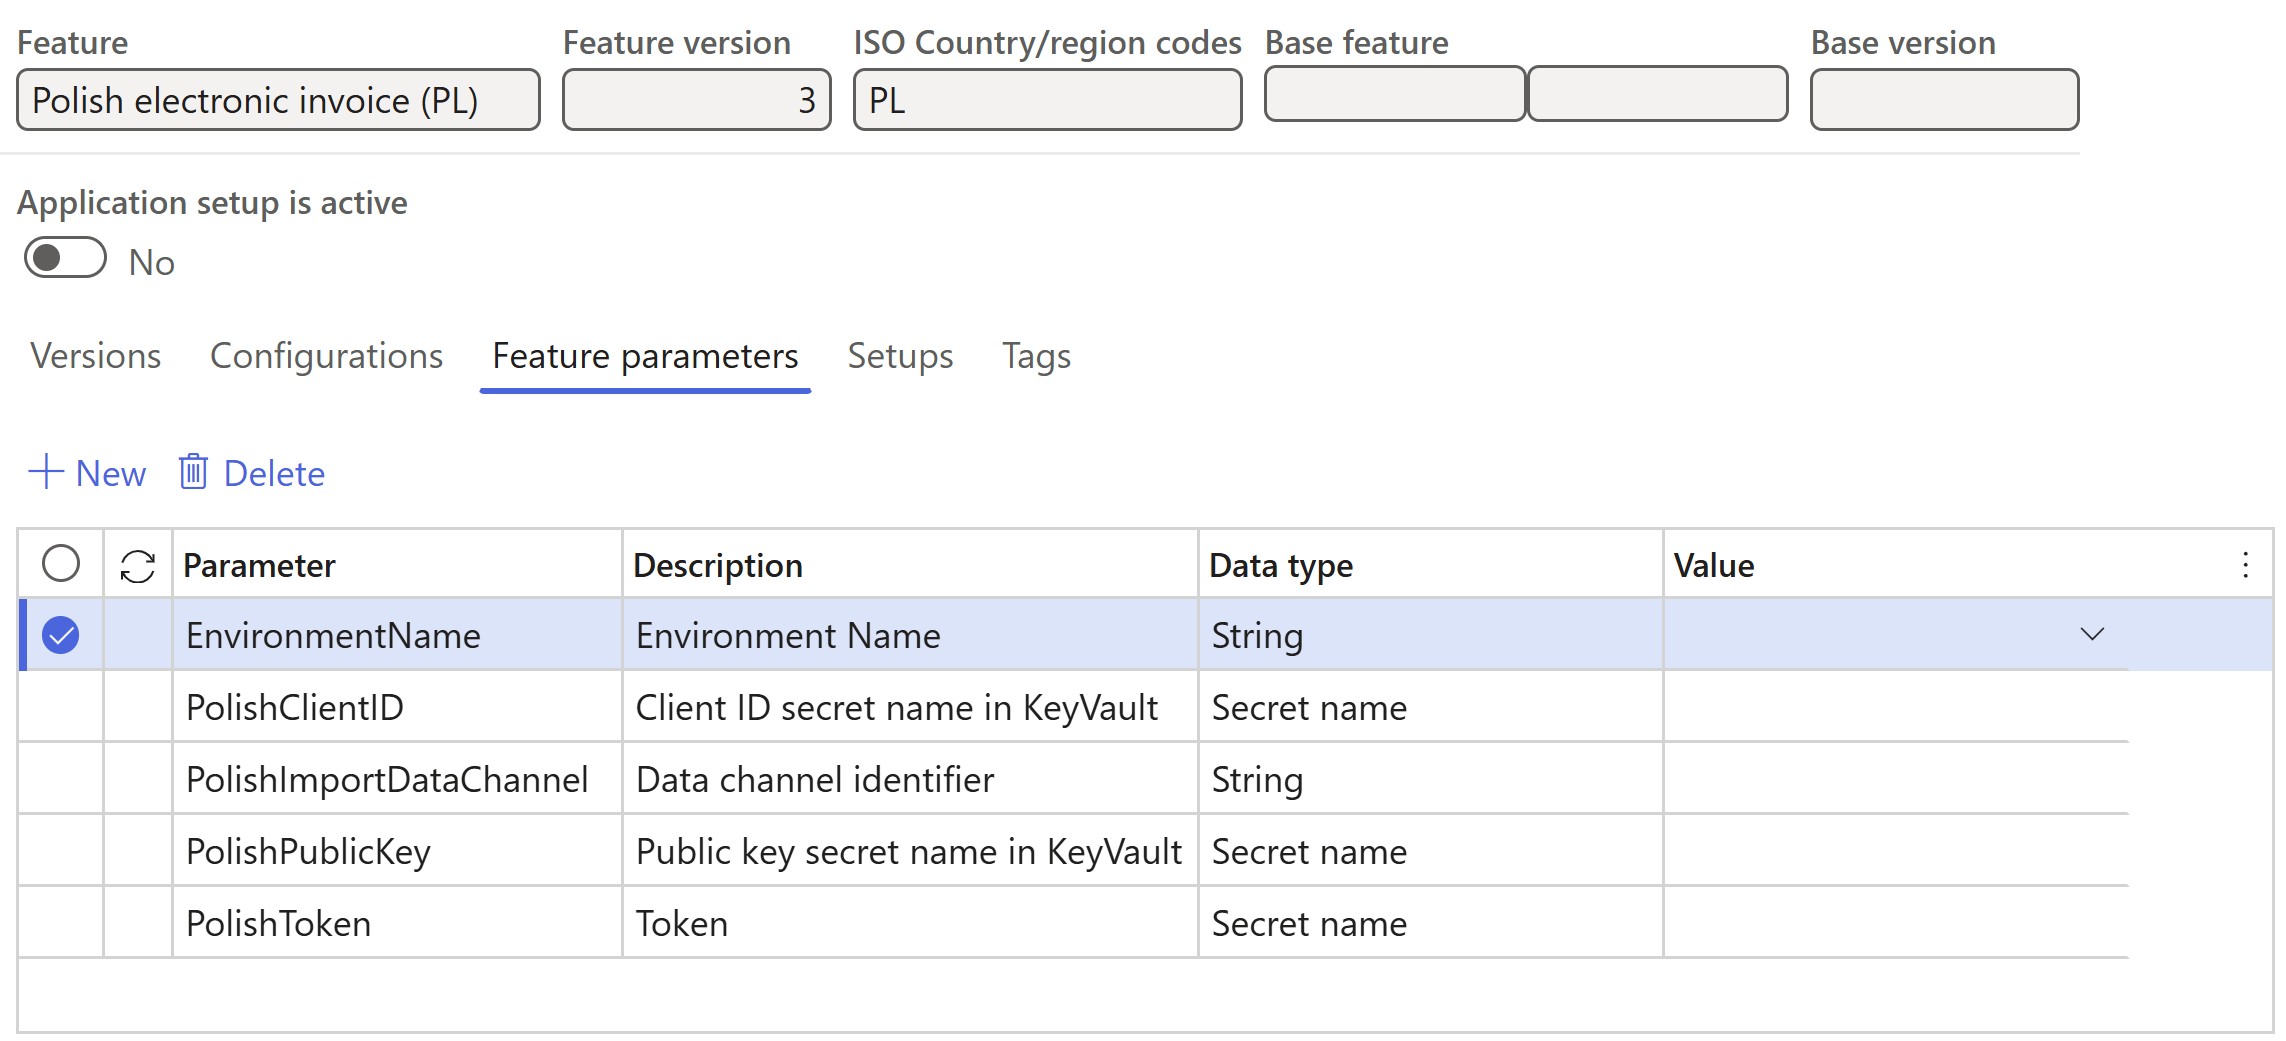
On the Feature parameters tab, specify values for the following connection and integration parameters. These parameters are required for interoperation with Polish KSEF services.
- EnvironmentName – select the type of the environment, depending on the implementation stage: Test, Demo, or Prod.
- PolishClientID – select the name of the client ID that you previously created.
- PolishImportDataChannel – enter the name of the data channel that you previously defined.
- PolishPublicKey – select the name of the public key that you previously created.
- PolishToken – select the name of the token that you previously created.

On the Setups tab, in the grid, select the Import vendor invoices derived feature setup and select Edit.
On the Applicability rules tab, in the Set up applicability rule section, in the Value field, enter the name of the data channel that you previously defined.
On the Variables tab, make a note of the OutputFile name, because you will use it in later configuration steps.
Select Save, and close the page.
The copy of the feature is always created as a Draft version. Complete and deploy the feature as described in Complete and deploy a Globalization feature.
Configure electronic document parameters
Go to Organization administration > Setup > Electronic document parameters.
On the Electronic document tab, add records for the Customer Invoice journal, Project invoice, and Advance invoice table names.
For each table name, set the Document context and Electronic document model mapping fields in accordance with Set up electronic invoicing parameters.

Note
If you have created the derived analogues of the mentioned above Electronic Reporting configurations then use it instead of standard ones.
For the Customer Invoice journal table name, select Response types.
Select New to create a response type, and enter the following values:
- In the Response type field, enter ResponseData (the default value).
- In the Submission status field, select Pending.
- In the Model mapping field, select KSeF response data import format (PL).

Note
ResponseData is the default name of the response type. If you must change it, make sure that the new name matches the name that was defined for the related variable of the To client type in the corresponding feature setups. To validate the variable's value, go to Globalization Studio, and select the Electronic invoicing tile. On the Electronic invoicing features page, verify that the Polish electronic invoice (PL) electronic invoicing feature is selected. On the Setups tab, in the grid, select the Submit customer invoice derived feature setup. Then select Edit or View, depending on the status of the feature version.
Repeat steps 4 and 5 for the Project invoice and Advance invoice table names.
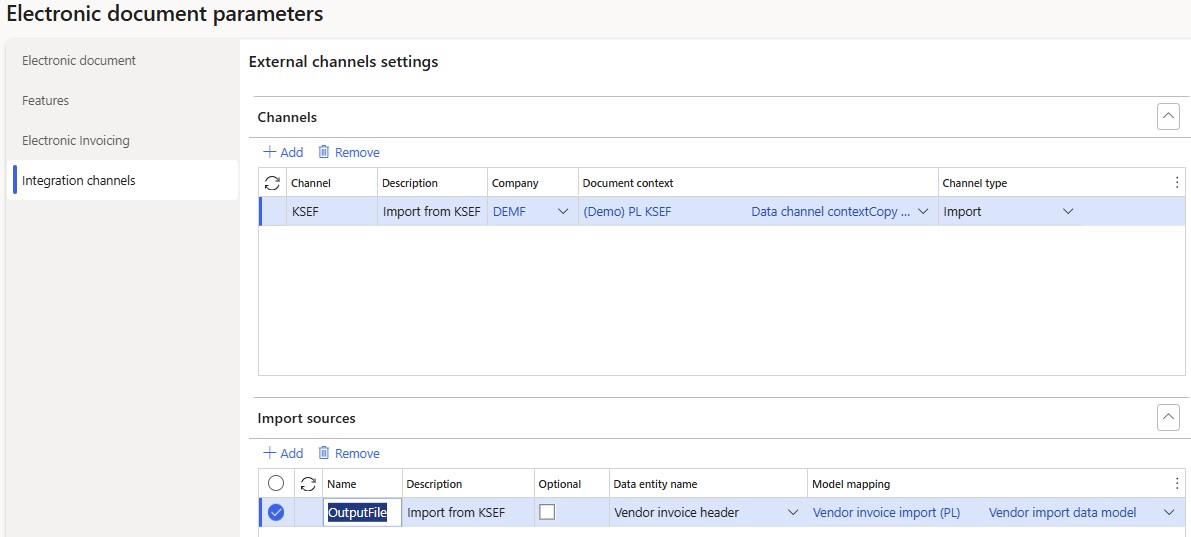
On the Integration channels tab, in the Channels section, in the Channel field, enter the name of the data channel that you previously defined.
In the Company field, select a required legal entity. In the Document context field, select the context configuration that you previously created.
In the Import sources section, in the Name field, enter the OutputFile name that is actually used.
In the Data entity name field, select Vendor invoice header. In the Model mapping field, reference the Vendor invoice import (PL) configuration.

Select Save, and close the page.
Configure Finance business data
Prerequisites
The primary address of the legal entity must be in Poland.
Configure legal entity data
To configure the legal entity data, complete the steps in each of the following sections.
Enter a legal entity's address
To enter a legal entity's address, follow these steps.
Go to Organization administration > Organizations > Legal entities.
Select a legal entity, and then, on the Addresses FastTab, add a valid primary address for the legal entity.
Note
Make sure that the following mandatory address elements are defined: country/region code, ZIP/postal code, city, and building number.
Enter a legal entity's tax registration number
To enter a legal entity's tax registration number, follow these steps.
- Go to Organization administration > Organizations > Legal entities.
- Select a legal entity, and then, on the Tax registration FastTab, in the Tax registration number field, enter a valid tax registration number for the legal entity. This number will be used as the seller's tax identification number (NIP).
Configure customer data
To configure the customer data, complete the steps in each of the following sections.
Enter a customer's address
To enter a customer's address, follow these steps.
Go to Accounts receivable > Customers > All customers.
Select a customer, and then, on the Addresses FastTab, add a valid address for the customer.
Note
- For addresses in Poland, make sure that the following mandatory elements are defined: country/region code, ZIP/postal code, city, and building number.
- For foreign addresses, make sure that at least the following mandatory elements are defined: country/region code and city.
Enter a customer's tax registration number
To enter a customer's tax registration number, follow these steps.
- Go to Accounts receivable > Customers > All customers.
- Select a customer, and then, on the Invoice and delivery FastTab, in the Tax exempt number field, enter a valid tax registration number for the customer. This number will be used as the buyer's tax identification number (NIP).
Configure additional data
You can add any additional arbitrary data to invoices. This data will be put in a special section of electronic invoices that is named DodatkowyOpis.
Configure electronic document properties
To configure electronic document properties, follow these steps.
- Go to Accounts receivable > Setup > Electronic document property types.
- Select New to add a property type.
- In the Type field, enter the value to use as an additional data key (
Klucz) in the resulting XML file of an electronic invoice. - Select Applicability to add an applicable table.
- On the Electronic document property type applicability setup page, in the Table name field, select Customer invoice journal and Project invoice.
- Add as many additional document properties as you require.
- Save your changes, and return to the Electronic document property types page.
Enter additional invoice data
To enter additional invoice data, follow these steps.
- Go to Accounts payable > Inquiries and reports > Invoice > Invoice journal.
- Select an invoice in the list, and then, on the Action Pane, on the Invoice tab, in the Properties group, select Electronic document properties.
- Enter a required value. This value will be used in the
Wartoscfield in the resulting XML file of an electronic invoice.
Note
You can enter additional data for project invoices in a similar way at Project management and accounting > Project invoices > Project invoice.
Additional data are applicable to invoice header level only.
Configure the data for incoming electronic invoices matching
You must configure the following types of master data to provide a match for incoming electronic invoices:
- Vendors
- Products
- Units
Configure vendors
To configure vendors, follow these steps.
- Go to Accounts payable > Vendors > All vendors, and select a vendor.
- On the Invoice and delivery FastTab, in the Tax exempt number field, enter a valid value. The vendor's tax exempt number is used to identify the vendor during the import process for incoming electronic invoices. If no vendor that has matching data is found in the system, the import process fails, and a related error message is shown.
Configure products
To configure products, follow these steps.
- Go to Product information management > Products > Released products, and select a product.
- On the Action Pane, on the Purchase tab, in the Related information group, select External item description.
- In the Vendor relation field, select the vendor or vendor group that the product's external identification is being set up for.
- In the External item number field, enter the identification number of the product for a specific vendor or the group of vendors. External item numbers are used to identify the product during the import process for incoming electronic invoices. If no product that has matching criteria is found in the system, the import process fails, and a related error message is shown.
Configure units
To configure units, follow these steps.
Go to Organization administration > Setup > Units > Units.
Select a unit, and then select External codes.
On the External codes page, in the Overview section, in the Code field, enter a code that corresponds to the selected unit.
In the Value section, in the Value field, enter the external code to match with the unit codes from incoming electronic invoices during the import process.
Note
External unit codes make sense only if incoming electronic invoices contain explicitly defined units. If incoming electronic invoices don't contain explicitly defined units, you can skip step 4.
Issue outgoing electronic invoices
After you complete all the required configuration steps, you can generate and submit electronic invoices for posted invoices by going to Organization administration > Periodic > Electronic documents > Submit electronic documents. For more information about how to generate and submit electronic invoices, see Submit electronic documents.
You can inquire about the results of a submission by going to Organization administration > Periodic > Electronic documents > Electronic document submission log and selecting the required document type. For more information about the submission log, see Work with Electronic document submission log.
Receive incoming electronic invoices
To receive electronic invoices, follow these steps.
- Go to Organization administration > Periodic > Electronic documents > Receive electronic documents.
- Select OK, and then close the page.
During the import process, the system tries to automatically match incoming electronic vendor invoices with existing confirmed purchase orders.
If no purchase order is found, the system raises a warning but continues to import the products on invoice lines as Non-stock items. Therefore, it expects that the products belong to an item model group where the Stocked product checkbox is cleared in the inventory policy.
If no related Non-stock products exist, the system tries to import invoice lines by referring to a default item. The default item must be configured in the system as a released product where the code is defined exactly as DEFAULT_ITEM. In addition, the product must belong to an item model group where the Stocked product checkbox is cleared in the inventory policy. If no default item is configured in the system, the import process fails, and a related error message is shown.
To view the receipt logs for electronic invoices, go to Organization administration > Periodic > Electronic documents > Electronic document receipt log. For more information about how to receive electronic invoices, see Receive electronic documents.
To view successfully received invoices, go to Accounts payable > Invoices > Pending vendor invoices.