How to: Target a Version of the .NET Framework
Note
This article applies to Visual Studio 2015. If you're looking for the latest Visual Studio documentation, see Visual Studio documentation. We recommend upgrading to the latest version of Visual Studio. Download it here
This document describes how to target a version of the .NET Framework when you create a project and how to change the targeted version in an existing Visual Basic, Visual C#, or Visual F# project.
Important
For information about how to change the target version for C++ projects, see How to: Modify the Target Framework and Platform Toolset.
In this topic
Targeting a version when you create a project
When you create a project, the version of the .NET Framework that you target determines which templates you can use.
Note
In Express editions of Visual Studio, you must create the project first, and then you can change the target, as Changing the target version describes later in this topic.
To target a version when you create a project
On the menu bar, choose File, New, Project.
In the list at the top of the New Project dialog box, choose the version of the .NET Framework that you want your project to target.
Note
Typically, only one version of the .NET Framework is installed with Visual Studio. If you want to target another version, you must first make sure that it's installed. See Visual Studio Multi-Targeting Overview.
In the list of installed templates, choose the type of project that you want to create, name the project, and then choose the OK button.
The list of templates shows only those projects that are supported by the version of the .NET Framework that you chose.
Changing the target version
You can change the targeted version of the .NET Framework in a Visual Basic, Visual C#, or Visual F# project by following this procedure.
To change the targeted version
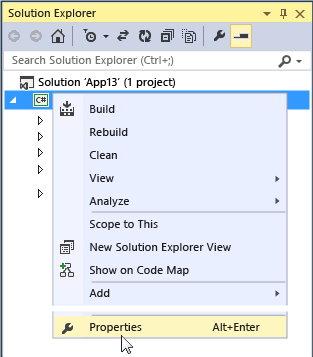
In Solution Explorer, open the shortcut menu for the project that you want to change, and then choose Properties.

Important
For information about how to change the target version for C++ projects, see How to: Modify the Target Framework and Platform Toolset.
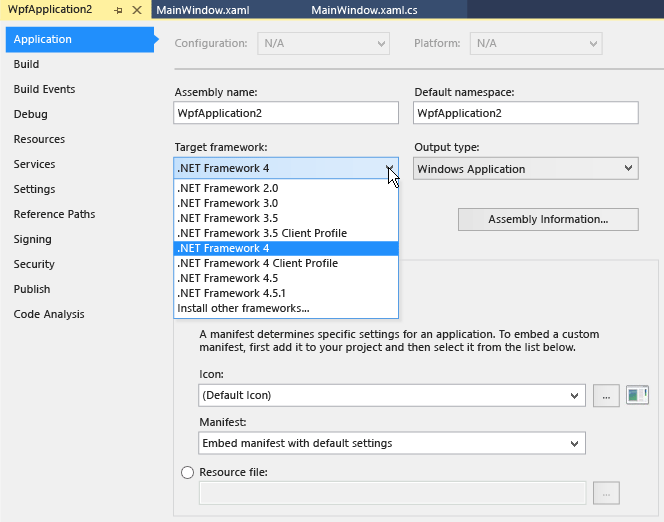
In the left column of the properties window, choose the Application tab.

Note
After you create a Windows Store app, you can't change the targeted version of either Windows or the .NET Framework.
In the Target Framework list, choose the version that you want.
In the verification dialog box that appears, choose the Yes button.
The project unloads. When it reloads, it targets the .NET Framework version that you just chose.
Note
If your code contains references to a different version of the .NET Framework than the one that you targeted, error messages may appear when you compile or run the code. To resolve these errors, you must modify the references. See Troubleshooting .NET Framework Targeting Errors.
See Also
Visual Studio Multi-Targeting Overview .NET Framework Multi-Targeting for ASP.NET Web Projects Troubleshooting .NET Framework Targeting Errors Application Page, Project Designer (C#) Application Page, Project Designer (Visual Basic) Configuring Projects How to: Modify the Target Framework and Platform Toolset