Hyper-V generation 2 virtual machines – part 2
Part 1: Introduction to generation 2 virtual machines
Part 2: Networking and boot order
Part 3: Storage
Part 4: Keyboard for Windows 8 & Windows Server 2012
Part 5: Kernel debugging
Part 6: Secure Boot
Part 7: FAQ
Part 8: Manually migrating generation 1 virtual machines to generation 2
Part 9: Installing from ISO
Part 10: Utility for converting generation 1 virtual machines to generation 2 (Convert-VMGeneration)
In the previous part, I explained why we introduced generation 2 VMs in Windows 8.1/Windows Server 2012 R2. In this part, I’m going to talk a little about what is simpler in generation 2 compared with generation 1 from a management perspective. In particular, in this part, I’m going to focus on networking.
Let’s start with a question I’m frequently asked – literally the saying about a “dollar for every time…” applies here. Why is networking in my virtual machine so slow?
The number one answer for this is that people have installed a VM using a legacy network adapter (which remember is emulated, thus incurring multiple expensive round trips through the Windows Hypervisor, plus context switches between kernel and user mode in the parent per I/O, plus the emulation itself), and forgotten to switch to a software based network adapter.
Even though we have this message in the settings page for a Legacy Network adapter, and a warning in the BPA (applies only to server, not Client Hyper-V), the fact is people don’t always read what’s in front of them:
Given we don’t have a legacy network adapter as an option in a generation 2 VM (go on, try it!), we had to make it possible to boot from a software based network adapter, providing the appropriate support for VMBus and the device in the UEFI firmware stack.
OK, I’ll try it for you - this is what “Add Hardware” looks like in a generation 1 VM on the left, vs. a generation 2 VM on the right, and below it through PowerShell running Add-VMNetworkAdapter –IsLegacy $true on a VM
(I’ll gloss over the RemoteFX 3D Video Adapter for the moment and come back to that later – however, in this case, the generation 1 screenshot was taken on Server Hyper-V without a capable graphics adapter, the generation 2 screenshot was taken on Client Hyper-V where RemoteFX is not available.)
It was actually a little worse than having a potentially confusing choice of two network adapters, as, in order to remove the legacy network adapter and add a software based network adapter to replace it, you had to shut the virtual machine down. I’ve even heard of problems with network infrastructure due to the DHCP lease not expiring immediately when the legacy network adapter is removed from the virtual machine, or having to reconfigure switches to allow the MAC addresses for each of the NICs.
Well this is solved in generation 2. The only type of NIC is the software based network adapter. To boot from network, you simply need to ensure the network adapter is at the top of the list of firmware boot entries (or at least higher than another bootable device that would succeed in boot). Note setting the boot order for a generation 2 VM is somewhat more involved than for a generation 1 VM due to the use of NVRAM variables to store explicit boot order and boot entries.
As the boot order is so much more flexible when using UEFI firmware than BIOS, we have had to introduce new WMI, PowerShell and UI for configuration. This means that the old properties such as BootOrder are not used by a generation 2 VM.
Here’s the settings of a generation 2 VM set to boot from network first (which would fail as it’s not connected to a switch):
We also have a new capability for network boot on generation 2 VMs that is not present on generation 1 VMs – the ability to network boot using both IPv4 and IPv6. Generation 1 can only boot using IPv4.
This capability is not exposed in Hyper-V Manager, but is available through both PowerShell and WMI. In PowerShell, you set the –NetworkBootPreferredProtocol parameter when calling Set-VMFirmware. The WMI property has the same name and is a member of the Msvm_VirtualSystemSettingData class.
Note that the property is global and applies to all NICs in a virtual machine. You cannot selectively attempt an IPv4 network boot from the first NIC in a VM, and if unsuccessful, attempt an IPv6 network boot from a subsequent NIC. The default protocol is IPv4.
There is one relatively fortunate downside to UEFI – it goes through boot entries too fast! So it’s not really a downside unless you have lots of devices and they all fail – there would be a slew of messages on the screen which wouldn’t necessarily be readable. For that reason, for advanced users we have a WMI property PauseAfterBootFailure in the Msvm_VirtualSystemSettingData class which does exactly what it implies – it requires user input before advancing to the next boot entry candidate should the current one fail.
You may be asking how you can change the boot order in PowerShell. There’s been a number of people ask this internally during development, or have been confused, so it’s worth spending a couple of minutes on it.
There are two ways in PowerShell to change the boot order of a generation 2 virtual machine. The simplest way is to use the –FirstBootDevice parameter to Set-VMFirmware. This simply bumps a device to the top of the list which is more often than not the most common case.
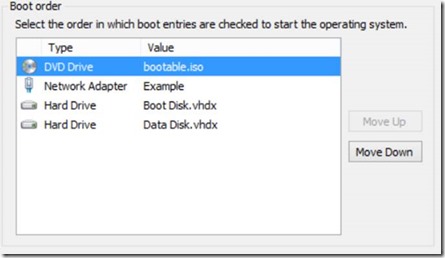
Consider this example – a virtual machine with a boot disk, data disk, network adapter and a bootable ISO in a DVD drive. Initially the boot order is network, boot disk, data disk and DVD.
In PowerShell, I’m going to make the DVD drive the first boot device by obtaining the DVD object and passing it in as the parameter for FirstBootDevice:
PS C:\> $vm = get-vm "Boot Order Example"
PS C:\> $dvd = Get-VMDvdDrive $vm
PS C:\> Set-VMFirmware $vm -FirstBootDevice $dvd
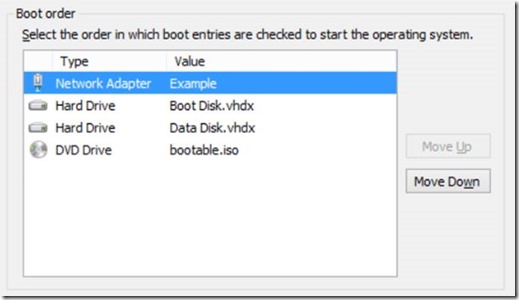
Back in the UI, we can see that the DVD drive has jumped to the top of the list, and all other boot entries have been bumped down by one, in the order they originally were.
Now while this technically allows you to do any ordering, with a lot of devices, this is not always the easiest way to manage the settings. Instead, let’s work with the BootOrder property returned by Get-VMFirmware. Here, I’m getting the property, and as there are two SCSI hard disks (one data, one bootable), I’m showing which is which by examining the .Device.Path property.
PS C:\> $bootorder = (Get-VMFirmware $vm).BootOrder
PS C:\> $bootorder | fl Device
Device : Microsoft.HyperV.PowerShell.DvdDrive
Device : Microsoft.HyperV.PowerShell.VMNetworkAdapter
Device : Microsoft.HyperV.PowerShell.HardDiskDrive
Device : Microsoft.HyperV.PowerShell.HardDiskDrive
PS C:\> $bootorder[2].Device.Path
d:\vms\Boot Disk.vhdx
PS C:\> $bootorder[3].Device.Path
d:\vms\Data Disk.vhdx
We can simply re-order the array by rearranging the elements and passing that into Set-VMFirmware. A silly example would be to sort by the firmware device path. You would probably want to do something a little more sensible, but you get the idea.
PS C:\> (set-vmfirmware $vm -bootorder ($bootorder | sort firmwarepath) -passthru).BootOrder.FirmwarePath
\AcpiEx(VMBus,0,0)\VenHw(9B17E5A2-0891-42DD-B653-80B5C22809BA,635161F83EDFC546913FF2D2F965ED0E0532954F3B05964FB09794B5A
F46C4DC)\MAC(000000000000)
\AcpiEx(VMBus,0,0)\VenHw(9B17E5A2-0891-42DD-B653-80B5C22809BA,D96361BAA104294DB60572E2FFB1DC7F01DF391F428F934A85E1115ED
64C01E4)\Scsi(0,0)
\AcpiEx(VMBus,0,0)\VenHw(9B17E5A2-0891-42DD-B653-80B5C22809BA,D96361BAA104294DB60572E2FFB1DC7F01DF391F428F934A85E1115ED64C01E4)\Scsi(0,1)
\AcpiEx(VMBus,0,0)\VenHw(9B17E5A2-0891-42DD-B653-80B5C22809BA,D96361BAA104294DB60572E2FFB1DC7F01DF391F428F934A85E1115ED64C01E4)\Scsi(0,2)
This also happens to get us back to where we started
If you use the BootOrder property, I would strongly recommend you Get- it from the VM first, re-order it and Set- it on the VM. As opposed to simply constructing your own array and passing it in to Set-VMFirmware. There is a good reason for this. In the above examples, the VM just had a bunch of devices configured on it. I’d never actually started it, and the “Boot Disk.vhdx” file was just a blank VHDX without an operating system.
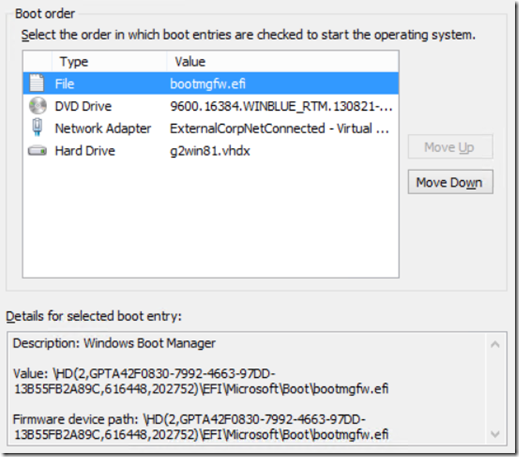
However, there is another type of boot entry, type File. Any UEFI application running in the VM can create File boot entries. In fact, Windows does exactly this during operating system installation, and places it first in the boot entries by default. In this way, even if you perform a network installation or DVD installation of Windows, subsequent boots will always start the Windows Boot Manager unless you explicitly change it. So now you can see, if you just constructed the boot entries from devices attached to the VM, you would delete any File entries. Below is an example of a file boot entry created by Windows 8.1.
So while I’m here, let’s suppose you don’t heed my advice and construct a bootorder array which doesn’t list all the devices in the VM. I’ll use the real VM which has the File entry and Windows 8.1 installed, and set the boot order to an array which contains just the network adapter.
PS S:\> (get-vmfirmware $vm).bootorder.boottype
File
Drive
Network
Drive
PS S:\> $nic = get-vmnetworkadapter $vm
PS S:\> $mybootorder=@()
PS S:\> $mybootorder = $mybootorder + $nic
PS S:\> set-vmfirmware $vm -bootorder $mybootorder
PS S:\> (get-vmfirmware $vm).bootorder.boottype
Network
PS S:\>
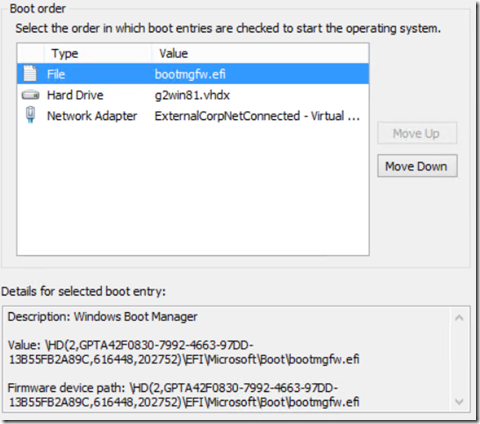
You’re probably totally unsurprised by this. The new boot order contains just the network adapter. And of course, if I started the VM, it’s not going to boot back into the Windows installation sitting on it’s SCSI connected operating system disk. The easiest solution to this is to remove and re-add the hard disk through the VM settings (or PowerShell equivalent), and change the hard disk to be top of the boot order. Hyper-V will automatically add an entry to bottom of NVRAM boot entries when a SCSI or NIC device is added to the VM configuration.
However, you have still lost that file entry which Windows setup created. It can be re-created in WMI (not through PowerShell directly) assuming you know (can calculate) the correct firmware device path. An easier way is using bcdboot inside the guest operating system once it is booted, as you can see here.
Anyway, enough of boot entries. I’ll move on to storage in the next part.
Cheers,
John.
Comments
Anonymous
January 01, 2003
IIya - this is a mistake on my part. I need to correct this but haven't had a chance. Although we planned to have this capability, it did not make it in time for the release. There is no WMI method in Windows 8.1 to recreate the entry from the parent side. It can only be done from inside the guest.Anonymous
October 25, 2013
any reason why remotefx adapter is not available in Gen 2 VMs?Anonymous
October 26, 2013
Hi, John For PXE boot machines of the Gen2 can only use WDS on 2012 R2 (ADK 8.1)?Anonymous
October 26, 2013
Also, what are the requirements for WDS?Anonymous
October 27, 2013
Do your networking changes make it easier to get networking working with wireless adapters in Win8/8.1 on laptops? That has been a constant problem with Win 7/8.Anonymous
October 28, 2013
@Marius, I'll get on to that in the FAQ part. @Denis - As long as it's a version of WDS that can deploy to an EFI based machine, that should work. I know that works for 2012 and 2012R2, and there's no reason I can think of it won't work for 2008 R2 as well. I'd need to confirm with the WDS team if they support EFI deployments in 2008. Of course, this is all subject to them also supporting Windows 8/2012 minimum .WIM deployments from downlevel as well.Anonymous
October 28, 2013
@Steve - Generation 2 changes the make up of the hardware/firmware inside the virtual machine. It does not affect how you configure switches on the parent partition.Anonymous
October 28, 2013
@Denis - update to WDS. 2008 only supported EFI for IA64 systems, so the earliest version you can use to deploy generation 2 virtual machines is the version from Windows Server 2008 R2Anonymous
October 28, 2013
Hi, John Thanks for the replay. But... Look this translated post www.microsofttranslator.com/bv.aspx Gen2 don't boot from WDS 2008 R2 SP1.Anonymous
October 29, 2013
OK, I'll try to find some time to setup a 2008 R2 WDS server to try this out. I know it works fine on 2012 and 2012 R2, but personally I haven't tried from a 2008 R2 server.Anonymous
October 30, 2013
Thank you, I'm waiting for solutionы -)Anonymous
November 01, 2013
I am trying to automate the OS installation on virtual machines. On generation 2 vm's I need to manually press the keyboard to get it to boot from a DVD image. Is there any way around this? The DVD drive is at the top of the boot order list, but it still requires a key press to boot off the DVD.Anonymous
November 01, 2013
@Petri - yes. Subject of part 9.Anonymous
November 10, 2013
I have a strange problem. All servers running 2012 r2. But EFI boot works only if WDS installed in standalone mode. If it's in AD integrated mode: there's an error: "PXE-16 No offer received". Any ideas?Anonymous
November 11, 2013
Can you verify you are getting DHCP ACK packets when running in AD integrated mode with netmon. You should see the VM send a DHCP packet on the PXE attempt and the server should respond with an extended DHCP ACK packet which will initiate the network boot. Have you verified that a generation 1 VM does get a PXE response? If not, it sounds like a configuration problem with the WDS server when running in AD integrated mode.Anonymous
November 14, 2013
When using Gen 2 VM (on a 2012 R2 Hyper-V host) with Server 2012 and SR-IOV enabled, my Integration Services shows that my VM needs to be updated. But when I switch the virtual NICs in the VM to a VMQ enabled Virtual Switch, then the VM reports that it's Integration Services are up to date. I can reproduce this all day long. I'm using the very common and supported i350-T4 NIC Card. I can not find any support on this issue and we would like to continue our migration from VMWARE, but now we are stuck on this. CheersAnonymous
November 15, 2013
Interesting, thanks Allan. I'll try to repro this on one of my test boxes to work out what's going on, but need to get hold of one of those cards. Obviously I assume you do have the ICs up to date, and the latest and matching PF/VF drivers installed on both the parent and the guest? Thanks, John.Anonymous
November 16, 2013
Hi John, thanks for getting back to me. Every piece of my hardware is new, up to date in every way, and compatible. Microsoft has released a driver update to the i350-t4 PCI NIC card within the last few weeks, this update is installed on the host but when I run software update on the guest, the SR-IOV enabled guest does not show it as an available update, even when I change the device installation settings within control panel to allow driver updates. This issue is only happening on Server 2012 guests, my 2012 R2 SR-IOV enabled guests are not experiencing this issue. Thank you! AllanAnonymous
November 17, 2013
John, the first round of updates on S2012 will not cause the conflict, I have narrowed it to the updates that come after the first batch of updates that S2012 first downloads after installation.Anonymous
November 19, 2013
Allan - we are actively investigating what's going on here and I have a repro. Thanks, John.Anonymous
March 05, 2014
~ Cedric Davies In Windows Server 2012 R2, Hyper-V added a new type of virtual machine called a GenerationAnonymous
April 28, 2014
Details on Generation 2 virtual machines and using them in VMM 2012 R2Anonymous
April 30, 2014
"you have still lost that file entry which Windows setup created. It can be re-created in WMI "
Can you tell how to do this through WMI? I can't find a way to modify or create Msvm_BootSourceSettingData objects.Anonymous
August 17, 2014
@John Howard -MSFT: Thanks for the reply to Iliya. I was precisely looking for this information. Could you update the article once such a capability is added (assuming it does get added)?


