Goods and Services Tax (GST) integration for cash registers for India
This article provides a walkthrough of the features that are related to Goods and Services Tax (GST). It also highlights the effect of GST on various types of commerce business transactions, and shows the accounting and posting of transactions where the receipt is printed at the point of sale (POS).
Prerequisites
To work with GST in Commerce for India, you need to complete a general GST setup. For more information, see India Goods and Services Tax (GST).
You also need to enable the India-specific functionality on the Commerce channel side:
- If you are using Commerce version 10.0.33 or earlier, you must configure extensions for channel components. For more information, see the deployment guidelines.
- If you are using Commerce version 10.0.34 or later, you must enable the following features in the Feature management workspace:
- (India) Enable Tax engine for Commerce for India - Enable this feature to use the Tax engine to calculate India GST for in-store and e-commerce transactions.
- (India) Enable customer tax registration information in Retail POS - Enable this feature to populate India-specific tax registration information, such as GSTIN, VAT number (TIN), or PAN number, in the customer master record in Commerce POS.
- If you are using Commerce version 10.0.33 or earlier and are migrating to Commerce version 10.0.34 or later, follow the steps in Migrate to Commerce version 10.0.34 or later.
India tax entities for Commerce
The following table shows the navigation paths for the India tax entities in Commerce.
| India tax entities | Navigation path in Commerce |
|---|---|
| Business verticals | Retail and Commerce > Channel setup > Sales taxes > Business verticals |
| Enterprise tax registration numbers | Retail and Commerce > Channel setup > Sales taxes > Enterprise tax registration numbers |
| GST reference number sequence group | Retail and Commerce > Channel setup > Sales taxes > GST reference number sequence group |
| HSN codes | Retail and Commerce > Channel setup > Sales taxes > HSN codes |
| Service accounting codes | Retail and Commerce > Channel setup > Sales taxes > Service accounting codes |
| Maintain setoff hierarchy profiles | Retail and Commerce > Channel setup > Sales taxes > Maintain setoff hierarchy profiles |
| VAT schedules | Retail and Commerce > Channel setup > Sales taxes > VAT schedules |
| Tax setup | Retail and Commerce > Channel setup > Sales taxes > Tax configuration > Tax setup |
Note
The navigation paths for the India tax entities in Commerce differ from the navigations paths in Finance. For information about the navigation paths in Finance, see India Goods and Services Tax (GST).
Validate tax information for the store
The tax information for the store comes from the selected warehouse. This warehouse is defined in the warehouse master. The configured tax information from the store is printed on the POS receipt. It's also updated on the sales order at the headquarters for the financial postings.
Follow these steps to view the tax information for a store.
- Go to Retail and Commerce > Channels > Stores > All stores.
- Select a store.
- Select the Tax information FastTab.
Configure language texts and custom fields
You can configure the language text and custom fields that are used in the POS receipt formats. The default company of the user who creates the receipt setup should be the same as the legal entity where the language text setup is created. Alternatively, the same language texts should be created in both the user's default company and the legal entity of the store that the setup is created for.
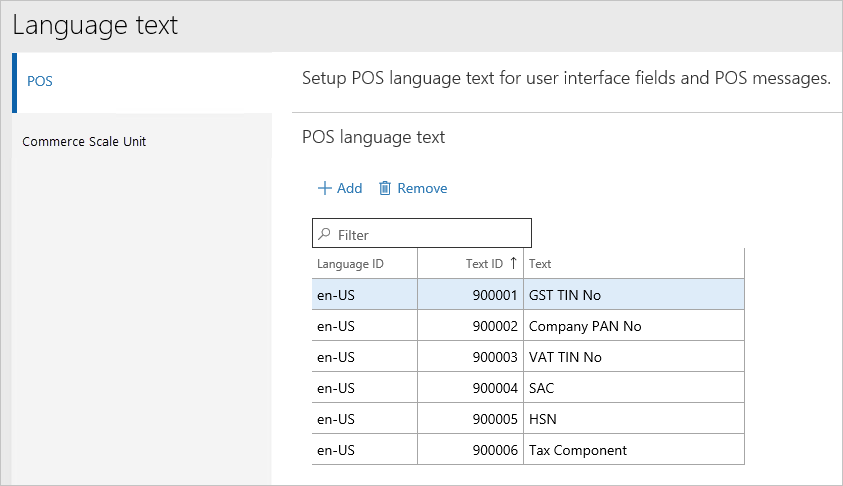
Set up the POS language text
- Go to Retail and Commerce > Channel setup > POS setup > POS profile > Language text.
- On the POS tab, on the POS language text FastTab, select the language ID for the text. The language should match the user's preferred language.
- In the Text ID field, enter a unique ID that is equal to or more than 900001.
- In the Text field, enter the language text.
Create custom fields
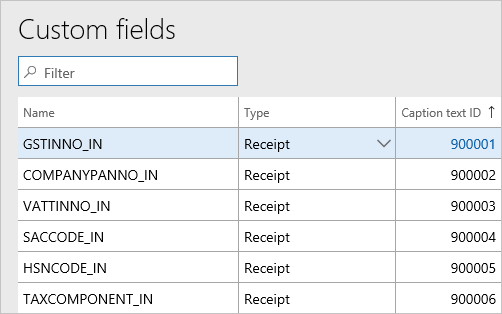
When you create custom fields, the value of the Caption text ID field must match the value that you entered for the Text ID field on the Language text page.
- Go to Retail and Commerce > Channel setup > POS setup > POS profile > Custom fields.
- Enter a name for the field.
- Select the field type.
- In the Caption text ID field, enter the Text ID value for one of the language texts on the Language text page.
Create the receipt format
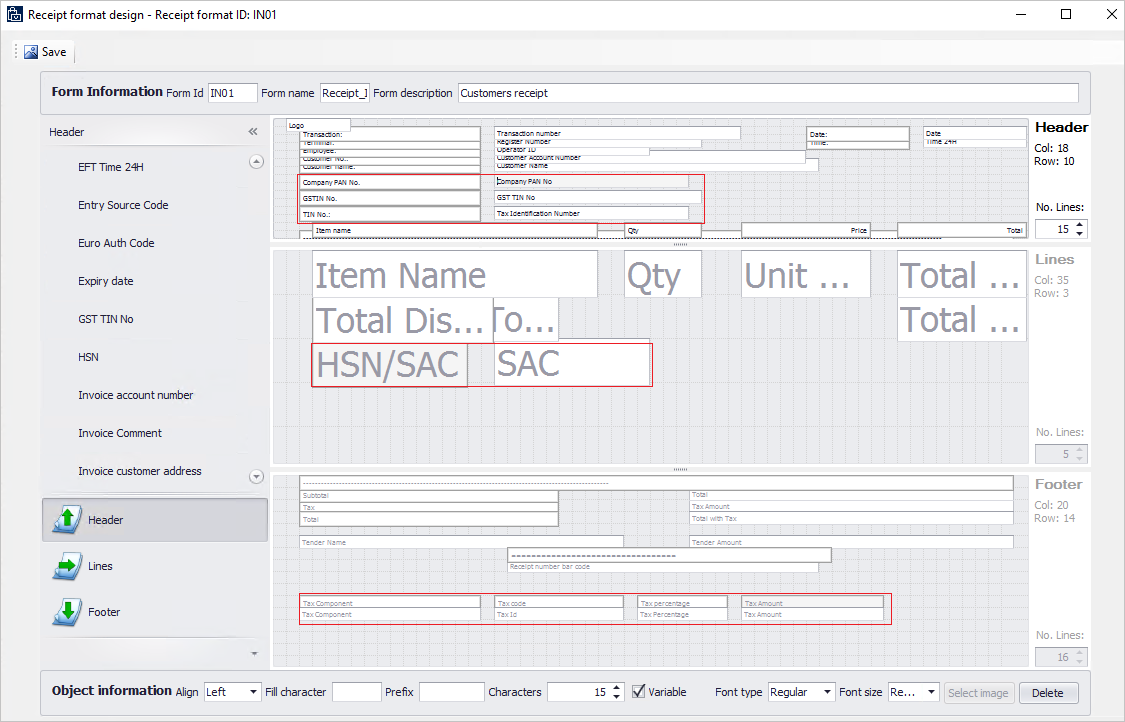
You can use Receipt format designer to add custom fields to the appropriate receipt sections. For more information, see Set up and design receipt formats.
- Go to Retail and Commerce > Channel setup > POS setup > POS profile > Receipt formats.
- Select a receipt format for the Receipt receipt type, and make the required changes.
Update receipt profiles
After you create a receipt format, you can assign that format to a receipt profile.
Follow these steps to update a receipt profile.
- Go to Retail and Commerce > Setup > POS > Receipt profile.
- Select the receipt profile to update.
- Select Edit.
- For each receipt type in the list, select a receipt format.
Update the POS invoice number
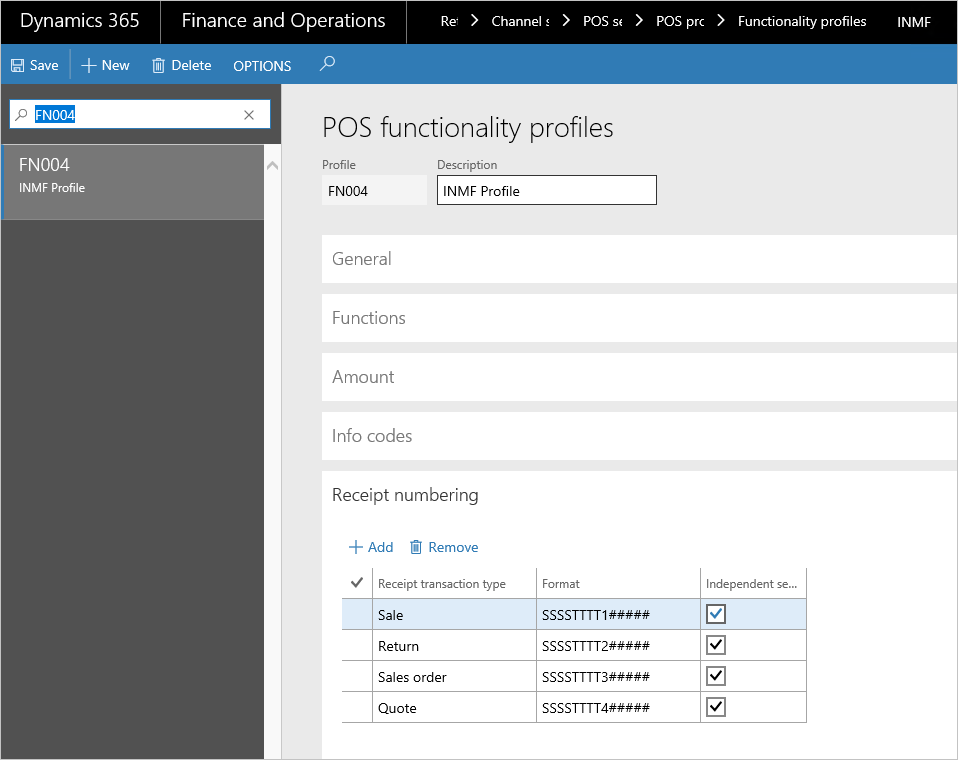
You can reconcile the POS receipt number with the invoice number for customer transactions. If you set the Update POS invoice number option to Yes on the Posting tab of the Commerce parameters page, the POS receipt number is entered in the Transaction ID field for corresponding sales orders.
You can set the Update POS invoice number option to Yes only if the existing receipt number format includes both the store number and the terminal number. The following illustration shows a POS functionality profile where the receipt numbering includes the store number and the terminal number.
Run a distribution schedule
To synchronize Tax Engine (GTE) data from headquarter to the POS database, you must add a job to the Distribution schedule page.
Follow these steps to verify that the job exists and to run the job.
- Go to Retail and Commerce > Periodic > Data distribution > Distribution schedule.
- Verify that a new job, 1180, has been added for Generic tax engine.
- Run all the jobs (9999).
Example scenarios
The following example scenarios walk you through sample transactions for India:
- Scenario 1: Sell to a registered customer
- Scenario 2: Sell taxable goods to a consumer
- Scenario 3: Sell taxable goods to an anonymous customer where GST is price-inclusive
- Scenario 4: Sell an exempted good
- Scenario 5: Return the transaction that has GST
Scenario 1: Sell to a registered customer
Sales to a registered customer are known as business-to-business (B2B) sales. If the store location and the place of supply (that is, the customer address) are in the same state, the transaction is an intrastate sale, and Central GST (CGST) and State GST (SGST) must be paid. If the store location and the place of supply are in different states, the transaction is an interstate sale, and Integrated GST (IGST) must be paid.
Note
For these transactions, the fields for the customer address and the registration number are required.
Sign in to the POS.
Enter the items, and then select Enter.
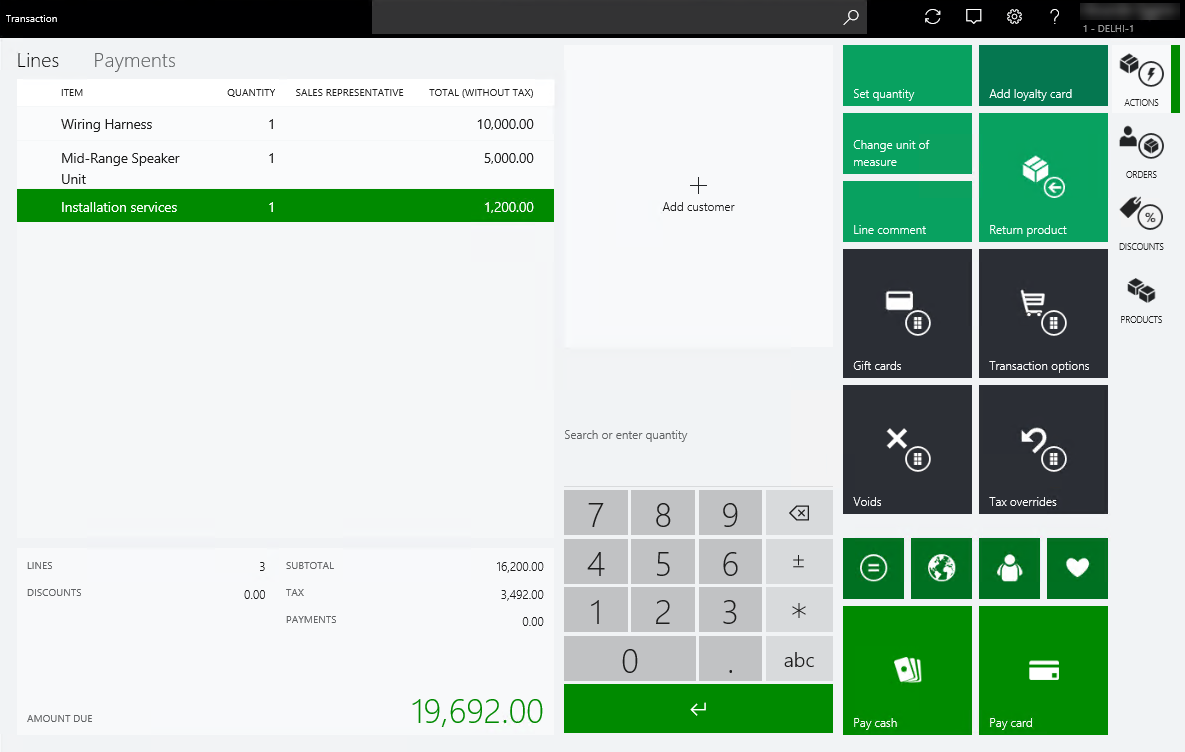
Validate the GST calculations. Consider the rate that is defined in the tax setup.
Item/service Unit price Tax rates CGST SGST M0001 10,000.00 CGST 12%, SGST 11% 1,200.00 1,100.00 M0002 5,000.00 CGST 10%, SGST 10% 500.00 500.00 S0001 1,200.00 CGST 11%, SGST 5% 132.00 60.00 16,200.00 1,832.00 1,660.00 Total amount 19,692.00 Select Orders > Create customer order.
Select Add customer, and select the customer account.
Select Pick up all.
Select the store and the pick-up date.
Select OK.
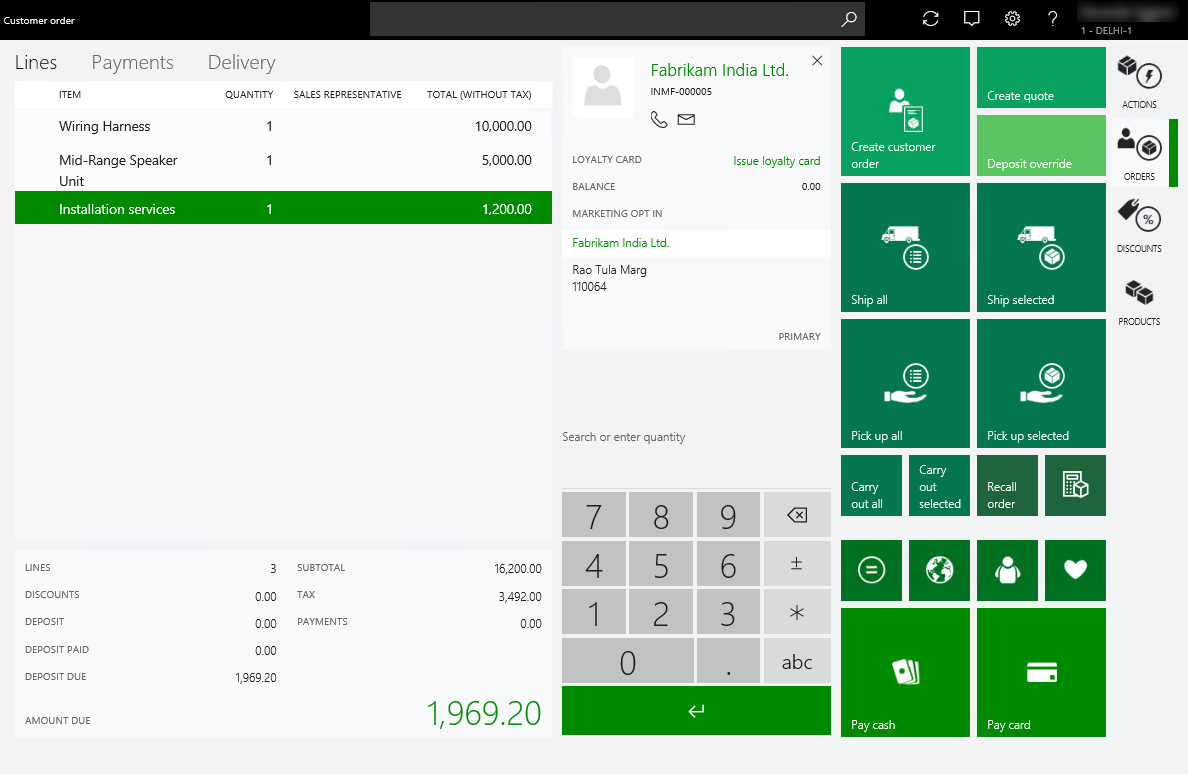
Note
In this example, the state of the store location is Delhi, and the state of the customer address is also Delhi. Because the state is the same, intrastate GST is calculated.
Select Exact to process the deposit payment.
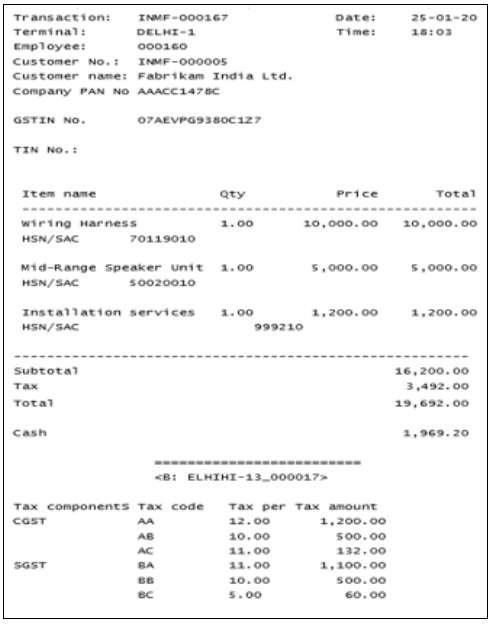
Validate the receipt:
- Select Show journal.
- Select the transactions.
- Select Receipt.
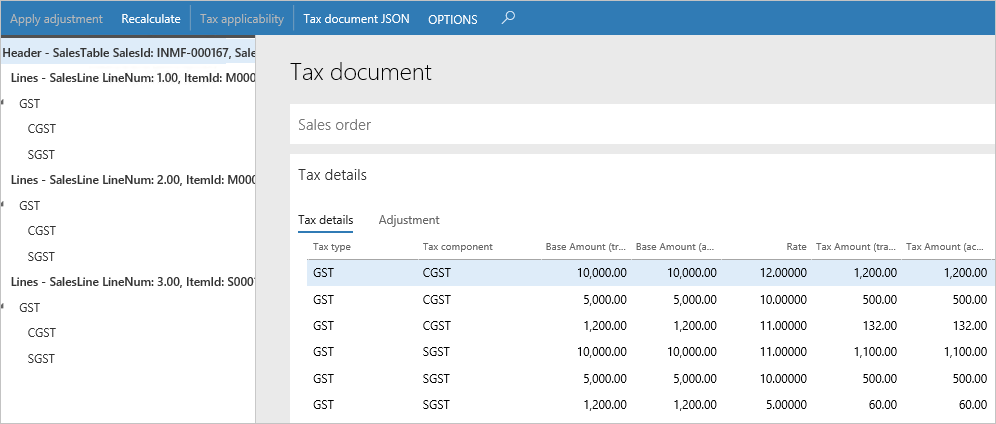
Validate the sales order and tax document in Headquarters:
- Go to Retail and Commerce > Customers > All sales orders.
- Select the sales order.
- On the Action Pane, on the Sell tab, in the Tax group, select Tax document.
Recall and process the customer order:
- Sign in to the POS.
- Select Recall order.
- Search for and select the order.
- Select Picking and packing > Pickup
- Select Select all and then Pickup.
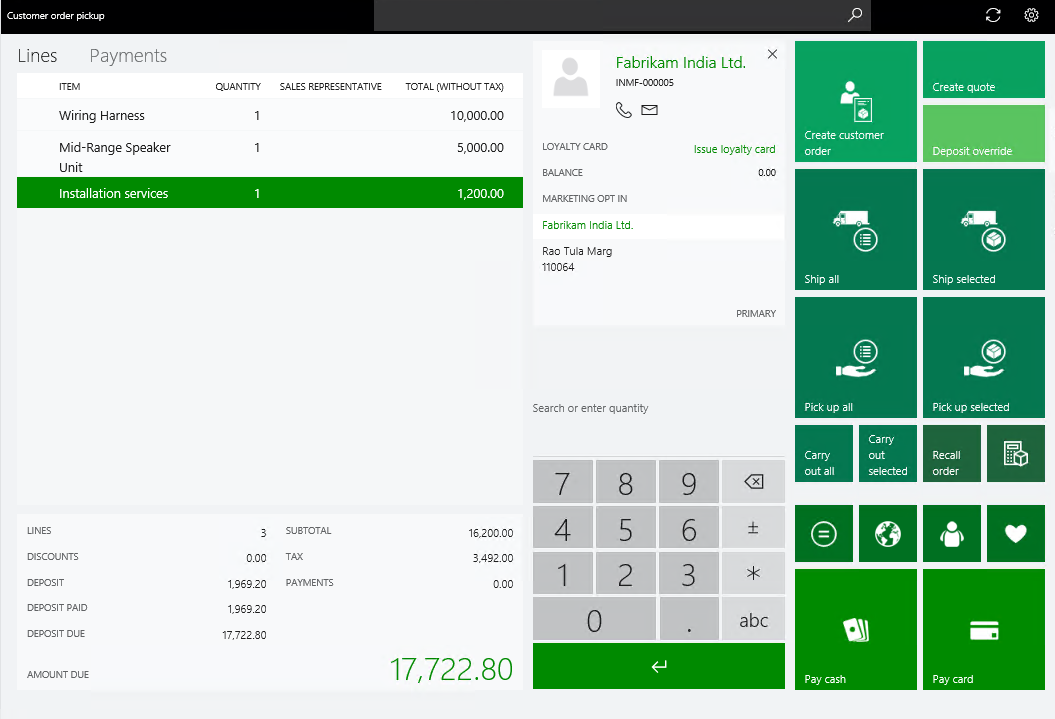
Select Exact to process the payment.
Validate the receipt.
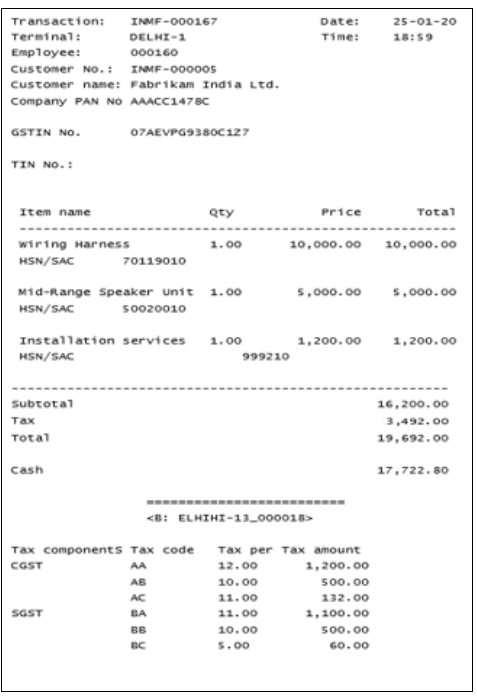
Validate the voucher transactions:
Go to Retail and Commerce > Customers > All sales orders.
Select the sales order.
On the Action Pane, on the Invoice tab, select Invoice journals.
Select Voucher.
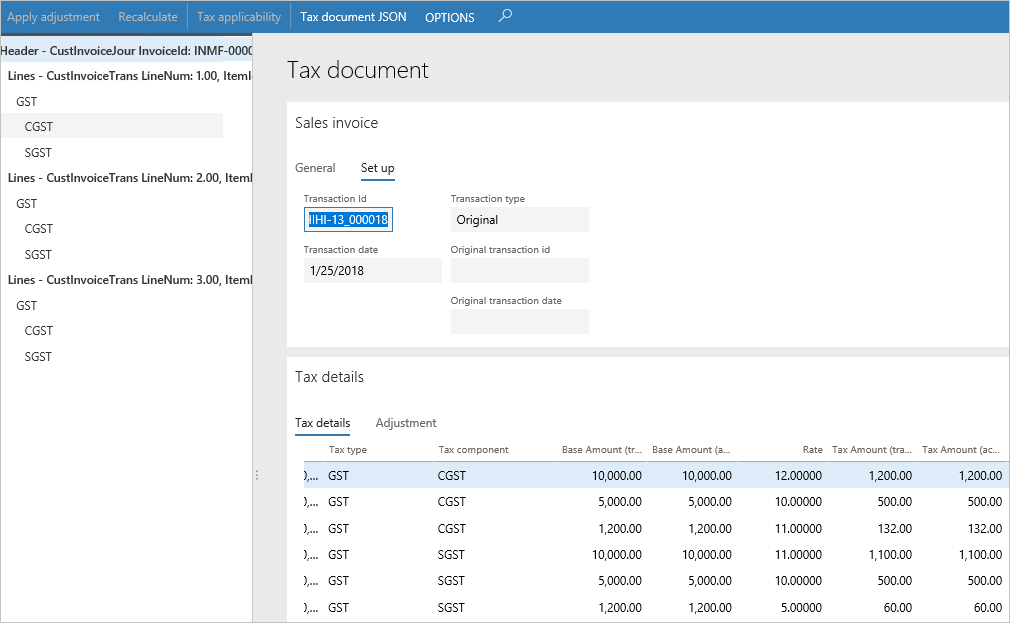
Ledger account name Debit amount (Rs.) Credit amount (Rs.) Customer account 19,692.00 CGST payable account 1,832.00 SGST payable account 1,660.00 Sales account 16,200.00 Select Tax document.
Verify that the receipt number is updated as the transaction ID.
Scenario 2: Sell taxable goods to a consumer
When you sell to unregistered customers, the sales are referred to as business-to-consumer (B2C) sales. Tax is calculated in the same manner for B2B and B2C sales.
Sign in to the POS.
Enter an item, and then select Enter.
Select Add customer, and select the customer account.
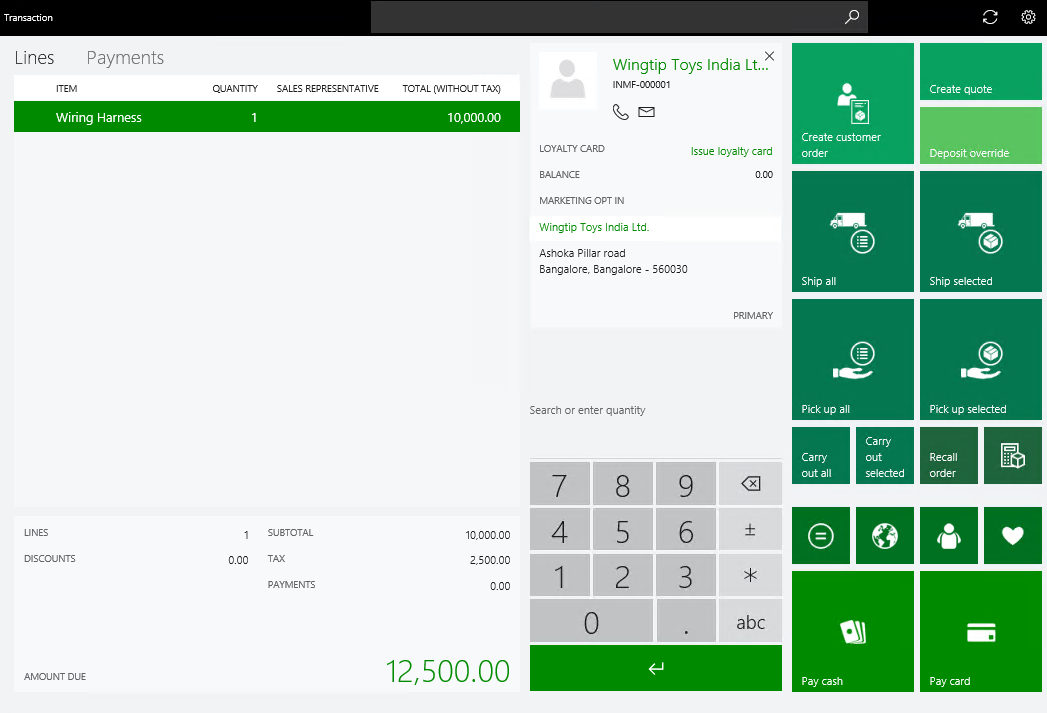
Note
In this example, the state of the store location is Delhi, but the state of the customer address is Bengaluru (Bangalore). Because the states differ, interstate GST is computed.
Select Exact to process the payment.
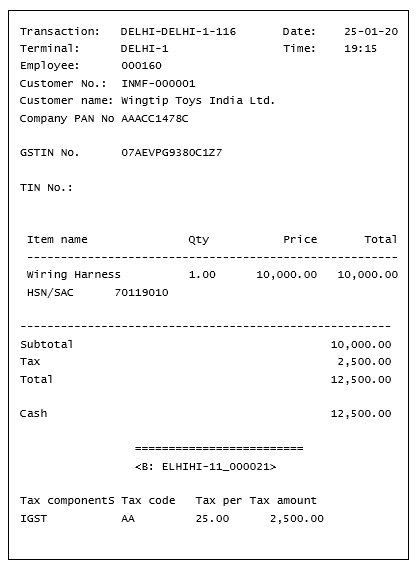
Validate the receipt:
- Select Show journal.
- Select the transactions.
- Select Receipt.
Validate the sales invoice in Headquarters:
- Go to Retail and Commerce > Retail and Commerce IT > Data distribution.
- Run job P-0001 (Channel transactions).
- Close the page.
Post the statement:
- Go to Retail and Commerce > Channels > Stores > Open statements.
- Create a statement.
- Select Calculate statement and then Post statement.
Validate the voucher transactions:
Go to Retail and Commerce > Customers > All sales orders.
Select the sales invoice.
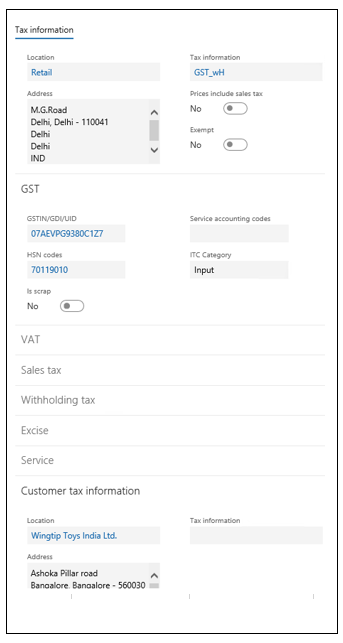
Select Sales order lines > Tax information.
On the appropriate tabs, verify the location (store address) and the customer address.
Select OK.
On the Action Pane, on the Invoice tab, select Invoice journals.
Select Voucher.
Ledger account name Debit amount (Rs.) Credit amount (Rs.) Customer account 12,500.00 IGST payable account 2,500.00 Sales account 10,000.00 Select Tax document.
Verify that the receipt number is updated as the transaction ID.
Scenario 3: Sell taxable goods to an anonymous customer where GST is price-inclusive
Define price-inclusiveness at the store:
- Go to Retail and Commerce > Channels > Stores > All stores.
- Select a store.
- Set the Prices include sales tax option to Yes.
Run the distribution schedule:
- Go to Retail and Commerce > Retail and Commerce IT > Data distribution.
- Run the job to update the changes in the POS database.
- Close the page.
Enter a transaction:
Sign in to the POS.
Enter an item, and then select Enter. For this example, use an item that has the following values:
- Taxable value: 10,000.00
- CGST: 12 percent
- SGST: 11 percent
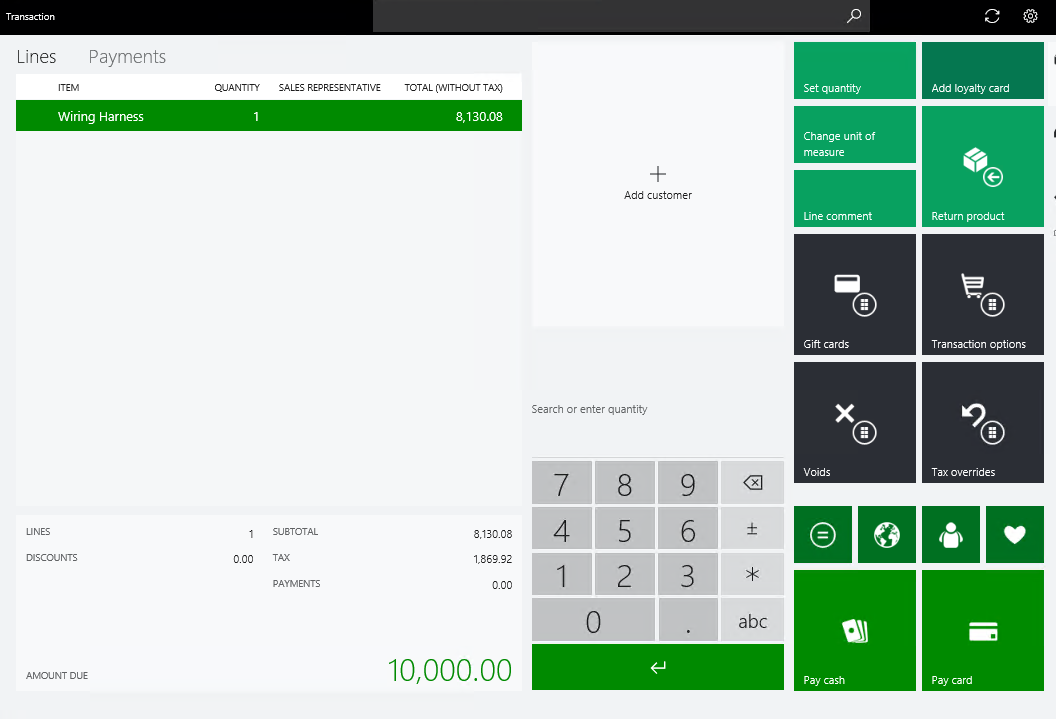
Select Exact to process the payment.
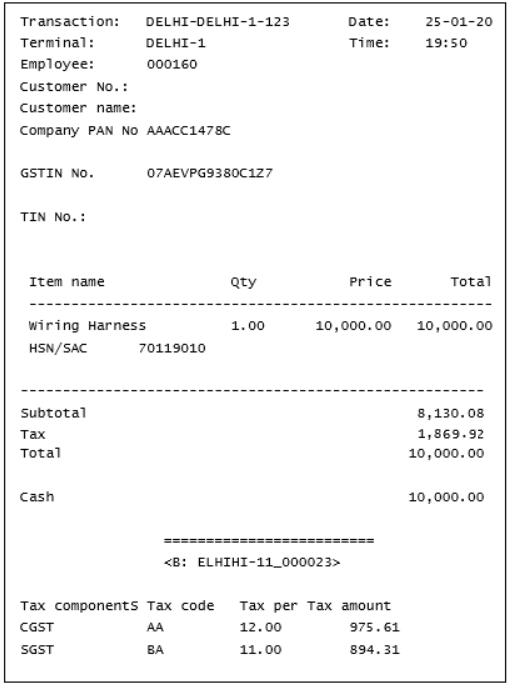
Validate the receipt.
Validate the sales invoice in Headquarters:
- Go to Retail and Commerce > Retail and Commerce IT > Data distribution.
- Run job P-0001 (Channel transactions).
- Close the page.
Post the statement:
- Go to Retail and Commerce > Channels > Stores > Open statements.
- Create a statement.
- Select Calculate statement and then Post statement.
Validate the voucher transactions:
Go to Retail and Commerce > Customers > All sales orders.
Select the sales invoice.
On the Action Pane, on the Invoice tab, select Invoice journals.
Select Voucher.
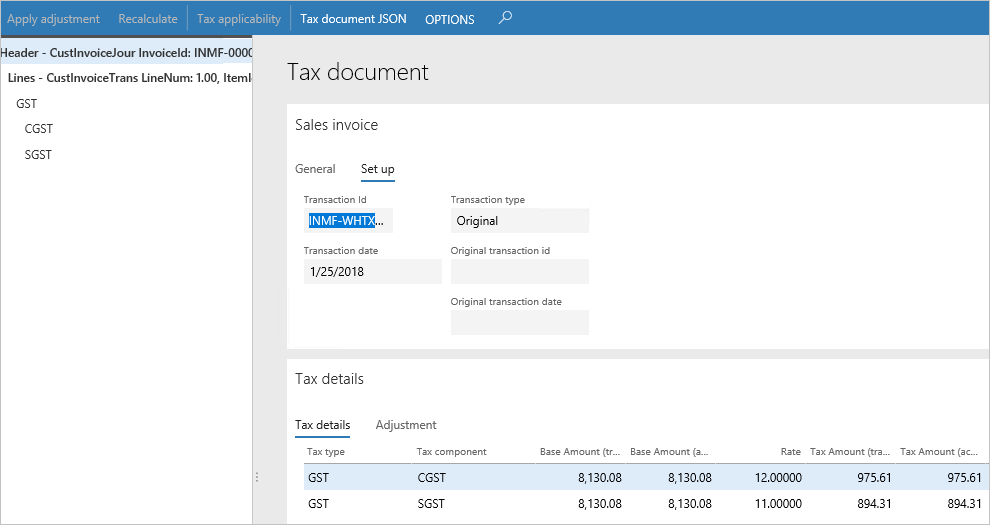
Ledger account name Debit amount (Rs.) Credit amount (Rs.) Customer account 10,000.00 CGST payable account 975.61 SGST payable account 894.31 Sales account 8,130.08 Select Tax document.
Verify that the transaction ID is updated according to the GST number sequence that is defined in the GST reference number sequence group.
Scenario 4: Sell an exempted good
Sign in to the POS.
Enter an exempted item.
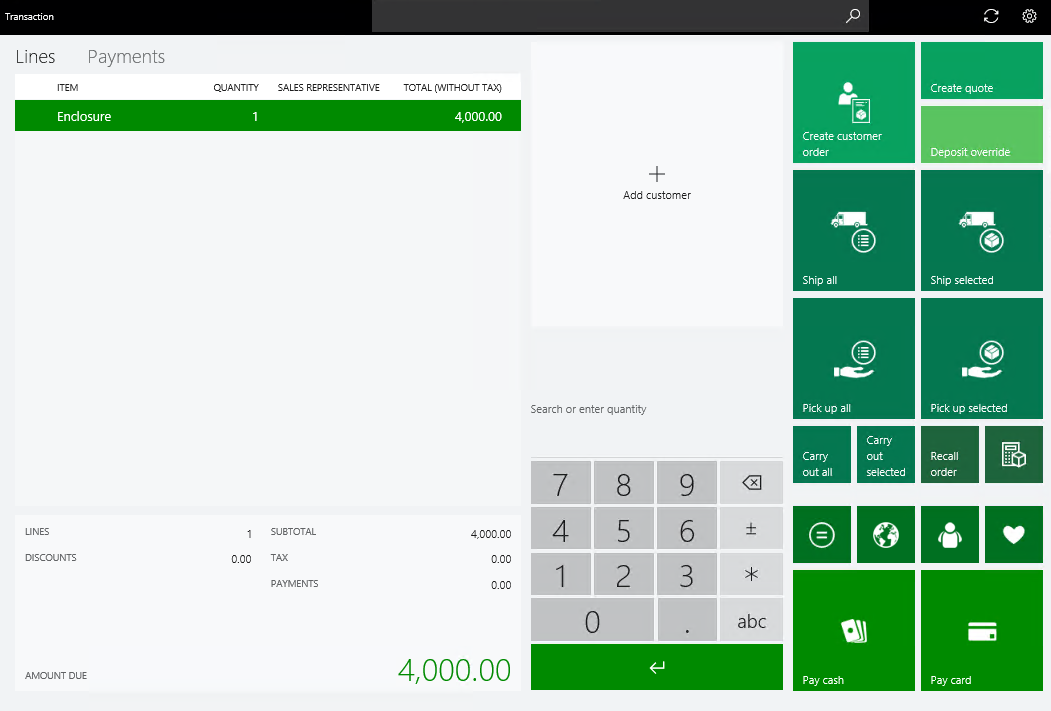
Select Exact to process the payment.
Validate the receipt.
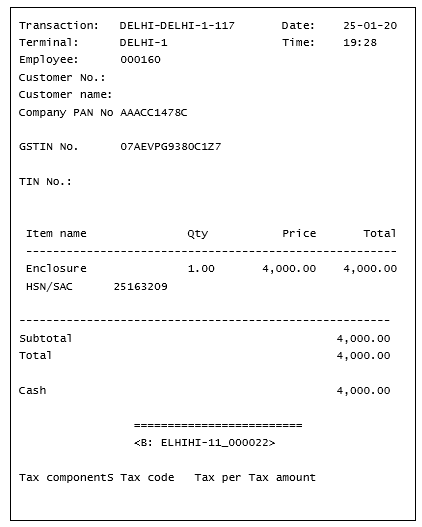
Validate the sales invoice in Headquarters:
- Go to Retail and Commerce > Retail and Commerce IT > Data distribution.
- Run job P-0001 (Channel transactions).
- Close the page.
Post the statement:
- Go to Retail and Commerce > Channels > Stores > Open statements.
- Create a statement.
- Select Calculate statement and then Post statement.
Validate the voucher transactions:
Go to Retail and Commerce > Customers > All sales orders.
Select the sales invoice.
On the Action Pane, on the Invoice tab, select Invoice journals.
Select Voucher.
Ledger account name Debit amount (Rs.) Credit amount (Rs.) Customer account 12,000.00 Sales - Finished Goods 12,000.00 Select Tax document.
Verify that the Exempt option is set to Yes.
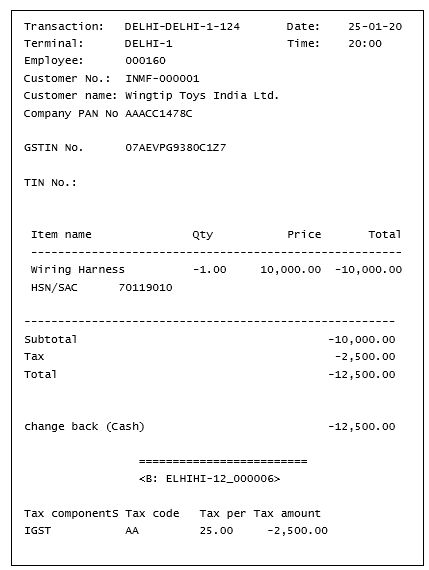
Scenario 5: Return the transaction that has GST:
Sign in to the POS.
Select Show journal.
Select the transaction, and then select Return.
Select Select all and then Return.
Verify that the GST calculation is done correctly, based on the selected original transactions that must be returned.
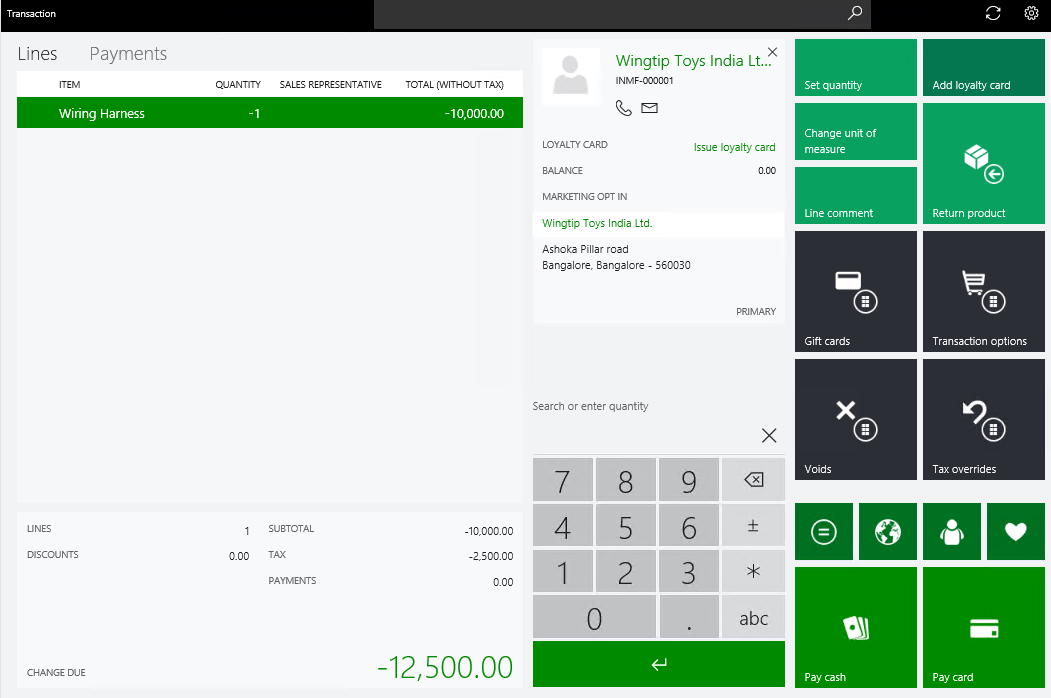
Select Exact.
Validate the receipt.
Validate the sales invoice in Headquarters:
- Go to Retail and Commerce > Retail and Commerce IT > Data distribution.
- Run job P-0001 (Channel transactions).
- Close the page.
Post the statement:
- Go to Retail and Commerce > Channels > Stores > Open statements.
- Create a statement.
- Select Calculate statement and then Post statement.
Validate the voucher transactions:
Go to Retail and Commerce > Customers > All sales orders.
Select the sales invoice.
On the Action Pane, on the Invoice tab, select Invoice journals.
Select Voucher.
Ledger account name Debit amount (Rs.) Credit amount (Rs.) Customer account 12,500.00 IGST payable account 2,500.00 Sales account 10,000.00 Select Tax document.
Verify that the return receipt number is updated as the transaction ID.
Update credit notes with references to original invoices
Note
This functionality is available with Application update 10.0.3 and later.
In order to be correctly reflected in the GSTR reporting, sales credit notes should contain references to original sales invoices. When store transactions are posted through statements, it is not always possible to establish this reference for return transactions. You can use the Update credit notes with references to original invoices procedure to update the Original GST transaction ID link in credit notes so that the link correctly references the related original sales invoice. The procedure is located on the Retail and Commerce > Retail and Commerce IT > POS posting menu.
It is also recommended that you enable the Do not aggregate returns parameter on the Commerce parameters page. In this case, each return transaction will be posted as a separate sale order when posting a statement. This option is only available if the transaction aggregation is enabled.
Manage customer registration numbers from POS
You can specify customer registration numbers, such as GSTIN, VAT number (TIN), and PAN number, when creating or editing a customer master record and a customer address record in POS. The customer registration numbers may be printed in receipts or used for searching customers in POS.
Note
It isn't possible to specify customer registration numbers in POS when Create customer in async mode is enabled in the POS functionality profile. Support for the ssync customer creation mode may be added in future updates.
Configure printing customer registration numbers in receipts
To enable printing customer registration numbers in receipts, follow the procedure outlined in the Configure language texts and custom fields section. Add language texts and custom fields with the following names:
- TAXREGISTRATIONGST_IN for the GST registration number;
- TAXREGISTRATIONTIN_IN for the VAT registration number;
- TAXREGISTRATIONPAN_IN for the PAN number.
Add the custom fields to receipt profiles.
Enable searching customers by tax registration numbers in POS
To enable searching customers by tax registration numbers in POS, on the POS search criteria tab of the Commerce parameters page, add a record on the Customer search criteria fast-tab and select Tax registration number in the Customer search criteria drop-down list. Select the Display as shortcut checkbox while keeping the Can be refined checkbox clear. Run the 1110 job on the Distribution schedules page.