Use Windows Azure to learn Windows Server 2012 Storage Spaces – 31 Days of Servers in the Cloud (Part 27 of 31)
What an amazing platform and opportunity for learning. Creating virtual machines in Windows Azure is a great platform for trying out functionality that would otherwise be hard or expensive to do in your own test lab or on your own hardware.
So in this Part 27 of our “31 Days of Servers in the Cloud” series, and with the help of some instructions from some of our earlier articles, I’m going to help you set up a server that you can use to then go through a hands-on-lab on the subject of Windows Server 2012 Storage Spaces.
“Sounds great, Kevin. How do I begin?”
It’s pretty simple. Here are the steps required to make this happen:
- Get a Windows Azure subscription. (You can sign up for a free 90-day trial HERE.)
- Create a new virtual machine running Windows Server 2012.
- Attach new, blank disks to your server.
- Connect (remote desktop) to your server.
And once these three easy steps are done, it’s simply a matter of using the attached lab manual and walking through the training.
Step 1 is easy. Hopefully by now you have your Windows Azure subscription.
Step 2 is also easy. Creating a virtual machine using the Windows Azure Portal is well documented in my friend Tommy Patterson’s Part 2 of our series. Or you can use PowerShell, as my friend Brian Lewis showed you in Part 14. And last but certainly least, I showed you how you can use App Controller to create VMs in Part 12 and Part 13.
Whichever method you decide to use to create your virtual machine, make sure that you create a machine running Windows Server 2012, and make sure that it is of size MEDIUM or larger.
“Why can’t it be a SMALL virtual machine?”
Because the lab requires four (4) data disks be connected to the virtual machine. SMALL size only allows up to two (2) disks. MEDIUM allows up to four (4).
Networking is not important for this lab. Other than running Server 2012, the only thing this machine will need is the extra disks. Which leads me to…
Step 3: Attach new, blank disks to your server.
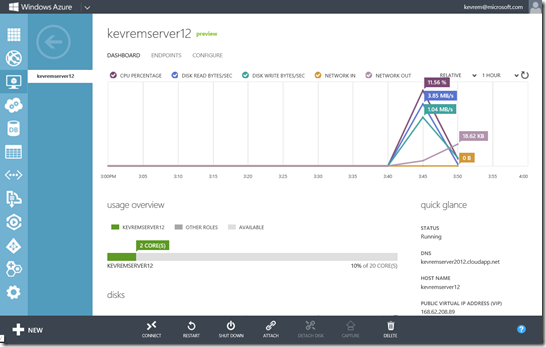
Assuming you have your machine created and running, and you’ve selected it in the Windows Azure Portal, you should see something like this:
Notice that my machine “kevremserver2012” is currently running, has two core2, and if I scroll down a little…
…we see that I only have the one disk (the operating system disk) configured in this machine.
Now, see at the bottom where it says “Attach”? That’s what you’ll click on to attach new disks. To play with Storage Spaces, let’s attach 4 additional disks to this server.
Mouse-over Attach, and choose “Attach empty disk”. You’ll see this:

The only thing you have to fill in on this is the size of the disk you’re creating. Enter 10 (as in 10 GB), and click the checkmark.
Now you should see this towards the bottom of your browser:

This will take a minute or two to complete. When it’s done, do it 3 more times so that you have four additional disks connected to your virtual machine:
And now you’re ready to do the labs. Print out the attached lab manual, and connect and login to your virtual machine by clicking the Connect button at the bottom of the browser window. This will download and prompt you to open a .rdp file that will then open a remote desktop connection to your machine.
Again, the lab manual is attached to this blog post, down at the bottom. Enjoy!
---
Did you find this useful? I certainly hope so! Ask questions or give opinions in the comments.


