Migrating my home network to Azure - Part 3–Install and use the Windows Azure Command Line Tools
Here is a list of the posts I plan on making as a part of this migration. I may add some but this is the basic framework -
Step 1 - Clean up, patch, backup and prepare machines for migration
Step 2 –
Migrate Gallifrey (DC) – including making “primary” DC, FSMO role holders, Install and using the Azure CMD line toolsStep 3 – Migrate Azjol-Nerub (web server) – including verifying that all web sites stay online and web re-directs are active.
Step 4 – Migrate remaining virtual machines – including verifying all connectivity
Step 5 – Deploy new VM’s to support personal projects
Step 6 – Start planning secondary support domain for cloud based lab (this will get broken into several distinct posts)
As you can see, I have changed the next step in the blog series. As I was planning for this post, I realized the moving all of my FSMO roles to a server that would get migrated into Azure would cause me some serious network issues at home. Since I do not plan to connect my home network into Azure, my local machine will have no access to those roles. So this is being delayed until we get through the primary goal which is migrating the network as a whole to Windows Azure. This also means I may need to adjust some of the other items in the list. Stay Tuned….
Today’s Post is -
Step 2 – Install and Use the Windows Azure Command Line Tools
Here is what we will be doing today -
Download and Install Windows Azure PowerShell
Download and Install the Windows Azure Command Line tools
Download the Azure Publisher settings file
Import Azure Publisher settings File
Done!
Download and Install Windows Azure PowerShell
First, while the Windows Azure PowerShell tools are strictly required to perform the migration in question, I want to introduce you to them anyway because PowerShell is such a powerful administrative tool.
Go to the Windows Azure Downloads page. Here you will find all of the tools IT professionals and Developers need for working with Windows Azure. We will be working with the Command Line tools which is officially called Windows Azure PowerShell. As you can see, we have command line tools for mac and Linux systems as well. I am on Windows though so – Windows Azure PowerShell it is! Select the Windows Azure PowerShell item to download and install.
This will launch the Web Platform installer which is a super cool way to install utilities to your system – Click Install to continue.
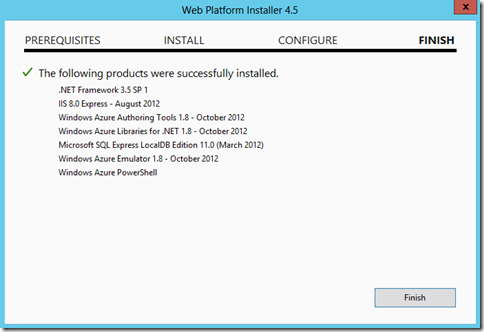
Next you will see a list of items that will be installed for using the Azure PowerShell tools. Notice there are SQL and IIS componentds that will be installed. These will show up even if you have existing SQL and IIS instances. Thus far in my testing, I have not run into an co-existence issues, but I would still advise that your first install of this be to a machine that does not have any pre-existing SQL or IIS instances. Accept to continue -
This will start the download and installation of the various components.
Takes 3-5 minutes to complete!
When you click Finish, the Web Installer will stay open revealing additional utilities you can install. You will notice that Windows Azure PowerShell in shown as Installed. Now select the Windows Azure Cross-platform Command Line Tools and proceed with the install.
Click Exit to close the Web Installer. Note – Although no Reboot Required option is requested, I recommend a reboot here anyway. If you are on Windows 8 or Windows Server 2012, you will have some new tiles on your Start screen -
For other versions of Windows look for these items under the Start button. We don’t need to launch this just yet though as well have some additional information to collection and items to prep.
Interesting Tidbit – PowerShell ISE gets installed as a part of this process, but you won’t find it by searching on the Start screen of a Windows 8 machine.
But it is there! You just have to dig for it. It is actually located in the Control Panel –> Administrative Tools area
This is important because we are going to be using ISE a little later on.
Download the Azure Publisher settings file
The next step is to connect your local command line tools to your Windows Azure account. To do this, we need to request some information from your Windows Azure account in the form of a Windows Azure Publish-Settings file. You can retrieve your publisher setting file by clicking this link - Windows Azure Publish-Settings file. If you are prompted to sign in, use the credentials for your existing Windows Azure Subscription. Note – this file contains sensitive information about your Windows Azure subscription. Please store in a safe, secure location.
This page has some additional directions on it that we can ignore for what we are doing. Simply save the file to a safe, secure location, then close the page. (It is a LONG file name so you may wish to rename it to something simpler)
Import The Azure Publisher Settings File
Launch Windows Azure PowerShell
We will use the “Import-AzurePublishSettingsFile” cmdlet to import the Azure Publisher Settings file -
PS C:\> Import-AzurePublishSettingsFile "enterfullpathtoyourfile"
Here is how it looks on my machine after a successful import -
At this point we can now use Windows Azure PowerShell to manage our Windows Azure Subscription! If you want to know more about what you can do with Windpows Azure PowerShell, check out this Getting Started Guide -
Windows Azure PowerShell – Including sample CMDlets
In our next installment, I will show how we import a Hyper-V VM into Windows Azure!!
-Cheers!


