Implantar seu modelo do TensorFlow em um aplicativo do Windows com as APIs do Windows Machine Learning
Esta seção final explicará como criar um aplicativo UWP simples com uma GUI para transmitir por streaming a webcam e detectar objetos avaliando nosso modelo YOLO com Windows ML.
Criar um aplicativo UWP no Visual Studio
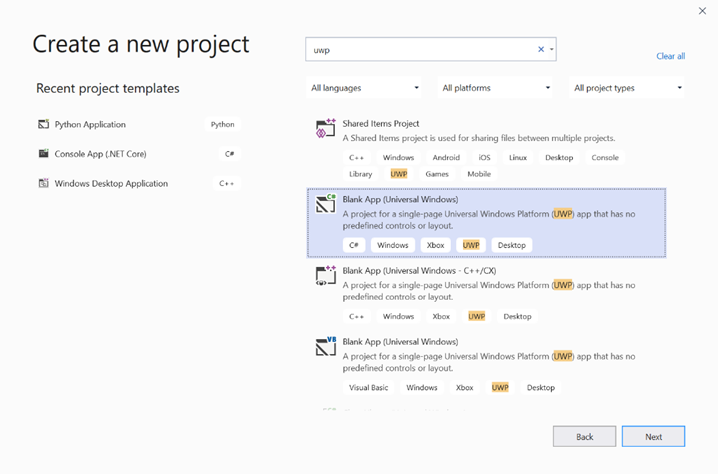
- Abra o Visual Studio e selecione
Create a new project.. Procure um UWP e selecioneBlank App (Universal Windows).

- Na página a seguir, defina as configurações do projeto dando a ele um nome e um local. Em seguida, selecione um destino e uma versão mínima do sistema operacional do seu aplicativo. Para usar o Windows ML APIs você deve usar X ou pode escolher o pacote NuGet para dar suporte a X. se você optar por usar o pacote NuGet, siga estas instruções [link].
Chamar APIs do Windows ML para avaliar o modelo
Etapa 1: use o Gerador de Código de Machine Learning para gerar classes de wrapper para APIs do Windows ML.
Etapa 2: modifique o código gerado no arquivo.cs gerado. O arquivo final fica assim:
using System;
using System.Collections.Generic;
using System.Threading.Tasks;
using Windows.Media;
using Windows.Storage;
using Windows.Storage.Streams;
using Windows.AI.MachineLearning;
namespace yolodemo
{

    public sealed class YoloInput
    {
        public TensorFloat input_100; // shape(-1,3,416,416)
    }

    public sealed class YoloOutput
    {
        public TensorFloat concat_1600; // shape(-1,-1,-1)
    }

    public sealed class YoloModel
    {
        private LearningModel model;
        private LearningModelSession session;
        private LearningModelBinding binding;
        public static async Task<YoloModel> CreateFromStreamAsync(IRandomAccessStreamReference stream)
        {
            YoloModel learningModel = new YoloModel();
            learningModel.model = await LearningModel.LoadFromStreamAsync(stream);
            learningModel.session = new LearningModelSession(learningModel.model);
            learningModel.binding = new LearningModelBinding(learningModel.session);
            return learningModel;
        }
        public async Task<YoloOutput> EvaluateAsync(YoloInput input)
        {
            binding.Bind("input_1:0", input.input_100);
            var result = await session.EvaluateAsync(binding, "0");
            var output = new YoloOutput();
            output.concat_1600 = result.Outputs["concat_16:0"] as TensorFloat;
            return output;
        }
    }
}
Avalie cada quadro de vídeo para detectar objetos e desenhar caixas delimitadoras.
- Adicione as bibliotecas a seguir a mainPage.xaml.cs.
using System.Threading.Tasks;
using Windows.Devices.Enumeration;
using Windows.Media;
using Windows.Media.Capture;
using Windows.Storage;
using Windows.UI;
using Windows.UI.Xaml.Media.Imaging;
using Windows.UI.Xaml.Shapes;
using Windows.AI.MachineLearning;
- Adicione as variáveis a seguir em
public sealed partial class MainPage : Page.
private MediaCapture _media_capture;
private LearningModel _model;
private LearningModelSession _session;
private LearningModelBinding _binding;
private readonly SolidColorBrush _fill_brush = new SolidColorBrush(Colors.Transparent);
private readonly SolidColorBrush _line_brush = new SolidColorBrush(Colors.DarkGreen);
private readonly double _line_thickness = 2.0;
        private readonly string[] _labels =
            {
                "<list of labels>"
        };
- Crie uma estrutura para o modo como os resultados da detecção são formatados.
        internal struct DetectionResult
        {
            public string label;
            public List<float> bbox;
            public double prob;
        }
- Crie um objeto Comparer que compare dois objetos do tipo Box. Essa classe será usada para desenhar caixas delimitadas em volta dos objetos detectados.
        class Comparer : IComparer<DetectionResult>
        {
            public int Compare(DetectionResult x, DetectionResult y)
            {
                return y.prob.CompareTo(x.prob);
            }
        }
- Adicione o método a seguir para inicializar o streaming da webcam do dispositivo e começar a processar cada quadro para detectar objetos.
        private async Task InitCameraAsync()
        {
            if (_media_capture == null || _media_capture.CameraStreamState == Windows.Media.Devices.CameraStreamState.Shutdown || _media_capture.CameraStreamState == Windows.Media.Devices.CameraStreamState.NotStreaming)
            {
                if (_media_capture != null)
                {
                    _media_capture.Dispose();
                }

                MediaCaptureInitializationSettings settings = new MediaCaptureInitializationSettings();
                var cameras = await DeviceInformation.FindAllAsync(DeviceClass.VideoCapture);
                var camera = cameras.FirstOrDefault();
                settings.VideoDeviceId = camera.Id;

                _media_capture = new MediaCapture();
                await _media_capture.InitializeAsync(settings);
                WebCam.Source = _media_capture;
            }

            if (_media_capture.CameraStreamState == Windows.Media.Devices.CameraStreamState.NotStreaming)
            {
                await _media_capture.StartPreviewAsync();
                WebCam.Visibility = Visibility.Visible;
            }

            ProcessFrame();
        }
- Adicione o método a seguir para processar cada quadro. Esse método chama EvaluateFrame e DrawBoxes, que serão implementados em uma etapa posterior.
        private async Task ProcessFrame()
        {
            var frame = new VideoFrame(Windows.Graphics.Imaging.BitmapPixelFormat.Bgra8, (int)WebCam.Width, (int)WebCam.Height);
            await _media_capture.GetPreviewFrameAsync(frame);
            var results = await EvaluateFrame(frame);
            await DrawBoxes(results.ToArray(), frame);
            ProcessFrame();
        }
- Criar um float de Sigmoide
        private float Sigmoid(float val)
        {
            var x = (float)Math.Exp(val);
            return x / (1.0f + x);
        }
- Crie um limite para detectar objetos corretamente.
        private float ComputeIOU(DetectionResult DRa, DetectionResult DRb)
        {
            float ay1 = DRa.bbox[0];
            float ax1 = DRa.bbox[1];
            float ay2 = DRa.bbox[2];
            float ax2 = DRa.bbox[3];
            float by1 = DRb.bbox[0];
            float bx1 = DRb.bbox[1];
            float by2 = DRb.bbox[2];
            float bx2 = DRb.bbox[3];

            Debug.Assert(ay1 < ay2);
            Debug.Assert(ax1 < ax2);
            Debug.Assert(by1 < by2);
            Debug.Assert(bx1 < bx2);

            // determine the coordinates of the intersection rectangle
            float x_left = Math.Max(ax1, bx1);
            float y_top = Math.Max(ay1, by1);
            float x_right = Math.Min(ax2, bx2);
            float y_bottom = Math.Min(ay2, by2);

            if (x_right < x_left || y_bottom < y_top)
                return 0;
            float intersection_area = (x_right - x_left) * (y_bottom - y_top);
            float bb1_area = (ax2 - ax1) * (ay2 - ay1);
            float bb2_area = (bx2 - bx1) * (by2 - by1);
            float iou = intersection_area / (bb1_area + bb2_area - intersection_area);

            Debug.Assert(iou >= 0 && iou <= 1);
            return iou;
        }
- Implemente a lista a seguir para acompanhar os objetos atuais detectados no quadro.
        private List<DetectionResult> NMS(IReadOnlyList<DetectionResult> detections,
            float IOU_threshold = 0.45f,
            float score_threshold=0.3f)
        {
            List<DetectionResult> final_detections = new List<DetectionResult>();
            for (int i = 0; i < detections.Count; i++)
            {
                int j = 0;
                for (j = 0; j < final_detections.Count; j++)
                {
                    if (ComputeIOU(final_detections[j], detections[i]) > IOU_threshold)
                    {
                        break;
                    }
                }
                if (j==final_detections.Count)
                {
                    final_detections.Add(detections[i]);
                }
            }
            return final_detections;
        }
- Implemente o método a seguir.
        private List<DetectionResult> ParseResult(float[] results)
        {
            int c_values = 84;
            int c_boxes = results.Length / c_values;
            float confidence_threshold = 0.5f;
            List<DetectionResult> detections = new List<DetectionResult>();
            this.OverlayCanvas.Children.Clear();
            for (int i_box = 0; i_box < c_boxes; i_box++)
            {
                float max_prob = 0.0f;
                int label_index = -1;
                for (int j_confidence = 4; j_confidence < c_values; j_confidence++)
                {
                    int index = i_box * c_values + j_confidence;
                    if (results[index] > max_prob)
                    {
                        max_prob = results[index];
                        label_index = j_confidence - 4;
                    }
                }
                if (max_prob > confidence_threshold)
                {
                    List<float> bbox = new List<float>();
                    bbox.Add(results[i_box * c_values + 0]);
                    bbox.Add(results[i_box * c_values + 1]);
                    bbox.Add(results[i_box * c_values + 2]);
                    bbox.Add(results[i_box * c_values + 3]);

                    detections.Add(new DetectionResult()
                    {
                        label = _labels[label_index],
                        bbox = bbox,
                        prob = max_prob
                    });
                }
            }
            return detections;
        }
- Adicione o método a seguir para desenhar as caixas em volta dos objetos detectados no quadro.
private async Task DrawBoxes(float[] results, VideoFrame frame)
        {
            List<DetectionResult> detections = ParseResult(results);
            Comparer cp = new Comparer();
            detections.Sort(cp);
            IReadOnlyList<DetectionResult> final_detetions = NMS(detections);

            for (int i=0; i < final_detetions.Count; ++i)
            {
                int top = (int)(final_detetions[i].bbox[0] * WebCam.Height);
                int left = (int)(final_detetions[i].bbox[1] * WebCam.Width);
                int bottom = (int)(final_detetions[i].bbox[2] * WebCam.Height);
                int right = (int)(final_detetions[i].bbox[3] * WebCam.Width);

                var brush = new ImageBrush();
                var bitmap_source = new SoftwareBitmapSource();
                await bitmap_source.SetBitmapAsync(frame.SoftwareBitmap);

                brush.ImageSource = bitmap_source;
                // brush.Stretch = Stretch.Fill;

                this.OverlayCanvas.Background = brush;

                var r = new Rectangle();
                r.Tag = i;
                r.Width = right - left;
                r.Height = bottom - top;
                r.Fill = this._fill_brush;
                r.Stroke = this._line_brush;
                r.StrokeThickness = this._line_thickness;
                r.Margin = new Thickness(left, top, 0, 0);

                this.OverlayCanvas.Children.Add(r);
                // Default configuration for border
                // Render text label


                var border = new Border();
                var backgroundColorBrush = new SolidColorBrush(Colors.Black);
                var foregroundColorBrush = new SolidColorBrush(Colors.SpringGreen);
                var textBlock = new TextBlock();
                textBlock.Foreground = foregroundColorBrush;
                textBlock.FontSize = 18;

                textBlock.Text = final_detetions[i].label;
                // Hide
                textBlock.Visibility = Visibility.Collapsed;
                border.Background = backgroundColorBrush;
                border.Child = textBlock;

                Canvas.SetLeft(border, final_detetions[i].bbox[1] * 416 + 2);
                Canvas.SetTop(border, final_detetions[i].bbox[0] * 416 + 2);
                textBlock.Visibility = Visibility.Visible;
                // Add to canvas
                this.OverlayCanvas.Children.Add(border);
            }
        }
- Agora que manipulamos a infraestrutura necessária, é hora de incorporar a avaliação em si. Esse método avalia o modelo em relação ao quadro atual para detectar objetos.
        private async Task<List<float>> EvaluateFrame(VideoFrame frame)
        {
            _binding.Clear();
            _binding.Bind("input_1:0", frame);
            var results = await _session.EvaluateAsync(_binding, "");
            Debug.Print("output done\n");

            TensorFloat result = results.Outputs["Identity:0"] as TensorFloat;
            var shape = result.Shape;
            var data = result.GetAsVectorView();

            return data.ToList<float>();
        }
- Nosso aplicativo precisa iniciar de alguma forma. Adicione um método que inicia a transmissão por streaming da webcam e a avaliação de modelo quando o usuário pressiona o botão
Go.
        private void button_go_Click(object sender, RoutedEventArgs e)
        {
            InitModelAsync();
            InitCameraAsync();
        }
- Chame APIs do Windows ML para avaliar o modelo. Primeiro, o modelo é carregado do armazenamento e, em seguida, uma sessão é criada e associada à memória.
        private async Task InitModelAsync()
        {
            var model_file = await StorageFile.GetFileFromApplicationUriAsync(new Uri("ms-appx:///Assets//Yolo.onnx"));
            _model = await LearningModel.LoadFromStorageFileAsync(model_file);
            var device = new LearningModelDevice(LearningModelDeviceKind.Cpu);
            _session = new LearningModelSession(_model, device);
            _binding = new LearningModelBinding(_session);
        }
Iniciar o aplicativo
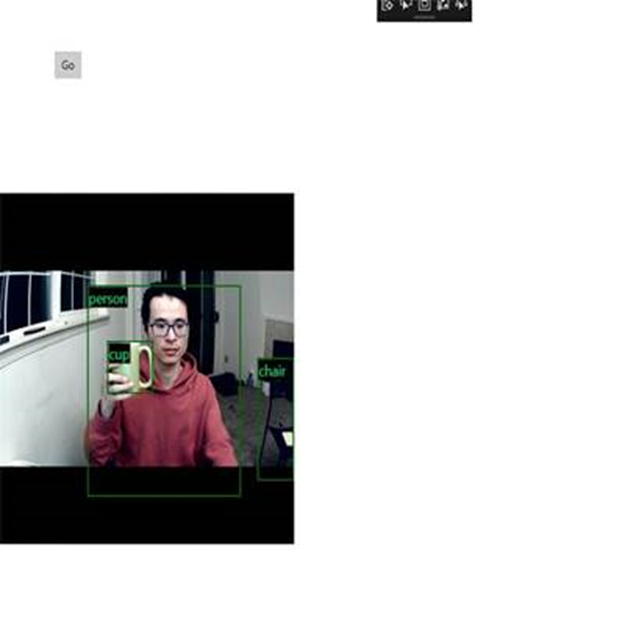
Você criou um aplicativo de detecção de objetos em tempo real! Clique no botão Run na barra superior do Visual Studio para iniciar o aplicativo. O aplicativo deve ser assim.

Recursos adicionais
Para saber mais sobre os tópicos mencionados neste tutorial, visite os seguintes recursos:
- Ferramentas do Windows ML: conheça mais ferramentas como o Painel do Windows ML, o WinMLRunner e o gerador de código do Windows ML mlgen.
- Modelo de ONNX: saiba mais sobre o formato ONNX.
- Desempenho e memória do Windows ML: saiba mais sobre como gerenciar o desempenho do aplicativo com o Windows ML.
- Referência de API do Windows Machine Learning: saiba mais sobre três áreas das APIs do Windows ML.