Compreender e investigar Caminhos de Movimento Lateral (LMPs) com Microsoft Defender para Identidade
O movimento lateral ocorre quando um atacante utiliza contas não confidenciais para obter acesso a contas confidenciais em toda a rede. O movimento lateral é utilizado pelos atacantes para identificar e obter acesso às contas e máquinas confidenciais na sua rede que partilham credenciais de início de sessão armazenadas em contas, grupos e computadores. Assim que um atacante fizer movimentos laterais bem-sucedidos em direção aos seus principais destinos, o atacante também pode tirar partido e obter acesso aos controladores de domínio. Os ataques de movimento lateral são realizados através de muitos dos métodos descritos em Alertas de Segurança do Microsoft Defender para Identidade.
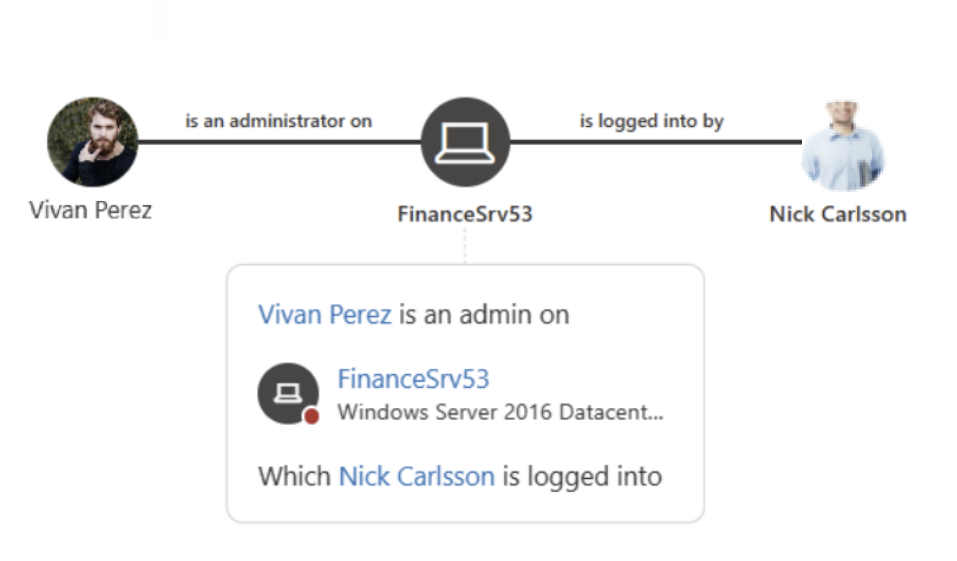
Um componente fundamental das informações de segurança do Microsoft Defender para Identidade são Caminhos de Movimento Lateral ou LMPs. Os LMPs do Defender para Identidade são guias visuais que o ajudam a compreender e identificar rapidamente exatamente como os atacantes podem mover-se lateralmente dentro da sua rede. O objetivo dos movimentos laterais dentro da cadeia de eliminação de ataques cibernéticos é que os atacantes ganhem e comprometam as suas contas confidenciais usando contas não confidenciais. Comprometer as suas contas confidenciais coloca-as mais um passo mais perto do seu objetivo final, o domínio de domínio. Para impedir que estes ataques sejam bem-sucedidos, os LMPs do Defender para Identidade dão-lhe orientações visuais diretas e fáceis de interpretar nas suas contas mais vulneráveis e confidenciais. Os LMPs ajudam-no a mitigar e evitar esses riscos no futuro e a fechar o acesso dos atacantes antes de atingirem o domínio.
Por exemplo:
Normalmente, os ataques de movimento lateral são realizados através de várias técnicas diferentes. Alguns dos métodos mais populares utilizados pelos atacantes são o roubo de credenciais e a Passagem da Permissão. Em ambos os métodos, as suas contas não confidenciais são utilizadas pelos atacantes para movimentações laterais ao explorar máquinas não confidenciais que partilham credenciais de início de sessão armazenadas em contas, grupos e computadores com contas confidenciais.
Veja o seguinte vídeo para saber mais sobre a redução dos caminhos de movimento lateral com o Defender para Identidade:
Onde posso encontrar LMPs do Defender para Identidade?
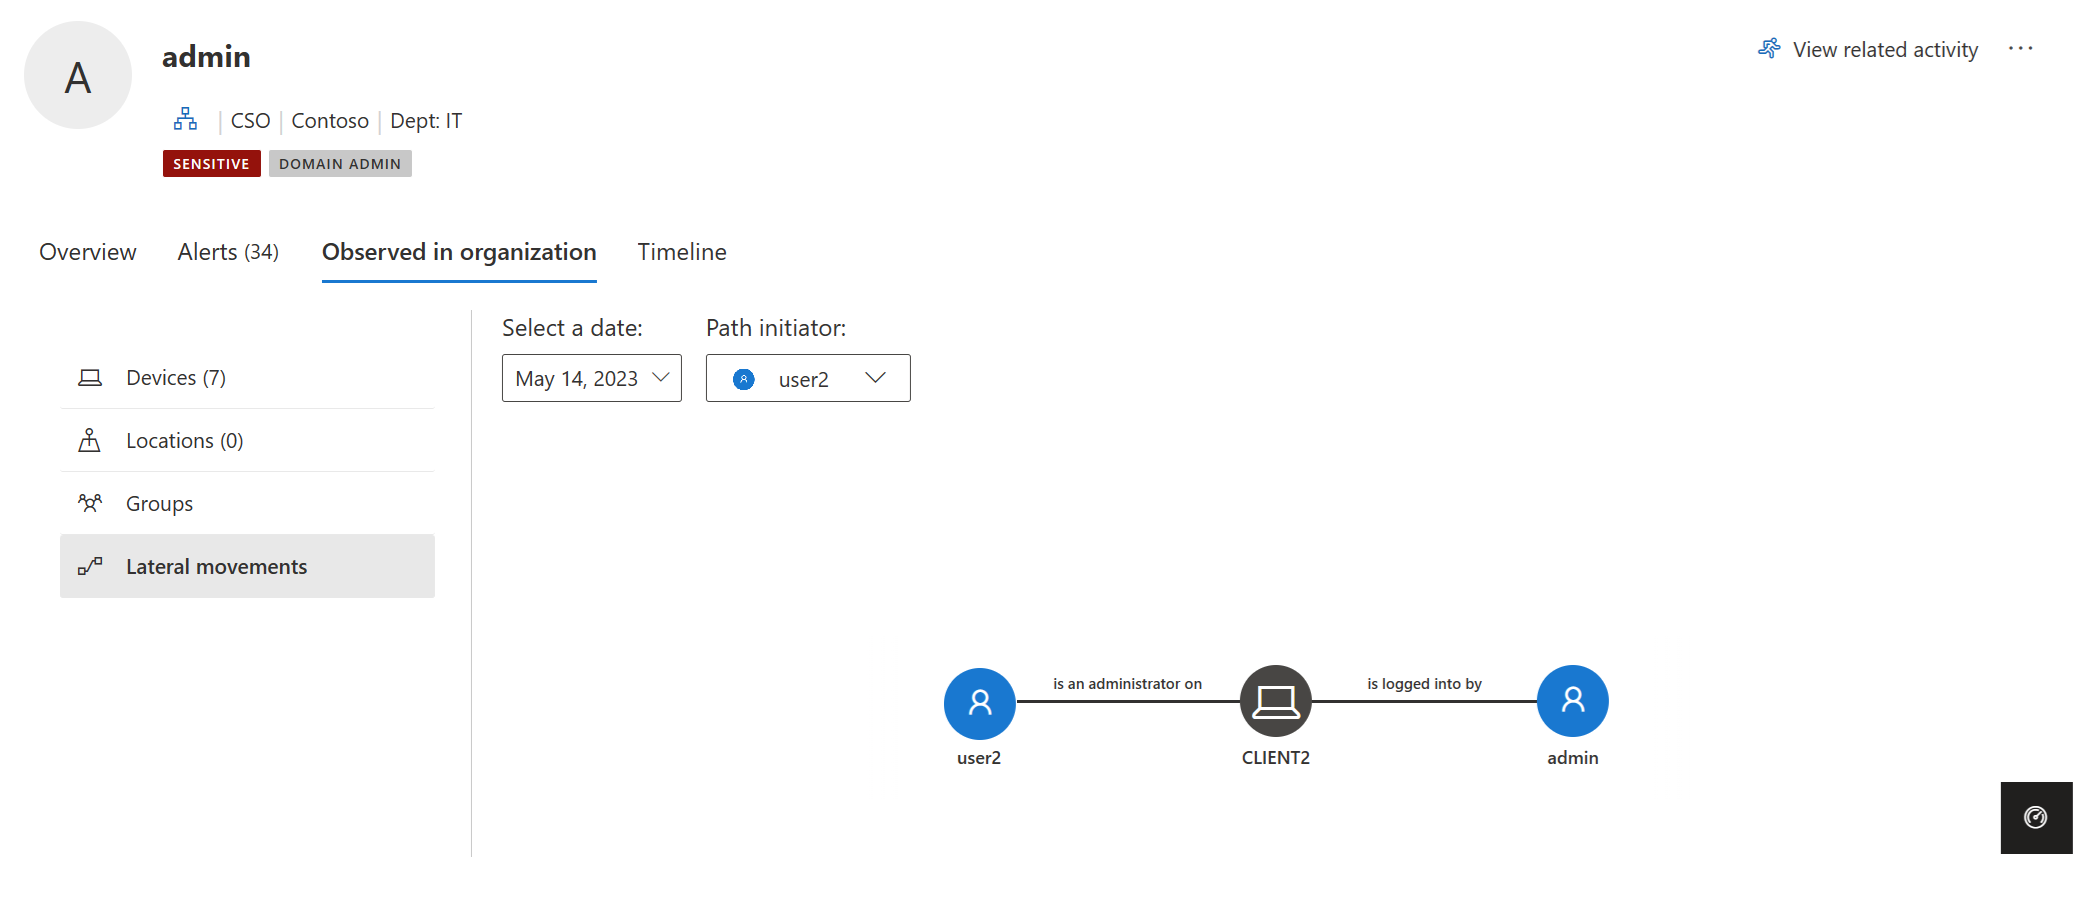
Todas as identidades detetadas pelo Defender para Identidade num LMP têm uma informação de caminhos de movimento lateral no separador Celebrado na organização . Por exemplo:

O LMP para cada entidade fornece informações diferentes consoante a confidencialidade da entidade:
- Utilizadores confidenciais – são apresentados potenciais LMP(s) que conduzem a este utilizador.
- Utilizadores e computadores não confidenciais – são apresentados os potenciais LMP a que a entidade está relacionada.
Sempre que o separador estiver selecionado, o Defender para Identidade apresenta o LMP detetado mais recentemente. Cada LMP potencial é guardado durante 48 horas após a deteção. O histórico LMP está disponível. Veja os LMPs mais antigos que foram detetados no passado ao selecionar Selecionar uma data. Também pode escolher um utilizador diferente que tenha iniciado o LMP ao selecionar Iniciador de caminho.
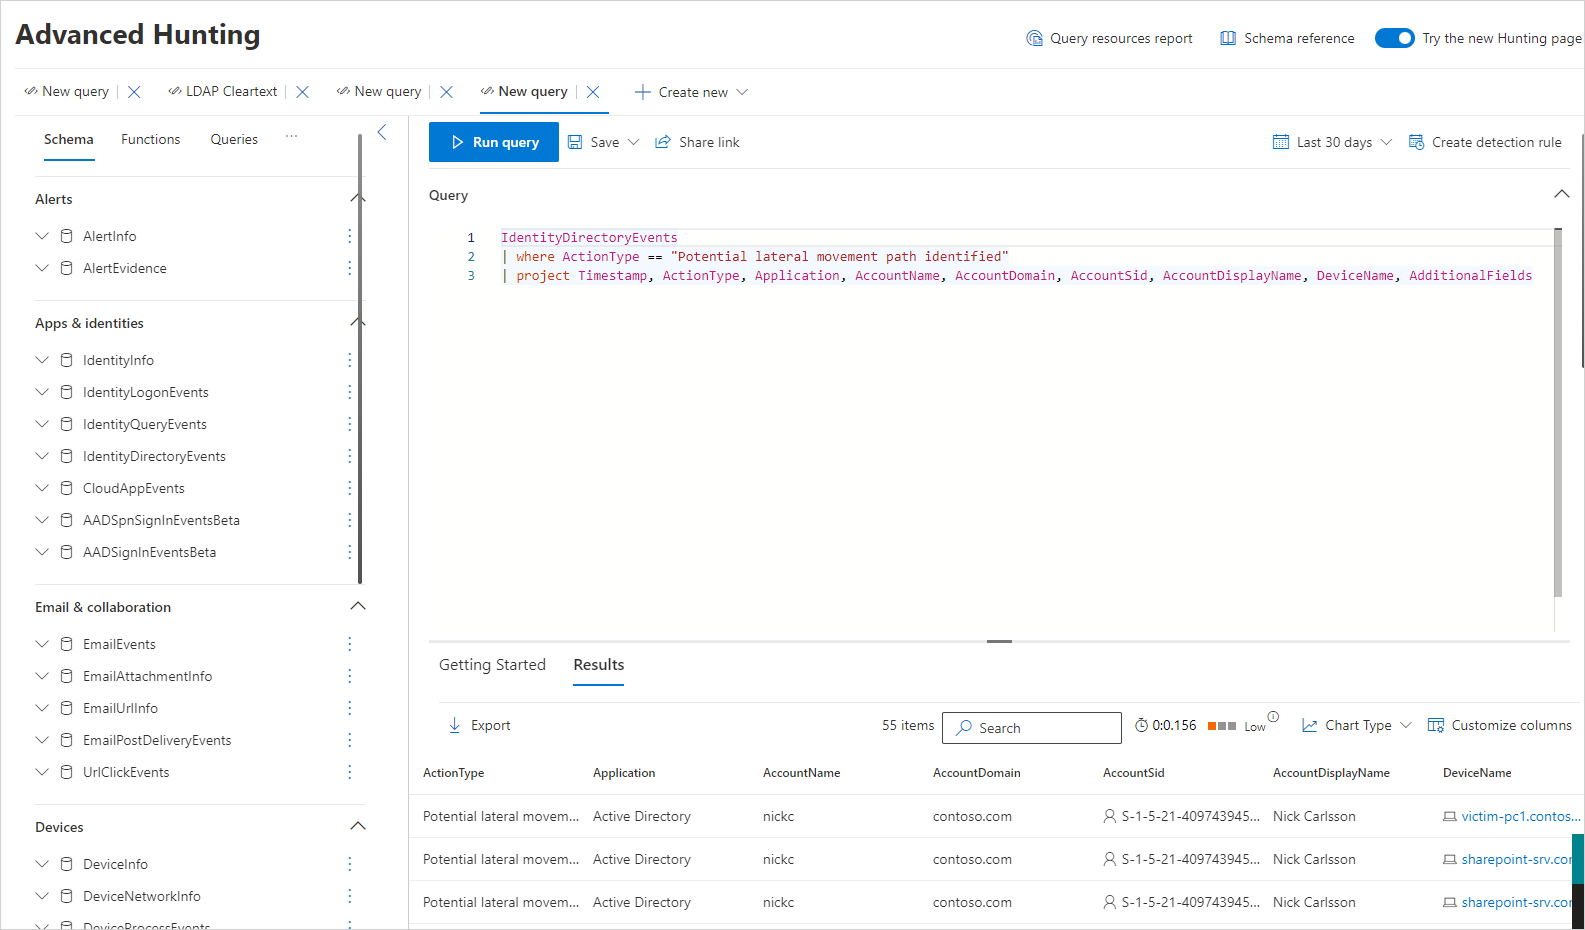
Deteção de LMP com investigação avançada
Para detetar proativamente atividades de caminho de movimento lateral, pode executar uma consulta de investigação avançada.
Eis um exemplo dessa consulta:
Para obter instruções sobre como executar consultas de investigação avançadas, veja Proativamente investigar ameaças com investigação avançada no Microsoft Defender XDR.
Entidades relacionadas com LMP
A LMP pode agora ajudar diretamente no processo de investigação. As listas de provas de alertas de segurança do Defender para Identidade fornecem as entidades relacionadas que estão envolvidas em cada potencial caminho de movimento lateral. As listas de provas ajudam diretamente a sua equipa de resposta de segurança a aumentar ou reduzir a importância do alerta de segurança e/ou investigação das entidades relacionadas. Por exemplo, quando é emitido um alerta Passagem da Permissão, o computador de origem, o utilizador comprometido e o computador de destino a partir do qual a permissão roubada foi utilizada fazem parte do potencial caminho de movimento lateral que conduz a um utilizador confidencial. A existência do LMP detetado torna ainda mais importante investigar o alerta e observar o utilizador suspeito para impedir que o adversário faça movimentações laterais adicionais. São fornecidas provas rastreáveis em LMPs para facilitar e acelerar a execução dos atacantes na sua rede.
Avaliação de segurança dos caminhos de Movimento Lateral
Microsoft Defender para Identidade monitoriza continuamente o seu ambiente para identificar contas confidenciais com os caminhos de movimento lateral mais arriscados que expõem um risco de segurança e relatórios sobre estas contas para o ajudar na gestão do seu ambiente. Os caminhos são considerados arriscados se tiverem três ou mais contas não confidenciais que possam expor a conta confidencial ao roubo de credenciais por atores maliciosos. Para descobrir quais das suas contas confidenciais têm caminhos de movimento lateral de risco, veja a avaliação de segurança caminhos de movimento lateral mais arriscados (LMP ). Com base nas recomendações, pode remover a entidade do grupo ou remover as permissões de administrador local da entidade do dispositivo especificado.
Para obter mais informações, veja Avaliação de segurança: Caminhos de movimento lateral mais arriscados (LMP).
Melhores práticas preventivas
As informações de segurança nunca são demasiado tarde para evitar o próximo ataque e corrigir danos. Por este motivo, investigar um ataque mesmo durante a fase de dominância do domínio fornece um exemplo diferente, mas importante. Normalmente, enquanto investiga um alerta de segurança, como a Execução remota de código, se o alerta for um verdadeiro positivo, o controlador de domínio pode já estar comprometido. No entanto, os LMPs informam sobre onde o atacante obteve privilégios e qual o caminho utilizado na sua rede. Utilizados desta forma, os LMPs também podem oferecer informações importantes sobre como remediar.
A melhor forma de impedir a exposição de movimentos laterais na sua organização é garantir que os utilizadores confidenciais utilizam apenas as credenciais de administrador quando iniciam sessão em computadores endurecidos. No exemplo, marcar se o administrador no caminho precisar realmente de acesso ao computador partilhado. Se precisarem de acesso, certifique-se de que iniciam sessão no computador partilhado com um nome de utilizador e palavra-passe que não as credenciais de administrador.
Verifique se os seus utilizadores não têm permissões administrativas desnecessárias. No exemplo, marcar se todas as pessoas no grupo partilhado necessitam realmente de direitos de administrador no computador exposto.
Certifique-se de que as pessoas só têm acesso aos recursos necessários. No exemplo, Ron Harper alarga significativamente a exposição de Nick Cowley. É necessário que Ron Harper seja incluído no grupo? Existem subgrupos que podem ser criados para minimizar a exposição ao movimento lateral?
Dica
Quando não for detetada nenhuma potencial atividade de caminho de movimento lateral para uma entidade nas últimas 48 horas, selecione Selecionar uma data e marcar para caminhos de movimento lateral anteriores.
Importante
Para obter instruções sobre como definir os seus clientes e servidores para permitir que o Defender para Identidade execute as operações SAM-R necessárias para a deteção de caminhos de movimento lateral, veja Configurar Microsoft Defender para Identidade para efetuar chamadas remotas para SAM.
Investigar caminhos de movimento lateral
Existem várias formas de utilizar e investigar LMPs. No portal Microsoft Defender, pesquise por entidade e, em seguida, explore por caminho ou atividade.
No portal, procure um utilizador. Em Observado na organização (nos separadores Descrição Geral e Observado ), pode ver se o utilizador é detetado num potencial LMP.
Se o utilizador for detetado, selecione o separador Observado na organização e selecione Caminhos de movimento lateral.
O gráfico apresentado fornece um mapa dos caminhos possíveis para o utilizador confidencial durante o período de tempo de 48 horas. Utilize a opção Selecionar uma data para apresentar o gráfico das deteções anteriores do caminho de movimento lateral da entidade.
Reveja o gráfico para ver o que pode aprender sobre a exposição das credenciais do utilizador confidencial. Por exemplo, no caminho, siga as setas Com sessão iniciada por para ver onde o Nick iniciou sessão com as respetivas credenciais privilegiadas. Neste caso, as credenciais confidenciais do Nick foram guardadas no computador apresentado. Agora, repare que outros utilizadores iniciaram sessão em que computadores criaram mais exposição e vulnerabilidade. Neste exemplo, Elizabeth King tem a capacidade de aceder às credenciais de utilizador a partir desse recurso.

