Avaliar a preparação para implantação do seu ambiente para o Azure Local, versão 23H2
Aplica-se a: Azure Local 2311.2 e posterior
Este artigo descreve como usar o Verificador de Ambiente Local do Azure em um modo autônomo para avaliar o quão pronto seu ambiente está para implantar a solução Local do Azure.
Para uma implantação tranquila da solução Local do Azure, seu ambiente de TI deve atender a determinados requisitos de conectividade, hardware, rede e Active Directory. O Verificador de Ambiente Local do Azure é uma ferramenta de avaliação de preparação que verifica esses requisitos mínimos e ajuda a determinar se o ambiente de TI está pronto para implantação.
Sobre a ferramenta Verificador de Ambiente
A ferramenta Verificador de Ambiente executa uma série de testes em cada computador em sua instância local do Azure, relata o resultado de cada teste, fornece diretrizes de correção quando disponíveis e salva um arquivo de log e um arquivo de relatório detalhado.
A ferramenta Verificador de Ambiente consiste nos seguintes validadores:
- Validador de conectividade. Verifica se cada máquina no sistema atende aos requisitos de conectividade. Por exemplo, cada computador no sistema tem conexão com a Internet e pode se conectar por meio de tráfego de saída HTTPS a pontos de extremidade conhecidos do Azure por meio de todos os firewalls e servidores proxy.
- Validador de hardware. Verifica se o hardware atende aos requisitos do sistema. Por exemplo, todas as máquinas do sistema têm o mesmo fabricante e modelo.
- Validador do Active Directory. Verifica se a ferramenta de preparação do Active Directory é executada antes de executar a implantação.
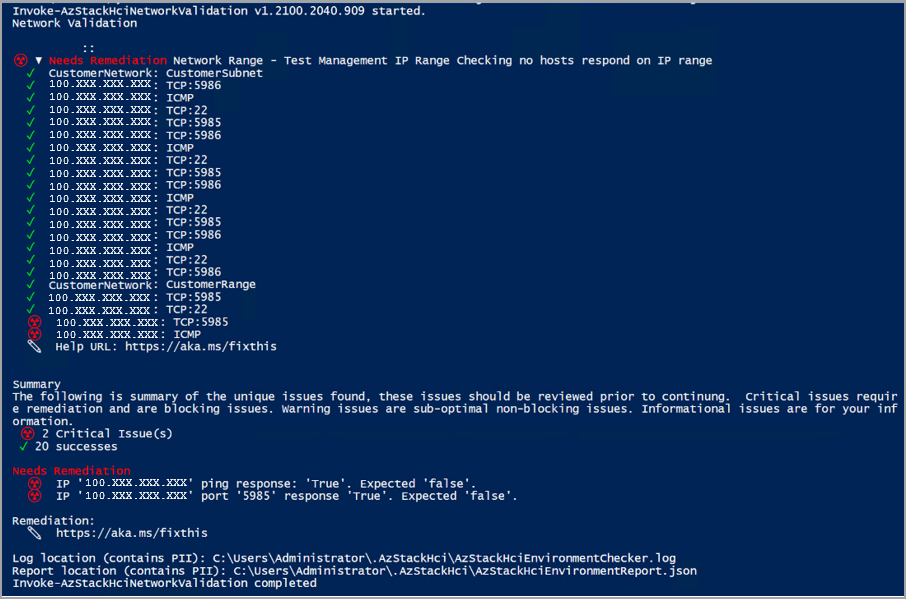
- Validador de rede. Valida sua infraestrutura de rede para intervalos de IP válidos fornecidos pelos clientes para implantação. Por exemplo, ele verifica se não há hosts ativos na rede usando o intervalo de IP reservado.
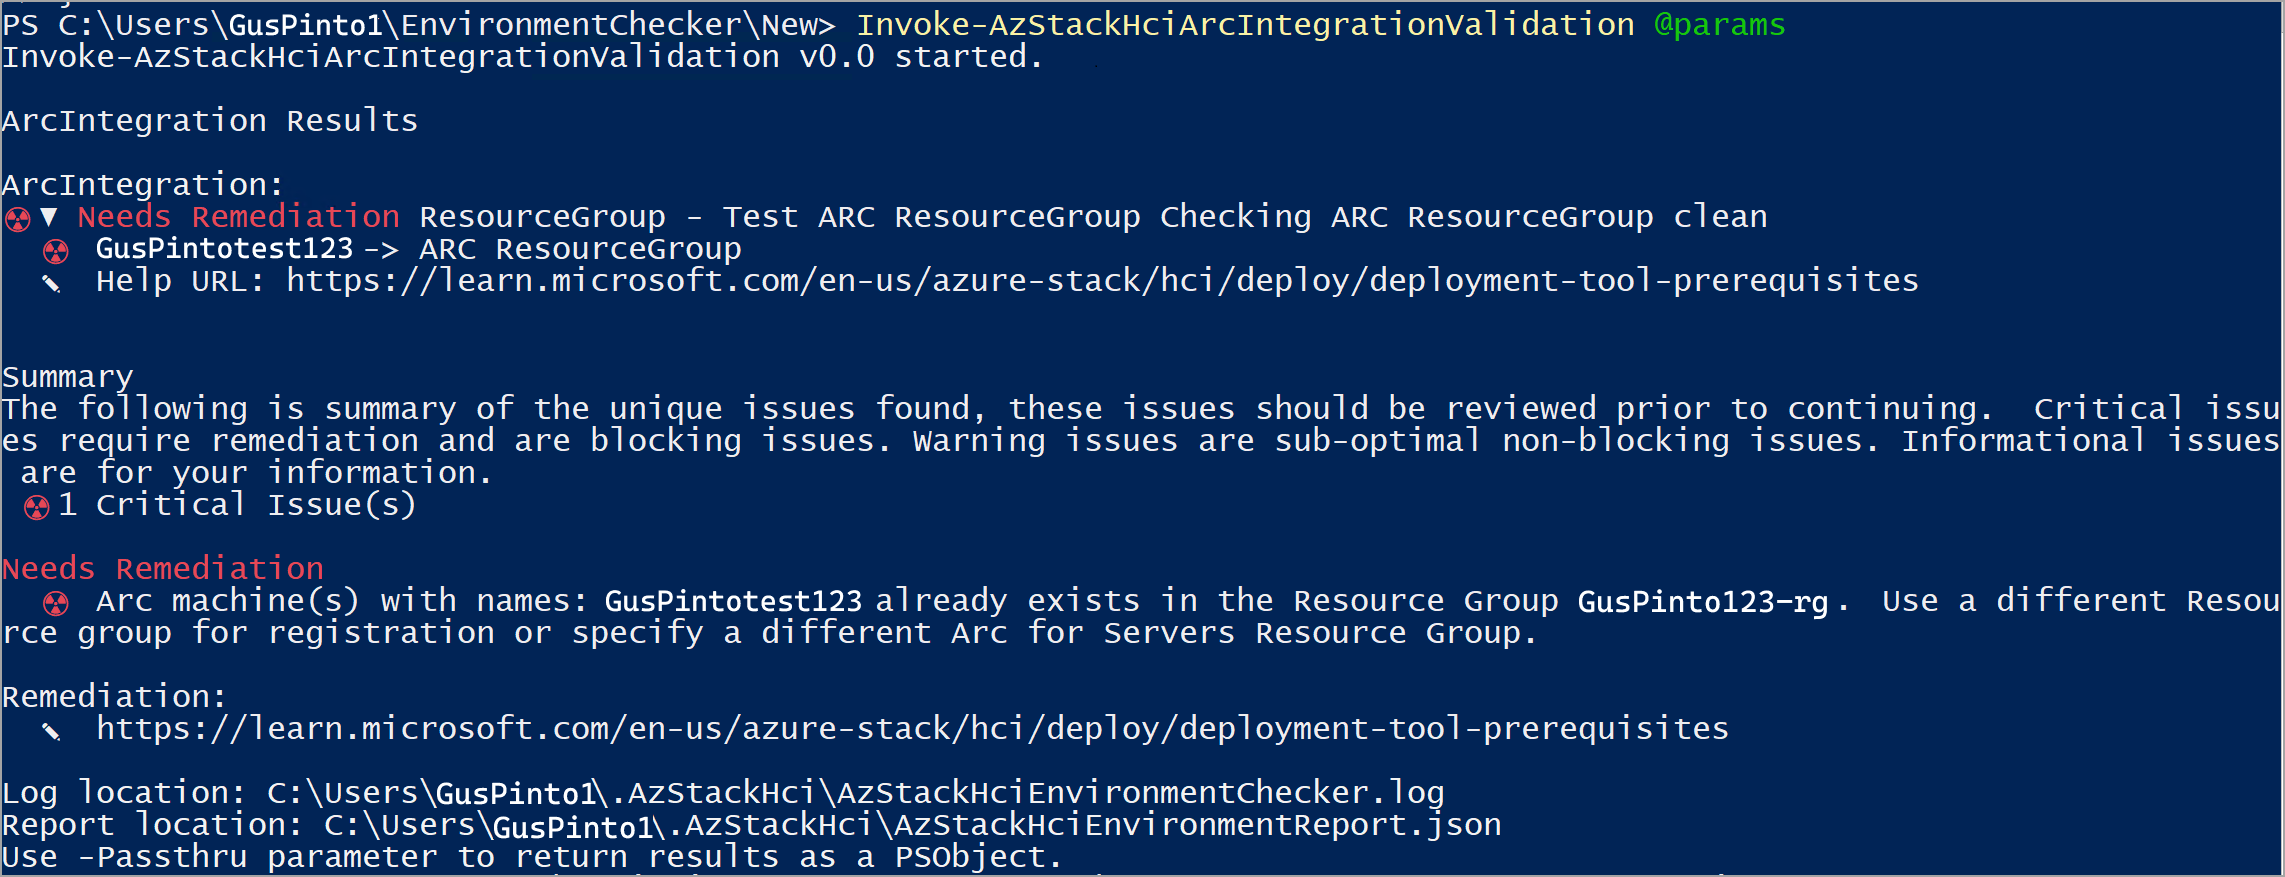
- Validador de integração Arc. Verifica se o Azure Local atende a todos os pré-requisitos para uma integração bem-sucedida do Arc.
Por que usar o Verificador de Ambiente?
Você pode executar o Verificador de Ambiente para:
- Verifique se a infraestrutura local do Azure está pronta antes de implantar atualizações ou upgrades futuros.
- Identifique os problemas que podem bloquear a implantação, como não executar um script do Active Directory de pré-implantação.
- Confirme se os requisitos mínimos foram atendidos.
- Identifique e corrija pequenos problemas com antecedência e rapidez, como um URL de firewall mal configurado ou um DNS errado.
- Identifique e corrija discrepâncias por conta própria e verifique se a configuração atual do ambiente está em conformidade com os requisitos do sistema local do Azure.
- Colete logs de diagnóstico e obtenha suporte remoto para solucionar quaisquer problemas de validação.
Modos do Verificador de Ambiente
Você pode executar o Verificador de Ambiente em dois modos:
Ferramenta integrada: a funcionalidade Verificador de Ambiente é integrada ao processo de implantação. Por padrão, todos os validadores são executados durante a implantação para executar verificações de preparação pré-implantação.
Ferramenta autônoma: essa ferramenta leve do PowerShell está disponível para download gratuito na galeria do Windows PowerShell. Você pode executar a ferramenta autônoma a qualquer momento, fora do processo de implantação. Por exemplo, você pode executá-lo antes mesmo de receber o hardware real para verificar se todos os requisitos de conectividade foram atendidos.
Este artigo descreve como executar o Verificador de Ambiente em um modo autônomo.
Pré-requisitos
Antes de começar, conclua as seguintes tarefas:
- Examine os requisitos do sistema local do Azure.
- Examine os requisitos de firewall para o Azure Local.
- Verifique se você tem acesso a um computador cliente em execução na rede em que você implantará a instância local do Azure.
- Verifique se o computador cliente usado está executando o PowerShell 5.1 ou posterior.
- Verifique se você tem permissão para verificar se a ferramenta de preparação do Active Directory está em execução.
Instalar o Verificador de Ambiente
O Verificador de Ambiente funciona com o PowerShell 5.1, que é integrado ao Windows.
Você pode instalar o Verificador de Ambiente em um computador cliente, servidor de preparo ou computador local do Azure. No entanto, se instalado em um computador local do Azure, certifique-se de desinstalá-lo antes de iniciar a implantação para evitar possíveis conflitos.
Para instalar o Verificador de Ambiente, siga estas etapas:
Execute o PowerShell como administrador (5.1 ou posterior). Se você precisar instalar o PowerShell, consulte Instalação do PowerShell no Windows.
Insira o seguinte cmdlet para instalar a versão mais recente do módulo PowerShellGet:
Install-Module PowerShellGet -AllowClobber -ForceApós a conclusão da instalação, feche a janela do PowerShell e abra uma nova sessão do PowerShell como administrador.
Na nova sessão do PowerShell, registre a galeria do PowerShell como um repositório confiável:
Set-PSRepository -Name PSGallery -InstallationPolicy TrustedInsira o seguinte cmdlet para instalar o módulo Verificador de Ambiente:
Install-Module -Name AzStackHci.EnvironmentCheckerSe solicitado, pressione Y (Sim) ou A (Sim para todos) para instalar o módulo.
Executar verificações de prontidão
Cada validador na ferramenta Verificador de Ambiente verifica configurações e requisitos específicos. Você pode executar esses validadores invocando seus respectivos cmdlets do PowerShell em cada computador em seu sistema local do Azure ou de qualquer computador na rede em que você implantará o Azure Local.
Você pode executar os validadores nos seguintes locais:
Remotamente por meio da sessão do PowerShell.
Localmente a partir de uma estação de trabalho ou de um servidor de teste.
Localmente do computador local do Azure. No entanto, certifique-se de desinstalar o Verificador de Ambiente antes de iniciar a implantação para evitar possíveis conflitos.
Selecione cada uma das guias a seguir para saber mais sobre o validador correspondente.
Use o validador de conectividade para verificar se todas as máquinas em seu sistema têm conectividade com a Internet e atendem aos requisitos mínimos de conectividade. Para obter pré-requisitos de conectividade, consulte Requisitos de firewall para o Azure Local.
Você pode usar o validador de conectividade para:
- Verifique a conectividade de suas máquinas antes de receber o hardware real. Você pode executar o validador de conectividade de qualquer computador cliente na rede em que implantará o sistema local do Azure.
- Verifique a conectividade de todas as máquinas em seu sistema depois de implantar o sistema. Você pode verificar a conectividade de cada computador executando o cmdlet validador localmente em cada computador. Ou você pode se conectar remotamente a partir de um servidor de teste para verificar a conectividade de um ou mais computadores.
Executar o validador de conectividade
Para executar o validador de conectividade, siga estas etapas.
Abra o PowerShell localmente na estação de trabalho, no servidor de preparo ou no computador local do Azure.
Execute uma validação de conectividade inserindo o seguinte cmdlet:
Invoke-AzStackHciConnectivityValidationObservação
Usar o
Invoke-AzStackHciConnectivityValidationcmdlet sem nenhum parâmetro verifica a conectividade de todos os pontos de extremidade de serviço habilitados em seu dispositivo. Você também pode passar parâmetros para executar verificações de preparação para cenários específicos. Veja exemplos abaixo.
Aqui estão alguns exemplos de execução do cmdlet validador de conectividade com parâmetros.
Exemplo 1: Verificar a conectividade de um computador remoto
Neste exemplo, você se conecta remotamente de sua estação de trabalho ou de um servidor de teste para verificar a conectividade de um ou mais sistemas remotos.
$session = New-PSSession -ComputerName remotesystem.contoso.com -Credential $credential
Invoke-AzStackHciConnectivityValidation -PsSession $Session
Exemplo 2: Verificar a conectividade de um serviço específico
Você pode verificar a conectividade de um ponto de extremidade de serviço específico passando o Service parâmetro. No exemplo a seguir, o validador verifica a conectividade para pontos de extremidade de serviço do Azure Arc.
Invoke-AzStackHciConnectivityValidation -Service "Arc For Servers"
Exemplo 3: verificar a conectividade se você estiver usando um proxy
Se você estiver usando um servidor proxy, poderá especificar o validador de conectividade para passar pelo proxy e pelas credenciais especificadas, conforme mostrado no exemplo a seguir:
Invoke-AzStackHciConnectivityValidation -Proxy http://proxy.contoso.com:8080 -ProxyCredential $proxyCredential
Observação
O validador de conectividade valida o proxy geral, ele não verifica se o sistema local do Azure está configurado corretamente para usar um proxy. Para obter informações sobre como configurar firewalls para o Azure Local, consulte Requisitos de firewall para o Azure Local.
Exemplo 4: Verificar a conectividade e criar o objeto de saída do PowerShell
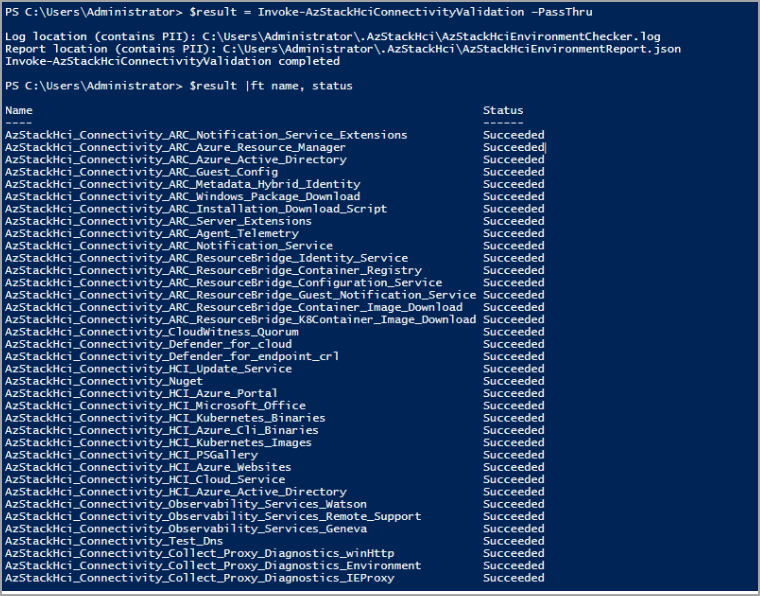
Você pode exibir a saída do verificador de conectividade como um objeto usando o –PassThru parâmetro:
Invoke-AzStackHciConnectivityValidation –PassThru
Aqui está uma captura de tela de exemplo da saída:
Atributos do validador de conectividade
Você pode filtrar qualquer um dos seguintes atributos e exibir o resultado do validador de conectividade no formato desejado:
| Nome do atributo | Descrição |
|---|---|
| EndPoint | O ponto de extremidade que está sendo validado. |
| Protocolo | Protocolo usado – exemplo https. |
| Serviço | O ponto de extremidade de serviço que está sendo validado. |
| Tipo de operação | Tipo de operação – implantação, atualização. |
| Grupo | Verificações de prontidão. |
| Sistema | Para uso interno. |
| Nome | Nome do serviço individual. |
| Título | Título do serviço; Nome voltado para o usuário. |
| Severidade | Crítico, Aviso, Informativo, Oculto. |
| Descrição | Descrição do nome do serviço. |
| Marcações | Pares internos de chave-valor para agrupar ou filtrar testes. |
| Status | Sucesso, falhou, em andamento. |
| Remediação | Link de URL para documentação para correção. |
| TargetResourceID | Identificador exclusivo para o recurso afetado (nó ou unidade). |
| TargetResourceName | Nome do recurso afetado. |
| TargetResourceType | Tipo do recurso afetado. |
| Timestamp | A hora em que o teste foi chamado. |
| AdditionalData | Recipiente de propriedades de pares de valores-chave para obter informações adicionais. |
| HealthCheckSource | O nome dos serviços pedia o exame de saúde. |
Saída do validador de conectividade
Os exemplos a seguir são a saída de execuções bem-sucedidas e malsucedidas do validador de conectividade.
Para saber mais sobre as diferentes seções no relatório de verificação de preparação, consulte Entender o relatório de verificação de preparação.
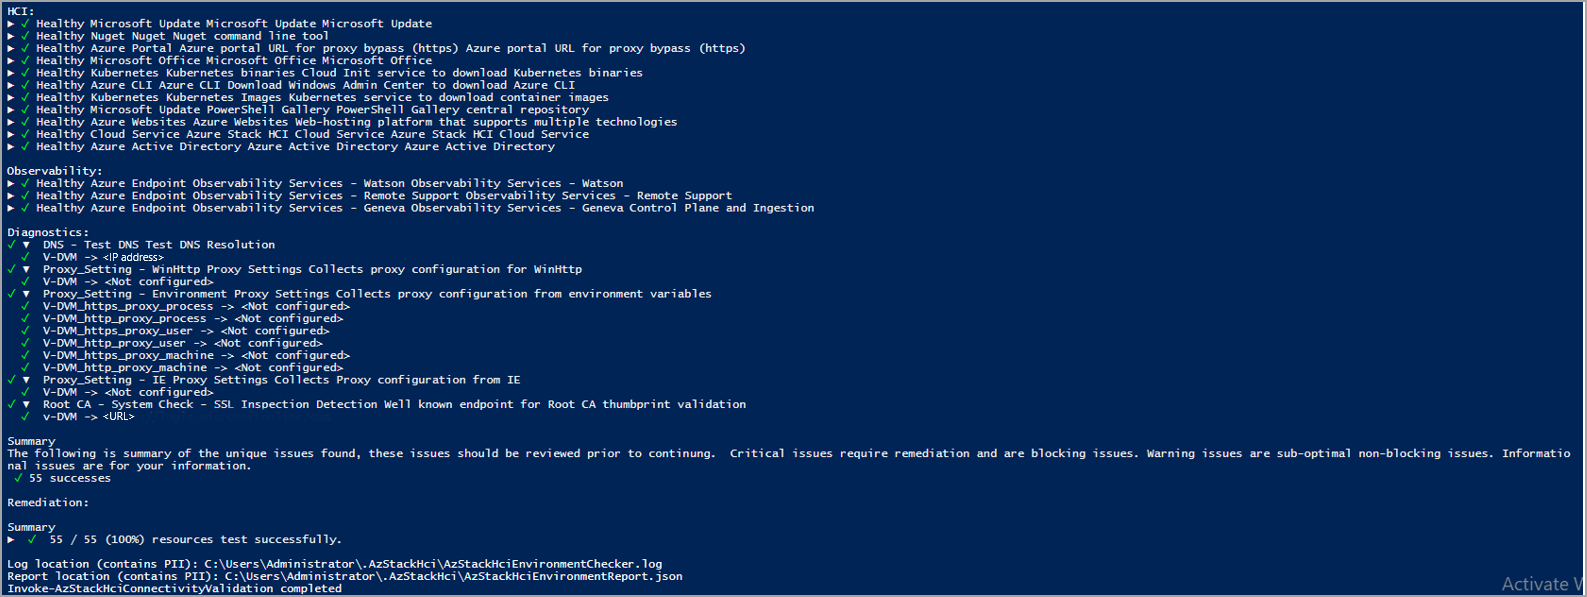
Saída de amostra: Teste bem-sucedido
A saída de exemplo a seguir é de uma execução bem-sucedida do validador de conectividade. A saída indica uma conexão íntegra com todos os pontos de extremidade, incluindo serviços conhecidos do Azure e serviços de observabilidade. Em Diagnóstico, você pode ver que o validador verifica se um servidor DNS está presente e íntegro. Ele coleta WinHttp, proxy do IE e configurações de proxy de variável de ambiente para diagnóstico e coleta de dados. Ele também verifica se um proxy transparente é usado no caminho de saída e exibe a saída.
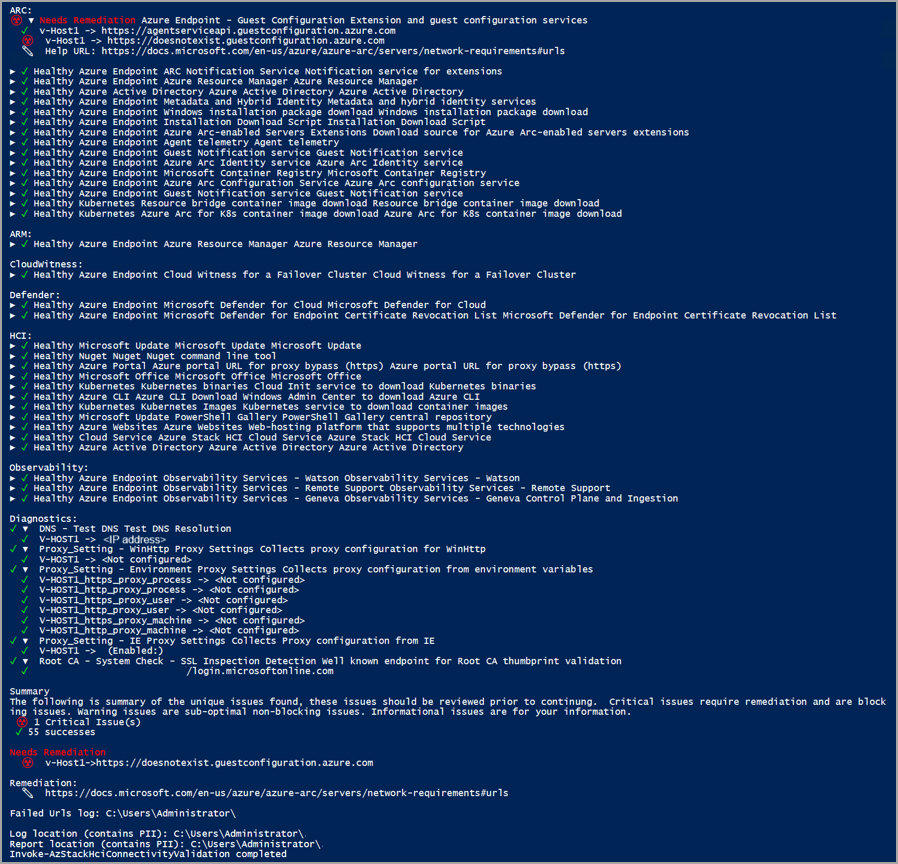
Saída de exemplo: Teste com falha
Se um teste falhar, o validador de conectividade retornará informações para ajudá-lo a resolver o problema, conforme mostrado na saída de exemplo abaixo. A seção Precisa de correção exibe o problema que causou a falha. A seção Remediação lista o artigo relevante para ajudar a corrigir o problema.
Cenário de falha potencial para validador de conectividade
O validador de conectividade verifica a inspeção SSL antes de testar a conectividade de quaisquer pontos de extremidade necessários. Se a inspeção SSL estiver ativada no sistema local do Azure, você receberá o seguinte erro:
Solução alternativa
Trabalhe com sua equipe de rede para desativar a inspeção SSL para seu sistema local do Azure. Para confirmar se a inspeção SSL está desativada, você pode usar os exemplos a seguir. Depois que a inspeção SSL for desativada, você poderá executar a ferramenta novamente para verificar a conectividade com todos os endpoints.
Se você receber a mensagem de erro de validação de certificado, execute os seguintes comandos individualmente para cada ponto de extremidade para verificar manualmente as informações do certificado:
C:\> Import-Module AzStackHci.EnvironmentChecker
C:\> Get-SigningRootChain -Uri <Endpoint-URI> | ft subject
Por exemplo, se você quiser verificar as informações do certificado para dois pontos de extremidade, digamos https://login.microsoftonline.com e https://portal.azure.com, execute os seguintes comandos individualmente para cada ponto de extremidade:
Para
https://login.microsoftonline.com:C:\> Import-Module AzStackHci.EnvironmentChecker C:\> Get-SigningRootChain -Uri https://login.microsoftonline.com | ft subjectAqui está um exemplo de saída:
Subject
-------
CN=portal.office.com, O=Microsoft Corporation, L=Redmond, S=WA, C=US
CN=Microsoft Azure TLS Issuing CA 02, O=Microsoft Corporation, C=US
CN=DigiCert Global Root G2, OU=www.digicert.com, O=DigiCert Inc, C=US
Para
https://portal.azure.com:C:\> Import-Module AzStackHci.EnvironmentChecker C:\> Get-SigningRootChain -Uri https://portal.azure.com | ft SubjectAqui está um exemplo de saída:
Subject
-------
CN=portal.azure.com, O=Microsoft Corporation, L=Redmond, S=WA, C=US
CN=Microsoft Azure TLS Issuing CA 01, O=Microsoft Corporation, C=US
CN=DigiCert Global Root G2, OU=www.digicert.com, O=DigiCert Inc, C=US
Entender o relatório de verificação de prontidão
Cada validador gera um relatório de verificação de prontidão após concluir a verificação. Certifique-se de revisar o relatório e corrigir quaisquer problemas antes de iniciar a implantação real.
As informações exibidas em cada relatório de verificação de prontidão variam de acordo com as verificações que os validadores realizam. A tabela a seguir resume as diferentes seções nos relatórios de verificação de prontidão para cada validador:
| Seção | Descrição | Disponível em |
|---|---|---|
| Serviços | Exibe o status de integridade de cada ponto de extremidade de serviço que o validador de conectividade verifica. Qualquer ponto de extremidade de serviço que falhe na verificação é realçado com a marca Precisa de correção . | Relatório do validador de conectividade |
| Diagnóstico | Exibe o resultado dos testes de diagnóstico. Por exemplo, a integridade e a disponibilidade de um servidor DNS. Ele também mostra quais informações o validador coleta para fins de diagnóstico, como WinHttp, proxy do IE e configurações de proxy de variável de ambiente. | Relatório do validador de conectividade |
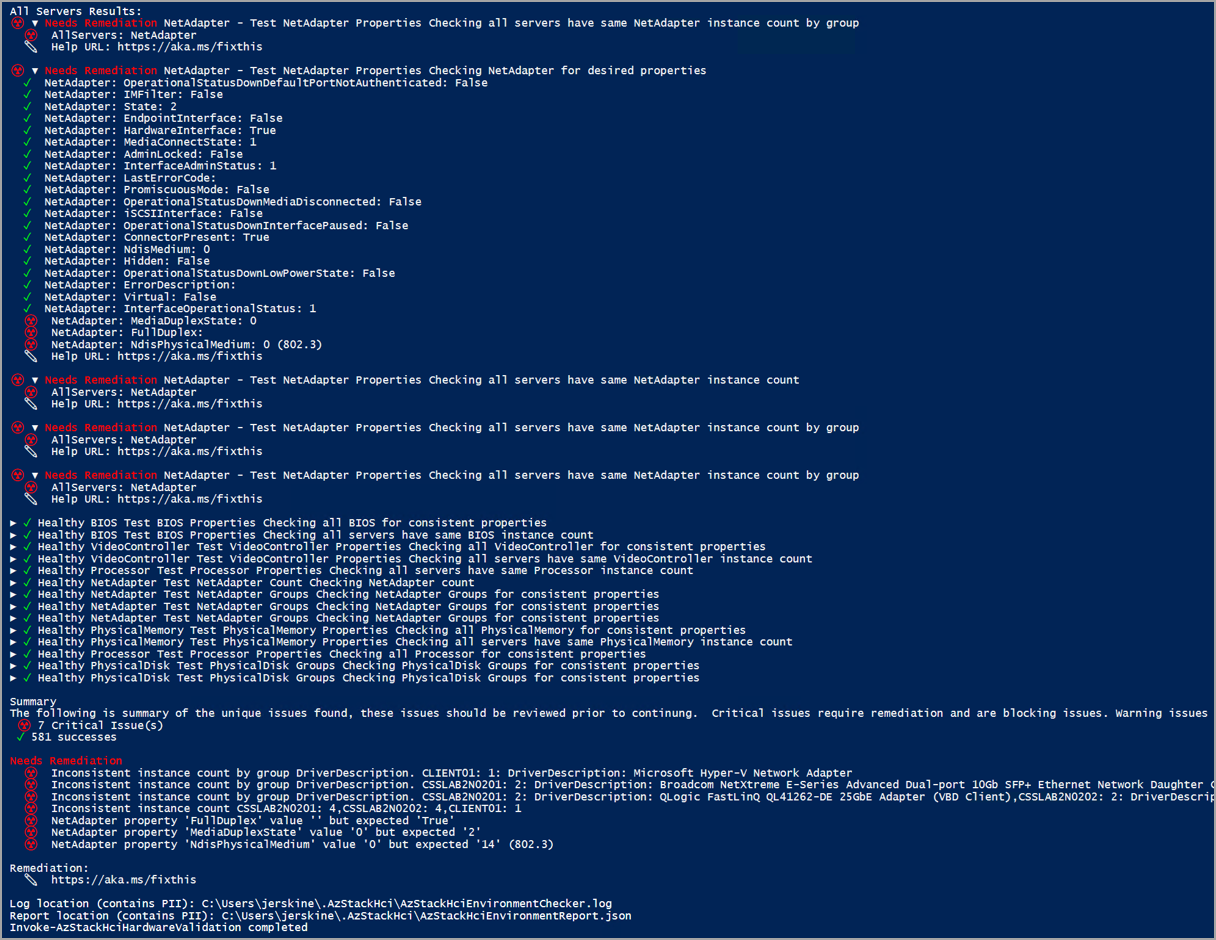
| Hardware | Exibe o status de integridade de todas as máquinas físicas e seus componentes de hardware. Para obter informações sobre os testes realizados em cada hardware, consulte a tabela na guia "Hardware" na seção Executar verificações de prontidão. | Relatório do validador de hardware |
| Diagnóstico de UO AD | Exibe o resultado do teste de unidade organizacional do Active Directory. Exibe se a unidade organizacional especificada existe e contém unidades suborganizacionais adequadas. | Relatório do validador do Active Directory |
| Teste de rede | Exibe o resultado do teste de rede. Se o teste falhar, ele exibirá os resultados e as correções correspondentes. | Relatório do validador de rede |
| Resumo | Lista a contagem de testes bem-sucedidos e com falha. Os resultados do teste com falha são expandidos para mostrar os detalhes da falha em Precisa de correção. | Todos os relatórios |
| Remediação | Exibido somente se um teste falhar. Fornece um link para o artigo que fornece orientação sobre como corrigir o problema. | Todos os relatórios |
| Local do log (contém PII) | Fornece o caminho onde o arquivo de log é salvo. O caminho padrão é: - $HOME\.AzStackHci\AzStackHciEnvironmentChecker.log quando você executa o Verificador de Ambiente em um modo autônomo.- C:\CloudDeployment\Logs quando o Verificador de Ambiente é executado como parte do processo de implantação.Cada execução do validador substitui o arquivo existente. |
Todos os relatórios |
| Local do relatório (contém PII) | Fornece o caminho em que o relatório de verificação de preparação concluído é salvo no formato JSON. O caminho padrão é: - $HOME\.AzStackHci\AzStackHciEnvironmentReport.json quando você executa o Verificador de Ambiente em um modo autônomo.- C:\CloudDeployment\Logs quando o Verificador de Ambiente é executado como parte do processo de implantação.O relatório fornece diagnósticos detalhados que são coletados durante cada teste. Essas informações podem ser úteis para integradores de sistemas ou quando você precisar entrar em contato com a equipe de suporte para solucionar o problema. Cada execução do validador substitui o arquivo existente. |
Todos os relatórios |
| Mensagem de conclusão | No final do relatório, exibe uma mensagem informando que a verificação de validação foi concluída. | Todos os relatórios |
Resultados do Verificador de Ambiente
Observação
Os resultados relatados pela ferramenta Verificador de Ambiente refletem o status de suas configurações somente no momento em que você a executou. Se você fizer alterações posteriormente, por exemplo, no Active Directory ou nas configurações de rede, os itens que foram aprovados com êxito anteriormente podem se tornar problemas críticos.
Para cada teste, o validador fornece um resumo dos problemas exclusivos e os classifica em: sucesso, problemas críticos, problemas de aviso e problemas informativos. Problemas críticos são os problemas de bloqueio que você deve corrigir antes de prosseguir com a implantação.
Desinstalar verificador de ambiente
O verificador de ambiente é fornecido com o Azure Local, certifique-se de desinstalá-lo de todos os computadores locais do Azure antes de iniciar a implantação para evitar possíveis conflitos.
Remove-Module AzStackHci.EnvironmentChecker -Force
Get-Module AzStackHci.EnvironmentChecker -ListAvailable | Where-Object {$_.Path -like "*$($_.Version)*"} | Uninstall-Module -force
Solucionar problemas de validação de ambiente
Para obter informações sobre como obter suporte da Microsoft para solucionar problemas de validação que possam surgir durante a implantação ou pré-registro do sistema, consulte Obter suporte para problemas de implantação.
Próximas etapas
- Preencha os pré-requisitos e a lista de verificação de implantação.
- Entre em contato com o Suporte da Microsoft.
