Deploying Windows Server 2012 R2 Essentials in an Existing Active Directory Environment
[This post comes to us courtesy of Rituraj Choudhary from Global Business Support]
In this post we will discuss deploying Windows Server 2012 R2 Essentials in an existing Active Directory domain. Some key points to keep in mind in this scenario are:
- The Windows Server 2012 R2 Essentials once deployed, must be the domain controller at the root of the forest and domain, and must hold all the FSMO roles.
- Windows Server 2012 R2 Essentials can only be deployed into a single domain. Also, a read-only domain controller cannot exist in this domain.
- It can be installed in a pre-existing Active Directory domain only on the pretext that you are migrating to Windows Server 2012 R2 Essentials. Note that there is a grace period of 21 days for completing the entire migration from previous versions of Windows Server Essentials or Small Business Server editions.
Note: If you are planning to deploy a Windows Server 2012 R2 Standard or Windows Server 2012 R2 Datacenter with Windows Server Essentials Experience role in an existing Active Directory environment, please follow our previous post.
Here are the steps we need to cover for this deployment:
- Plan migration for LOB Applications
- Complete the initial setup of Windows Server 2012 R2 Essentials
- Rename the computer
- Make it a Replica Domain Controller
- Transfer all the FSMO Roles to the new Windows Server 2012 R2 Essentials
- Configure Windows Server Essentials Experience role
- Make required changes to the DHCP Scope
- Demote and remove Active Directory Domain Services from the source server
- Set up Windows Server 2012 R2 Essentials features
Before beginning the deployment of Windows Server 2012 R2 Essentials in the existing domain, make sure you plan, rehome and reconfigure your Line of Business applications, so that they are available during and post migration, as per your business requirements.
The first step towards the deployment of the Windows Server 2012 R2 Essentials in an existing domain is to complete the initial setup. Once the installation is complete and the server reboots, log on with the local administrator account.
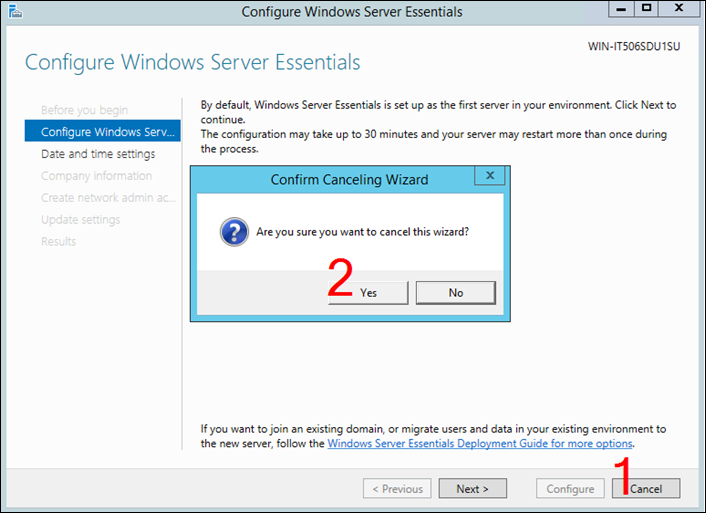
Important: When you log on to the server desktop, you will see Configure Windows Server Essentials wizard that gets triggered automatically. Click Cancel (1) to cancel this wizard at this time, and confirm the cancellation by clicking Yes (2) to the subsequent warning.
Make sure you are connected to the local network. To double-check, you may ping the internal domain name to verify that it resolves to the IP address of the source domain controller.
In most probability you would like to change the name of the server conventionally. Make sure to do that right now, if you intend to. The simplest way would be to open a PowerShell window as an administrator on the target Windows Server 2012 R2 Essentials and issue the following command:
Rename-Computer <new name>
* <new name> is the new name of the local computer in the above command.
For example:

Restart the computer for the changes to take effect. Please note that the Configure Windows Server Essentials wizard will show up again and you need to cancel it.
Confirm the new computer name by issuing command hostname on a PowerShell or a Command Prompt window.
The next step is to add this Windows Server 2012 R2 Essentials to the domain as a replica domain controller. To accomplish this, open Server Manager. On the Server Manager Dashboard, click Manage, and then click Add Roles and Features.

On the Add Roles and Features Wizard that shows up subsequently, proceed through by clicking Next on each of these pages: Before You Begin, Installation Type, and Server Selection with the default options selected. On the Server Roles page, click to select Active Directory Domain Services.

This action pops up a new dialog to add some features. Click Add Features to add the features that are required for Active Directory Domain Services. Click Next on Features and AD DS (Active Directory Domain Services) pages, and Install on the Confirmation page.

Once the installation is complete, click Close to close the wizard.
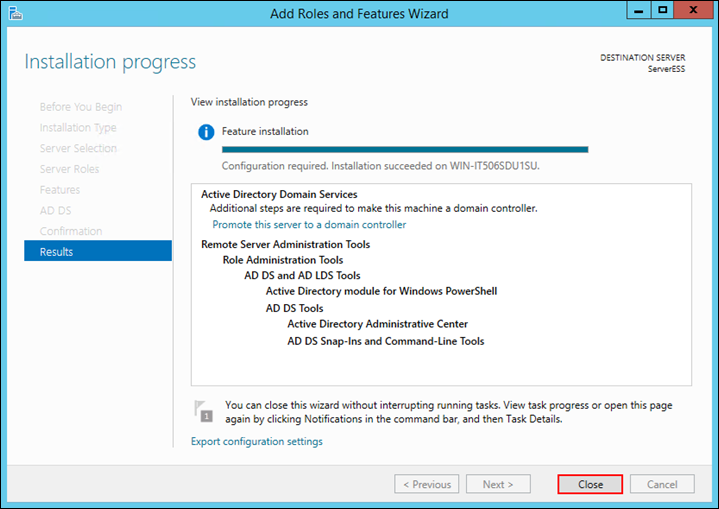
Back on the Server Manager, click the Notifications flag, and click Promote this server to a domain controller to promote the server to a domain controller.

This action should bring up the Active Directory Domain Services Configuration Wizard. On the Deployment Configuration page, select the option Add a domain controller to an existing domain, and then click Select… button next to the Domain field.

You need to enter the domain administrator credentials here, so that it picks up the domain name that exists in the local network.

Select the existing domain name here. Once you click OK, the Domain field should now populate with the FQDN of the domain name, e.g. contoso.local. Click Next.
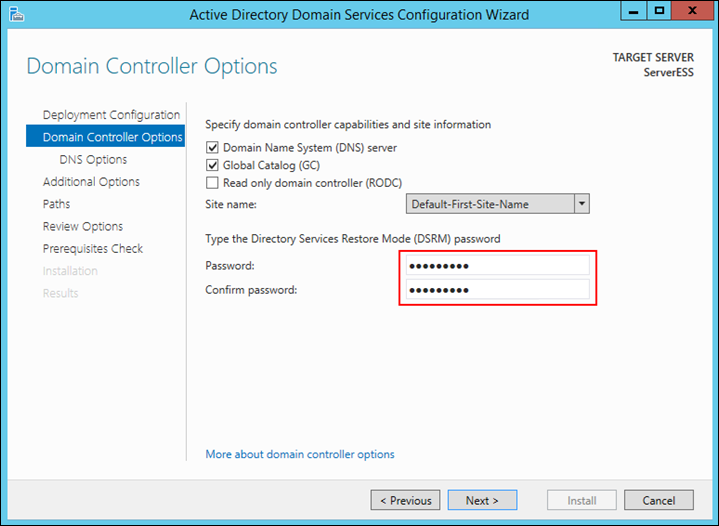
On the Domain Controller Options page, leave the default options selected, and enter a Directory Services Restore Mode (DSRM) password. Keep it safe so you won't lose it. Now click Next.
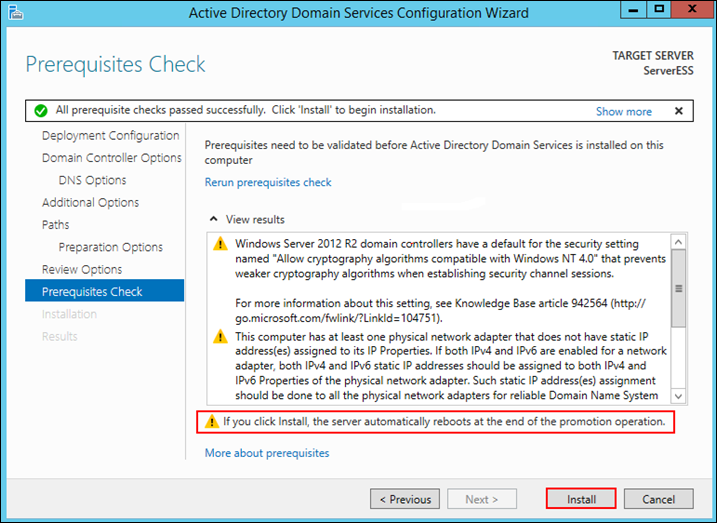
Proceed on these pages with the default options selected: DNS Options, Additional Options, Paths, Preparation Options, and Review Options. On the Prerequisite Check page, after certain checks are validated, you will be presented with an option to install. Click Install to proceed.
Note: After you click Install, the server would automatically reboot at the end of the promotion operation.
PowerShell Script:
We have put the GUI options on the blog post for better grasp and visibility by an end user. You may also choose this PowerShell Script over the GUI.
Import-Module ServerManager Add-WindowsFeature AD-Domain-Services Import-Module ADDSDeployment Install-ADDSDomainController -NoGlobalCatalog:$false -CreateDnsDelegation:$false -Credential (Get-Credential) -CriticalReplicationOnly:$false -DatabasePath "C:\Windows\NTDS" -DomainName "contoso.local" -InstallDns:$true -LogPath "C:\Windows\NTDS" -NoRebootOnCompletion:$false -SiteName "Default-First-Site-Name" -SysvolPath "C:\Windows\SYSVOL" -Force:$true ' * contoso.local is the domain name in this example' * The server will reboot automatically to complete the operation |
After the reboot, you would be presented with the domain account to log in with since the server is joined to the domain at this point. After the logon, it will wind up the process of domain controller promotion. You can then verify the domain join and domain controller functionality on a PowerShell window as:
Dir ENV:\U*
Import-Module ActiveDirectory
Get-ADDomainController

You would again see the Configure Windows Server Essentials wizard pop up. Let's minimize the wizard this time.
Let us now transfer the FSMO roles to the new server. Check the current FSMO role holder domain controller using the command:
netdom query fsmo
These FSMO roles should be with your source server currently.
Run the following commands on an elevated PowerShell window on Windows Server 2012 R2 Essentials to transfer all the FSMO roles on Windows Server 2012 R2 Essentials:
Move-ADDirectoryServerOperationMasterRole –Identity <Target-DC> 0,1,2,3,4
* <Target-DC> is the name of the new Windows Server 2012 R2 Essentials in the above command.

You can either say 'a' once or 'y' 5 times for each operation master roles transfer in the subsequent prompts.
That is pretty much it. You may again run the netdom query fsmo command to verify that they are now with the new Windows Server 2012 R2 Essentials.
Let us now restore the Configure Windows Server Essentials wizard from the Taskbar or Server Manager under Notifications, and click Configure on the Configure Windows Server Essentials page.
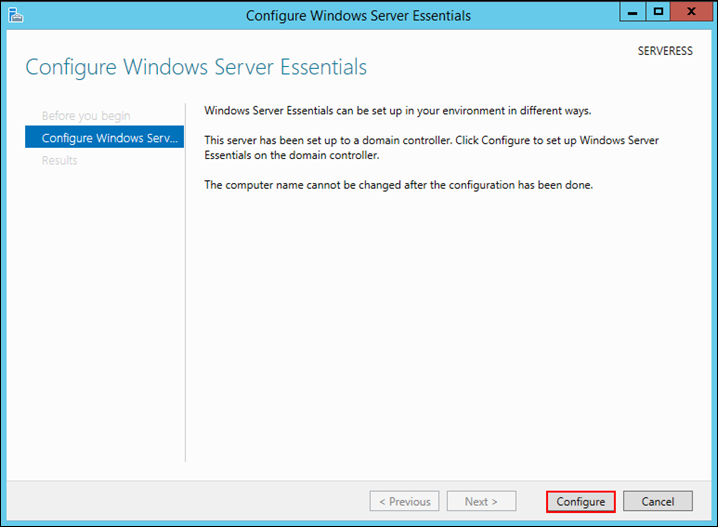
This should take a few minutes. Click Close on the Results page after the configuration is complete.

Change the scope options on the DHCP server on the existing domain to point to the new Windows Server 2012 R2 Essentials as the DNS server.
Follow up by demoting the source server. The shortest way to accomplish this is to run the command Uninstall-ADDSDomainController on an elevated PowerShell window on the source server.

Please note that this process reboots the server automatically to complete the operation. After the source server reboots, you may remove the Active Directory Domain Services role from the Server Manager on the source server.
You are now ready to use your new Windows Server 2012 R2 Essentials. You may now proceed to add client PCs using the connect wizard so that it shows up in the DEVICES tab of the Windows Server Essentials Dashboard, set up Remote Web Access etc. and other Essentials features as per your requirement.
Comments
- Anonymous
January 01, 2003
thanks - Anonymous
January 01, 2003
Thank you - Anonymous
January 01, 2003
Thank you for sharing. - Anonymous
January 01, 2003
nice try,
but did you test that with an SBS2003? I have the problem, that the Essentials Server (after joining the domain) does not find an ADWS Server for connecting the powershell to AD. When installing the AD Gateway Services on the SBS2003, the Essentials is able to use the powershell. So far so good, but in three weeks? To be more clear: the Essentials installs the ADWS and starts it, but the powershell is not able to find and connect to it! Any ideas?
Thx L. - Anonymous
January 01, 2003
The comment has been removed - Anonymous
January 01, 2003
Great article, thanks! Went through it worked great with the addition of Dan's post and a correction as it only allowed me to add ServerAdmin$ at first and after finishing the wizard and seeing a media streaming error it allowed me to add the second user MediaAdmin$ BUT after all the work I could not just add computers through the wizard or re-use the same user names so it seems to me it would have been faster and cleaner to just do it from scratch. Any thoughts on that? - Anonymous
January 01, 2003
Thanks for the overview!
I'm planning a migration of an SBS2003 server to server 2012 R2 Ess with a mix of XP & Win7 clients:
- will the XP clients continue to work during the 21day grace period when the 20212 server "lives" besides the SBS2003 server
- will the LOB applications continue to work on the SBS2003 server during the 21day grace period. As such I could plan the move to the 2012 Ess server during the 21 days.
- Do I need to re-add the Win7 clients to the 2012 Ess R2 server or will the migration (via replica DC) take care of this? If so, will the essentials features be added (like PC backup) to the Win7 clients without re-adding them via the 2012 Ess R2 connect computer Wiz?
Thanks for your help!
Mike - Anonymous
February 21, 2014
hej folKens ha det fjong - Anonymous
February 22, 2014
Cannot open my mail account - Anonymous
February 22, 2014
Need new address for mail account - Anonymous
February 22, 2014
Great Blog . I have read this blog and I really like this blog .
I think that will helpful for any person .
I just come internet for learn more about
http://www.seoexparte.com/buy-email-database/">Buy Email Database
I need to know some answer about this topic.. - Anonymous
February 26, 2014
227 Microsoft Team blogs searched, 60 blogs have new articles. 141 new articles found searching from - Anonymous
March 26, 2014
I followed your scenario but I am stuck on this part: "Move-ADDirectoryServerOperationMasterRole –Identity 0,1,2,3,4". My 2012R2 Essentials servers replies with this error after executing the command:
Move-ADDirectoryServerOperationMasterRole : Could not find attribute: 'dNSHostName' on object: 'CN=SERVER,CN=Servers,CN=Default-First-Site-Name,CN=Sites,CN=Configuration,DC=domainname (not showing real one",DC=local'.
Any ideas on what goes wrong? - Anonymous
April 04, 2014
I have gone through your post and finds this extremely informative.
http://www.bizfind.us/35/599900/1/merchandise/new-york.aspx - Anonymous
May 08, 2014
@Wouter Pinkhof
If you get the dNSHostName attribute error, you can resolve it by right clicking PowerShell and running it as an administrator. - Anonymous
May 14, 2014
Great article with graphics, thank you so much!!! All the steps worked perfectly for me coming from 2003 std to 2012 R2 Essentials... except the end!
The Essentials wizard, that we had minimized, "Configuration encountered some issues" please click retry. Not sure how to proceed. - Anonymous
May 14, 2014
The comment has been removed - Anonymous
May 21, 2014
Pingback from Deploying Windows Server 2012 R2 Essentials in an Existing Active Directory Environment - The Windows Server Essentials and Small Business Server Blog - Site Home - TechNet Blogs - Anonymous
May 21, 2014
[This post comes to us courtesy of Sandeep Biswas and Rituraj Choudhary from Global Business Support - Anonymous
June 10, 2014
How about the DHCP migration ? Does it require special steps or could I follow standard DHCP migration tools like netsh ? - Anonymous
July 02, 2014
原文地址: http://blogs.technet.com/b/sbs/archive/2014/02/17/deploying-windows-server-2012-r2-standard-datacenter - Anonymous
July 04, 2014
I have tried this but, the server manager will not open until I complete the configuration wizard. Any work around? - Anonymous
July 17, 2014
原文地址: http://blogs.technet.com/b/sbs/archive/2014/03/31/windows-server-2012-r2-essentials-migration-keys - Anonymous
August 08, 2014
The comment has been removed - Anonymous
August 11, 2014
These are the top Microsoft Support solutions for the most common issues experienced when you use Windows - Anonymous
August 12, 2014
These are the top Microsoft Support solutions for the most common issues experienced when you use Windows - Anonymous
August 14, 2014
can you not just run DCPROMO and demote? - Anonymous
August 16, 2014
These are the top Microsoft Support solutions for the most common issues experienced when you use Windows - Anonymous
August 25, 2014
Short, concise and easy to follow. Much better than jumping from page to page on the official TechNet guidance! Really helped. Thanks. - Anonymous
August 28, 2014
Made it to the very last step, changing FSMO over.
However after typing A or the Y option I get the message saying access is denied.
I've tried on my network admin account as well as those of others here in office.
Anyone know why this is happening? - Anonymous
September 13, 2014
The comment has been removed - Anonymous
October 18, 2014
Help when I try to edit Group policy as DAN has done I get Failed to open group policy object you might not have appropriate rights, Network Name not found - Anonymous
October 27, 2014
trying to upgrade a windows server 2003 domain and I get this warning.
A domain controller running Windows Server 2008 or later could not be located in this domain. To install a read-only domain controller, the domain must have a domain controller running Windows Server 2008 or later.
is it safe to go pas this warning or do I need to resolve and if so how?
Thanks,
CS - Anonymous
December 05, 2014
Remote Setup (Windows Essential VS Cisco Router) - Anonymous
December 11, 2014
The comment has been removed - Anonymous
December 25, 2014
The comment has been removed - Anonymous
January 13, 2015
Remote Setup (Windows Essential VS Cisco Router) - Anonymous
February 11, 2015
The comment has been removed - Anonymous
February 12, 2015
Would you kindly explain how to promote the ess2k12r2 to a dc? Your way doesn't work. A certificate server is already installed. Sadly that makes your blog entry completly useless :( - Anonymous
February 12, 2015
Nevermind... I started with a wrong ToDo manual. - Anonymous
May 15, 2015
These are the top Microsoft Support solutions for the most common issues experienced when you use Windows - Anonymous
August 29, 2015
The comment has been removed - Anonymous
August 29, 2015
The comment has been removed - Anonymous
September 09, 2015
Nice information. Thanks. - Anonymous
September 15, 2015
This may help some:
I had to add "ServerAdmin1$" in the same group policy that we are instructed to add "ServerAdmin$".
After that, I forced a group policy update with an elevated command prompt and then "gpupdate".
After that, I was able to start the "Windows Server Essentials Management Service" service within the Services window.
I clicked the "Retry" button and the post-deployment wizard completed. - Anonymous
October 19, 2015
Hi all,
Yesterday at last I succedded with smooth migration from axisting domain under MS Windows Server 2003 Enterprize to MS Windows Server 2012 R2 Essentials. It all works if you will do the next things:
1) read CAREFULLY all material above;
2) after installing MS WS 2012 R2 Ess install all applicable updates (windows update)
3) you MUST REBOOT your 2012 Ess server after changing it's role from member server to DC
4) Really, the registering of library can be done ONLY with LOCAL ADMIN on your 2012R2 Ess server, NOT DOMAIN ADMIN!! (command regsvr32 schmmgmt.dll)
Here is one more very useful link (in Russian but it WORKS!!): http://habrahabr.ru/company/microsoft/blog/245667/ - Anonymous
October 20, 2015
Thanks for this guide. I've successfully installed server essentials. And i'm up & running with Active directory.
Thanks,
Moshe Dillenburg,
https://techsupportphonenumber.net/microsoft-windows-email-support.html - Anonymous
October 20, 2015
Great post really useful.
Thanks,
Sharita Lafayette,
https://techsupportphonenumber.net/contact-norton.html - Anonymous
October 20, 2015
Wonderful post.
Thanks,
Marquita Tegtmeier,
https://techsupportphonenumber.net/mcafee-repair.html - Anonymous
November 06, 2015
Thanks for doing this.
Thanks,
Rita Ono, - Anonymous
November 18, 2015
This looks like what im after, but can someone confirm that it spossible to migrate from windows server 2003 standard (not SBS) to 2012 Essentials R2?
Im getting conflicting information, its a new server not an upgrade. - Anonymous
January 07, 2016
http://www.happynewyear2016wishesimagessms.com/hindu-festival-2016/
http://www.happynewyear2016wishesimagessms.com/lohri-pics-lohri-sms-lohri-wallpapers/
http://www.happynewyear2016wishesimagessms.com/happy-lohri-images/
http://www.happynewyear2016wishesimagessms.com/happy-lohri-quotes/
http://www.happynewyear2016wishesimagessms.com/happy-lohri-wishes/
http://www.happynewyear2016wishesimagessms.com/happy-lohri-wallpaper/
http://www.happynewyear2016wishesimagessms.com/lohri-greetings/
http://www.happynewyear2016wishesimagessms.com/lohri-images/
http://www.happynewyear2016wishesimagessms.com/lohri-songs/
http://www.happynewyear2016wishesimagessms.com/lohri-wishes/
http://www.happynewyear2016wishesimagessms.com/lohri-festival/
http://www.happynewyear2016wishesimagessms.com/happy-lohri-bonfire-festival/
http://www.happynewyear2016wishesimagessms.com/lohri-bonfire-festival/
http://www.happynewyear2016wishesimagessms.com/lohri-the-bonfire-festival/
http://www.happynewyear2016wishesimagessms.com/up-helly-aa-event-in-scotland/
http://www.happynewyear2016wishesimagessms.com/dinagyang-festival/
http://www.happynewyear2016wishesimagessms.com/sundance-film-festival-2016/
http://www.happynewyear2016wishesimagessms.com/wwe-in-india-wwe-live-event-in-new-delhi/
http://www.happynewyear2016wishesimagessms.com/lohri-wishes-for-friends-family/
http://www.happynewyear2016wishesimagessms.com/cowboy-poetry/
http://www.happynewyear2016wishesimagessms.com/ati-atihan-festival-full-information/
http://www.happynewyear2016wishesimagessms.com/holy-ship-2016/
http://www.happynewyear2016wishesimagessms.com/things-to-do-in-banff-town-canada/
http://www.happynewyear2016wishesimagessms.com/rainbow-serpent-festival/
http://www.happynewyear2016wishesimagessms.com/sundance-film-festival-winners/
http://www.happynewyear2016wishesimagessms.com/junkanoo-parade/
http://www.happynewyear2016wishesimagessms.com/hogmanay-2016/
http://www.happynewyear2016wishesimagessms.com/ice-sculpture-snow-sculpture-festival/
http://www.happynewyear2016wishesimagessms.com/carnevale-di-venezia/
http://www.happynewyear2016wishesimagessms.com/bpm-festival-what-bpm-festival-is/
http://www.happynewyear2016wishesimagessms.com/thaipusam-thaipusam-is-a-hindu-festival/
http://www.happynewyear2016wishesimagessms.com/holy-ship-unveils-massive-lineups-for-2016-cruises/
http://www.happynewyear2016wishesimagessms.com/quebec-winter-carnival/
http://www.happynewyear2016wishesimagessms.com/jam-cruise/
http://www.happynewyear2016wishesimagessms.com/things-to-do-in-edinburgh/
http://www.happynewyear2016wishesimagessms.com/harbin-ice-festival/
http://www.happynewyear2016wishesimagessms.com/the-sundance-film-festival-a-program-of-the-sundance-institute/ - Anonymous
January 07, 2016
http://www.republicdayimagesi.com/republic-day-songs/
http://www.republicdayimagesi.com/republic-day-status-republic-day-wallpaper/
http://www.republicdayimagesi.com/republic-day-information-republic-day-photos/
http://www.republicdayimagesi.com/republic-day-pictures-republic-day-pics/
http://www.republicdayimagesi.com/republic-day-messages-republic-day-sms/
http://www.republicdayimagesi.com/republic-day-in-hindi/
http://www.republicdayimagesi.com/essay-on-republic-day/
http://www.republicdayimagesi.com/what-is-republic-day/
http://www.republicdayimagesi.com/republic-day-wishes/
http://www.republicdayimagesi.com/speech-on-republic-day-in-hindi-speech-for-republic-day/
http://www.republicdayimagesi.com/republic-day-speech-in-hindi/
http://www.republicdayimagesi.com/republic-day-image/
http://www.republicdayimagesi.com/india-republic-day/
http://www.republicdayimagesi.com/republic-day-quotes/
http://www.republicdayimagesi.com/images-of-republic-day-pics-of-republic-day/
http://www.republicdayimagesi.com/speech-on-republic-day/
http://www.republicdayimagesi.com/republic-day-2016/
http://www.republicdayimagesi.com/republic-day-india/
http://www.republicdayimagesi.com/republic-day-speech/
http://www.republicdayimagesi.com/republic-day-images/
http://www.republicdayimagesi.com/happy-republic-day/
http://www.republicdayimagesi.com/republic-day/
http://www.republicdayi.com/republic-day-songs/
http://www.republicdayi.com/republic-day-status-republic-day-wallpaper/
http://www.republicdayi.com/republic-day-information-republic-day-photos/
http://www.republicdayi.com/republic-day-pictures-republic-day-pics/
http://www.republicdayi.com/republic-day-messages-republic-day-sms/
http://www.republicdayi.com/speech-on-republic-day-in-hindi-speech-for-republic-day/
http://www.republicdayi.com/republic-day-in-hindi/
http://www.republicdayi.com/essay-on-republic-day/
http://www.republicdayi.com/what-is-republic-day/
http://www.republicdayi.com/republic-day-wishes/
http://www.republicdayi.com/republic-day-speech-in-hindi/
http://www.republicdayi.com/republic-day-image/
http://www.republicdayi.com/india-republic-day/
http://www.republicdayi.com/republic-day-quotes/
http://www.republicdayi.com/images-of-republic-day/
http://www.republicdayi.com/speech-on-republic-day/
http://www.republicdayi.com/republic-day-2016/
http://www.republicdayi.com/republic-day-india/
http://www.republicdayi.com/republic-day-speech/
http://www.republicdayi.com/republic-day-images/
http://www.republicdayi.com/happy-republic-day/
http://www.republicdayi.com/republic-day/ - Anonymous
January 07, 2016
http://www.happylohrii.com/lohri-pics-lohri-sms-lohri-wallpapers/
http://www.happylohrii.com/happy-lohri-images/
http://www.happylohrii.com/hindu-festival-2016/
http://www.happylohrii.com/happy-lohri-quotes/
http://www.happylohrii.com/happy-lohri-wishes/
http://www.happylohrii.com/happy-lohri-wallpaper/
http://www.happylohrii.com/lohri-greetings/
http://www.happylohrii.com/lohri-images/
http://www.happylohrii.com/lohri-songs/
http://www.happylohrii.com/lohri-wishes/
http://www.happylohrii.com/lohri-festival/
http://www.happylohrii.com/happy-lohri-bonfire-festival/
http://www.happylohrii.com/lohri-bonfire-festival/ - Anonymous
February 03, 2016
after we have moved the fsmo roles, what exactly does the 'configure' button do on the wizard?