Hierarchical Navigation
The NavigationPage class provides a hierarchical navigation experience where the user is able to navigate through pages, forwards and backwards, as desired. The class implements navigation as a last-in, first-out (LIFO) stack of Page objects. This article demonstrates how to use the NavigationPage class to perform navigation in a stack of pages.
To move from one page to another, an application will push a new page onto the navigation stack, where it will become the active page, as shown in the following diagram:

To return back to the previous page, the application will pop the current page from the navigation stack, and the new topmost page becomes the active page, as shown in the following diagram:

Navigation methods are exposed by the Navigation property on any Page derived types. These methods provide the ability to push pages onto the navigation stack, to pop pages from the navigation stack, and to perform stack manipulation.
Performing Navigation
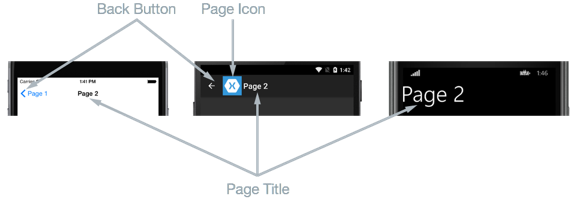
In hierarchical navigation, the NavigationPage class is used to navigate through a stack of ContentPage objects. The following screenshots show the main components of the NavigationPage on each platform:

The layout of a NavigationPage is dependent on the platform:
- On iOS, a navigation bar is present at the top of the page that displays a title, and that has a Back button that returns to the previous page.
- On Android, a navigation bar is present at the top of the page that displays a title, an icon, and a Back button that returns to the previous page. The icon is defined in the
[Activity]attribute that decorates theMainActivityclass in the Android platform-specific project. - On the Universal Windows Platform, a navigation bar is present at the top of the page that displays a title.
On all the platforms, the value of the Page.Title property will be displayed as the page title. In addition, the IconColor property can be set to a Color that's applied to the icon in the navigation bar.
Note
It's recommended that a NavigationPage should be populated with ContentPage instances only.
Creating the Root Page
The first page added to a navigation stack is referred to as the root page of the application, and the following code example shows how this is accomplished:
public App ()
{
  MainPage = new NavigationPage (new Page1Xaml ());
}
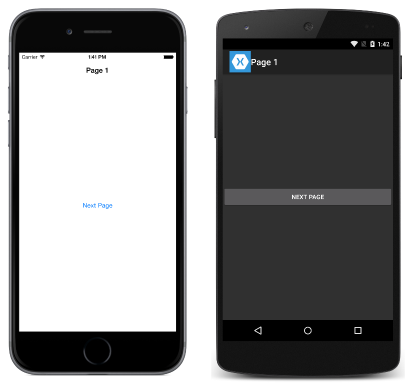
This causes the Page1Xaml ContentPage instance to be pushed onto the navigation stack, where it becomes the active page and the root page of the application. This is shown in the following screenshots:

Note
The RootPage property of a NavigationPage instance provides access to the first page in the navigation stack.
Pushing Pages to the Navigation Stack
To navigate to Page2Xaml, it is necessary to invoke the PushAsync method on the Navigation property of the current page, as demonstrated in the following code example:
async void OnNextPageButtonClicked (object sender, EventArgs e)
{
  await Navigation.PushAsync (new Page2Xaml ());
}
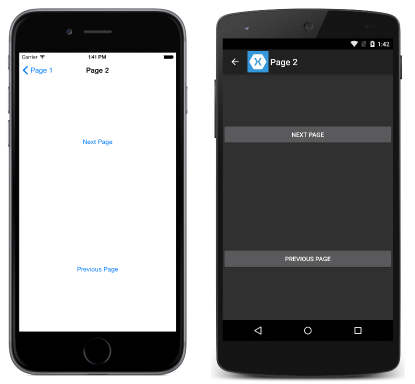
This causes the Page2Xaml instance to be pushed onto the navigation stack, where it becomes the active page. This is shown in the following screenshots:

When the PushAsync method is invoked, the following events occur:
- The page calling
PushAsynchas itsOnDisappearingoverride invoked. - The page being navigated to has its
OnAppearingoverride invoked. - The
PushAsynctask completes.
However, the precise order in which these events occur is platform dependent. For more information, see Chapter 24 of Charles Petzold's Xamarin.Forms book.
Note
Calls to the OnDisappearing and OnAppearing overrides cannot be treated as guaranteed indications of page navigation. For example, on iOS, the OnDisappearing override is called on the active page when the application terminates.
Popping Pages from the Navigation Stack
The active page can be popped from the navigation stack by pressing the Back button on the device, regardless of whether this is a physical button on the device or an on-screen button.
To programmatically return to the original page, the Page2Xaml instance must invoke the PopAsync method, as demonstrated in the following code example:
async void OnPreviousPageButtonClicked (object sender, EventArgs e)
{
  await Navigation.PopAsync ();
}
This causes the Page2Xaml instance to be removed from the navigation stack, with the new topmost page becoming the active page. When the PopAsync method is invoked, the following events occur:
- The page calling
PopAsynchas itsOnDisappearingoverride invoked. - The page being returned to has its
OnAppearingoverride invoked. - The
PopAsynctask returns.
However, the precise order in which these events occur is platform dependent. For more information see Chapter 24 of Charles Petzold's Xamarin.Forms book.
As well as PushAsync and PopAsync methods, the Navigation property of each page also provides a PopToRootAsync method, which is shown in the following code example:
async void OnRootPageButtonClicked (object sender, EventArgs e)
{
  await Navigation.PopToRootAsync ();
}
This method pops all but the root Page off the navigation stack, therefore making the root page of the application the active page.
Animating Page Transitions
The Navigation property of each page also provides overridden push and pop methods that include a boolean parameter that controls whether to display a page animation during navigation, as shown in the following code example:
async void OnNextPageButtonClicked (object sender, EventArgs e)
{
  // Page appearance not animated
  await Navigation.PushAsync (new Page2Xaml (), false);
}

async void OnPreviousPageButtonClicked (object sender, EventArgs e)
{
  // Page appearance not animated
  await Navigation.PopAsync (false);
}

async void OnRootPageButtonClicked (object sender, EventArgs e)
{
  // Page appearance not animated
  await Navigation.PopToRootAsync (false);
}
Setting the boolean parameter to false disables the page-transition animation, while setting the parameter to true enables the page-transition animation, provided that it is supported by the underlying platform. However, the push and pop methods that lack this parameter enable the animation by default.
Passing Data when Navigating
Sometimes it's necessary for a page to pass data to another page during navigation. Two techniques for accomplishing this are passing data through a page constructor, and by setting the new page's BindingContext to the data. Each will now be discussed in turn.
Passing Data through a Page Constructor
The simplest technique for passing data to another page during navigation is through a page constructor parameter, which is shown in the following code example:
public App ()
{
  MainPage = new NavigationPage (new MainPage (DateTime.Now.ToString ("u")));
}
This code creates a MainPage instance, passing in the current date and time in ISO8601 format, which is wrapped in a NavigationPage instance.
The MainPage instance receives the data through a constructor parameter, as shown in the following code example:
public MainPage (string date)
{
  InitializeComponent ();
  dateLabel.Text = date;
}
The data is then displayed on the page by setting the Label.Text property, as shown in the following screenshots:

Passing Data through a BindingContext
An alternative approach for passing data to another page during navigation is by setting the new page's BindingContext to the data, as shown in the following code example:
async void OnNavigateButtonClicked (object sender, EventArgs e)
{
  var contact = new Contact {
    Name = "Jane Doe",
    Age = 30,
    Occupation = "Developer",
    Country = "USA"
  };

  var secondPage = new SecondPage ();
  secondPage.BindingContext = contact;
  await Navigation.PushAsync (secondPage);
}
This code sets the BindingContext of the SecondPage instance to the Contact instance, and then navigates to the SecondPage.
The SecondPage then uses data binding to display the Contact instance data, as shown in the following XAML code example:
<ContentPage xmlns="http://xamarin.com/schemas/2014/forms"
             xmlns:x="http://schemas.microsoft.com/winfx/2009/xaml"
             x:Class="PassingData.SecondPage"
             Title="Second Page">
    <ContentPage.Content>
        <StackLayout HorizontalOptions="Center" VerticalOptions="Center">
            <StackLayout Orientation="Horizontal">
                <Label Text="Name:" HorizontalOptions="FillAndExpand" />
                <Label Text="{Binding Name}" FontSize="Medium" FontAttributes="Bold" />
            </StackLayout>
            ...
            <Button x:Name="navigateButton" Text="Previous Page" Clicked="OnNavigateButtonClicked" />
        </StackLayout>
    </ContentPage.Content>
</ContentPage>
The following code example shows how the data binding can be accomplished in C#:
public class SecondPageCS : ContentPage
{
  public SecondPageCS ()
  {
    var nameLabel = new Label {
      FontSize = Device.GetNamedSize (NamedSize.Medium, typeof(Label)),
      FontAttributes = FontAttributes.Bold
    };
    nameLabel.SetBinding (Label.TextProperty, "Name");
    ...
    var navigateButton = new Button { Text = "Previous Page" };
    navigateButton.Clicked += OnNavigateButtonClicked;

    Content = new StackLayout {
      HorizontalOptions = LayoutOptions.Center,
      VerticalOptions = LayoutOptions.Center,
      Children = {
        new StackLayout {
          Orientation = StackOrientation.Horizontal,
          Children = {
            new Label{ Text = "Name:", FontSize = Device.GetNamedSize (NamedSize.Medium, typeof(Label)), HorizontalOptions = LayoutOptions.FillAndExpand },
            nameLabel
          }
        },
        ...
        navigateButton
      }
    };
  }

  async void OnNavigateButtonClicked (object sender, EventArgs e)
  {
    await Navigation.PopAsync ();
  }
}
The data is then displayed on the page by a series of Label controls, as shown in the following screenshots:

For more information about data binding, see Data Binding Basics.
Manipulating the Navigation Stack
The Navigation property exposes a NavigationStack property from which the pages in the navigation stack can be obtained. While Xamarin.Forms maintains access to the navigation stack, the Navigation property provides the InsertPageBefore and RemovePage methods for manipulating the stack by inserting pages or removing them.
The InsertPageBefore method inserts a specified page in the navigation stack before an existing specified page, as shown in the following diagram:

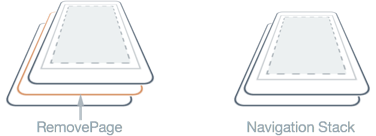
The RemovePage method removes the specified page from the navigation stack, as shown in the following diagram:

These methods enable a custom navigation experience, such as replacing a login page with a new page, following a successful login. The following code example demonstrates this scenario:
async void OnLoginButtonClicked (object sender, EventArgs e)
{
  ...
  var isValid = AreCredentialsCorrect (user);
  if (isValid) {
    App.IsUserLoggedIn = true;
    Navigation.InsertPageBefore (new MainPage (), this);
    await Navigation.PopAsync ();
  } else {
    // Login failed
  }
}
Provided that the user's credentials are correct, the MainPage instance is inserted into the navigation stack before the current page. The PopAsync method then removes the current page from the navigation stack, with the MainPage instance becoming the active page.
Displaying Views in the Navigation Bar
Any Xamarin.Forms View can be displayed in the navigation bar of a NavigationPage. This is accomplished by setting the NavigationPage.TitleView attached property to a View. This attached property can be set on any Page, and when the Page is pushed onto a NavigationPage, the NavigationPage will respect the value of the property.
The following example shows how to set the NavigationPage.TitleView attached property from XAML:
<ContentPage xmlns="http://xamarin.com/schemas/2014/forms"
             xmlns:x="http://schemas.microsoft.com/winfx/2009/xaml"
             x:Class="NavigationPageTitleView.TitleViewPage">
    <NavigationPage.TitleView>
        <Slider HeightRequest="44" WidthRequest="300" />
    </NavigationPage.TitleView>
    ...
</ContentPage>
Here is the equivalent C# code:
public class TitleViewPage : ContentPage
{
    public TitleViewPage()
    {
        var titleView = new Slider { HeightRequest = 44, WidthRequest = 300 };
        NavigationPage.SetTitleView(this, titleView);
        ...
    }
}
This results in a Slider being displayed in the navigation bar on the NavigationPage:
Important
Many views won't appear in the navigation bar unless the size of the view is specified with the WidthRequest and HeightRequest properties. Alternatively, the view can be wrapped in a StackLayout with the HorizontalOptions and VerticalOptions properties set to appropriate values.
Note that, because the Layout class derives from the View class, the TitleView attached property can be set to display a layout class that contains multiple views. On iOS and the Universal Windows Platform (UWP), the height of the navigation bar can't be changed, and so clipping will occur if the view displayed in the navigation bar is larger than the default size of the navigation bar. However, on Android, the height of the navigation bar can be changed by setting the NavigationPage.BarHeight bindable property to a double representing the new height. For more information, see Setting the Navigation Bar Height on a NavigationPage.
Alternatively, an extended navigation bar can be suggested by placing some of the content in the navigation bar, and some in a view at the top of the page content that you color match to the navigation bar. In addition, on iOS the separator line and shadow that's at the bottom of the navigation bar can be removed by setting the NavigationPage.HideNavigationBarSeparator bindable property to true. For more information, see Hiding the Navigation Bar Separator on a NavigationPage.
Note
The BackButtonTitle, Title, TitleIcon, and TitleView properties can all define values that occupy space on the navigation bar. While the navigation bar size varies by platform and screen size, setting all of these properties will result in conflicts due to the limited space available. Instead of attempting to use a combination of these properties, you may find that you can better achieve your desired navigation bar design by only setting the TitleView property.
Limitations
There are a number of limitations to be aware of when displaying a View in the navigation bar of a NavigationPage:
- On iOS, views placed in the navigation bar of a
NavigationPageappear in a different position depending on whether large titles are enabled. For more information about enabling large titles, see Displaying Large Titles. - On Android, placing views in the navigation bar of a
NavigationPagecan only be accomplished in apps that use app-compat. - It's not recommended to place large and complex views, such as
ListViewandTableView, in the navigation bar of aNavigationPage.
