Deploy an Office solution by using ClickOnce
You can deploy your Office solution in fewer steps if you use ClickOnce. If you publish updates, your solution will automatically detect and install them. However, ClickOnce requires that you install your solution separately for each user of a computer. Therefore, you should consider using Windows Installer (.msi) if more than one user will run your solution on the same computer.
In this topic
Put the document of a solution onto the end user's computer (document-level customizations only)
Roll back a solution to an earlier version
For more information about how to deploy an Office solution by creating a Windows Installer file, see Deploy an Office solution by using Windows Installer.
Publish the solution
You can publish your solution by using the Publish Wizard or the Project Designer. In this procedure, you'll use the Project Designer because it provides the complete set of publishing options. See Publish wizard (Office development in Visual Studio).
To publish the solution
In Solution Explorer, choose the node that's named for your project.
On the menu bar, choose Project, ProjectName Properties.
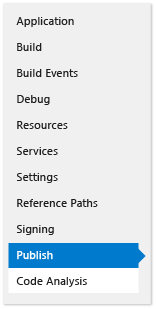
In the Project Designer, choose the Publish tab, which the following illustration shows.
In the Publishing Folder Location (ftp server, or file path) box, enter the path of the folder where you want the Project Designer to copy the solution files.
You can enter any of the following types of paths.
A local path (for example, C:\FolderName\FolderName).
A Uniform Naming Convention (UNC) path to a folder on your network (for example, \\ServerName\FolderName).
A relative path (for example, PublishFolder\, which is the folder into which the project is published by default).
In the Installation Folder URL box, enter the fully qualified path of the location where end users will find your solution.
If you don't know the location yet, don't enter anything into this field. By default, ClickOnce looks for updates in the folder from which your users install the solution.
Choose the Prerequisites button.
In the Prerequisites dialog box, ensure that the Create setup program to install prerequisite components check box is selected.
In the Choose which prerequisites to install list, select the check boxes for Windows Installer 4.5 and the appropriate .NET Framework package.
For example, if your solution targets the .NET Framework 4.5, select the check boxes for Windows Installer 4.5 and Microsoft .NET Framework 4.5 Full.
If your solution targets the .NET Framework 4.5, also select the Visual Studio 2010 Tools for Office Runtime check box.
Note
By default, this check box doesn't appear. To show this check box, you must create a Bootstrapper package. See Create a Bootstrapper package for an Office 2013 VSTO Add-in with Visual Studio 2012.
Under Specify the install location for prerequisites, choose one of the options that appear, and then choose the OK button.
The following table describes each option.
Option Description Download prerequisites from the component vendor's web site The user is prompted to download and install these prerequisites from the vendor. Download prerequisites from the same location as my application The prerequisite software is installed with the solution. If you choose this option, Visual Studio copies all of the prerequisite packages to the publish location for you. For this option to work, the prerequisite packages must be on the development computer. Download prerequisites from the following location Visual Studio copies all of the prerequisite packages to the location that you specify and installs them with the solution. Choose the Updates button, specify how often you want each end user's VSTO Add-in or customization to check for updates, and then choose the OK button.
Note
If you're deploying by using a CD or a removable drive, choose the Never check for updates option button.
For information about how to publish an update, see Publish an update.
Choose the Options button, review the options in the Options dialog box, and then choose the OK button.
Choose the Publish Now button.
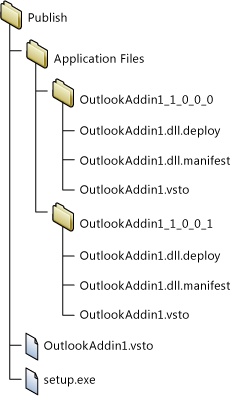
Visual Studio adds the following folders and files to the publishing folder that you specified earlier in this procedure.
The Application Files folder.
The setup program.
A deployment manifest that points to the deployment manifest of the most recent version.
The Application Files folder contains a subfolder for each version that you publish. Each version-specific subfolder contains the following files.
An application manifest.
A deployment manifest.
Customization assemblies.
The following illustration shows the structure of the publish folder for an Outlook VSTO Add-in.
Note
ClickOnce appends the .deploy extension to assemblies so that a secured installation of Internet Information Services (IIS) won't block the files because of an unsafe extension. When the user installs the solution, ClickOnce removes the .deploy extension.
Copy the solution files to the installation location that you specified earlier in this procedure.
Decide how you want to grant trust to the solution
Before a solution can run on user computers, either you must grant trust or users must respond to a trust prompt when they install the solution. To grant trust to the solution, sign the manifests by using a certificate that identifies a known and trusted publisher. See Trust the solution by signing the application and deployment manifests.
If you're deploying a document-level customization and you want to put the document into a folder on the user's computer or make the document available on a SharePoint site, ensure that Office trusts the location of the document. See Grant trust to documents.
Help users install the solution
Users can install the solution by running the setup program, opening the deployment manifest, or during document-level customization, opening the document directly. As a best practice, users should install your solution by using the setup program. The other two approaches don't ensure that the prerequisite software is installed. If users want to open the document from the installation location, they must add it to the list of trusted locations in the Trust Center of the Office application.
Opening the document of a document-level customization
Users can open the document of a document-level customization directly from the installation location or by copying the document to their local computer and then opening the copy.
As a best practice, users should open a copy of the document on their computers so that multiple users won't try to open the same copy at the same time. To enforce this practice, you can configure your setup program to copy the document to user computers. See Put the document of a solution onto the end user's computer (document-level customizations only).
Install the solution by opening the deployment manifest from an IIS website
Users can install an Office solution by opening the deployment manifest from the web. However, a secured installation of Internet Information Services (IIS) will block files that have the .vsto extension. The MIME type must be defined in IIS before you can deploy an Office solution by using IIS.
To add the .vsto MIME type to IIS 6.0
On the server that's running IIS 6.0, choose Start > All Programs > Administrative Tools > Internet Information Services (IIS) Manager.
Choose the computer name, the Web Sites folder, or the web site that you're configuring.
On the menu bar, choose Action > Properties.
On the HTTP Headers tab, choose the MIME Types button.
In the MIME Types window, choose the New button.
In the MIME Type window, enter .vsto as the extension, enter application/x-ms-vsto as the MIME type, and then apply the new settings.
Note
For the changes to take effect, you must restart the World Wide Web Publishing Service or wait for the worker process to recycle. You must then flush the browser's disk cache and then try to open the .vsto file again.
To add the .vsto MIME type to IIS 7.0
On the server that's running IIS 7.0, choose Start > All Programs > Accessories.
Open the shortcut menu for Command Prompt, and then choose Run as administrator.
In the Open box, enter the following path, and then choose the OK button.
%windir%\system32\inetsrvEnter the following command, and then apply the new settings.
set config /section:staticContent /+[fileExtension='.vsto',mimeType='application/x-ms-vsto']Note
For the changes to take effect, you must restart the World Wide Web Publishing Service, or you must wait for the worker process to recycle. You must then flush the browser's disk cache and then try to open the .vsto file again.
Put the document of a solution onto the end user's computer (document-level customizations only)
You can copy the document of your solution onto the end user's computer for them by creating a post-deployment action. That way, the user doesn't have to manually copy the document from the installation location to their computer after they install your solution. You'll have to create a class that defines the post-deployment action, build and publish the solution, modify the application manifest, and re-sign the application and deployment manifest.
The following procedures assume that your project name is ExcelWorkbook and that you publish the solution into a created folder named C:\publish on your computer.
Create a class that defines the post-deployment action
On the menu bar, choose File > Add > New Project.
In the Add New Project dialog box, in the Installed Templates pane, choose the Windows folder.
In the Templates pane, choose the Class Library template.
In the Name field, enter FileCopyPDA, and then choose the OK button.
In Solution Explorer, choose the FileCopyPDA project.
On the menu bar, choose Project > Add Reference.
On the .NET tab, add references to
Microsoft.VisualStudio.Tools.Applications.RuntimeandMicrosoft.VisualStudio.Tools.Applications.ServerDocument.Rename the class to
FileCopyPDA, and then replace the contents of the file with the code. This code performs the following tasks:Copies the document to the user's desktop.
Changes the _AssemblyLocation property from a relative path to a fully qualified path for the deployment manifest.
Deletes the file if the user uninstalls the solution.
using Microsoft.VisualStudio.Tools.Applications.Deployment;
using Microsoft.VisualStudio.Tools.Applications;
using System.IO;

namespace FileCopyPDA
{
    public class FileCopyPDA : IAddInPostDeploymentAction
    {
        public void Execute(AddInPostDeploymentActionArgs args)
        {
            string dataDirectory = @"Data\ExcelWorkbook.xlsx";
            string file = @"ExcelWorkbook.xlsx";
            string sourcePath = args.AddInPath;
            Uri deploymentManifestUri = args.ManifestLocation;
            string destPath = Environment.GetFolderPath(Environment.SpecialFolder.DesktopDirectory);
            string sourceFile = System.IO.Path.Combine(sourcePath, dataDirectory);
            string destFile = System.IO.Path.Combine(destPath, file);

            switch (args.InstallationStatus)
            {
                case AddInInstallationStatus.InitialInstall:
                case AddInInstallationStatus.Update:
                    File.Copy(sourceFile, destFile);
                    ServerDocument.RemoveCustomization(destFile);
                    ServerDocument.AddCustomization(destFile, deploymentManifestUri);
                    break;
                case AddInInstallationStatus.Uninstall:
                    if (File.Exists(destFile))
                    {
                        File.Delete(destFile);
                    }
                    break;
            }
        }
    }
}
Build and publish the solution
In Solution Explorer, open the shortcut menu for the FileCopyPDA project, and then choose Build.
Open the shortcut menu for the ExcelWorkbook project, and then choose Build.
Open the shortcut menu for the ExcelWorkbook project, and then choose Add Reference.
In the Add Reference dialog box, choose the Projects tab, choose FileCopyPDA, and then choose the OK button.
In Solution Explorer, choose the ExcelWorkbook project.
On menu bar, choose Project > New Folder.
Enter Data, and then choose the Enter key.
In Solution Explorer, choose the Data folder.
On the menu bar, choose Project > Add Existing Item.
In the Add Existing Item dialog box, browse to the output directory for the ExcelWorkbook project, choose the ExcelWorkbook.xlsx file, and then choose the Add button.
In Solution Explorer choose the ExcelWorkbook.xlsx file.
In the Properties window, change the Build Action property to Content and the Copy to Output Directory property to Copy if newer.
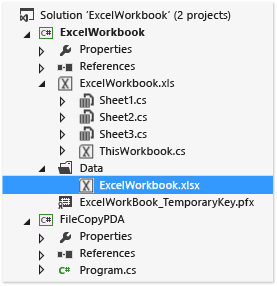
When you've completed these steps, your project will resemble the following illustration.
Publish the ExcelWorkbook project.
Modify the application manifest
Open the solution directory, c:\publish, by using File Explorer.
Open the Application Files folder, and then open the folder that corresponds to the most recent published version of your solution.
Open the ExcelWorkbook.dll.manifest file in a text editor such as Notepad.
After the
</vstav3:update>element, add following code. For the class attribute of the<vstav3:entryPoint>element, use the following syntax: NamespaceName.ClassName. In the following example, the namespace and class names are the same, so the resulting entry point name isFileCopyPDA.FileCopyPDA.<vstav3:postActions> <vstav3:postAction> <vstav3:entryPoint class="FileCopyPDA.FileCopyPDA"> <assemblyIdentity name="FileCopyPDA" version="1.0.0.0" language="neutral" processorArchitecture="msil" /> </vstav3:entryPoint> <vstav3:postActionData> </vstav3:postActionData> </vstav3:postAction> </vstav3:postActions>
Re-sign the application and deployment manifests
In the %USERPROFILE%\Documents\Visual Studio 2013\Projects\ExcelWorkbook\ExcelWorkbook folder, copy the ExcelWorkbook_TemporaryKey.pfx certificate file, and then paste it into the PublishFolder \Application Files\ExcelWorkbook_MostRecentPublishedVersion folder.
Open the Visual Studio command prompt, and then change directories to the c:\publish\Application Files\ExcelWorkbook_MostRecentPublishedVersion folder (for example, c:\publish\Application Files\ExcelWorkbook_1_0_0_4).
Sign the modified application manifest by running the following command:
mage -sign ExcelWorkbook.dll.manifest -certfile ExcelWorkbook_TemporaryKey.pfxThe message "ExcelWorkbook.dll.manifest successfully signed" appears.
Change to the c:\publish folder, and then update and sign the deployment manifest by running the following command:
mage -update ExcelWorkbook.vsto -appmanifest "Application Files\Ex
celWorkbookMostRecentVersionNumber>\ExcelWorkbook.dll.manifest" -certfile "Application Files\ExcelWorkbookMostRecentVersionNumber>\ExcelWorkbook_TemporaryKey.pfx"
Note
In the previous example, replace MostRecentVersionNumber with the version number of the most recently published version of your solution (for example, 1_0_0_4).
The message "ExcelWorkbook.vsto successfully signed" appears.
Copy the ExcelWorkbook.vsto file to the c:\publish\Application Files\ExcelWorkbook_MostRecentVersionNumber directory.
Put the document of a solution onto a server that's running SharePoint (document-level customizations only)
You can publish your document-level customization to end users by using SharePoint. When users go to the SharePoint site and open the document, the runtime automatically installs the solution from the shared network folder to the user's local computer. After the solution is installed locally, the customization will still function even if the document is copied elsewhere, such as the desktop.
To put the document on a server that's running SharePoint
Add the solution document to a document library on a SharePoint site.
Perform the steps for one of the following approaches:
Use the Office Configuration Tool to add the server that's running SharePoint to the Trust Center in Word or Excel on all user computers.
Ensure that each user performs the following steps.
On the local computer, open Word or Excel, choose the File tab, and then choose the Options button.
In the Trust Center dialog box, choose the Trusted Locations button.
Select the Allow Trusted Locations on my network (not recommended) check box, and then choose the Add new location button.
In the Path box, enter the URL of the SharePoint document library that contains the document that you uploaded (for example, http://SharePointServerName/TeamName/ProjectName/DocumentLibraryName).
Don't add the name of the default Web page, such as default.aspx or AllItems.aspx.
Select the Subfolders of this location are also trusted check box, and then choose the OK button.
When users open the document from the SharePoint site, the document opens, and the customization is installed. Users can copy the document to their desktop. The customization will still run because properties in the document point to the network location of the document.
Create a custom installer
You can create a custom installer for your Office solution, instead of using the setup program that's created for you when you publish the solution. For example, you could use a sign in script to start the installation, or you could use a batch file to install the solution without user interaction. These scenarios work best if the prerequisites are already installed on end-user computers.
As part of your custom installation process, call the installer tool for Office solutions (VSTOInstaller.exe), which is installed in the following location by default:
%commonprogramfiles%\microsoft shared\VSTO\10.0\VSTOInstaller.exe
If the tool isn't in that location, you can use the HKEY_LOCAL_MACHINE\SOFTWARE\Microsoft\VSTO Runtime Setup\v4\InstallerPath or HKEY_LOCAL_MACHINE\SOFTWARE\Wow6432Node\Microsoft\VSTO Runtime Setup\v4\InstallerPath registry key to find the path to that tool.
You can use the following parameters with VSTOinstaller.exe.
| Parameter | Definition |
|---|---|
| /Install or /I | Install the solution. You must follow this option with the path of a deployment manifest. You can specify a path on the local computer, a universal naming convention (UNC) file share. You can specify a local path (C:\FolderName\PublishFolder), a relative path (Publish\), or a fully qualified location (\\ServerName\FolderName or http://ServerName/FolderName). |
| /Uninstall or /U | Uninstall the solution. You must follow this option with the path of a deployment manifest. You can specify a path can be on the local computer, a UNC file share. You can specify a local path (c:\FolderName\PublishFolder), a relative path (Publish\), or a fully qualified location (\\ServerName\FolderName or http://ServerName/FolderName). |
| /Silent or /S | Install or uninstall without prompting the user for input or displaying any messages. If a trust prompt is required, the customization isn't installed or updated. |
| /Help or /? | Display the Help information. |
When you run VSTOinstaller.exe, the following error codes might appear.
| Error Code | Definition |
|---|---|
| 0 | The solution was successfully installed or uninstalled, or the VSTOInstaller Help appeared. |
| -100 | One or more command-line options aren't valid or was set more than once. For more information, enter "vstoinstaller /?" or see Create a custom installer for a ClickOnce Office solution. |
| -101 | One or more command-line options aren't valid. For more information, enter "vstoinstaller /?". |
| -200 | The deployment manifest URI isn't valid. For more information, enter "vstoinstaller /?". |
| -201 | The solution couldn't be installed because the deployment manifest isn't valid. See Deployment manifests for Office solutions. |
| -202 | The solution couldn't be installed because the Visual Studio Tools for Office section of the application manifest isn't valid. See Application manifests for Office solutions. |
| -203 | The solution couldn't be installed because a download error occurred. Check the URI or network file location of the deployment manifest, and then try again. |
| -300 | The solution couldn't be installed because a security exception occurred. See Secure Office solutions. |
| -400 | The solution couldn't be installed. |
| -401 | The solution couldn't be uninstalled. |
| -500 | The operation has been canceled because the solution couldn't be installed or uninstalled or the deployment manifest couldn't be downloaded. |
Publish an update
To update a solution, you publish it again by using the Project Designer or Publish Wizard, and then you copy the updated solution to the installation location. When you copy the files to the installation location, make sure that you overwrite the previous files.
The next time that the solution checks for an update, it will find and load the new version automatically.
Change the installation location of a solution
You can add or change the installation path after a solution is published. You might want to change the installation path for one or more of the following reasons:
The setup program was compiled before the installation path was known.
The solution files have been copied to a different location.
The server that hosts the installation files has a new name or location.
To change the installation path of a solution, you must update the setup program, and then users must run it. For document-level customizations, users must also update a property in their document to point to the new location.
Note
If you don't want to ask users to update their document properties, you can ask users to get the updated document from the installation location.
To change the installation path in the setup program
Open a Command Prompt window, and then change directories to the installation folder.
Run the setup program, and include the
/urlparameter, which takes the new installation path as a string.The following example shows how to change the installation path to a location on the Fabrikam website, but you can replace that URL with the path that you want:
setup.exe /url="http://www.fabrikam.com/newlocation"Note
If a message appears and state that the signature of the executable will be invalidated, the certificate that was used to sign the solution is no longer valid, and the publisher is unknown. As a result, users will need to confirm that they trust the source of the solution before they can install it.
Note
To display the current value of the URL, run
setup.exe /url.For document-level customizations, users must open the document and then update its _AssemblyLocation property. The following steps describe how users can perform this task.
To update the _AssemblyLocation property in a document
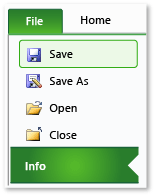
On the File tab, choose Info, which the following illustration shows.
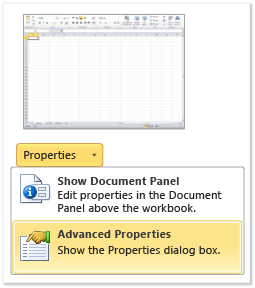
In the Properties list, choose Advanced Properties, which the following illustration shows.
On the Custom tab in the Properties list, choose _AssemblyLocation, as the following illustration shows.
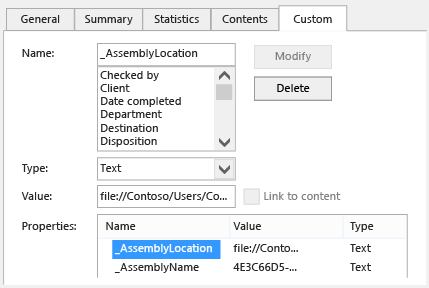
The Value box contains the deployment manifest identifier.
Before the identifier, enter the fully qualified path of the document, followed by a bar, in the format Path|Identifier (for example, File://ServerName/FolderName/FileName|74744e4b-e4d6-41eb-84f7-ad20346fe2d9.
For more information about how to format this identifier, see Custom document properties overview.
Choose the OK button, and then save and close the document.
Run the setup program without the /url parameter to install the solution in the specified location.
Roll back a solution to an earlier version
When you roll back a solution, you revert users back to an earlier version of that solution.
To roll back a solution
Open the installation location of the solution.
In the top-level publish folder, delete the deployment manifest (the .vsto file).
Find the subfolder for the version to which you want to roll back.
Copy the deployment manifest from that subfolder to the top-level publish folder.
For example, to roll back a solution that's called OutlookAddIn1 from version 1.0.0.1 to version 1.0.0.0, copy the file OutlookAddIn1.vsto from the OutlookAddIn1_1_0_0_0 folder. Paste the file into the top-level publish folder, overwriting the version-specific deployment manifest for OutlookAddIn1_1_0_0_1 that was already there.
The following illustration shows the publish folder structure in this example.

The next time that a user opens the application or customized document, the deployment manifest change is detected. The earlier version of the Office solution runs from the ClickOnce cache.
Note
Local data is saved for only one previous version of a solution. If you roll back two versions, local data isn't retained. For more information about local data, see Access local and remote data in ClickOnce applications.