Run your Azure Databricks job with serverless compute for workflows
Serverless compute for workflows allows you to run your Azure Databricks job without configuring and deploying infrastructure. With serverless compute, you focus on implementing your data processing and analysis pipelines, and Azure Databricks efficiently manages compute resources, including optimizing and scaling compute for your workloads. Autoscaling and Photon are automatically enabled for the compute resources that run your job.
Serverless compute for workflows automatically and continuously optimizes infrastructure, such as instance types, memory, and processing engines, to ensure the best performance based on the specific processing requirements of your workloads.
Databricks automatically upgrades the Databricks Runtime version to support enhancements and upgrades to the platform while ensuring the stability of your Azure Databricks jobs. To see the current Databricks Runtime version used by serverless compute for workflows, see Serverless compute release notes.
Because cluster creation permission is not required, all workspace users can use serverless compute to run their workflows.
This article describes using the Azure Databricks Jobs UI to create and run jobs that use serverless compute. You can also automate creating and running jobs that use serverless compute with the Jobs API, Databricks Asset Bundles, and the Databricks SDK for Python.
- To learn about using the Jobs API to create and run jobs that use serverless compute, see Jobs in the REST API reference.
- To learn about using Databricks Asset Bundles to create and run jobs that use serverless compute, see Develop a job on Azure Databricks using Databricks Asset Bundles.
- To learn about using the Databricks SDK for Python to create and run jobs that use serverless compute, see Databricks SDK for Python.
Requirements
- Your Azure Databricks workspace must have Unity Catalog enabled.
- Because serverless compute for workflows uses standard access mode, your workloads must support this access mode.
- Your Databricks workspace must be in a supported region. See Features with limited regional availability.
- Your Azure Databricks account must have serverless compute enabled. See Enable serverless compute.
Create a job using serverless compute
Note
Because serverless compute for workflows ensures that sufficient resources are provisioned to run your workloads, you might experience increased startup times when running a Azure Databricks job that requires large amounts of memory or includes many tasks.
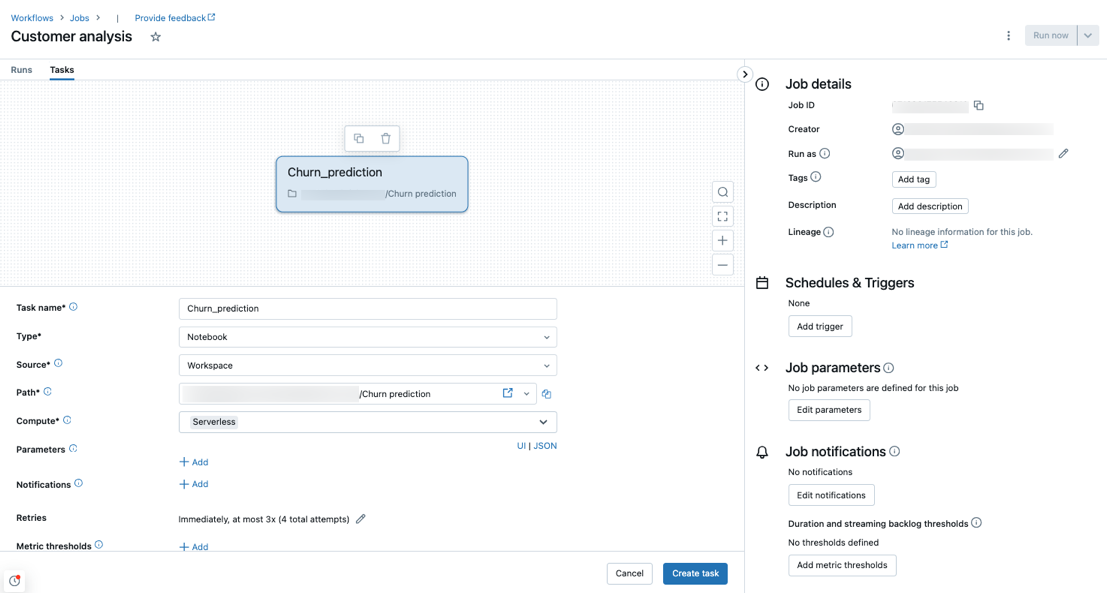
Serverless compute is supported with the notebook, Python script, dbt, and Python wheel task types. By default, serverless compute is selected as the compute type when you create a new job and add one of these supported task types.

Databricks recommends using serverless compute for all job tasks. You can also specify different compute types for tasks in a job, which might be required if a task type is not supported by serverless compute for workflows.
To manage outbound network connections for your jobs, see What is serverless egress control?
Configure an existing job to use serverless compute
You can switch an existing job to use serverless compute for supported task types when you edit the job. To switch to serverless compute, either:
- In the Job details side panel click Swap under Compute, click New, enter or update any settings, and click Update.
- Click
 in the Compute drop-down menu and select Serverless.

Schedule a notebook using serverless compute
In addition to using the Jobs UI to create and schedule a job using serverless compute, you can create and run a job that uses serverless compute directly from a Databricks notebook. See Create and manage scheduled notebook jobs.
Select a budget policy for your serverless usage
Important
This feature is in Public Preview.
Budget policies allow your organization to apply custom tags on serverless usage for granular billing attribution.
If your workspace uses budget policies to attribute serverless usage, you can select your job’s budget policy using the Budget policy setting in the job details UI. If you are only assigned to one budget policy, the policy is automatically selected for your new jobs.
Note
After you’ve been assigned a budget policy, your existing jobs are not automatically tagged with your policy. You must manually update existing jobs if you want to attach a policy to them.
For more on budget policies, see Attribute serverless usage with budget policies.
Set Spark configuration parameters
To automate the configuration of Spark on serverless compute, Databricks allows setting only specific Spark configuration parameters. For the list of allowable parameters, see Supported Spark configuration parameters.
You can set Spark configuration parameters at the session level only. To do this, set them in a notebook and add the notebook to a task included in the same job that uses the parameters. See Get and set Apache Spark configuration properties in a notebook.
Configure environments and dependencies
To learn how to install libraries and dependencies using serverless compute, see Install notebook dependencies.
Configure high memory for notebook tasks
Important
This feature is in Public Preview.
You can configure notebook tasks to use a higher memory size. To do this, configure the Memory setting in the notebook’s Environment side panel. See Configure high memory for your serverless workloads.
High memory is only available for notebook task types.
Configure serverless compute auto-optimization to disallow retries
Serverless compute for workflows auto-optimization automatically optimizes the compute used to run your jobs and retries failed tasks. Auto-optimization is enabled by default, and Databricks recommends leaving it enabled to ensure critical workloads run successfully at least once. However, if you have workloads that must be executed at most once, for example, jobs that are not idempotent, you can turn off auto-optimization when adding or editing a task:
- Next to Retries, click Add (or
 if a retry policy already exists).
 - In the Retry Policy dialog, uncheck Enable serverless auto-optimization (may include additional retries).
- Click Confirm.
- If you’re adding a task, click Create task. If you’re editing a task, click Save task.
Monitor the cost of jobs that use serverless compute for workflows
You can monitor the cost of jobs that use serverless compute for workflows by querying the billable usage system table. This table is updated to include user and workload attributes about serverless costs. See Billable usage system table reference.
For information on current pricing and any promotions, see the Workflows pricing page.
View query details for job runs
You can view detailed runtime information for your Spark statements, such as metrics and query plans.
To access query details from the jobs UI, use the following steps:
Click
 Workflows in the sidebar.
Click the name of the job you want to view.
Click the specific run you want to view.
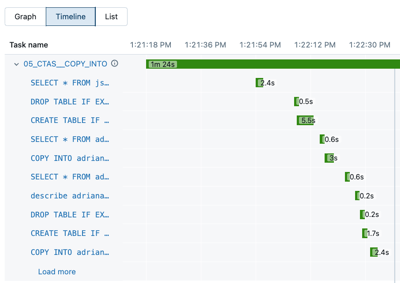
Click Timeline to view the run as a timeline, split into individual tasks.
Click the arrow next to the task name to show query statements and their runtimes.

Click a statement to open the query details panel. See View query details to learn more about the information available in this panel.
To view the query history for a task:
- In the Compute section of the Task run side panel, click Query history.
- You are redirected to the Query History, prefiltered based on the task run ID of the task you were in.
For information on using query history, see Access query history for Delta Live Tables pipelines and Query history.
Limitations
For a list of serverless compute for workflows limitations, see Serverless compute limitations in the serverless compute release notes.