Create an SMB volume for Azure NetApp Files
Azure NetApp Files supports creating volumes using NFS (NFSv3 or NFSv4.1), SMB3, or dual protocol (NFSv3 and SMB, or NFSv4.1 and SMB). A volume's capacity consumption counts against its pool's provisioned capacity.
This article shows you how to create an SMB3 volume. For NFS volumes, see Create an NFS volume. For dual-protocol volumes, see Create a dual-protocol volume.
Important
Windows Server 2025 currently doesn't work with the Azure NetApp Files SMB protocol.
Before you begin
Important
If you're using a custom RBAC/IAM role, you must have the Microsoft.Network/virtualNetworks/subnets/read permission configured to create or update a volume.
For more information about permissions and to confirm permissions configuration, see Create or update Azure custom roles using the Azure portal.
- You must have already set up a capacity pool. See Create a capacity pool.
- A subnet must be delegated to Azure NetApp Files. See Delegate a subnet to Azure NetApp Files.
Configure Active Directory connections
Before creating an SMB volume, you need to create an Active Directory connection. If you haven't configured Active Directory connections for Azure NetApp files, follow instructions described in Create and manage Active Directory connections.
Add an SMB volume
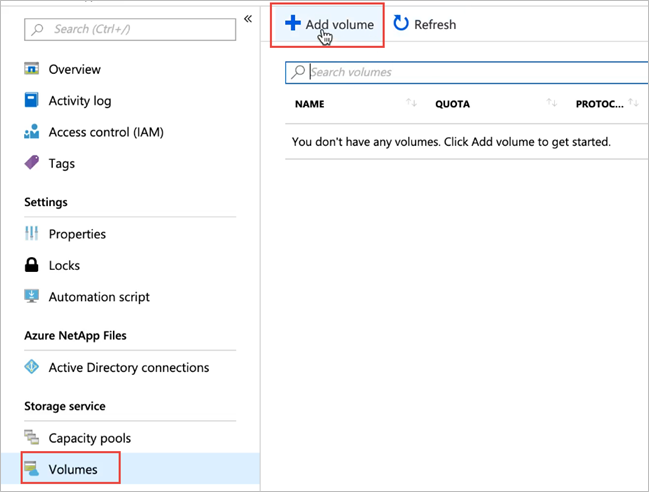
Select the Volumes blade from the Capacity Pools blade.

Select + Add volume to create a volume.
The Create a Volume window appears.In the Create a Volume window, select Create and provide information for the following fields under the Basics tab:
Volume name
Specify the name for the volume that you are creating.Refer to Naming rules and restrictions for Azure resources for naming conventions on volumes. Additionally, you cannot use
defaultorbinas the volume name.Capacity pool
Specify the capacity pool where you want the volume to be created.Quota
Specify the amount of logical storage that is allocated to the volume.The Available quota field shows the amount of unused space in the chosen capacity pool that you can use towards creating a new volume. The size of the new volume must not exceed the available quota.
Large Volume
Regular volumes quotas are between 50 GiB and 100 TiB. Large volume quotas range from 50 TiB to 1 PiB in size. If you intend for the volume quota to fall in the large volume range, select Yes. Volume quotas are entered in GiB.
Important
If this is your first time using large volumes, you must first register the feature and request an increase in regional capacity quota.
Regular volumes cannot be converted to large volumes. Large volumes can't be resized to less than 50 TiB. To understand the requirements and considerations of large volumes, see Requirements and considerations for large volumes. For other limits, see Resource limits.
Throughput (MiB/S)
If the volume is created in a manual QoS capacity pool, specify the throughput you want for the volume.If the volume is created in an auto QoS capacity pool, the value displayed in this field is (quota x service level throughput).
Enable Cool Access, Coolness Period, and Cool Access Retrieval Policy
These fields configure Azure NetApp Files storage with cool access. For descriptions, see Manage Azure NetApp Files storage with cool access.Virtual network
Specify the Azure virtual network (VNet) from which you want to access the volume.The VNet you specify must have a subnet delegated to Azure NetApp Files. The Azure NetApp Files service can be accessed only from the same VNet or from a VNet that is in the same region as the volume through VNet peering. You can also access the volume from your on-premises network through Express Route.
Subnet
Specify the subnet that you want to use for the volume.
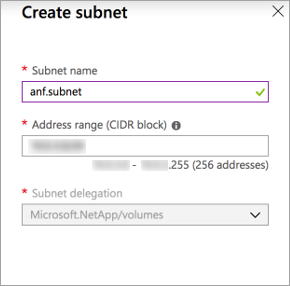
The subnet you specify must be delegated to Azure NetApp Files.If you haven't delegated a subnet, you can select Create new on the Create a Volume page. Then in the Create Subnet page, specify the subnet information, and select Microsoft.NetApp/volumes to delegate the subnet for Azure NetApp Files. In each VNet, only one subnet can be delegated to Azure NetApp Files.

Network features
In supported regions, you can specify whether you want to use Basic or Standard network features for the volume. See Configure network features for a volume and Guidelines for Azure NetApp Files network planning for details.Encryption key source Select Microsoft Managed Key or Customer Managed Key. See Configure customer-managed keys for Azure NetApp Files volume encryption and Azure NetApp Files double encryption at rest to learn more about this field.
Availability zone
This option lets you deploy the new volume in the logical availability zone that you specify. Select an availability zone where Azure NetApp Files resources are present. For details, see Manage availability zone volume placement.If you want to apply an existing snapshot policy to the volume, select Show advanced section to expand it, specify whether you want to hide the snapshot path, and select a snapshot policy in the pull-down menu.
For information about creating a snapshot policy, see Manage snapshot policies.

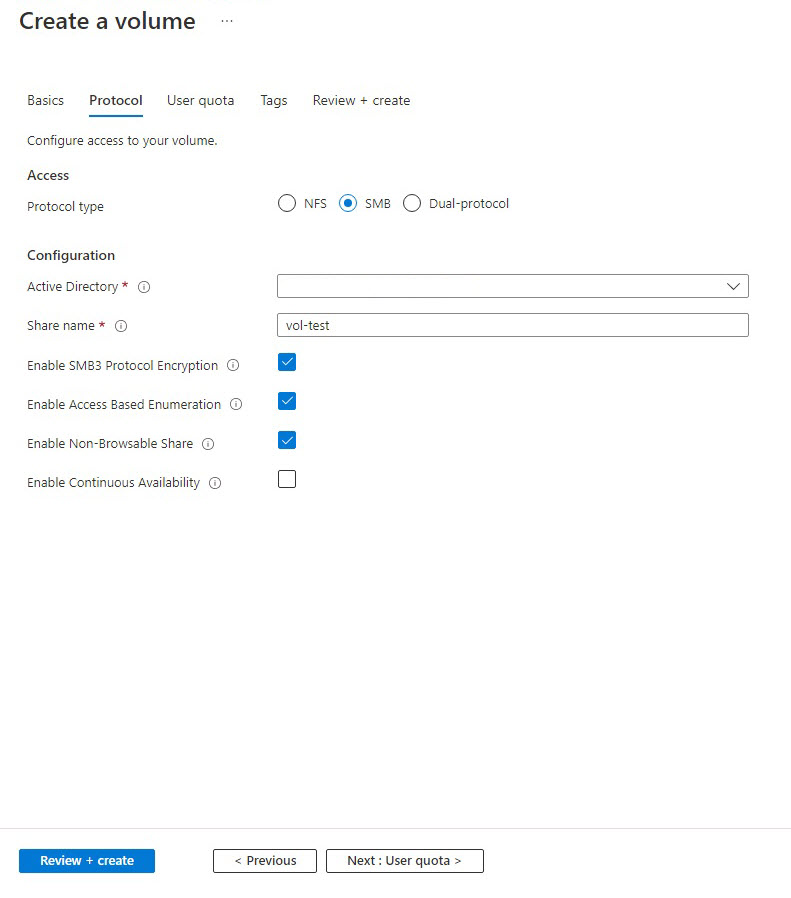
Select Protocol and complete the following information:
Select SMB as the protocol type for the volume.
Select your Active Directory connection from the drop-down list.
Specify a unique share name for the volume. This share name is used when you create mount targets. The requirements for the share name are as follows:
- For volumes not in an availability zone or volumes in the same availability zone, it must be unique within each subnet in the region.
- For volumes in availability zones, it must be unique within each availability zone. For more information, see Manage availability zone volume placement.
- It can contain only letters, numbers, or dashes (
-). - The length must not exceed 80 characters.
If you want to enable encryption for SMB3, select Enable SMB3 Protocol Encryption.
This feature enables encryption for in-flight SMB3 data. SMB clients not using SMB3 encryption will not be able to access this volume. Data at rest is encrypted regardless of this setting.
See SMB encryption for additional information.If you want to enable access-based enumeration, select Enable Access Based Enumeration.
Hide directories and files created under a share from users who don't have access permissions to the files or folders under the share. Users are still able to view the share.
You can enable the non-browsable-share feature.
Prevent the Windows client from browsing the share. The share doesn't show up in the Windows File Browser or in the list of shares when you run the
net view \\server /allcommand.If you want to enable Continuous Availability for the SMB volume, select Enable Continuous Availability.
You should enable Continuous Availability for the following workloads/use cases only:
- Citrix App Layering
- FSLogix user profile containers, including FSLogix ODFC containers
- MSIX app attach with Azure Virtual Desktop
- When using MSIX applications with the
CIM FSfile format:- The number of AVD session hosts per volume shouldn't exceed 500.
- The number of MSIX applications per volume shouldn't exceed 40.
- When using MSIX applications with the
VHDXfile format:- The number of AVD session hosts per volume shouldn't exceed 500.
- The number of MSIX applications per volume shouldn't exceed 60.
- When using a combination of MSIX applications with both the
VHDXandCIM FSfile formats:- The number of AVD session hosts per volume shouldn't exceed 500.
- The number of MSIX applications per volume using the
CIM FSfile format shouldn't exceed 24. - The number of MSIX applications per volume using the
VHDXfile format shouldn't exceed 24.
- When using MSIX applications with the
- SQL Server
- Continuous Availability is currently supported on Windows SQL Server.
- Linux SQL Server is not currently supported.
Important
Using SMB Continuous Availability shares is only supported for Citrix App Layering, SQL Server, FSLogix user profile containers including FSLogix ODFC containers, or MSIX app attach containers. This feature is currently supported on SQL Server on Windows. Any other workload is not supported.
If you are using a non-administrator (domain) account to install SQL Server, ensure the account has the required security privilege assigned. If the domain account does not have the required security privilege (
SeSecurityPrivilege), and the privilege cannot be set at the domain level, you can grant the privilege to the account by using the Security privilege users field of Active Directory connections. For more information, see Create an Active Directory connection.Important
Change notifications are not supported with Continuously Available shares in Azure NetApp Files.
Custom applications are not supported with SMB Continuous Availability.
Select Review + Create to review the volume details. Then select Create to create the SMB volume.
The volume you created appears in the Volumes page.
A volume inherits subscription, resource group, location attributes from its capacity pool. To monitor the volume deployment status, you can use the Notifications tab.
Control access to an SMB volume
Access to an SMB volume is managed through permissions.
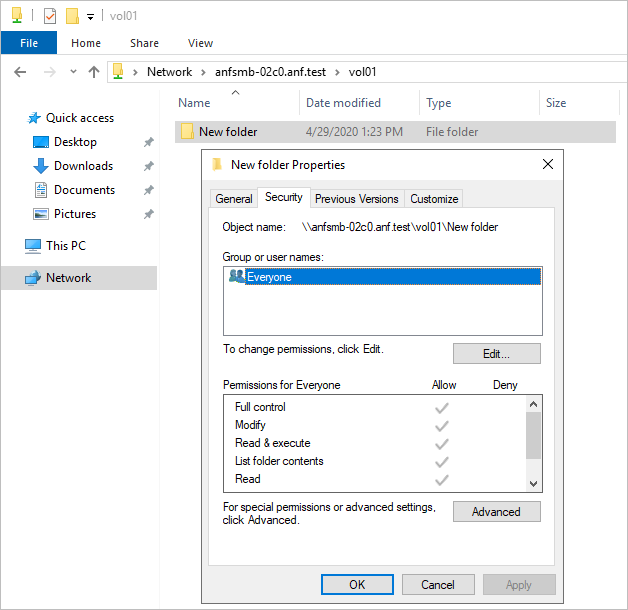
NTFS file and folder permissions
You can set permissions for a file or folder by using the Security tab of the object's properties in the Windows SMB client.

Modify SMB share permissions
You can modify SMB share permissions using Microsoft Management Console (MMC).
Important
Modifying SMB share permissions poses a risk. If the users or groups assigned to the share properties are removed from the Active Directory, or if the permissions for the share become unusable, then the entire share will become inaccessible.
- To open Computer Management MMC on any Windows server, in the Control Panel, select Administrative Tools > Computer Management.
- Select Action > Connect to another computer.
- In the Select Computer dialog box, enter the name of the Azure NetApp Files FQDN or IP address or select Browse to locate the storage system.
- Select OK to connect the MMC to the remote server.
- When the MMC connects to the remote server, in the navigation pane, select Shared Folders > Shares.
- In the display pane that lists the shares, double-click a share to display its properties. In the Properties dialog box, modify the properties as needed.
Next steps
- Manage availability zone volume placement for Azure NetApp Files
- Requirements and considerations for large volumes
- Mount a volume for Windows or Linux virtual machines
- Resource limits for Azure NetApp Files
- Enable Continuous Availability on existing SMB volumes
- SMB encryption
- Troubleshoot volume errors for Azure NetApp Files
- Learn about virtual network integration for Azure services
- Install a new Active Directory forest using Azure CLI
- Application resilience FAQs for Azure NetApp Files
