C# 자습서: 기술 세트를 사용하여 Azure AI 검색에서 검색 가능한 콘텐츠 생성
이 자습서에서는 .NET용 Azure SDK를 사용하여 인덱싱 중에 콘텐츠 추출 및 변환을 위한 AI 보강 파이프라인을 만드는 방법을 알아봅니다.
기술 세트는 원시 콘텐츠에 AI 처리를 추가하여 해당 콘텐츠를 보다 균일하고 검색 가능하게 만듭니다. 기술 세트의 작동 방식을 알고 나면 이미지 분석부터 자연어 처리, 외부에서 제공하는 사용자 지정 처리에 이르기까지 광범위한 변환을 지원할 수 있습니다.
이 자습서에서는 작동 방법에 대해 알아볼 수 있습니다.
- 보강 파이프라인에서 개체를 정의합니다.
- 기술 세트를 빌드합니다. OCR, 언어 감지, 엔터티 인식, 핵심 구 추출을 호출합니다.
- 파이프라인을 실행합니다. 검색 인덱스를 만들고 로드합니다.
- 전체 텍스트 검색을 사용하여 결과를 확인합니다.
Azure 구독이 없는 경우 시작하기 전에 체험 계정을 엽니다.
개요
이 자습서에서는 C# 및 Azure.Search.Documents 클라이언트 라이브러리를 사용하여 데이터 원본, 인덱스, 인덱서 및 기술 세트를 만듭니다.
인덱서는 Azure Storage의 Blob 컨테이너에서 샘플 데이터(구조화되지 않은 텍스트 및 이미지)의 콘텐츠 추출부터 시작하여 파이프라인의 각 단계를 구동합니다.
콘텐츠가 추출되면 기술 세트는 Microsoft의 기본 제공 기술을 실행하여 정보를 찾고 추출합니다. 이러한 기술에는 이미지에 대한 OCR(광학 문자 인식), 텍스트의 언어 감지, 핵심 구 추출, 엔터티 인식(조직)이 포함됩니다. 기술 세트에서 만든 새 정보는 인덱스의 필드로 보내집니다. 인덱스가 채워지면 쿼리, 패싯 및 필터의 필드를 사용할 수 있습니다.
필수 조건
참고 항목
이 자습서에서는 무료 검색 서비스를 사용할 수 있습니다. 무료 계층에서는 인덱스 3개, 인덱서 3개, 데이터 원본 3개로 제한됩니다. 이 자습서에서는 각각을 하나씩 만듭니다. 시작하기 전에 새 리소스를 수용할 수 있는 공간이 서비스에 있는지 확인하세요.
파일 다운로드
샘플 데이터 리포지토리의 zip 파일을 다운로드하고 콘텐츠를 추출합니다. 방법을 알아보세요.
Azure Storage에 샘플 데이터 업로드
Azure Storage에서 새 컨테이너를 만들고 cog-search-demo라고 이름을 붙입니다.
Azure AI 검색에서 연결을 공식화할 수 있도록 스토리지 연결 문자열을 가져옵니다.
왼쪽에서 액세스 키를 선택합니다.
키 1 또는 키 2의 연결 문자열을 복사합니다. 연결 문자열은 다음 예제와 유사합니다.
DefaultEndpointsProtocol=https;AccountName=<your account name>;AccountKey=<your account key>;EndpointSuffix=core.windows.net
Azure AI 서비스
기본 제공 AI 보강은 자연어와 이미지 처리를 위한 언어 서비스와 Azure AI 비전을 포함한 Azure AI 서비스를 통해 지원됩니다. 이 자습서와 같은 소규모 워크로드의 경우 인덱서당 20개의 트랜잭션을 무료로 할당할 수 있습니다. 더 큰 규모 워크로드의 경우 종량제 가격 책정을 위해 Azure AI 서비스 다중 지역 리소스를 기술 세트에 연결합니다.
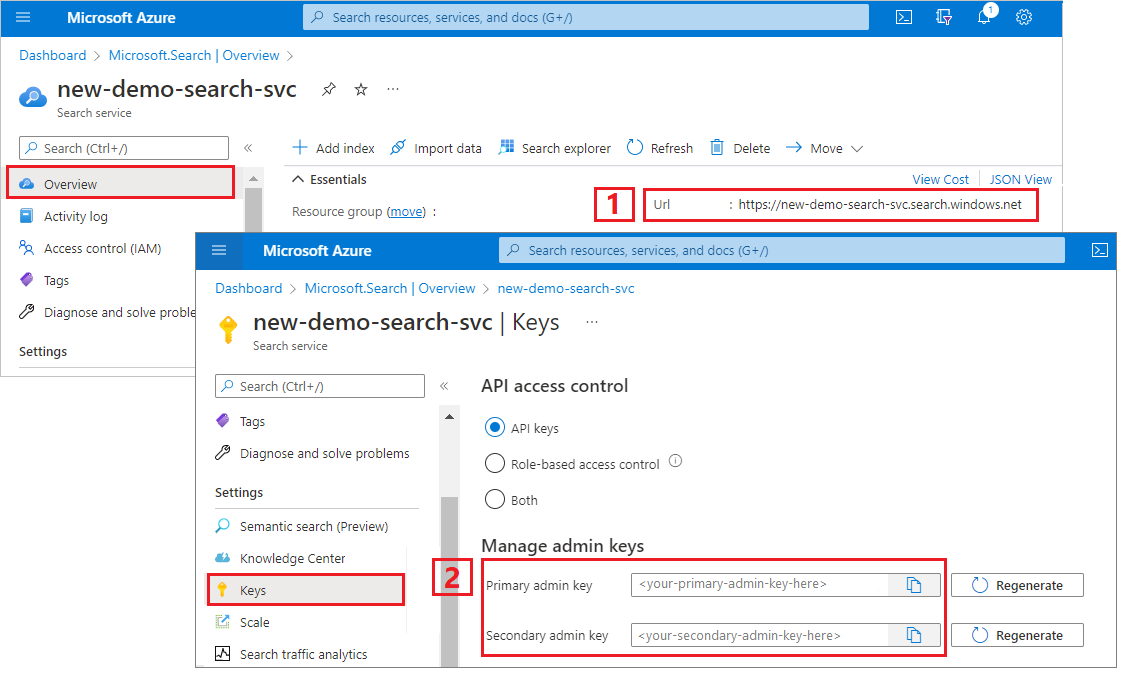
검색 서비스 URL 및 API 키 복사
이 자습서의 경우, Azure AI 검색에 연결하려면 엔드포인트와 API 키가 필요합니다. Azure Portal에서 이러한 값을 가져올 수 있습니다.
Azure Portal에 로그인하고 검색 서비스 개요 페이지로 이동한 다음, URL을 복사합니다. 엔드포인트의 예는 다음과 같습니다.
https://mydemo.search.windows.net설정>키에서 관리자 키를 복사합니다. 관리자 키는 개체를 추가, 수정, 삭제하는 데 사용됩니다. 교환 가능한 관리자 키는 2개입니다. 둘 중 하나를 복사합니다.
환경 설정
먼저 Visual Studio를 열고 .NET Core에서 실행할 수 있는 새 콘솔 앱 프로젝트를 만듭니다.
Azure.Search.Documents 설치
Azure AI 검색 .NET SDK는 HTTP 및 JSON의 세부 정보를 처리하지 않고도 인덱스, 데이터 원본, 인덱서 및 기술 세트를 관리하고, 문서를 업로드 및 관리하고, 쿼리를 실행할 수 있게 하는 클라이언트 라이브러리로 구성됩니다. 이 클라이언트 라이브러리는 NuGet 패키지로 배포됩니다.
이 프로젝트의 경우 Azure.Search.Documents 11 이상 버전과 Microsoft.Extensions.Configuration 최신 버전을 설치합니다.
Visual Studio에서 도구>NuGet 패키지 관리자>솔루션용 NuGet 패키지 관리...를 선택합니다.
Azure.Search.Document를 찾습니다.
최신 버전을 선택한 다음, 설치를 선택합니다.
이전 단계를 반복하여 Microsoft.Extensions.Configuration 및 Microsoft.Extensions.Configuration.Json을 설치합니다.
서비스 연결 정보 추가
솔루션 탐색기에서 마우스 오른쪽 단추로 프로젝트를 클릭하고, 추가>새 항목...을 차례로 선택합니다.
파일 이름을
appsettings.json으로 지정하고 추가를 선택합니다.이 파일을 출력 디렉터리에 포함합니다.
-
appsettings.json을 마우스 오른쪽 단추로 클릭하고 속성을 선택합니다. - 출력 디렉터리로 복사의 값을 변경된 내용만 복사로 변경합니다.
-
아래 JSON을 새 JSON 파일에 복사합니다.
{
  "SearchServiceUri": "<YourSearchServiceUri>",
  "SearchServiceAdminApiKey": "<YourSearchServiceAdminApiKey>",
  "SearchServiceQueryApiKey": "<YourSearchServiceQueryApiKey>",
  "AzureAIServicesKey": "<YourMultiRegionAzureAIServicesKey>",
  "AzureBlobConnectionString": "<YourAzureBlobConnectionString>"
}
검색 서비스 및 Blob 스토리지 계정 정보를 추가합니다. 이 정보는 이전 섹션에 표시된 서비스 프로비전 단계에서 가져올 수 있습니다.
SearchServiceUri에 전체 URL을 입력합니다.
네임스페이스 추가
Program.cs에서 다음 네임스페이스를 추가합니다.
using Azure;
using Azure.Search.Documents.Indexes;
using Azure.Search.Documents.Indexes.Models;
using Microsoft.Extensions.Configuration;
using System;
using System.Collections.Generic;
using System.Linq;

namespace EnrichwithAI
클라이언트 만들기
Main에서 SearchIndexClient 및 SearchIndexerClient 인스턴스를 만듭니다.
public static void Main(string[] args)
{
    // Create service client
    IConfigurationBuilder builder = new ConfigurationBuilder().AddJsonFile("appsettings.json");
    IConfigurationRoot configuration = builder.Build();

    string searchServiceUri = configuration["SearchServiceUri"];
    string adminApiKey = configuration["SearchServiceAdminApiKey"];
    string azureAiServicesKey = configuration["AzureAIServicesKey"];

    SearchIndexClient indexClient = new SearchIndexClient(new Uri(searchServiceUri), new AzureKeyCredential(adminApiKey));
    SearchIndexerClient indexerClient = new SearchIndexerClient(new Uri(searchServiceUri), new AzureKeyCredential(adminApiKey));
}
참고 항목
클라이언트가 검색 서비스에 연결합니다. 너무 많은 연결이 열리는 것을 방지하기 위해 되도록 애플리케이션에서 단일 인스턴스를 공유합니다. 이 메서드는 스레드로부터 안전하므로 이러한 공유를 사용할 수 있습니다.
오류 발생 시 프로그램을 종료하는 함수 추가
이 자습서는 인덱싱 파이프라인의 각 단계를 이해하는 데 도움을 주기 위해 작성되었습니다. 프로그램에서 데이터 원본, 기술 세트, 인덱스 또는 인덱서를 만들 수 없도록 하는 중요한 문제가 있는 경우 프로그램에서 오류 메시지를 출력하고 종료하여 문제를 이해하고 해결할 수 있도록 합니다.
프로그램이 종료되어야 하는 시나리오를 처리하려면 Main에 ExitProgram을 추가합니다.
private static void ExitProgram(string message)
{
    Console.WriteLine("{0}", message);
    Console.WriteLine("Press any key to exit the program...");
    Console.ReadKey();
    Environment.Exit(0);
}
파이프라인 만들기
Azure AI 검색에서 AI 처리는 인덱싱(또는 데이터 수집) 중에 발생합니다. 이 연습 부분에서는 데이터 원본, 인덱스 정의, 기술 세트, 인덱서의 네 가지 개체를 만듭니다.
1단계: 데이터 소스 만들기
SearchIndexerClient에는 SearchIndexerDataSourceConnection 개체로 설정할 수 있는 DataSourceName 속성이 있습니다. 이 개체는 Azure AI 검색 데이터 원본을 생성, 나열, 업데이트 또는 삭제하는 데 필요한 모든 메서드를 제공합니다.
indexerClient.CreateOrUpdateDataSourceConnection(dataSource)를 호출하여 새 SearchIndexerDataSourceConnection 인스턴스를 만듭니다. 다음 코드는 AzureBlob 형식의 데이터 원본을 만듭니다.
private static SearchIndexerDataSourceConnection CreateOrUpdateDataSource(SearchIndexerClient indexerClient, IConfigurationRoot configuration)
{
    SearchIndexerDataSourceConnection dataSource = new SearchIndexerDataSourceConnection(
        name: "demodata",
        type: SearchIndexerDataSourceType.AzureBlob,
        connectionString: configuration["AzureBlobConnectionString"],
        container: new SearchIndexerDataContainer("cog-search-demo"))
    {
        Description = "Demo files to demonstrate Azure AI Search capabilities."
    };

    // The data source does not need to be deleted if it was already created
    // since we are using the CreateOrUpdate method
    try
    {
        indexerClient.CreateOrUpdateDataSourceConnection(dataSource);
    }
    catch (Exception ex)
    {
        Console.WriteLine("Failed to create or update the data source\n Exception message: {0}\n", ex.Message);
        ExitProgram("Cannot continue without a data source");
    }

    return dataSource;
}
요청이 성공하면 메서드에서 만들어진 데이터 원본을 반환합니다. 잘못된 매개 변수와 같이 요청에 문제가 있는 경우 메서드에서 예외를 throw합니다.
이제 Main에 방금 추가한 CreateOrUpdateDataSource 함수를 호출하는 줄을 추가합니다.
// Create or Update the data source
Console.WriteLine("Creating or updating the data source...");
SearchIndexerDataSourceConnection dataSource = CreateOrUpdateDataSource(indexerClient, configuration);
솔루션을 빌드하고 실행합니다. 이번이 첫 번째 요청이므로 Azure Portal에서 데이터 원본이 Azure AI 검색에 생성되었는지 확인합니다. 검색 서비스 개요 페이지에서 데이터 원본 목록에 새 항목이 있는지 확인합니다. Azure Portal 페이지가 새로 고쳐질 때까지 몇 분 정도 기다려야 할 수 있습니다.

2단계: 기술 세트 만들기
이 섹션에서는 데이터에 적용하려는 일단의 보강 단계를 정의합니다. 각 보강 단계를 기술이라고 하고, 보강 단계 세트를 기술 세트라고 합니다. 이 자습서에서는 다음과 같은 기본 제공 기술을 기술 세트에 사용합니다.
광학 문자 인식: 이미지 파일의 인쇄 및 필기 텍스트를 인식합니다.
텍스트 병합기: 필드 컬렉션의 텍스트를 단일 "병합된 콘텐츠" 필드로 통합합니다.
언어 감지: 콘텐츠의 언어를 식별합니다.
엔터티 인식: Blob 컨테이너의 콘텐츠에서 조직 이름을 추출합니다.
텍스트 나누기: 핵심 구 추출 기술과 엔터티 인식 기술을 호출하기 전에 큰 콘텐츠를 작은 청크로 나눕니다. 핵심 구 추출 및 엔터티 인식은 50,000자 이하의 입력을 허용합니다. 일부 샘플 파일은 이 제한에 맞게 분할해야 합니다.
핵심 구 추출: 상위 핵심 구를 추출합니다.
초기 처리 중에 Azure AI 검색은 각 문서를 분해하여 다른 파일 형식에서 콘텐츠를 추출합니다. 원본 파일에서 발생하는 텍스트는 각 문서에 대해 생성되는 content 필드에 배치됩니다. 따라서 이 텍스트를 사용하려면 입력을 "/document/content"로 설정합니다. 이미지 콘텐츠는 생성된 normalized_images 필드에 배치되고, 기술 세트에서 /document/normalized_images/*로 지정됩니다.
출력을 인덱스에 매핑할 수도 있고, 다운스트림 기술의 입력으로 사용할 수도 있고, 언어 코드처럼 둘 다 할 수도 있습니다. 인덱스에서 언어 코드는 필터링에 유용합니다. 입력으로써의 언어 코드는 단어 분리에 대한 언어적 규칙을 알려주기 위해 텍스트 분석 기술에 사용됩니다.
기술 집합 기본에 대한 자세한 내용은 기술 집합을 정의하는 방법을 참조하세요.
OCR 기술
OcrSkill은 이미지에서 텍스트를 추출합니다. 이 기술은 normalized_images 필드가 있다고 가정합니다. 이 필드를 생성하기 위해 자습서의 뒷부분에서 인덱서 정의의 "imageAction" 구성을 "generateNormalizedImages"로 설정합니다.
private static OcrSkill CreateOcrSkill()
{
    List<InputFieldMappingEntry> inputMappings = new List<InputFieldMappingEntry>();
    inputMappings.Add(new InputFieldMappingEntry("image")
    {
        Source = "/document/normalized_images/*"
    });

    List<OutputFieldMappingEntry> outputMappings = new List<OutputFieldMappingEntry>();
    outputMappings.Add(new OutputFieldMappingEntry("text")
    {
        TargetName = "text"
    });

    OcrSkill ocrSkill = new OcrSkill(inputMappings, outputMappings)
    {
        Description = "Extract text (plain and structured) from image",
        Context = "/document/normalized_images/*",
        DefaultLanguageCode = OcrSkillLanguage.En,
        ShouldDetectOrientation = true
    };

    return ocrSkill;
}
병합 기술
이 섹션에서는 문서 콘텐츠 필드를 OCR 기술로 생성된 텍스트와 병합하는 MergeSkill을 만듭니다.
private static MergeSkill CreateMergeSkill()
{
    List<InputFieldMappingEntry> inputMappings = new List<InputFieldMappingEntry>();
    inputMappings.Add(new InputFieldMappingEntry("text")
    {
        Source = "/document/content"
    });
    inputMappings.Add(new InputFieldMappingEntry("itemsToInsert")
    {
        Source = "/document/normalized_images/*/text"
    });
    inputMappings.Add(new InputFieldMappingEntry("offsets")
    {
        Source = "/document/normalized_images/*/contentOffset"
    });

    List<OutputFieldMappingEntry> outputMappings = new List<OutputFieldMappingEntry>();
    outputMappings.Add(new OutputFieldMappingEntry("mergedText")
    {
        TargetName = "merged_text"
    });

    MergeSkill mergeSkill = new MergeSkill(inputMappings, outputMappings)
    {
        Description = "Create merged_text which includes all the textual representation of each image inserted at the right location in the content field.",
        Context = "/document",
        InsertPreTag = " ",
        InsertPostTag = " "
    };

    return mergeSkill;
}
언어 감지 기술
LanguageDetectionSkill은 입력 텍스트의 언어를 감지하고 요청에 제출된 모든 문서에 대한 단일 언어 코드를 보고합니다.
언어 감지 기술의 출력을 텍스트 나누기 기술에 대한 입력의 일부로 사용합니다.
private static LanguageDetectionSkill CreateLanguageDetectionSkill()
{
    List<InputFieldMappingEntry> inputMappings = new List<InputFieldMappingEntry>();
    inputMappings.Add(new InputFieldMappingEntry("text")
    {
        Source = "/document/merged_text"
    });

    List<OutputFieldMappingEntry> outputMappings = new List<OutputFieldMappingEntry>();
    outputMappings.Add(new OutputFieldMappingEntry("languageCode")
    {
        TargetName = "languageCode"
    });

    LanguageDetectionSkill languageDetectionSkill = new LanguageDetectionSkill(inputMappings, outputMappings)
    {
        Description = "Detect the language used in the document",
        Context = "/document"
    };

    return languageDetectionSkill;
}
텍스트 나누기 기술
아래 SplitSkill은 텍스트를 페이지별로 나누고 String.Length에서 측정할 때 페이지 길이를 4,000자로 제한합니다. 알고리즘은 텍스트를 최대 maximumPageLength 크기의 청크로 나누려고 시도합니다. 이 경우 알고리즘은 문장 경계에서 문장을 나누는 데 최선을 다할 것이므로 청크의 크기는 maximumPageLength보다 약간 작을 수 있습니다.
private static SplitSkill CreateSplitSkill()
{
    List<InputFieldMappingEntry> inputMappings = new List<InputFieldMappingEntry>();
    inputMappings.Add(new InputFieldMappingEntry("text")
    {
        Source = "/document/merged_text"
    });
    inputMappings.Add(new InputFieldMappingEntry("languageCode")
    {
        Source = "/document/languageCode"
    });

    List<OutputFieldMappingEntry> outputMappings = new List<OutputFieldMappingEntry>();
    outputMappings.Add(new OutputFieldMappingEntry("textItems")
    {
        TargetName = "pages",
    });

    SplitSkill splitSkill = new SplitSkill(inputMappings, outputMappings)
    {
        Description = "Split content into pages",
        Context = "/document",
        TextSplitMode = TextSplitMode.Pages,
        MaximumPageLength = 4000,
        DefaultLanguageCode = SplitSkillLanguage.En
    };

    return splitSkill;
}
엔터티 인식 기술
다음 EntityRecognitionSkill 인스턴스는 organization 범주 유형을 인식하도록 설정되어 있습니다.
EntityRecognitionSkill은 카테고리 유형 person 및 location을 인식할 수도 있습니다.
"context" 필드는 별표를 포함하여 "/document/pages/*"로 설정되어 있으며, 이는 "/document/pages" 아래의 각 페이지에 대해 보강 단계가 호출됨을 의미합니다.
private static EntityRecognitionSkill CreateEntityRecognitionSkill()
{
    List<InputFieldMappingEntry> inputMappings = new List<InputFieldMappingEntry>();
    inputMappings.Add(new InputFieldMappingEntry("text")
    {
        Source = "/document/pages/*"
    });

    List<OutputFieldMappingEntry> outputMappings = new List<OutputFieldMappingEntry>();
    outputMappings.Add(new OutputFieldMappingEntry("organizations")
    {
        TargetName = "organizations"
    });

    EntityRecognitionSkill entityRecognitionSkill = new EntityRecognitionSkill(inputMappings, outputMappings)
    {
        Description = "Recognize organizations",
        Context = "/document/pages/*",
        DefaultLanguageCode = EntityRecognitionSkillLanguage.En
    };
    entityRecognitionSkill.Categories.Add(EntityCategory.Organization);

    return entityRecognitionSkill;
}
핵심 구 추출 기술
방금 만든 EntityRecognitionSkill 인스턴스와 마찬가지로 문서의 각 페이지에 대해 KeyPhraseExtractionSkill이 호출됩니다.
private static KeyPhraseExtractionSkill CreateKeyPhraseExtractionSkill()
{
    List<InputFieldMappingEntry> inputMappings = new List<InputFieldMappingEntry>();
    inputMappings.Add(new InputFieldMappingEntry("text")
    {
        Source = "/document/pages/*"
    });
    inputMappings.Add(new InputFieldMappingEntry("languageCode")
    {
        Source = "/document/languageCode"
    });

    List<OutputFieldMappingEntry> outputMappings = new List<OutputFieldMappingEntry>();
    outputMappings.Add(new OutputFieldMappingEntry("keyPhrases")
    {
        TargetName = "keyPhrases"
    });

    KeyPhraseExtractionSkill keyPhraseExtractionSkill = new KeyPhraseExtractionSkill(inputMappings, outputMappings)
    {
        Description = "Extract the key phrases",
        Context = "/document/pages/*",
        DefaultLanguageCode = KeyPhraseExtractionSkillLanguage.En
    };

    return keyPhraseExtractionSkill;
}
기술 집합 빌드 및 만들기
만든 기술을 사용하여 SearchIndexerSkillset를 빌드합니다.
private static SearchIndexerSkillset CreateOrUpdateDemoSkillSet(SearchIndexerClient indexerClient, IList<SearchIndexerSkill> skills,string azureAiServicesKey)
{
    SearchIndexerSkillset skillset = new SearchIndexerSkillset("demoskillset", skills)
    {
        // Azure AI services was formerly known as Cognitive Services.
        // The APIs still use the old name, so we need to create a CognitiveServicesAccountKey object.
        Description = "Demo skillset",
        CognitiveServicesAccount = new CognitiveServicesAccountKey(azureAiServicesKey)
    };

    // Create the skillset in your search service.
    // The skillset does not need to be deleted if it was already created
    // since we are using the CreateOrUpdate method
    try
    {
        indexerClient.CreateOrUpdateSkillset(skillset);
    }
    catch (RequestFailedException ex)
    {
        Console.WriteLine("Failed to create the skillset\n Exception message: {0}\n", ex.Message);
        ExitProgram("Cannot continue without a skillset");
    }

    return skillset;
}
Main에 다음 줄을 추가합니다.
// Create the skills
Console.WriteLine("Creating the skills...");
OcrSkill ocrSkill = CreateOcrSkill();
MergeSkill mergeSkill = CreateMergeSkill();
EntityRecognitionSkill entityRecognitionSkill = CreateEntityRecognitionSkill();
LanguageDetectionSkill languageDetectionSkill = CreateLanguageDetectionSkill();
SplitSkill splitSkill = CreateSplitSkill();
KeyPhraseExtractionSkill keyPhraseExtractionSkill = CreateKeyPhraseExtractionSkill();

// Create the skillset
Console.WriteLine("Creating or updating the skillset...");
List<SearchIndexerSkill> skills = new List<SearchIndexerSkill>();
skills.Add(ocrSkill);
skills.Add(mergeSkill);
skills.Add(languageDetectionSkill);
skills.Add(splitSkill);
skills.Add(entityRecognitionSkill);
skills.Add(keyPhraseExtractionSkill);

SearchIndexerSkillset skillset = CreateOrUpdateDemoSkillSet(indexerClient, skills, azureAiServicesKey);
3단계: 인덱스 만들기
이 섹션에서는 검색 가능한 인덱스에 포함할 필드 및 각 필드의 검색 특성을 지정하여 인덱스 스키마를 정의합니다. 필드에는 형식이 있으며 필드가 사용되는 방식(검색 가능, 정렬 가능 등)을 결정하는 특성을 가질 수 있습니다. 인덱스의 필드 이름은 원본의 필드 이름과 동일하게 일치할 필요는 없습니다. 이후 단계에서 인덱서의 필드 매핑을 원본-대상 연결 필드에 추가할 것입니다. 이 단계에서는 검색 애플리케이션과 관련된 필드 명명 규칙을 사용하여 인덱스를 정의합니다.
이 연습에서는 다음 필드와 필드 형식을 사용합니다.
| 필드 이름 | 필드 유형 |
|---|---|
id |
Edm.String |
content |
Edm.String |
languageCode |
Edm.String |
keyPhrases |
List<Edm.String> |
organizations |
List<Edm.String> |
DemoIndex 클래스 만들기
이 인덱스에 대한 필드는 모델 클래스를 사용하여 정의됩니다. 모델 클래스의 각 속성에는 해당 인덱스 필드의 검색 관련 동작을 결정하는 특성이 있습니다.
모델 클래스를 새 C# 파일에 추가합니다. 마우스 오른쪽 단추로 프로젝트를 선택하고, 추가>새 항목...을 차례로 선택하고, "클래스"를 선택하고, 파일 이름을 DemoIndex.cs로 지정한 다음, 추가를 선택합니다.
Azure.Search.Documents.Indexes 및 System.Text.Json.Serialization 네임스페이스의 형식을 사용하도록 지정해야 합니다.
아래의 모델 클래스 정의를 DemoIndex.cs에 추가하고, 인덱스를 만들 동일한 네임스페이스에 이를 포함시킵니다.
using Azure.Search.Documents.Indexes;
using System.Text.Json.Serialization;

namespace EnrichwithAI
{
    // The SerializePropertyNamesAsCamelCase is currently unsupported as of this writing.
    // Replace it with JsonPropertyName
    public class DemoIndex
    {
        [SearchableField(IsSortable = true, IsKey = true)]
        [JsonPropertyName("id")]
        public string Id { get; set; }

        [SearchableField]
        [JsonPropertyName("content")]
        public string Content { get; set; }

        [SearchableField]
        [JsonPropertyName("languageCode")]
        public string LanguageCode { get; set; }

        [SearchableField]
        [JsonPropertyName("keyPhrases")]
        public string[] KeyPhrases { get; set; }

        [SearchableField]
        [JsonPropertyName("organizations")]
        public string[] Organizations { get; set; }
    }
}
이제 모델 클래스를 Program.cs에 다시 정의했으므로 인덱스 정의를 매우 쉽게 만들 수 있습니다. 이 인덱스의 이름은 demoindex입니다. 동일한 이름의 인덱스가 이미 있으면 삭제됩니다.
private static SearchIndex CreateDemoIndex(SearchIndexClient indexClient)
{
    FieldBuilder builder = new FieldBuilder();
    var index = new SearchIndex("demoindex")
    {
        Fields = builder.Build(typeof(DemoIndex))
    };

    try
    {
        indexClient.GetIndex(index.Name);
        indexClient.DeleteIndex(index.Name);
    }
    catch (RequestFailedException ex) when (ex.Status == 404)
    {
        //if the specified index not exist, 404 will be thrown.
    }

    try
    {
        indexClient.CreateIndex(index);
    }
    catch (RequestFailedException ex)
    {
        Console.WriteLine("Failed to create the index\n Exception message: {0}\n", ex.Message);
        ExitProgram("Cannot continue without an index");
    }

    return index;
}
테스트 중에 인덱스를 두 번 이상 만들려고 시도할 수 있습니다. 이로 인해 인덱스를 만들려고 하기 전에 해당 인덱스가 이미 있는지 확인합니다.
Main에 다음 줄을 추가합니다.
// Create the index
Console.WriteLine("Creating the index...");
SearchIndex demoIndex = CreateDemoIndex(indexClient);
다음 using 문을 추가하여 명확하지 않은 참조를 확인합니다.
using Index = Azure.Search.Documents.Indexes.Models;
인덱스 개념에 대한 자세한 내용은 인덱스 만들기(REST API)를 참조하세요.
4단계: 인덱서 만들기 및 실행
지금까지 데이터 원본, 기술 집합 및 인덱스를 만들었습니다. 이러한 세 가지 구성 요소는 각 조각을 서로 연결하여 단일 다단계 작업으로 만드는 인덱서의 일부가 됩니다. 각 구성 요소를 인덱서에 서로 연결하려면 필드 매핑을 정의해야 합니다.
fieldMappings은 기술 세트보다 먼저 처리되며, 데이터 원본의 원본 필드를 인덱스의 대상 필드로 매핑합니다. 필드 이름과 유형이 양쪽 끝에서 동일하면 매핑이 필요 없습니다.
outputFieldMappings는 기술 세트 후에 처리되며, 문서 크래킹 또는 보강을 통해 만들기 전에는 존재하지 않는 sourceFieldNames를 참조합니다. targetFieldName은 인덱스의 필드입니다.
입력을 출력에 후크할 뿐만 아니라 필드 매핑을 사용하여 데이터 구조를 평면화할 수도 있습니다. 자세한 내용은 검색 가능한 인덱스에 보강된 필드를 매핑하는 방법을 참조하세요.
private static SearchIndexer CreateDemoIndexer(SearchIndexerClient indexerClient, SearchIndexerDataSourceConnection dataSource, SearchIndexerSkillset skillSet, SearchIndex index)
{
    IndexingParameters indexingParameters = new IndexingParameters()
    {
        MaxFailedItems = -1,
        MaxFailedItemsPerBatch = -1,
    };
    indexingParameters.Configuration.Add("dataToExtract", "contentAndMetadata");
    indexingParameters.Configuration.Add("imageAction", "generateNormalizedImages");

    SearchIndexer indexer = new SearchIndexer("demoindexer", dataSource.Name, index.Name)
    {
        Description = "Demo Indexer",
        SkillsetName = skillSet.Name,
        Parameters = indexingParameters
    };

    FieldMappingFunction mappingFunction = new FieldMappingFunction("base64Encode");
    mappingFunction.Parameters.Add("useHttpServerUtilityUrlTokenEncode", true);

    indexer.FieldMappings.Add(new FieldMapping("metadata_storage_path")
    {
        TargetFieldName = "id",
        MappingFunction = mappingFunction

    });
    indexer.FieldMappings.Add(new FieldMapping("content")
    {
        TargetFieldName = "content"
    });

    indexer.OutputFieldMappings.Add(new FieldMapping("/document/pages/*/organizations/*")
    {
        TargetFieldName = "organizations"
    });
    indexer.OutputFieldMappings.Add(new FieldMapping("/document/pages/*/keyPhrases/*")
    {
        TargetFieldName = "keyPhrases"
    });
    indexer.OutputFieldMappings.Add(new FieldMapping("/document/languageCode")
    {
        TargetFieldName = "languageCode"
    });

    try
    {
        indexerClient.GetIndexer(indexer.Name);
        indexerClient.DeleteIndexer(indexer.Name);
    }
    catch (RequestFailedException ex) when (ex.Status == 404)
    {
        //if the specified indexer not exist, 404 will be thrown.
    }

    try
    {
        indexerClient.CreateIndexer(indexer);
    }
    catch (RequestFailedException ex)
    {
        Console.WriteLine("Failed to create the indexer\n Exception message: {0}\n", ex.Message);
        ExitProgram("Cannot continue without creating an indexer");
    }

    return indexer;
}
Main에 다음 줄을 추가합니다.
// Create the indexer, map fields, and execute transformations
Console.WriteLine("Creating the indexer and executing the pipeline...");
SearchIndexer demoIndexer = CreateDemoIndexer(indexerClient, dataSource, skillset, demoIndex);
인덱서 처리를 완료하는 데 다소 시간이 소요됩니다. 데이터 집합이 작아도 분석 기술은 계산을 많이 수행합니다. 이미지 분석 같은 일부 기술은 오래 실행됩니다.
팁
인덱서를 만들면 파이프라인이 호출됩니다. 데이터 도달, 입력 및 출력 매핑 또는 작업 순서에 문제가 있으면 이 단계에 나타납니다.
인덱서 만들기 검색
코드에서 "maxFailedItems"를 -1로 설정하며, 이는 데이터를 가져오는 동안 오류를 무시하도록 인덱싱 엔진에 지시합니다. 데모 데이터 원본에는 문서가 몇 개 없기 때문에 이렇게 하면 도움이 됩니다. 데이터 원본의 크기가 큰 경우에는 0보다 큰 값으로 설정해야 합니다.
또한 "dataToExtract"는 "contentAndMetadata"으로 설정되어 있습니다. 이 명령문은 다른 파일 형식의 콘텐츠 및 각 파일과 관련된 메타데이터를 자동으로 추출하도록 인덱서에 지시합니다.
콘텐츠가 추출되면 데이터 원본에서 찾은 이미지의 텍스트를 추출하도록 imageAction을 설정할 수 있습니다. OCR 기술 및 텍스트 병합 기술과 함께 "generateNormalizedImages" 구성으로 설정된 "imageAction"은 이미지에서 텍스트(예: 트래픽 중지 기호에서 "중지"라는 단어)를 추출하여 콘텐츠 필드의 일부로 포함시키도록 인덱서에 지시합니다. 이 동작은 문서에 포함된 이미지(예: PDF 내 이미지)뿐 아니라 JPG 파일 같은 데이터 원본의 이미지에도 적용됩니다.
인덱싱 모니터링
인덱서가 정의되면 사용자가 요청을 제출할 때 인덱서가 자동으로 실행됩니다. 사용자가 정의한 기술에 따라 인덱싱이 예상보다 오래 걸릴 수 있습니다. 인덱서가 아직 실행되고 있는지 확인하려면 GetStatus 메서드를 사용합니다.
private static void CheckIndexerOverallStatus(SearchIndexerClient indexerClient, SearchIndexer indexer)
{
    try
    {
        var demoIndexerExecutionInfo = indexerClient.GetIndexerStatus(indexer.Name);

        switch (demoIndexerExecutionInfo.Value.Status)
        {
            case IndexerStatus.Error:
                ExitProgram("Indexer has error status. Check the Azure Portal to further understand the error.");
                break;
            case IndexerStatus.Running:
                Console.WriteLine("Indexer is running");
                break;
            case IndexerStatus.Unknown:
                Console.WriteLine("Indexer status is unknown");
                break;
            default:
                Console.WriteLine("No indexer information");
                break;
        }
    }
    catch (RequestFailedException ex)
    {
        Console.WriteLine("Failed to get indexer overall status\n Exception message: {0}\n", ex.Message);
    }
}
demoIndexerExecutionInfo는 인덱서의 현재 상태 및 실행 기록을 나타냅니다.
경고는 일부 원본 파일과 기술 조합에서 일반적이며 항상 문제를 나타내는 것은 아닙니다. 이 자습서의 경고는 심각하지 않습니다(예: JPEG 파일의 텍스트 입력이 없음).
Main에 다음 줄을 추가합니다.
// Check indexer overall status
Console.WriteLine("Check the indexer overall status...");
CheckIndexerOverallStatus(indexerClient, demoIndexer);
검색
Azure AI 검색 자습서 콘솔 앱에서는 결과를 반환하는 쿼리를 실행하기 전에 일반적으로 2초의 지연을 추가하지만 보강이 완료될 때까지 몇 분 정보 걸리기 때문에, 콘솔 앱을 닫고 다른 방법을 사용하겠습니다.
가장 쉬운 옵션은 Azure Portal의 검색 탐색기입니다. 먼저 모든 문서를 반환하는 빈 쿼리를 실행하거나 파이프라인에서 만든 새 필드 콘텐츠를 반환하는 보다 구체적인 검색을 실행할 수 있습니다.
Azure Portal의 검색 개요 페이지에서 인덱스를 선택합니다.
목록에서
demoindex를 찾습니다. 14개 문서가 있을 것입니다. 문서 수가 0이면 인덱서가 아직 실행 중이거나 페이지가 아직 새로 고쳐지지 않은 것입니다.demoindex를 선택합니다. 검색 탐색기는 첫 번째 탭입니다.첫 번째 문서가 로드되는 즉시 콘텐츠를 검색할 수 있습니다. 콘텐츠가 있는지 확인하려면 검색을 클릭하여 지정되지 않은 쿼리를 실행합니다. 이 쿼리는 현재 인덱싱된 모든 문서를 반환하여 인덱스에 무엇이 들어 있는지 알려줍니다.
다음으로, 결과를 보다 쉽게 관리할 수 있도록
search=*&$select=id, languageCode, organizations문자열을 붙여넣습니다.
다시 설정하고 다시 실행
초기 개발 실험 단계에서 설계 반복에 대한 가장 실용적인 방법은 Azure AI 검색에서 개체를 삭제하고 코드에서 이를 다시 작성하도록 허용하는 것입니다. 리소스 이름은 고유합니다. 개체를 삭제하면 동일한 이름을 사용하여 개체를 다시 만들 수 있습니다.
이 자습서의 샘플 코드는 기존 개체가 있는지 확인하고 코드를 다시 실행할 수 있도록 삭제합니다. Azure Portal을 사용하여 인덱스, 인덱서, 데이터 원본 및 기술 세트를 삭제할 수도 있습니다.
핵심 내용
이 자습서에서는 데이터 원본, 기술 집합, 인덱스 및 인덱서라는 구성 요소 부분을 만들어서 강화된 인덱싱 파이프라인을 빌드하는 기본 단계를 살펴보았습니다.
기술 세트 정의 및 입/출력을 통해 기술을 서로 연결하는 메커니즘과 함께 미리 빌드된 기술을 소개했습니다. 인덱서 정의의 outputFieldMappings는 보강된 값을 Azure AI 검색 서비스의 파이프라인에서 검색 가능한 인덱스로 라우팅하는 데 필요하다는 것도 배웠습니다.
마지막으로, 결과를 테스트하고 추가 반복을 위해 시스템을 다시 설정하는 방법을 배웠습니다. 인덱스에 대한 쿼리를 실행하면 보강된 인덱싱 파이프라인에서 만든 출력이 반환된다는 것을 배웠습니다. 인덱서 상태를 확인하는 방법과 파이프라인을 다시 실행하기 전에 어떤 개체를 삭제해야 하는지도 배웠습니다.
리소스 정리
사용자 고유의 구독에서 작업하는 경우 프로젝트의 끝에서 더 이상 필요하지 않은 리소스를 제거하는 것이 좋습니다. 계속 실행되는 리소스에는 요금이 부과될 수 있습니다. 리소스를 개별적으로 삭제하거나 리소스 그룹을 삭제하여 전체 리소스 세트를 삭제할 수 있습니다.
왼쪽 탐색 창의 모든 리소스 또는 리소스 그룹 링크를 사용하여 Azure Portal에서 리소스를 찾고 관리할 수 있습니다.
다음 단계
AI 보강 파이프라인의 모든 개체에 대해 알아보았으면, 기술 세트 정의와 개별적인 기술을 자세히 살펴보겠습니다.