kubectl을 사용하여 Azure Stack Edge Pro 디바이스에서 PersistentVolume으로 Kubernetes 상태 저장 애플리케이션 실행
적용 대상:  Azure Stack Edge Pro - GPU
 Azure Stack Edge Pro 2
 Azure Stack Edge Pro R
 Azure Stack Edge Mini R
이 문서에서는 PV(PersistentVolume) 및 배포를 사용하여 Kubernetes에서 단일 인스턴스 상태 저장 애플리케이션을 배포하는 방법을 보여 줍니다. 배포는 기존 Kubernetes 클러스터에서 kubectl 명령을 사용하고 MySQL 애플리케이션을 배포합니다.
이 절차는 Azure Stack Edge Pro 디바이스의 Kubernetes 스토리지를 검토했으며 Kubernetes 스토리지의 개념에 대해 잘 알고 있는 사용자를 위해 제공됩니다.
Azure Stack Edge Pro는 Azure SQL Edge 컨테이너의 실행도 지원하며, MySQL에서 여기에 자세히 설명된 것과 비슷한 방식으로 이를 배포할 수 있습니다. 자세한 내용은 Azure SQL Edge를 참조하세요.
필수 조건
상태 저장 애플리케이션을 배포하기 전에 디바이스에 액세스하는 데 사용할 디바이스 및 클라이언트에 대한 다음 필수 구성 요소를 완료합니다.
디바이스의 경우
- 1노드 Azure Stack Edge Pro 디바이스에 대한 로그인 자격 증명이 있어야 합니다.
디바이스에 액세스하는 클라이언트의 경우
- Azure Stack Edge Pro 디바이스에 액세스하는 데 사용되는 Windows 클라이언트 시스템이 있습니다.
클라이언트에서 Windows PowerShell 5.0 이상을 실행하고 있습니다. 최신 버전의 Windows PowerShell을 다운로드하려면 Windows Powershell 설치로 이동합니다.
지원되는 운영 체제를 사용하는 다른 클라이언트도 있을 수 있습니다. 이 문서에서는 Windows 클라이언트를 사용하는 절차에 대해 설명합니다.
Azure Stack Edge Pro 디바이스에서 Kubernetes 클러스터에 액세스에 설명된 절차를 완료했습니다. 수행한 작업은 다음과 같습니다.
New-HcsKubernetesNamespace명령을 통해userns1네임스페이스를 만들었습니다.New-HcsKubernetesUser명령을 통해user1사용자를 만들었습니다.Grant-HcsKubernetesNamespaceAccess명령을 통해userns1에 대한user1액세스 권한을 부여했습니다.- 클라이언트에
kubectl을 설치하고 사용자 구성이 포함된kubeconfig파일을 C:\Users\<username>\.kube에 저장했습니다.
kubectl클라이언트 버전이 Azure Stack Edge Pro 디바이스에서 실행되는 Kubernetes 마스터 버전보다 두 버전 이상 차이 나지 않는지 확인합니다.kubectl version을 사용하여 클라이언트에서 실행되는 kubectl의 버전을 확인합니다. 전체 버전을 기록해 둡니다.- Azure Stack Edge Pro 디바이스의 로컬 UI에서 개요로 이동하여 Kubernetes 소프트웨어 번호를 확인합니다.
- 이 두 개의 버전이 지원되는 Kubernetes 버전에서 제공되는 매핑과 호환되는지 확인합니다.
Azure Stack Edge Pro 디바이스에 상태 저장 애플리케이션을 배포할 준비가 되었습니다.
정적 PV 프로비전
PV를 정적으로 프로비전하려면 디바이스에 공유를 만들어야 합니다. 다음 단계를 수행하여 SMB 공유에 대해 PV를 프로비전합니다.
참고 항목
- 이 방법 문서에 사용된 특정 예제는 NFS 공유에서 작동하지 않습니다. 일반적으로 NFS 공유는 데이터베이스가 아닌 애플리케이션을 사용하여 Azure Stack Edge 디바이스에 프로비전할 수 있습니다.
- 스토리지 볼륨을 사용하여 영구 스토리지를 제공하는 상태 저장 애플리케이션을 배포하려면
StatefulSet를 사용하는 것이 좋습니다. 이 예제는 복제본이 하나만 있는Deployment를 사용하며 개발 및 테스트에 적합합니다.
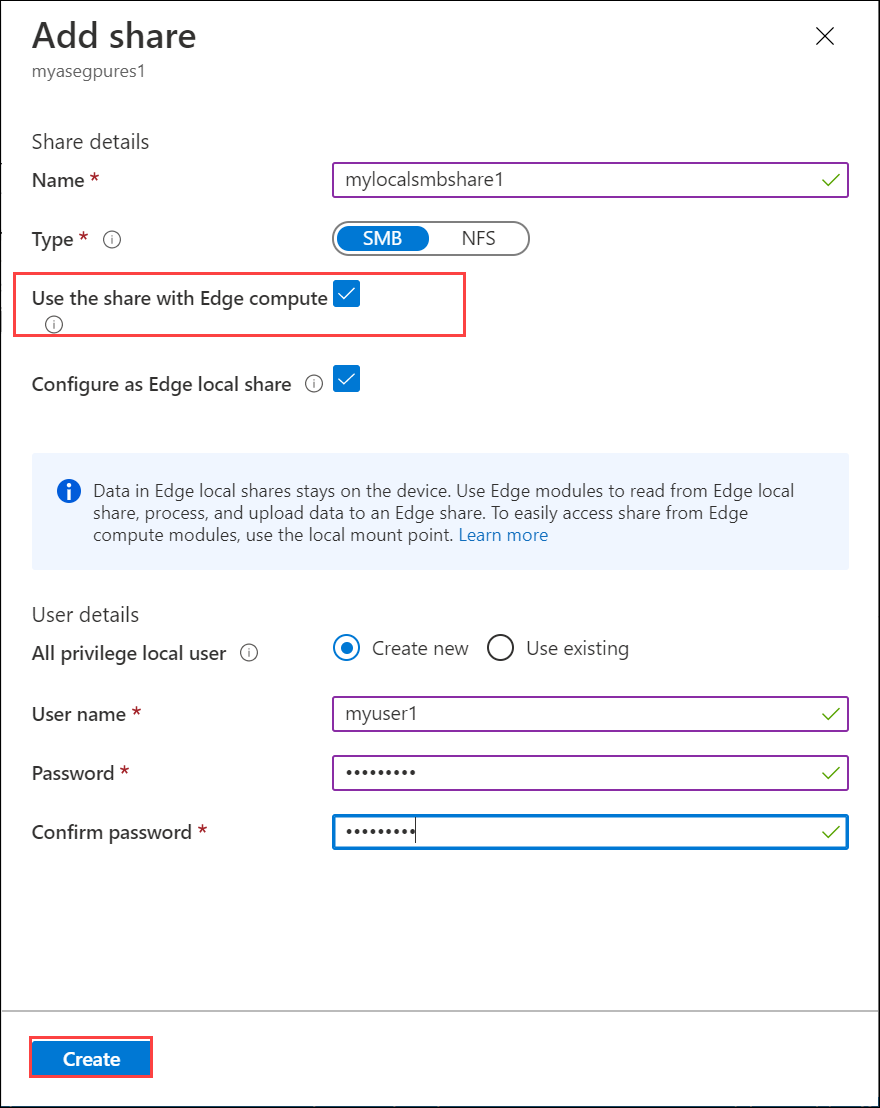
Edge 공유를 만들지, Edge 로컬 공유를 만들지 선택합니다. 공유 추가의 지침에 따라 공유를 만듭니다. Edge 컴퓨팅과 공유 사용 확인란을 선택해야 합니다.

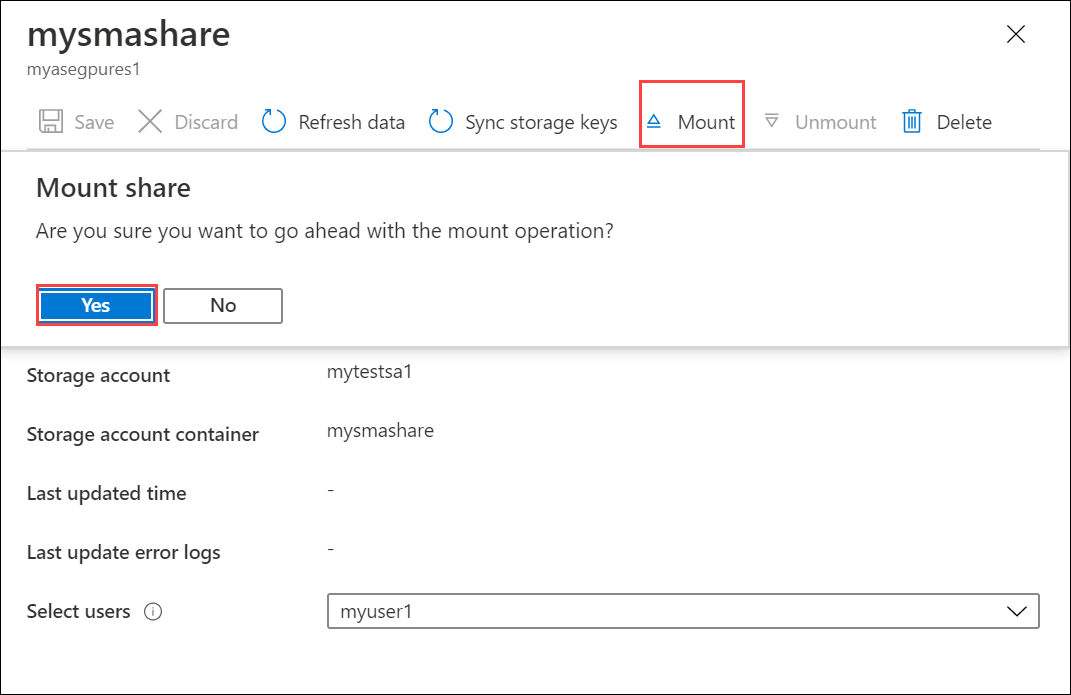
새 공유를 만드는 대신 기존 공유를 사용하기로 결정한 경우 공유를 탑재해야 합니다.
Azure Portal에서 Azure Stack Edge 리소스의 공유로 이동합니다. 기존 공유 목록에서 사용하려는 공유를 선택하고 클릭합니다.

탑재를 선택하고 메시지가 표시되면 탑재를 확인합니다.

공유 이름을 적어 둡니다. 이 공유를 만들 때 생성된 SMB 공유에 해당하는 Kubernetes 클러스터에 영구 볼륨 개체가 자동으로 생성됩니다.
MySQL 배포
이제 Kubernetes 배포를 만들고 이전 단계에서 PVC(PersistentVolumeClaim)를 사용하여 만든 PV에 연결하여 상태 저장 애플리케이션을 실행합니다.
상태 저장 애플리케이션 배포를 만들고 관리하는 데 사용하는 모든 kubectl 명령은 구성과 연결된 네임스페이스를 지정해야 합니다. kubectl 명령에서 네임스페이스를 지정하려면 kubectl <command> -n <your-namespace>를 사용합니다.
네임스페이스의 Kubernetes 클러스터에서 실행되는 Pod 목록을 가져옵니다. Pod는 Kubernetes 클러스터에서 실행되는 애플리케이션 컨테이너 또는 프로세스입니다.
kubectl get pods -n <your-namespace>다음은 명령 사용의 예입니다.
 C:\Users\user>kubectl get pods -n "userns1"
 No resources found in userns1 namespace.
 C:\Users\user>
클러스터에서 실행 중인 애플리케이션이 없기 때문에 리소스(Pod)가 없다는 내용이 출력에 표시되어야 합니다.
다음 YAML 파일을 사용하게 됩니다.
mysql-deployment.yml파일은 MySQL을 실행하고 PVC를 참조하는 배포를 설명합니다. 이 파일은/var/lib/mysql의 볼륨 탑재를 정의한 후 20GB 볼륨을 검색하는 PVC를 만듭니다.이 클레임은 이전 단계에서 공유를 만들 때 정적으로 프로비전된 기존 PV에 의해 충족됩니다. 디바이스에서 각 공유에 대해 32TB의 큰 PV가 생성됩니다. PV는 PVC에 의해 설정된 요구 사항을 충족하며, PVC는 이 PV에 바인딩되어야 합니다.
Azure Stack Edge Pro 디바이스에 액세스하는 데 사용하는 Windows 클라이언트의 폴더에 다음
mysql-deployment.yml파일을 복사하여 저장합니다.apiVersion: v1 kind: Service metadata: name: mysql spec: ports: - port: 3306 selector: app: mysql clusterIP: None --- apiVersion: apps/v1 # for versions before 1.9.0 use apps/v1beta2 kind: Deployment metadata: name: mysql spec: selector: matchLabels: app: mysql strategy: type: Recreate template: metadata: labels: app: mysql spec: containers: - image: mysql:5.6 name: mysql env: # Use secret in real usage - name: MYSQL_ROOT_PASSWORD value: password ports: - containerPort: 3306 name: mysql volumeMounts: - name: mysql-persistent-storage mountPath: /var/lib/mysql volumes: - name: mysql-persistent-storage persistentVolumeClaim: claimName: mysql-pv-claimmysql-deployment.yml을 저장한 폴더와 동일한 폴더에mysql-pv.yml파일을 복사하고 저장합니다. 이전에kubectl을 사용하여 만든 SMB 공유를 사용하려면 PVC 개체의volumeName필드를 공유 이름으로 설정합니다.참고 항목
YAML 파일의 들여쓰기가 올바른지 확인합니다. YAML lint로 확인하여 유효성을 검사한 후 저장할 수 있습니다.
apiVersion: v1 kind: PersistentVolumeClaim metadata: name: mysql-pv-claim spec: volumeName: <smb-share-name-here> storageClassName: "" accessModes: - ReadWriteOnce resources: requests: storage: 20Gimysql-pv.yaml파일을 배포합니다.kubectl apply -f <URI path to the mysql-pv.yml file> -n <your-user-namespace>배포의 샘플 출력은 다음과 같습니다.
C:\Users\user>kubectl apply -f "C:\stateful-application\mysql-pv.yml" -n userns1
persistentvolumeclaim/mysql-pv-claim created

C:\Users\user>
만든 PVC의 이름을 적어둡니다. 이후 단계에서 사용하게 됩니다.
mysql-deployment.yml파일의 콘텐츠를 배포합니다.kubectl apply -f <URI path to mysql-deployment.yml file> -n <your-user-namespace>배포의 샘플 출력은 다음과 같습니다.
C:\Users\user>kubectl apply -f "C:\stateful-application\mysql-deployment.yml" -n userns1
    service/mysql created
    deployment.apps/mysql created
사용자에 대한 정보를 표시합니다.
kubectl describe deployment <app-label> -n <your-user-namespace>C:\Users\user>kubectl describe deployment mysql -n userns1 Name: mysql Namespace: userns1 CreationTimestamp: Tue, 18 Aug 2020 09:44:58 -0700 Labels: <none> Annotations: deployment.kubernetes.io/revision: 1 kubectl.kubernetes.io/last-applied-configuration: {"apiVersion":"apps/v1","kind":"Deployment","metadata":{"annotations":{},"name":"mysql","namespace":"userns1"},"spec":{"selector":{"matchL... Selector: app=mysql Replicas: 1 desired | 1 updated | 1 total | 1 available | 0 unavailable StrategyType: Recreate MinReadySeconds: 0 Pod Template: Labels: app=mysql Containers: mysql: Image: mysql:5.6 Port: 3306/TCP Host Port: 0/TCP Environment: MYSQL_ROOT_PASSWORD: password Mounts: /var/lib/mysql from mysql-persistent-storage (rw) Volumes: mysql-persistent-storage: Type: PersistentVolumeClaim (a reference to a PersistentVolumeClaim in the same namespace) ClaimName: mysql-pv-claim ReadOnly: false Conditions: Type Status Reason ---- ------ ------ Progressing True NewReplicaSetAvailable Available True MinimumReplicasAvailable OldReplicaSets: <none> NewReplicaSet: mysql-c85f7f79c (1/1 replicas created) Events: Type Reason Age From Message ---- ------ ---- ---- ------- Normal ScalingReplicaSet 10m deployment-controller Scaled up replica set mysql-c85f7f79c to 1 C:\Users\user>배포에 의해 생성된 Pod를 나열합니다.
kubectl get pods -l <app=label> -n <your-user-namespace>샘플 출력은 다음과 같습니다.
C:\Users\user>kubectl get pods -l app=mysql -n userns1
NAME                    READY   STATUS    RESTARTS   AGE
mysql-c85f7f79c-vzz7j   1/1     Running   1          14m

C:\Users\user>
PersistentVolumeClaim을 조사합니다.
kubectl describe pvc <your-pvc-name>샘플 출력은 다음과 같습니다.
C:\Users\user>kubectl describe pvc mysql-pv-claim -n userns1
Name:          mysql-pv-claim
Namespace:     userns1
StorageClass:
Status:        Bound
Volume:        mylocalsmbshare1
Labels:        <none>
Annotations:   kubectl.kubernetes.io/last-applied-configuration:
                 {"apiVersion":"v1","kind":"PersistentVolumeClaim","metadata":{"annotations":{},"name":"mysql-pv-claim","namespace":"userns1"},"spec":{"acc...
               pv.kubernetes.io/bind-completed: yes
Finalizers:    [kubernetes.io/pvc-protection]
Capacity:      32Ti
Access Modes:  RWO,RWX
VolumeMode:    Filesystem
Mounted By:    mysql-c85f7f79c-vzz7j
Events:        <none>

C:\Users\user>
MySQL이 실행 중인지 확인
MySQL을 실행하는 Pod의 컨테이너에 대해 명령을 실행하려면 다음을 입력합니다.
kubectl exec <your-pod-with-the-app> -i -t -n <your-namespace> -- mysql
샘플 출력은 다음과 같습니다.
C:\Users\user>kubectl exec mysql-c85f7f79c-vzz7j -i -t -n userns1 -- mysql
Welcome to the MySQL monitor.  Commands end with ; or \g.
Your MySQL connection id is 1
Server version: 5.6.49 MySQL Community Server (GPL)

Copyright (c) 2000, 2020, Oracle and/or its affiliates. All rights reserved.

Oracle is a registered trademark of Oracle Corporation and/or its
affiliates. Other names may be trademarks of their respective
owners.

Type 'help;' or '\h' for help. Type '\c' to clear the current input statement.

mysql>
배포 삭제
배포를 삭제하려면 배포된 개체를 이름으로 삭제합니다. 이러한 개체에는 배포, 서비스 및 PVC가 포함됩니다.
kubectl delete deployment <deployment-name>,svc <service-name> -n <your-namespace>
kubectl delete pvc <your-pvc-name> -n <your-namespace>
배포 및 서비스를 삭제하는 경우의 샘플 출력은 다음과 같습니다.
C:\Users\user>kubectl delete deployment,svc mysql -n userns1
deployment.apps "mysql" deleted
service "mysql" deleted
C:\Users\user>
다음은 PVC를 삭제할 때의 샘플 출력입니다.
C:\Users\user>kubectl delete pvc mysql-pv-claim -n userns1
persistentvolumeclaim "mysql-pv-claim" deleted
C:\Users\user>
PVC가 삭제되었기 때문에 PV가 더 이상 PVC에 바인딩되지 않습니다. 공유가 생성될 때 PV가 프로비전되었기 때문에 공유를 삭제해야 합니다. 다음 단계를 수행합니다.
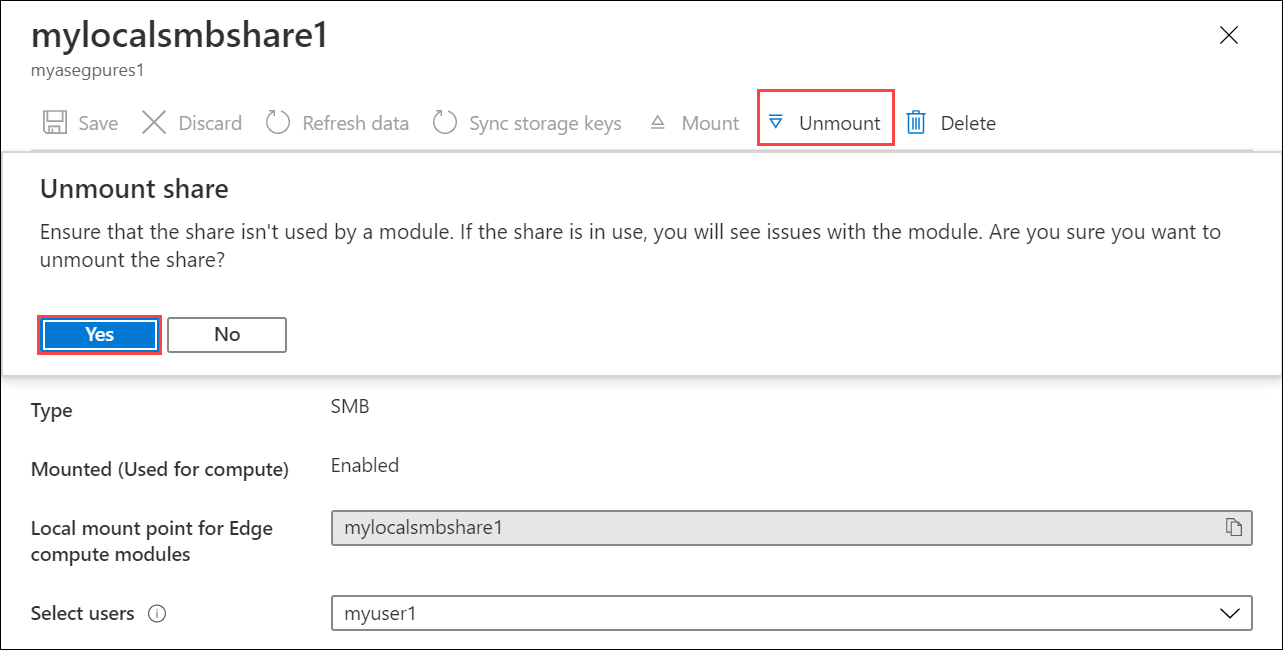
공유를 분리합니다. Azure Portal에서 Azure Stack Edge 리소스 > 공유로 이동하여 분리하려는 공유를 선택하고 클릭합니다. 분리를 선택하고 작업을 확인합니다. 공유가 분리될 때까지 기다립니다. 분리하면 공유(및 연결된 PersistentVolume)가 Kubernetes 클러스터에서 해제됩니다.

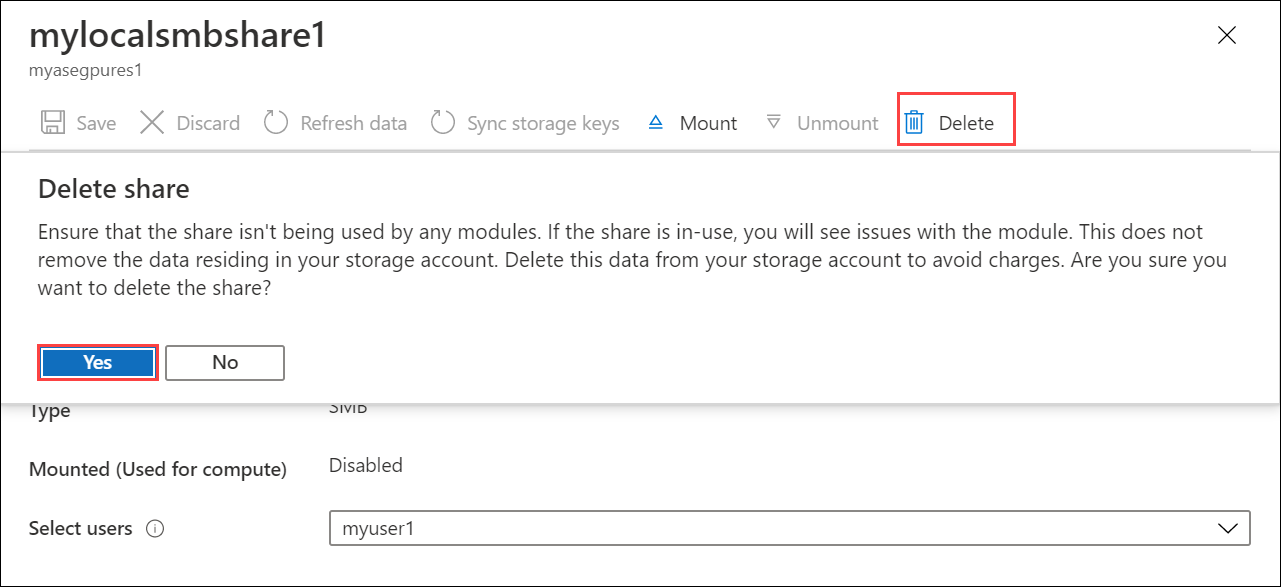
이제 삭제를 선택하고 삭제를 확인하여 공유를 삭제할 수 있습니다. 또한 공유 및 해당 PV도 삭제해야 합니다.

다음 단계
스토리지를 동적으로 프로비전하는 방법을 이해하려면 Azure Stack Edge Pro 디바이스에서 동적 프로비저닝을 통해 상태 저장 애플리케이션 배포를 참조하세요.