Azure Cosmos DB의 API for MongoDB를 사용하여 Angular 앱 만들기 - Angular를 사용하여 UI 빌드
적용 대상: ![]() MongoDB
MongoDB
여러 부분으로 구성된 이 자습서에서는 Express 및 Angular를 사용하여 Node.js로 작성된 새 앱을 만든 다음 Azure Cosmos DB의 API for MongoDB로 구성된 Azure Cosmos DB 계정에 연결하는 방법을 보여 줍니다.
자습서의 3부는 2부를 기반으로 하고 다음과 같은 작업을 다룹니다.
- Angular UI 빌드
- CSS를 사용하여 디자인 설정
- 로컬로 앱 테스트
연습 동영상
필수 조건
자습서의 이 부분을 시작하기 전에 자습서 2부의 단계를 완료했는지 확인합니다.
팁
이 자습서에서는 애플리케이션을 구축하는 단계를 단계별로 설명합니다. 완료된 프로젝트를 다운로드하려는 경우 GitHub의 angular-cosmosdb repo에서 완성된 애플리케이션을 가져올 수 있습니다.
UI 빌드
Visual Studio Code에서 중지 단추
 을 클릭하여 Node 앱을 중지합니다.
Windows 명령 프롬프트 또는 Mac 터미널 창에서 Heroes 구성 요소를 생성하는 다음 명령을 입력합니다. 이 코드에서 g=생성, c=구성 요소, heroes=구성 요소 이름이며, 플랫 파일 구조(--flat)를 사용하므로 여기에 하위 폴더가 생성되지 않습니다.
ng g c heroes --flat터미널 창에는 새 구성 요소에 대한 확인이 표시됩니다.
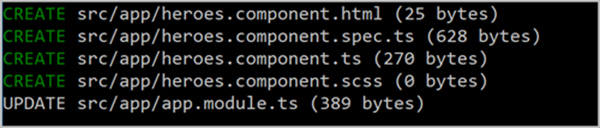
만들고 업데이트된 파일을 살펴보겠습니다.
Visual Studio Code의 탐색기 창에서 새 src\app 폴더로 이동하고 앱 폴더에 생성된 새 heroes.component.ts 파일을 엽니다. 이 TypeScript 구성 요소 파일은 이전 명령에 의해 만들어졌습니다.
팁
앱 폴더가 Visual Studio Code에 표시되지 않으면 Mac에서 CMD + SHIFT + P를 입력하거나 Windows에서 Ctrl + Shift + P를 입력하여 명령 팔레트를 열고 다시 로드 창 을 입력하여 시스템 변경 내용을 선택합니다.
동일한 폴더에서 app.module.ts 파일을 열고 5줄의 선언에
HeroesComponent을 추가하고 10줄로 가져옵니다.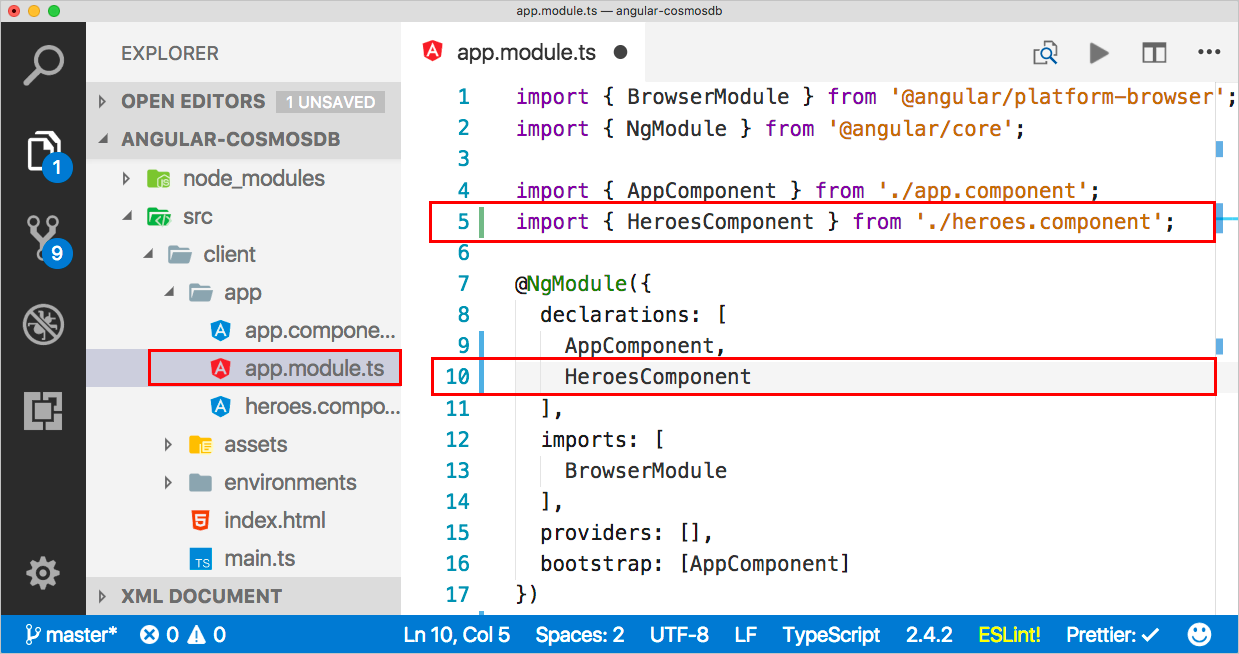
heroes.component.html 파일로 돌아가서 이 코드에 복사합니다.
<div>는 전체 페이지에 대한 컨테이너입니다. 컨테이너 내에는 만들어야 하는 Heroes 목록이 있습니다. 따라서 이 중 하나를 클릭하면 선택하고 편집하거나 UI에서 삭제할 수 있습니다. 그런 다음 HTML에서 선택한 항목을 확인할 수 있도록 몇 가지 스타일을 지정했습니다. 편집 영역도 있으므로 새 Hero를 추가하거나 기존 Hero를 편집할 수 있습니다.<div> <ul class="heroes"> <li *ngFor="let hero of heroes" (click)="onSelect(hero)" [class.selected]="hero === selectedHero"> <button class="delete-button" (click)="deleteHero(hero)">Delete</button> <div class="hero-element"> <div class="badge">{{hero.id}}</div> <div class="name">{{hero.name}}</div> <div class="saying">{{hero.saying}}</div> </div> </li> </ul> <div class="editarea"> <button (click)="enableAddMode()">Add New Hero</button> <div *ngIf="selectedHero"> <div class="editfields"> <div> <label>id: </label> <input [(ngModel)]="selectedHero.id" placeholder="id" *ngIf="addingHero" /> <label *ngIf="!addingHero" class="value">{{selectedHero.id}}</label> </div> <div> <label>name: </label> <input [(ngModel)]="selectedHero.name" placeholder="name" /> </div> <div> <label>saying: </label> <input [(ngModel)]="selectedHero.saying" placeholder="saying" /> </div> </div> <button (click)="cancel()">Cancel</button> <button (click)="save()">Save</button> </div> </div> </div>이제 HTML이 준비되었으므로 템플릿에서 조작할 수 있도록 heroes.component.ts 파일에 추가해야 합니다. 다음 코드는 구성 요소 파일에 템플릿을 추가합니다. 모든 데이터를 가져오기 위해 일부 Heroes를 가져오고 es 서비스 구성 요소를 초기화하는 생성자가 추가되었습니다. 또한 이 코드는 UI에서 이벤트를 처리하는 데 필요한 모든 메서드를 추가합니다. heroes.component.ts에 있는 기존 코드에 다음 코드를 복사할 수 있습니다. 해당 구성 요소를 아직 가져오지 않았기 때문에 Hero 및 HeroService 영역에 오류가 보일 것입니다. 이러한 오류는 다음 섹션에서 해결하겠습니다.
import { Component, OnInit } from '@angular/core'; @Component({ selector: 'app-heroes', templateUrl: './heroes.component.html', styleUrls: ['./heroes.component.scss'] }) export class HeroesComponent implements OnInit { addingHero = false; heroes: any = []; selectedHero: Hero; constructor(private heroService: HeroService) {} ngOnInit() { this.getHeroes(); } cancel() { this.addingHero = false; this.selectedHero = null; } deleteHero(hero: Hero) { this.heroService.deleteHero(hero).subscribe(res => { this.heroes = this.heroes.filter(h => h !== hero); if (this.selectedHero === hero) { this.selectedHero = null; } }); } getHeroes() { return this.heroService.getHeroes().subscribe(heroes => { this.heroes = heroes; }); } enableAddMode() { this.addingHero = true; this.selectedHero = new Hero(); } onSelect(hero: Hero) { this.addingHero = false; this.selectedHero = hero; } save() { if (this.addingHero) { this.heroService.addHero(this.selectedHero).subscribe(hero => { this.addingHero = false; this.selectedHero = null; this.heroes.push(hero); }); } else { this.heroService.updateHero(this.selectedHero).subscribe(hero => { this.addingHero = false; this.selectedHero = null; }); } } }탐색기에서 app/app.module.ts 파일을 열고
FormsModule에 대해 가져오기를 추가하도록 가져오기 섹션을 업데이트합니다. 가져오기 섹션은 다음과 같이 표시됩니다.imports: [ BrowserModule, FormsModule ],app/app.module.ts 파일에서 3줄의 새 FormsModule 모듈에 대해 가져오기를 추가합니다.
import { BrowserModule } from '@angular/platform-browser';
import { NgModule } from '@angular/core';
import { FormsModule } from '@angular/forms';
CSS를 사용하여 디자인 설정
탐색기 창에서 src/styles.scss 파일을 엽니다.
다음 코드를 styles.scss 파일에 복사하여 파일의 기존 내용을 대체합니다.
/* You can add global styles to this file, and also import other style files */

* {
  font-family: Arial;
}
h2 {
  color: #444;
  font-weight: lighter;
}
body {
  margin: 2em;
}

body,
input[text],
button {
  color: #888;
  // font-family: Cambria, Georgia;
}
button {
  font-size: 14px;
  font-family: Arial;
  background-color: #eee;
  border: none;
  padding: 5px 10px;
  border-radius: 4px;
  cursor: pointer;
  cursor: hand;
  &:hover {
    background-color: #cfd8dc;
  }
  &.delete-button {
    float: right;
    background-color: gray !important;
    background-color: rgb(216, 59, 1) !important;
    color: white;
    padding: 4px;
    position: relative;
    font-size: 12px;
  }
}
div {
  margin: .1em;
}

.selected {
  background-color: #cfd8dc !important;
  background-color: rgb(0, 120, 215) !important;
  color: white;
}

.heroes {
  float: left;
  margin: 0 0 2em 0;
  list-style-type: none;
  padding: 0;
  li {
    cursor: pointer;
    position: relative;
    left: 0;
    background-color: #eee;
    margin: .5em;
    padding: .5em;
    height: 3.0em;
    border-radius: 4px;
    width: 17em;
    &:hover {
      color: #607d8b;
      color: rgb(0, 120, 215);
      background-color: #ddd;
      left: .1em;
    }
    &.selected:hover {
      /*background-color: #BBD8DC !important;*/
      color: white;
    }
  }
  .text {
    position: relative;
    top: -3px;
  }
  .saying {
    margin: 5px 0;
  }
  .name {
    font-weight: bold;
  }
  .badge {
    /* display: inline-block; */
    float: left;
    font-size: small;
    color: white;
    padding: 0.7em 0.7em 0 0.5em;
    background-color: #607d8b;
    background-color: rgb(0, 120, 215);
    background-color:rgb(134, 183, 221);
    line-height: 1em;
    position: relative;
    left: -1px;
    top: -4px;
    height: 3.0em;
    margin-right: .8em;
    border-radius: 4px 0 0 4px;
    width: 1.2em;
  }
}

.header-bar {
  background-color: rgb(0, 120, 215);
  height: 4px;
  margin-top: 10px;
  margin-bottom: 10px;
}

label {
  display: inline-block;
  width: 4em;
  margin: .5em 0;
  color: #888;
  &.value {
    margin-left: 10px;
    font-size: 14px;
  }
}

input {
  height: 2em;
  font-size: 1em;
  padding-left: .4em;
  &::placeholder {
      color: lightgray;
      font-weight: normal;
      font-size: 12px;
      letter-spacing: 3px;
  }
}

.editarea {
  float: left;
  input {
    margin: 4px;
    height: 20px;
    color: rgb(0, 120, 215);
  }
  button {
    margin: 8px;
  }
  .editfields {
    margin-left: 12px;
  }
}
파일을 저장합니다.
구성 요소 표시
이제 구성 요소를 만들었으면 화면에 표시해보도록 하겠습니다. app.component.ts에서 기본 구성 요소를 수정하겠습니다.
탐색기 창에서 /app/app.component.ts를 열고, 제목을 Heroes로 변경하고, heroes.components.ts(app-heroes)에서 만든 구성 요소의 이름을 사용해서 새 구성 요소를 참조합니다. 이제 파일의 내용이 다음과 같이 표시됩니다.
import { Component } from '@angular/core';

@Component({
  selector: 'app-root',
  templateUrl: './app.component.html',
  styleUrls: ['./app.component.scss'],
  template: `
  <h1>Heroes</h1>
  <div class="header-bar"></div>
  <app-heroes></app-heroes>
`
})
export class AppComponent {
  title = 'app';
}
Hero 구성 요소와 마찬가지로 참조하는 heroes.components.ts에는 다른 구성 요소가 있으므로 그것도 만들어야 합니다. Angular CLI 명령 프롬프트에서 다음 명령을 사용하여 Hero 모델 및 hero.ts라는 파일을 만듭니다. 여기서 g=생성, cl=클래스, hero=클래스의 이름입니다.
ng g cl hero탐색기 창에서 src\app\hero.ts를 엽니다. hero.ts에서 ID, 이름을 포함한 Hero 클래스에 추가한 다음 코드로 파일의 내용을 바꿉니다.
export class Hero { id: number; name: string; saying: string; }heroes.components.ts로 돌아가서
selectedHero: Hero;줄(10줄),Hero에는 아래에 빨간색 선이 있습니다.Hero용어를 마우스 왼쪽 단추로 클릭하면 Visual Studio는 코드 블록의 왼쪽에 전구 모양 아이콘을 표시합니다.
전구를 클릭한 다음, "/app/hero"에서 Hero 가져오기 또는 "./hero"에서 Hero 가져오기를 클릭합니다(설정에 따라 메시지가 변경됨).
새 줄의 코드는 2줄에 표시됩니다. 2줄이 /app/hero를 참조하는 경우 로컬 폴더에서 Hero 파일을 참조하도록 수정합니다(./hero). 2줄은 다음과 같이 표시되어야 합니다.
import { Hero } from "./hero";그러면 모델로 사용할 수 있지만 서비스를 계속 만들어야 합니다.
서비스 만들기
Angular CLI 명령 프롬프트에서는 app.module.ts에서 Hero 서비스를 만드는 다음 명령을 입력합니다. 여기서 g=생성, s=서비스, hero=서비스 이름, -m=app.module에서 배치입니다.
ng g s hero -m app.moduleVisual Studio Code에서 heroes.components.ts로 돌아갑니다.
constructor(private heroService: HeroService) {}줄(13줄)에서HeroService의 아래에는 빨간색 선이 있습니다.HeroService를 클릭하면 코드 블록의 왼쪽에 전구 모양 아이콘이 생성됩니다. 전구 모양 아이콘을 클릭한 다음, "./hero.service "에서 HeroService 가져오기 또는 "/app/hero.service "에서 HeroService 가져오기를 클릭합니다.전구 모양 이아콘을 클릭하면 2줄에 새 코드 줄을 삽입합니다. 2줄이 /app/hero.service 폴더를 참조하는 경우 로컬 폴더에서 Hero 파일을 참조하도록 수정합니다(./hero.service). 2줄은 다음과 같이 표시되어야 합니다.
import { HeroService } from "./hero.service"Visual Studio Code에서 hero.service.ts를 열고 다음 코드를 복사하여 파일의 내용을 대체합니다.
import { Injectable } from '@angular/core';
import { HttpClient } from '@angular/common/http';

import { Hero } from './hero';

const api = '/api';

@Injectable()
export class HeroService {
  constructor(private http: HttpClient) {}

  getHeroes() {
    return this.http.get<Array<Hero>>(`${api}/heroes`)
  }

  deleteHero(hero: Hero) {
    return this.http.delete(`${api}/hero/${hero.id}`);
  }

  addHero(hero: Hero) {
    return this.http.post<Hero>(`${api}/hero/`, hero);
  }

  updateHero(hero: Hero) {
    return this.http.put<Hero>(`${api}/hero/${hero.id}`, hero);
  }
}
이 코드는 Angular에서 제공하는 HttpClient의 최신 버전을 사용합니다. 이 버전은 다음을 수행할 수 있도록 제공해야 하는 모듈입니다.
Visual Studio Code에서 app.module.ts를 열고 HttpClientModule을 포함하는 가져오기 섹션을 업데이트하여 HttpClientModule을 가져옵니다.
imports: [ BrowserModule, FormsModule, HttpClientModule ],app.module.ts에서 가져오기 목록인 HttpClientModule import 문을 추가합니다.
import { HttpClientModule } from '@angular/common/http';Visual Studio Code에서 모든 파일을 저장합니다.
앱 빌드
명령 프롬프트에서 Angular 애플리케이션을 빌드하는 다음 명령을 입력합니다.
ng b문제가 있는 경우 터미널 창에는 문제를 해결할 파일에 대한 정보가 표시됩니다. 빌드가 완료되면 새 파일은 dist 폴더에 만들어집니다. dist 폴더에서 새로운 파일을 검토할 수 있습니다.
이제 앱을 실행하겠습니다.
Visual Studio Code에서 왼쪽의 디버그 단추
 를 클릭한 다음, 디버깅 시작 단추
  를 클릭합니다.
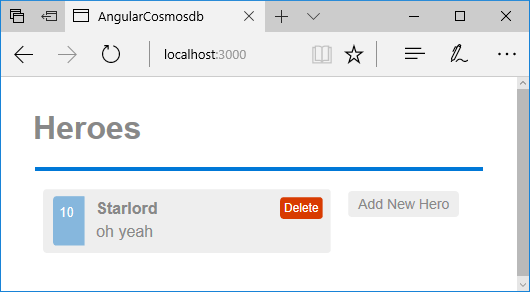
이제 인터넷 브라우저를 열고 localhost:3000으로 이동하고 로컬로 실행 중인 앱을 확인합니다.
다음 단계
자습서의 이 부분에서는 다음을 수행했습니다.
- Angular UI 빌드
- 로컬로 앱 테스트
Azure Cosmos DB 계정을 만드는 자습서의 다음 단계로 진행할 수 있습니다.
Azure Cosmos DB로 마이그레이션하기 위한 용량 계획을 수행하려고 하시나요? 용량 계획을 위해 기존 데이터베이스 클러스터에 대한 정보를 사용할 수 있습니다.
- 기존 데이터베이스 클러스터의 vCore 및 서버 수만을 알고 있는 경우, vCore 또는 vCPU를 사용하여 요청 단위 추정을 참조하세요
- 현재 데이터베이스 워크로드에 대한 일반적인 요청 비율을 알고 있는 경우 Azure Cosmos DB 용량 계획 도구를 사용하여 요청 단위 예측에 대해 읽어보세요.