Windows アプリで SQL Server データベースを使用する
アプリで System.Data.SqlClient 名前空間のクラスを使用して、SQL Server データベースに直接接続し、データを保存および取得することができます。
作業の開始
このガイドでは、Windows アプリ SDK アプリでこれを行う方法の 1 つを示します。 Northwind サンプル データベースを SQL Server インスタンスにインストールし、ここで示すスニペットを使用して、Northwind サンプルのデータベースから取得した製品を表示する基本的な UI を作成します。

このガイドで示すスニペットは、この UWP サンプル アプリに基づいています。
まず、ソリューションをセットアップします。
アプリを SQL Server データベースに直接接続するために、アプリは、Windows アプリ SDK でサポートされているいずれの最小バージョンの Windows も対象にできます。 プロジェクトのプロパティ ページにその情報があります。
- マニフェスト デザイナーで、Windows アプリ SDK プロジェクトの Package.appxmanifest ファイルを開きます。
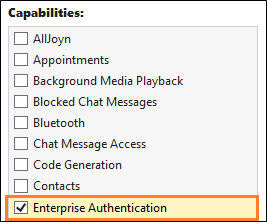
- Windows 認証を使用してご利用の SQL Server を認証する場合は、 [機能] タブで [エンタープライズ認証] チェックボックスを選択します。

重要
また、Windows 認証を使用しているかどうかにかかわらず、インターネット (クライアントとサーバー)、インターネット (クライアント)、およびプライベート ネットワーク (クライアントとサーバー) を選択する必要があります。
SQL Server データベースのデータの追加と取得
このセクションでは、以下のことを行います。
1️⃣ 接続文字列を追加します。
2️⃣ 製品データを保持するクラスを作成します。
3️⃣ SQL Server データベースから製品を取得します。
4️⃣ 基本的なユーザー インターフェイスを追加します。
5️⃣ UI に製品を追加します。
注意
このセクションでは、データ アクセス コードを編成する方法の 1 つを示します。 つまり、System.Data.SqlClient を使用して、SQL Server データベースのデータを保存および取得する方法の例を示すだけです。 アプリケーションの設計に最も適した方法でコードを編成してください。
接続文字列を追加する
App.xaml.cs ファイルで、App クラスにプロパティを追加します。これにより、ソリューションに含まれる他のクラスが接続文字列にアクセスできるようになります。
接続文字列は、SQL Server Express のインスタンスの Northwind データベースを指しています。 このスニペットの接続文字列は、SQL Server Express のインストール時に既定のインスタンス名SQLEXPRESSを保持していることを前提としています。 SQL Server インスタンス、データベース、および認証方法に合わせて、接続文字列に変更を加えることができます。
sealed partial class App : Application
{
    // Connection string for using Windows Authentication.
    private string connectionString =
        @"Data Source=.\SQLEXPRESS;Initial Catalog=NORTHWIND;Integrated Security=SSPI";

    public string ConnectionString { get => connectionString; set => connectionString = value; }

    ...
}
重要
運用アプリケーションでは、接続情報をアプリ構成に安全に格納する必要があります (「Visual Studio 接続済みサービスを使用して Azure App Configuration を追加する」を参照してください)。 接続文字列やその他のシークレットは、ハードコーディングしないでください。
製品データを保持するクラスを作成する
XAML UI でこのクラスのプロパティに属性をバインドできるように、INotifyPropertyChanged イベントを実装するクラスを作成します。
public class Product : INotifyPropertyChanged
{
    public int ProductID { get; set; }
    public string ProductCode { get { return ProductID.ToString(); } }
    public string ProductName { get; set; }
    public string QuantityPerUnit { get; set; }
    public decimal UnitPrice { get; set; }
    public string UnitPriceString { get { return UnitPrice.ToString("######.00"); } }
    public int UnitsInStock { get; set; }
    public string UnitsInStockString { get { return UnitsInStock.ToString("#####0"); } }
    public int CategoryId { get; set; }

    public event PropertyChangedEventHandler PropertyChanged;
    private void NotifyPropertyChanged(string propertyName)
    {
        PropertyChanged?.Invoke(this, new PropertyChangedEventArgs(propertyName));
    }
}
SQL Server データベースから製品を取得します。
Windows アプリ SDK プロジェクトの MainWindow.xaml.cs ファイルで、Northwind サンプル データベースから製品を取得し、Product インスタンスの ObservableCollection コレクションとしてそれらを返すメソッドを作成します。
public ObservableCollection<Product> GetProducts(string connectionString)
{
    const string GetProductsQuery = "select ProductID, ProductName, QuantityPerUnit," +
       " UnitPrice, UnitsInStock, Products.CategoryID " +
       " from Products inner join Categories on Products.CategoryID = Categories.CategoryID " +
       " where Discontinued = 0";

    var products = new ObservableCollection<Product>();
    try
    {
        using (var conn = new SqlConnection(connectionString))
        {
            conn.Open();
            if (conn.State == System.Data.ConnectionState.Open)
            {
                using (SqlCommand cmd = conn.CreateCommand())
                {
                    cmd.CommandText = GetProductsQuery;
                    using (SqlDataReader reader = cmd.ExecuteReader())
                    {
                        while (reader.Read())
                        {
                            var product = new Product();
                            product.ProductID = reader.GetInt32(0);
                            product.ProductName = reader.GetString(1);
                            product.QuantityPerUnit = reader.GetString(2);
                            product.UnitPrice = reader.GetDecimal(3);
                            product.UnitsInStock = reader.GetInt16(4);
                            product.CategoryId = reader.GetInt32(5);
                            products.Add(product);
                        }
                    }
                }
            }
        }
        return products;
    }
    catch (Exception eSql)
    {
        Debug.WriteLine($"Exception: {eSql.Message}");
    }
    return null;
}
基本的なユーザー インターフェイスを追加する
Windows アプリ SDK プロジェクトの MainWindow.xaml ファイルに、次の XAML を追加します。
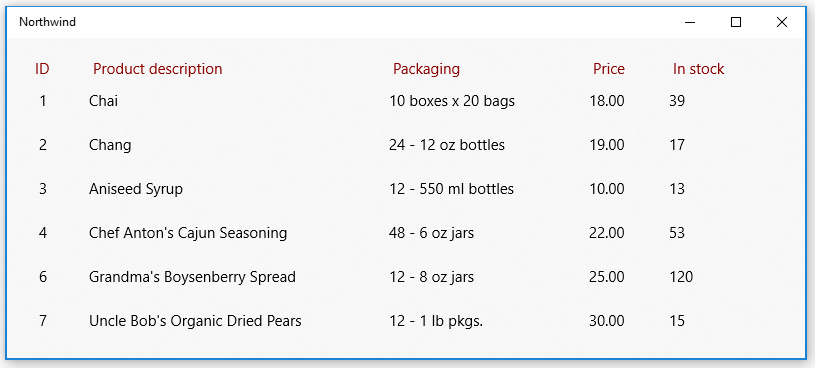
この XAML は、前のスニペットで返した各製品を表示する ListView を作成し、 ListView の各行の属性を、 Product クラスで定義したプロパティにバインドします。
<Grid Background="{ThemeResource SystemControlAcrylicWindowBrush}">
    <RelativePanel>
        <ListView Name="InventoryList"
                  SelectionMode="Single"
                  ScrollViewer.VerticalScrollBarVisibility="Auto"
                  ScrollViewer.IsVerticalRailEnabled="True"
                  ScrollViewer.VerticalScrollMode="Enabled"
                  ScrollViewer.HorizontalScrollMode="Enabled"
                  ScrollViewer.HorizontalScrollBarVisibility="Auto"
                  ScrollViewer.IsHorizontalRailEnabled="True"
                  Margin="20">
            <ListView.HeaderTemplate>
                <DataTemplate>
                    <StackPanel Orientation="Horizontal"  >
                        <TextBlock Text="ID" Margin="8,0" Width="50" Foreground="DarkRed" />
                        <TextBlock Text="Product description" Width="300" Foreground="DarkRed" />
                        <TextBlock Text="Packaging" Width="200" Foreground="DarkRed" />
                        <TextBlock Text="Price" Width="80" Foreground="DarkRed" />
                        <TextBlock Text="In stock" Width="80" Foreground="DarkRed" />
                    </StackPanel>
                </DataTemplate>
            </ListView.HeaderTemplate>
            <ListView.ItemTemplate>
                <DataTemplate x:DataType="local:Product">
                    <StackPanel Orientation="Horizontal" >
                        <TextBlock Name="ItemId"
                                    Text="{x:Bind ProductCode}"
                                    Width="50" />
                        <TextBlock Name="ItemName"
                                    Text="{x:Bind ProductName}"
                                    Width="300" />
                        <TextBlock Text="{x:Bind QuantityPerUnit}"
                                   Width="200" />
                        <TextBlock Text="{x:Bind UnitPriceString}"
                                   Width="80" />
                        <TextBlock Text="{x:Bind UnitsInStockString}"
                                   Width="80" />
                    </StackPanel>
                </DataTemplate>
            </ListView.ItemTemplate>
        </ListView>
    </RelativePanel>
</Grid>
ListView で製品を表示する
MainWindow.xaml.cs ファイルを開き、ListView の ItemSource プロパティを Product インスタンスの ObservableCollection に設定するコードを、MainWindow クラスのコンストラクターに追加します。
public MainWindow()
{
    this.InitializeComponent();
    InventoryList.ItemsSource = GetProducts((App.Current as App).ConnectionString);
}
プロジェクトを開始すると、Northwind サンプル データベースから取得した製品が UI に表示されます。

System.Data.SqlClient 名前空間を調べて、SQL Server データベース内のデータを使用して他に何ができるかを確認してください。
ヒント
SQL クエリのヘルプについては、 Microsoft Copilot に問い合わせてください。 Copilot は、SQL クエリを記述し、コードを改善する方法を提案するのに役立ちます。
データベースへの接続で問題が発生した場合
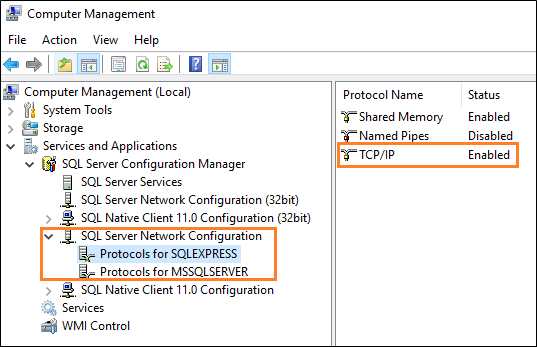
ほとんどの場合、SQL Server 構成のいくつかの側面を変更する必要があります。 Windows フォームや WPF アプリケーションなどの別の種類のデスクトップ アプリケーションからデータベースに接続できる場合は、SQL Server の TCP/IP を有効にしていることを確認します。 これは、コンピューターの管理コンソールで行うことができます。 (詳細については、「Windows ツール/管理ツール」を参照してください。)

次に、SQL Server Browser サービスが実行されていることを確認します。

次のステップ
Windows developer
