ADO.NET を使用して単純なデータ アプリケーションを作成する
手記
データセットと関連クラスは、アプリケーションがデータベースから切断されている間にアプリケーションがメモリ内のデータを操作できるようにする、2000 年代初頭のレガシ .NET Framework テクノロジです。 このテクノロジは、ユーザーがデータを変更し、変更をデータベースに保持できるアプリケーションに特に役立ちます。 データセットは非常に成功したテクノロジであることが証明されていますが、新しい .NET アプリケーションでは Entity Framework Core 使用することをお勧めします。 Entity Framework は、オブジェクト モデルとして表形式データを操作するより自然な方法を提供し、より簡単なプログラミング インターフェイスを備えています。
データベース内のデータを操作するアプリケーションを作成するときは、接続文字列の定義、データの挿入、ストアド プロシージャの実行などの基本的なタスクを実行します。 このトピックに従うことで、Visual C# または Visual Basic と ADO.NET を使用して、単純な Windows フォーム "データ経由のフォーム" アプリケーション内からデータベースを操作する方法を確認できます。 データセット、LINQ to SQL、Entity Framework を含むすべての .NET データ テクノロジは、最終的に、この記事に示すような手順を実行します。
この記事では、データベースからデータをすばやく取得する簡単な方法を示します。 アプリケーションで非一般的な方法でデータを変更し、データベースを更新する必要がある場合は、Entity Framework を使用し、データ バインディングを使用して、ユーザー インターフェイス コントロールを基になるデータの変更に自動的に同期することを検討する必要があります。
重要
コードをシンプルに保つために、運用環境に対応した例外処理は含まれません。
手記
このチュートリアルの完全なコードは、Visual Studio ドキュメントGitHub リポジトリで C# および Visual Basicをアクセスできます。
前提 条件
アプリケーションを作成するには、次のものが必要です。
.NET デスクトップ開発 と データ ストレージと処理 ワークロードがインストールされている Visual Studio。 それらをインストールするには、Visual Studio インストーラー を開き、変更したい Visual Studio のバージョンの横にある [ 変更] または [その他の>変更] を選択します。
SQL Server Express LocalDB。 SQL Server Express LocalDB がない場合は、SQL Server ダウンロード ページからインストール。
このトピックでは、Visual Studio IDE の基本的な機能を理解しており、Windows フォーム アプリケーションの作成、プロジェクトへのフォームの追加、フォームへのボタンやその他のコントロールの配置、コントロールのプロパティの設定、および単純なイベントのコードを作成できることを前提としています。 これらのタスクに慣れていない場合は、このチュートリアルを開始する前に、「Visual Studio で Windows フォーム アプリを作成する」Visual Basic チュートリアルまたは「C# を使用して Visual Studio で Windows フォーム アプリを作成する」チュートリアルを完了することをお勧めします。
サンプル データベースを設定する
次の手順に従って、サンプル データベースを作成します。
Visual Studio で、Server Explorer ウィンドウを開きます。
データ接続 を右クリックし、[新しい SQL Server データベース 作成] を選択します。
[サーバー名 テキスト ボックスに、「(localdb)\mssqllocaldb」と入力します。
[新しいデータベース名 テキスト ボックスに「Sales」と入力し、[OK] を選択します。
空の Sales データベースが作成され、サーバー エクスプローラーの [データ接続] ノードに追加されます。
[Sales] データ接続を右クリックし、[新しいクエリ] を選択します。
クエリ エディター ウィンドウが開きます。
Sales Transact-SQL スクリプト をクリップボードにコピーします。
T-SQL スクリプトをクエリ エディターに貼り付け、[ 実行] ボタンを選択します。
しばらくすると、クエリの実行が完了し、データベース オブジェクトが作成されます。 データベースには、Customer と Orders の 2 つのテーブルが含まれています。 これらのテーブルには最初はデータが含まれていませんが、作成したアプリケーションを実行するときにデータを追加できます。 データベースには、4 つの単純なストアド プロシージャも含まれています。
フォームを作成してコントロールを追加する
Windows フォーム アプリ (.NET Framework) テンプレートを使用して C# または Visual Basic プロジェクトを作成し、それに SimpleDataAppという名前を付けます。
Visual Studio では、プロジェクトと、Form1 という名前の空の Windows フォーム含む複数のファイルが作成されます。
プロジェクトに 2 つの Windows フォームを追加して、3 つのフォームを含め、次の名前を付けます。
ナビゲーション
新規顧客
FillOrCancel
フォームごとに、次の図に示すテキスト ボックス、ボタン、およびその他のコントロールを追加します。 各コントロールに対して、テーブルに記述されるプロパティを設定します。
手記
グループ ボックスとラベル コントロールはわかりやすくしますが、コードでは使用されません。
Navigation フォーム
ナビゲーションの
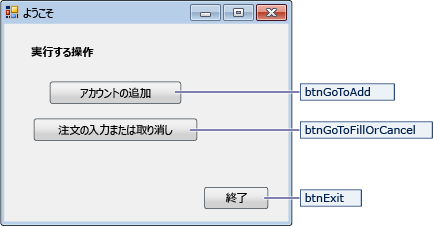
| ナビゲーション フォームのコントロール | プロパティ |
|---|---|
| ボタン | Name = btnGoToAdd |
| ボタン | Name = btnGoToFillOrCancel |
| ボタン | Name = btnExit |
NewCustomer フォーム
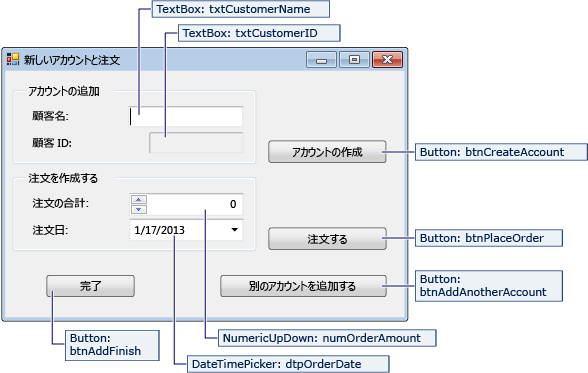
| NewCustomer フォームのコントロール | 特性 |
|---|---|
| テキストボックス | Name = txtCustomerName |
| テキストボックス | Name = txtCustomerID Readonly = True |
| ボタン | Name = btnCreateAccount |
| NumericUpdown | DecimalPlaces = 0 最大 = 5000 Name = numOrderAmount |
| DateTimePicker | Format = Short Name = dtpOrderDate |
| ボタン | Name = btnPlaceOrder |
| ボタン | Name = btnAddAnotherAccount |
| ボタン | Name = btnAddFinish |
FillOrCancel フォーム
注文 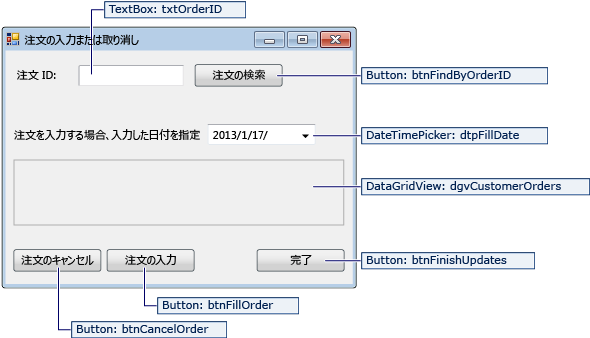 を入力または取り消す
| FillOrCancel フォームのコントロール | プロパティ |
|---|---|
| テキストボックス | Name = txtOrderID |
| ボタン | Name = btnFindByOrderID |
| DateTimePicker | Format = Short Name = dtpFillDate |
| DataGridView(データグリッドビュー) | Name = dgvCustomerOrders Readonly = True RowHeadersVisible = False |
| ボタン | Name = btnCancelOrder |
| ボタン | Name = btnFillOrder |
| ボタン | Name = btnFinishUpdates |
接続文字列を格納する
アプリケーションがデータベースへの接続を開こうとすると、アプリケーションは接続文字列にアクセスできる必要があります。 各フォームに文字列を手動で入力しないようにするには、プロジェクトの App.config ファイルに文字列を格納し、アプリケーション内の任意のフォームからメソッドが呼び出されたときに文字列を返すメソッドを作成します。
接続文字列を見つけるには、Server Explorer で Sales データ接続を右クリックし、[プロパティ] 選択します。 ConnectionString プロパティを探し、Ctrl +ACtrl+C を使用して文字列を選択し、クリップボードにコピーします。
C# を使用している場合は、ソリューション エクスプローラー で、プロジェクトの プロパティ ノードを展開し、Settings.settings ファイルを開きます。 Visual Basic を使用している場合は、ソリューション エクスプローラーの 、[すべてのファイルの表示] をクリックし、[マイ プロジェクトの ] ノード 展開して、[Settings.settings ファイルを開きます。
[名] 列に「
connString」と入力します。[の種類] 一覧で、[(接続文字列)を選択します。
[スコープ] の一覧で、[アプリケーション] を選択します。
[値 列に接続文字列を入力し (外部引用符を使用せずに)、変更を保存します。
Settings.settingsスクリーンショット
注意
実際のアプリケーションでは、「接続文字列と構成ファイル 説明されているように、接続文字列を安全に格納する必要があります。 最適なセキュリティを確保するには、パスワードを接続文字列に格納することに依存しない認証方法 (オンプレミスの SQL Server データベースの Windows 認証など) を使用します。 「接続文字列保存および編集する」を参照してください。
フォームのコードを記述する
このセクションでは、各フォームの機能の概要について簡単に説明します。 また、フォーム上のボタンがクリックされたときに基になるロジックを定義するコードも提供します。
ナビゲーション フォーム
アプリケーションを実行すると、ナビゲーション フォームが開きます。 アカウントを追加 ボタンをクリックすると、NewCustomerフォームが開きます。 [注文の入力または取り消し] ボタンは FillOrCancel フォームを開きます。 [終了] ボタンをクリックすると、アプリケーションが閉じます。
ナビゲーション フォームをスタートアップ フォームにする
C# を使用している場合は、ソリューション エクスプローラー で Program.csを開き、Application.Run 行を次の行に変更します Application.Run(new Navigation());
Visual Basic を使用している場合は、ソリューション エクスプローラー で[プロパティ] ウィンドウを開き、[アプリケーション] タブを選択し、[スタートアップ] フォーム 一覧で [SimpleDataApp.Navigation] 選択します。
自動生成されたイベント ハンドラーを作成する
ナビゲーション フォームの 3 つのボタンをダブルクリックして、空のイベント ハンドラー メソッドを作成します。 ボタンをダブルクリックすると、デザイナー コード ファイルに自動生成されたコードも追加されます。これにより、ボタン クリックによってイベントが発生します。
手記
デザイナーでダブルクリック アクションをスキップし、コードをコピーしてコード ファイルに貼り付けるだけの場合は、イベント ハンドラーを適切なメソッドに設定することを忘れないでください。 プロパティ ウィンドウでこれを行うことができます。 [イベント] タブに切り替えて、稲妻ツールバーのボタンを使用し、クリック ハンドラーを探します。
ナビゲーション フォーム ロジックのコードを追加する
ナビゲーション フォームのコード ページで、次のコードに示すように、3 つのボタンクリック イベント ハンドラーのメソッド本体を完成させます。
/// <summary>
/// Opens the NewCustomer form as a dialog box,
/// which returns focus to the calling form when it is closed.
/// </summary>
private void btnGoToAdd_Click(object sender, EventArgs e)
{
    Form frm = new NewCustomer();
    frm.Show();
}

/// <summary>
/// Opens the FillorCancel form as a dialog box.
/// </summary>
private void btnGoToFillOrCancel_Click(object sender, EventArgs e)
{
    Form frm = new FillOrCancel();
    frm.ShowDialog();
}

/// <summary>
/// Closes the application (not just the Navigation form).
/// </summary>
private void btnExit_Click(object sender, EventArgs e)
{
    this.Close();
}
手記
このチュートリアルのコードは、C# と Visual Basic で使用できます。 このページのコード言語を C# と Visual Basic の間で切り替えるには、各コード例の上部にあるコード言語スイッチャーを使用します。
新規顧客フォーム
顧客名を入力し、[アカウント の作成] ボタン 選択すると、NewCustomer フォームによって顧客アカウントが作成され、SQL Server は新しい顧客 ID として IDENTITY 値を返します。 その後、金額と注文日を指定し、注文 ボタンを選択して、新しいアカウントの注文を行うことができます。
自動生成されたイベント ハンドラーを作成する
4 つの各ボタンをダブルクリックして、NewCustomer フォームの各ボタンに空の Click イベント ハンドラーを作成します。 ボタンをダブルクリックすると、デザイナー コード ファイルに自動生成されたコードも追加されます。これにより、ボタン クリックによってイベントが発生します。
NewCustomer フォーム ロジックのコードを追加する
NewCustomer フォーム ロジックを完了するには、次の手順に従います。
System.Data.SqlClient名前空間をスコープに取り込み、メンバーの名前を完全に修飾する必要がないようにします。次のコードに示すように、いくつかの変数とヘルパー メソッドをクラスに追加します。
// Storage for IDENTITY values returned from database. private int parsedCustomerID; private int orderID; /// <summary> /// Verifies that the customer name text box is not empty. /// </summary> private bool IsCustomerNameValid() { if (txtCustomerName.Text == "") { MessageBox.Show("Please enter a name."); return false; } else { return true; } } /// <summary> /// Verifies that a customer ID and order amount have been provided. /// </summary> private bool IsOrderDataValid() { // Verify that CustomerID is present. if (txtCustomerID.Text == "") { MessageBox.Show("Please create customer account before placing order."); return false; } // Verify that Amount isn't 0. else if ((numOrderAmount.Value < 1)) { MessageBox.Show("Please specify an order amount."); return false; } else { // Order can be submitted. return true; } } /// <summary> /// Clears the form data. /// </summary> private void ClearForm() { txtCustomerName.Clear(); txtCustomerID.Clear(); dtpOrderDate.Value = DateTime.Now; numOrderAmount.Value = 0; this.parsedCustomerID = 0; }次のコードに示すように、4 つのボタンクリック イベント ハンドラーのメソッド本体を完了します。
/// <summary>
/// Creates a new customer by calling the Sales.uspNewCustomer stored procedure.
/// </summary>
private void btnCreateAccount_Click(object sender, EventArgs e)
{
    if (IsCustomerNameValid())
    {
        // Create the connection.
        using (SqlConnection connection = new SqlConnection(Properties.Settings.Default.connString))
        {
            // Create a SqlCommand, and identify it as a stored procedure.
            using (SqlCommand sqlCommand = new SqlCommand("Sales.uspNewCustomer", connection))
            {
                sqlCommand.CommandType = CommandType.StoredProcedure;

                // Add input parameter for the stored procedure and specify what to use as its value.
                sqlCommand.Parameters.Add(new SqlParameter("@CustomerName", SqlDbType.NVarChar, 40));
                sqlCommand.Parameters["@CustomerName"].Value = txtCustomerName.Text;

                // Add the output parameter.
                sqlCommand.Parameters.Add(new SqlParameter("@CustomerID", SqlDbType.Int));
                sqlCommand.Parameters["@CustomerID"].Direction = ParameterDirection.Output;

                try
                {
                    connection.Open();

                    // Run the stored procedure.
                    sqlCommand.ExecuteNonQuery();

                    // Customer ID is an IDENTITY value from the database.
                    this.parsedCustomerID = (int)sqlCommand.Parameters["@CustomerID"].Value;

                    // Put the Customer ID value into the read-only text box.
                    this.txtCustomerID.Text = Convert.ToString(parsedCustomerID);
                }
                catch
                {
                    MessageBox.Show("Customer ID was not returned. Account could not be created.");
                }
                finally
                {
                    connection.Close();
                }
            }
        }
    }
}

/// <summary>
/// Calls the Sales.uspPlaceNewOrder stored procedure to place an order.
/// </summary>
private void btnPlaceOrder_Click(object sender, EventArgs e)
{
    // Ensure the required input is present.
    if (IsOrderDataValid())
    {
        // Create the connection.
        using (SqlConnection connection = new SqlConnection(Properties.Settings.Default.connString))
        {
            // Create SqlCommand and identify it as a stored procedure.
            using (SqlCommand sqlCommand = new SqlCommand("Sales.uspPlaceNewOrder", connection))
            {
                sqlCommand.CommandType = CommandType.StoredProcedure;

                // Add the @CustomerID input parameter, which was obtained from uspNewCustomer.
                sqlCommand.Parameters.Add(new SqlParameter("@CustomerID", SqlDbType.Int));
                sqlCommand.Parameters["@CustomerID"].Value = this.parsedCustomerID;

                // Add the @OrderDate input parameter.
                sqlCommand.Parameters.Add(new SqlParameter("@OrderDate", SqlDbType.DateTime, 8));
                sqlCommand.Parameters["@OrderDate"].Value = dtpOrderDate.Value;

                // Add the @Amount order amount input parameter.
                sqlCommand.Parameters.Add(new SqlParameter("@Amount", SqlDbType.Int));
                sqlCommand.Parameters["@Amount"].Value = numOrderAmount.Value;

                // Add the @Status order status input parameter.
                // For a new order, the status is always O (open).
                sqlCommand.Parameters.Add(new SqlParameter("@Status", SqlDbType.Char, 1));
                sqlCommand.Parameters["@Status"].Value = "O";

                // Add the return value for the stored procedure, which is  the order ID.
                sqlCommand.Parameters.Add(new SqlParameter("@RC", SqlDbType.Int));
                sqlCommand.Parameters["@RC"].Direction = ParameterDirection.ReturnValue;

                try
                {
                    //Open connection.
                    connection.Open();

                    // Run the stored procedure.
                    sqlCommand.ExecuteNonQuery();

                    // Display the order number.
                    this.orderID = (int)sqlCommand.Parameters["@RC"].Value;
                    MessageBox.Show("Order number " + this.orderID + " has been submitted.");
                }
                catch
                {
                    MessageBox.Show("Order could not be placed.");
                }
                finally
                {
                    connection.Close();
                }
            }
        }
    }
}

/// <summary>
/// Clears the form data so another new account can be created.
/// </summary>
private void btnAddAnotherAccount_Click(object sender, EventArgs e)
{
    this.ClearForm();
}

/// <summary>
/// Closes the form/dialog box.
/// </summary>
private void btnAddFinish_Click(object sender, EventArgs e)
{
    this.Close();
}
FillOrCancel フォーム
FillOrCancel フォームは、注文 ID を入力し、その後に [注文の検索] ボタン を選択すると、注文を表示するクエリを実行します。 返された行は、読み取り専用のデータ グリッドに表示されます。 [注文をキャンセル ] ボタンを選択した場合、注文をキャンセル済み (X) としてマークできます。または、[注文を完了 ] ボタンを選択した場合、注文を完了 (F) としてマークできます。 [注文検索] ボタンをもう一度選択すると、更新された行が表示されます。
自動生成されたイベント ハンドラーを作成する
ボタンをダブルクリックして、FillOrCancel フォームの 4 つのボタンの空の Click イベント ハンドラーを作成します。 ボタンをダブルクリックすると、デザイナー コード ファイルに自動生成されたコードも追加されます。これにより、ボタン クリックによってイベントが発生します。
FillOrCancel フォーム ロジックのコードを追加する
FillOrCancel フォーム ロジックを完了するには、次の手順に従います。
メンバーの名前を完全修飾する必要がなくなるように、次の 2 つの名前空間を範囲に含めます。
次のコードに示すように、変数とヘルパー メソッドをクラスに追加します。
// Storage for the order ID value. private int parsedOrderID; /// <summary> /// Verifies that an order ID is present and contains valid characters. /// </summary> private bool IsOrderIDValid() { // Check for input in the Order ID text box. if (txtOrderID.Text == "") { MessageBox.Show("Please specify the Order ID."); return false; } // Check for characters other than integers. else if (Regex.IsMatch(txtOrderID.Text, @"^\D*$")) { // Show message and clear input. MessageBox.Show("Customer ID must contain only numbers."); txtOrderID.Clear(); return false; } else { // Convert the text in the text box to an integer to send to the database. parsedOrderID = Int32.Parse(txtOrderID.Text); return true; } }次のコードに示すように、4 つのボタンクリック イベント ハンドラーのメソッド本体を完了します。
/// <summary>
/// Executes a t-SQL SELECT statement to obtain order data for a specified
/// order ID, then displays it in the DataGridView on the form.
/// </summary>
private void btnFindByOrderID_Click(object sender, EventArgs e)
{
    if (IsOrderIDValid())
    {
        using (SqlConnection connection = new SqlConnection(Properties.Settings.Default.connString))
        {
            // Define a t-SQL query string that has a parameter for orderID.
            const string sql = "SELECT * FROM Sales.Orders WHERE orderID = @orderID";

            // Create a SqlCommand object.
            using (SqlCommand sqlCommand = new SqlCommand(sql, connection))
            {
                // Define the @orderID parameter and set its value.
                sqlCommand.Parameters.Add(new SqlParameter("@orderID", SqlDbType.Int));
                sqlCommand.Parameters["@orderID"].Value = parsedOrderID;

                try
                {
                    connection.Open();

                    // Run the query by calling ExecuteReader().
                    using (SqlDataReader dataReader = sqlCommand.ExecuteReader())
                    {
                        // Create a data table to hold the retrieved data.
                        DataTable dataTable = new DataTable();

                        // Load the data from SqlDataReader into the data table.
                        dataTable.Load(dataReader);

                        // Display the data from the data table in the data grid view.
                        this.dgvCustomerOrders.DataSource = dataTable;

                        // Close the SqlDataReader.
                        dataReader.Close();
                    }
                }
                catch
                {
                    MessageBox.Show("The requested order could not be loaded into the form.");
                }
                finally
                {
                    // Close the connection.
                    connection.Close();
                }
            }
        }
    }
}

/// <summary>
/// Cancels an order by calling the Sales.uspCancelOrder
/// stored procedure on the database.
/// </summary>
private void btnCancelOrder_Click(object sender, EventArgs e)
{
    if (IsOrderIDValid())
    {
        // Create the connection.
        using (SqlConnection connection = new SqlConnection(Properties.Settings.Default.connString))
        {
            // Create the SqlCommand object and identify it as a stored procedure.
            using (SqlCommand sqlCommand = new SqlCommand("Sales.uspCancelOrder", connection))
            {
                sqlCommand.CommandType = CommandType.StoredProcedure;

                // Add the order ID input parameter for the stored procedure.
                sqlCommand.Parameters.Add(new SqlParameter("@orderID", SqlDbType.Int));
                sqlCommand.Parameters["@orderID"].Value = parsedOrderID;

                try
                {
                    // Open the connection.
                    connection.Open();

                    // Run the command to execute the stored procedure.
                    sqlCommand.ExecuteNonQuery();
                }
                catch
                {
                    MessageBox.Show("The cancel operation was not completed.");
                }
                finally
                {
                    // Close connection.
                    connection.Close();
                }
            }
        }
    }
}

/// <summary>
/// Fills an order by calling the Sales.uspFillOrder stored
/// procedure on the database.
/// </summary>
private void btnFillOrder_Click(object sender, EventArgs e)
{
    if (IsOrderIDValid())
    {
        // Create the connection.
        using (SqlConnection connection = new SqlConnection(Properties.Settings.Default.connString))
        {
            // Create command and identify it as a stored procedure.
            using (SqlCommand sqlCommand = new SqlCommand("Sales.uspFillOrder", connection))
            {
                sqlCommand.CommandType = CommandType.StoredProcedure;

                // Add the order ID input parameter for the stored procedure.
                sqlCommand.Parameters.Add(new SqlParameter("@orderID", SqlDbType.Int));
                sqlCommand.Parameters["@orderID"].Value = parsedOrderID;

                // Add the filled date input parameter for the stored procedure.
                sqlCommand.Parameters.Add(new SqlParameter("@FilledDate", SqlDbType.DateTime, 8));
                sqlCommand.Parameters["@FilledDate"].Value = dtpFillDate.Value;

                try
                {
                    connection.Open();

                    // Execute the stored procedure.
                    sqlCommand.ExecuteNonQuery();
                }
                catch
                {
                    MessageBox.Show("The fill operation was not completed.");
                }
                finally
                {
                    // Close the connection.
                    connection.Close();
                }
            }
        }
    }
}

/// <summary>
/// Closes the form.
/// </summary>
private void btnFinishUpdates_Click(object sender, EventArgs e)
{
    this.Close();
}
アプリケーションをテストする
アプリケーションを実行し、いくつかの顧客と注文を作成して、すべてが期待どおりに動作していることを確認します。 データベースが変更内容で更新されたことを確認するには、サーバー エクスプローラーで テーブル ノードを開き、顧客 ノードと Orders ノードを右クリックし、[テーブル データの表示] 選択します。