SkiaSharp 線状グラデーション
SKPaint クラスは、単色で線を引いたり、領域を塗りつぶしたりするために使用する Color プロパティを定義します。 または、色が段階的にブレンドされた "グラデーション" で線を引いたり、領域を塗りつぶしたりすることもできます。

グラデーションの最も基本的な種類は、"線状" グラデーションです。 色のブレンドは、ある点から別の点への線 ("グラデーション線" と呼ばれます) で発生します。 グラデーション線に対して垂直方向の色は同じです。 2 つの静的 SKShader.CreateLinearGradient メソッドのいずれかを使用して線状グラデーションを作成します。 2 つのオーバーロードは、行列変換を一方は含み、もう一方は含まないという点で異なります。
これらのメソッドは、SKPaint の Shader プロパティに設定した SKShader 型のオブジェクトを返します。 Shader プロパティが null 値以外の場合は、Color プロパティをオーバーライドします。 この SKPaint オブジェクトを使用して引かれた線や塗りつぶされた領域のベースは、単色ではなくグラデーションになります。
Note
DrawBitmap 呼び出しに SKPaint オブジェクトを含めると、Shader プロパティは無視されます。 SKPaint の Color プロパティを使用すると、ビットマップを表示するための透明度レベルを設定できますが (「SkiaSharp ビットマップの表示」を参照)、透明度を持つグラデーションでビットマップを表示する Shader プロパティは使用できません。 透明度を持つグラデーションでビットマップを表示するには、その他の手法も使用できます。これらは、SkiaSharp の円形グラデーションおよび SkiaSharp の合成モードとブレンド モードに関する記事で説明されています。
隅から隅へのグラデーション
多くの場合、線状グラデーションは四角形の 1 つの隅から別の隅に向かって延びています。 始点が四角形の左上隅である場合、グラデーションを次に向かって延ばすことができます。
- 左下隅に向かって垂直方向
- 右上隅に向かって水平方向
- 右下隅に向かって対角線方向
対角線方向の線状グラデーションは、サンプルの SkiaSharp シェーダーとその他の効果に関するセクションの最初のページで示されています。 [Corner-to-Corner Gradient] (隅から隅へのグラデーション) ページでは、コンストラクターに SKCanvasView が作成されます。 PaintSurface ハンドラーは、using ステートメントに SKPaint オブジェクトを作成し、キャンバスの中央に 300 ピクセルの四角形を定義します。
public class CornerToCornerGradientPage : ContentPage
{
    ···
    public CornerToCornerGradientPage ()
    {
        Title = "Corner-to-Corner Gradient";

        SKCanvasView canvasView = new SKCanvasView();
        canvasView.PaintSurface += OnCanvasViewPaintSurface;
        Content = canvasView;
        ···
    }

    void OnCanvasViewPaintSurface(object sender, SKPaintSurfaceEventArgs args)
    {
        SKImageInfo info = args.Info;
        SKSurface surface = args.Surface;
        SKCanvas canvas = surface.Canvas;

        canvas.Clear();

        using (SKPaint paint = new SKPaint())
        {
            // Create 300-pixel square centered rectangle
            float x = (info.Width - 300) / 2;
            float y = (info.Height - 300) / 2;
            SKRect rect = new SKRect(x, y, x + 300, y + 300);

            // Create linear gradient from upper-left to lower-right
            paint.Shader = SKShader.CreateLinearGradient(
                                new SKPoint(rect.Left, rect.Top),
                                new SKPoint(rect.Right, rect.Bottom),
                                new SKColor[] { SKColors.Red, SKColors.Blue },
                                new float[] { 0, 1 },
                                SKShaderTileMode.Repeat);

            // Draw the gradient on the rectangle
            canvas.DrawRect(rect, paint);
            ···
        }
    }
}
SKPaint の Shader プロパティには、静的 SKShader.CreateLinearGradient メソッドからの SKShader 戻り値が割り当てられます。 5 つの引数は次のとおりです。
- グラデーションの始点。ここを四角形の左上隅に設定します
- グラデーションの終点。ここを四角形の右下隅に設定します
- グラデーションで使用する 2 つ以上の色の配列
- グラデーション線内の色の相対位置を示す
float値の配列 - グラデーション線の端部を超えてグラデーションがどのように動作するかを示す
SKShaderTileMode列挙型のメンバー
グラデーション オブジェクトを作成すると、DrawRect メソッドは、シェーダーを含む SKPaint オブジェクトを使用して、300 ピクセルの四角形を描画します。 iOS、Android、ユニバーサル Windows プラットフォーム (UWP) での実行結果を次に示します。
グラデーション線は、最初の 2 つの引数として指定された 2 点によって定義されます。 これらの点は "キャンバス" に対しては相対的ですが、グラデーションで表示されるグラフィカル オブジェクトに対しては相対的で "ない" ことに注意してください。 色は、グラデーション線に沿って左上の赤から右下の青に徐々に遷移します。 グラデーション線に対して垂直方向は、色が変化しません。
4 つ目の引数として指定された float 値の配列は、色の配列と 1 対 1 で対応しています。 この値は、それぞれの色が現れる、グラデーション線に沿った相対位置を示します。 ここで、0 とは、グラデーション線の始点で Red が現れることを意味し、1 は線の終点で Blue が現れることを意味します。 数値は昇順で、0 から 1 の範囲にある必要があります。 その範囲内にない場合は、その範囲内に収まるよう調整されます。
配列内の 2 つの値は、0 と 1 以外の値に設定できます。 これを試してみます。
new float[] { 0.25f, 0.75f }
これで、グラデーション線の最初の 4 分の 1 全体が純粋な赤になり、最後の 4 分の 1 が純粋な青になりました。 赤と青が混ざるのは、グラデーション線の中央半分に限られます。
一般に、これらの位置の値は 0 から 1 の間に均等に配置する必要があります。 その場合は、4 つ目の引数として null を CreateLinearGradient に指定するだけで実現できます。
このグラデーションは、300 ピクセルの四角形の 2 つの隅の間で定義されますが、四角形を塗りつぶすだけではありません。 [Corner-to-Corner Gradient] (隅から隅へのグラデーション) ページには、ページ上でのタップまたはマウス クリックに対応する追加コードがいくつかあります。 drawBackground フィールドは、タップごとに true と false に切り替えられます。 値が true の場合、PaintSurface ハンドラーは同じ SKPaint オブジェクトを使用してキャンバス全体を塗りつぶしてから、小さい四角形を示す黒い四角形を描画します。
public class CornerToCornerGradientPage : ContentPage
{
    bool drawBackground;

    public CornerToCornerGradientPage ()
    {
        ···
        TapGestureRecognizer tap = new TapGestureRecognizer();
        tap.Tapped += (sender, args) =>
        {
            drawBackground ^= true;
            canvasView.InvalidateSurface();
        };
        canvasView.GestureRecognizers.Add(tap);
    }

    void OnCanvasViewPaintSurface(object sender, SKPaintSurfaceEventArgs args)
    {
        ···
        using (SKPaint paint = new SKPaint())
        {
            ···
            if (drawBackground)
            {
                // Draw the gradient on the whole canvas
                canvas.DrawRect(info.Rect, paint);

                // Outline the smaller rectangle
                paint.Shader = null;
                paint.Style = SKPaintStyle.Stroke;
                paint.Color = SKColors.Black;
                canvas.DrawRect(rect, paint);
            }
        }
    }
}
画面をタップした後の表示を次に示します。
グラデーションは、グラデーション線を定義する点を超えて同じパターンで繰り返されます。 この繰り返しは、CreateLinearGradient に対する最後の引数が SKShaderTileMode.Repeat であるため発生します。 (その他のオプションについても近いうちに紹介します)。
また、グラデーション線を指定するために使用する点は一意ではありません。 グラデーション線に対して垂直方向は同じ色となるので、同じ効果に対して指定できるグラデーション線の数は無限にあります。 たとえば、水平方向のグラデーションで四角形を塗りつぶす場合、左上隅と右上隅、左下隅と右下隅、またはそれらの線に対して同一平面で平行な任意の 2 点を指定できます。
対話的に試す
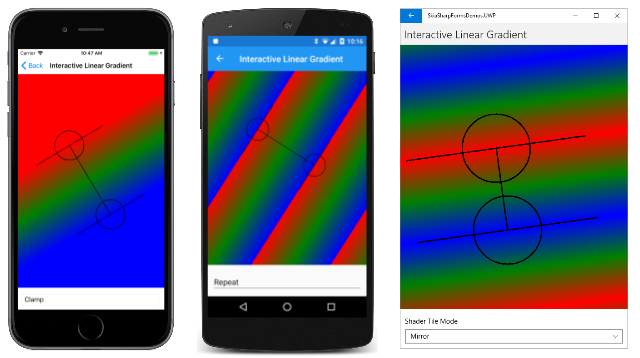
[Interactive Linear Gradient] (対話的線状グラデーション) ページを使用して、線状グラデーションを対話的に試すことができます。 このページでは、「円弧を描画する 3 つの方法」で紹介した InteractivePage クラスを使用します。InteractivePage は TouchEffect イベントを処理して、指またはマウスで移動できる TouchPoint オブジェクトのコレクションを保持します。
XAML ファイルは、TouchEffect を SKCanvasView の親にアタッチし、SKShaderTileMode 列挙型の 3 つのメンバーの 1 つを選択できる Picker も含んでいます。
<local:InteractivePage xmlns="http://xamarin.com/schemas/2014/forms"
                       xmlns:x="http://schemas.microsoft.com/winfx/2009/xaml"
                       xmlns:local="clr-namespace:SkiaSharpFormsDemos"
                       xmlns:skia="clr-namespace:SkiaSharp;assembly=SkiaSharp"
                       xmlns:skiaforms="clr-namespace:SkiaSharp.Views.Forms;assembly=SkiaSharp.Views.Forms"
                       xmlns:tt="clr-namespace:TouchTracking"
                       x:Class="SkiaSharpFormsDemos.Effects.InteractiveLinearGradientPage"
                       Title="Interactive Linear Gradient">
    <Grid>
        <Grid.RowDefinitions>
            <RowDefinition Height="*" />
            <RowDefinition Height="Auto" />
        </Grid.RowDefinitions>

        <Grid BackgroundColor="White"
              Grid.Row="0">
            <skiaforms:SKCanvasView x:Name="canvasView"
                                    PaintSurface="OnCanvasViewPaintSurface" />
            <Grid.Effects>
                <tt:TouchEffect Capture="True"
                                TouchAction="OnTouchEffectAction" />
            </Grid.Effects>
        </Grid>

        <Picker x:Name="tileModePicker"
                Grid.Row="1"
                Title="Shader Tile Mode"
                Margin="10"
                SelectedIndexChanged="OnPickerSelectedIndexChanged">
            <Picker.ItemsSource>
                <x:Array Type="{x:Type skia:SKShaderTileMode}">
                    <x:Static Member="skia:SKShaderTileMode.Clamp" />
                    <x:Static Member="skia:SKShaderTileMode.Repeat" />
                    <x:Static Member="skia:SKShaderTileMode.Mirror" />
                </x:Array>
            </Picker.ItemsSource>

            <Picker.SelectedIndex>
                0
            </Picker.SelectedIndex>
        </Picker>
    </Grid>
</local:InteractivePage>
分離コード ファイルのコンストラクターは、線状グラデーションの始点と終点に対して 2 つの TouchPoint オブジェクトを作成します。 PaintSurface ハンドラーは、3 色の配列 (赤、緑、青へのグラデーション) を定義し、Picker から現在の SKShaderTileMode を取得します。
public partial class InteractiveLinearGradientPage : InteractivePage
{
    public InteractiveLinearGradientPage ()
    {
        InitializeComponent ();

        touchPoints = new TouchPoint[2];

        for (int i = 0; i < 2; i++)
        {
            touchPoints[i] = new TouchPoint
            {
                Center = new SKPoint(100 + i * 200, 100 + i * 200)
            };
        }

        InitializeComponent();
        baseCanvasView = canvasView;
    }

    void OnPickerSelectedIndexChanged(object sender, EventArgs args)
    {
        canvasView.InvalidateSurface();
    }

    void OnCanvasViewPaintSurface(object sender, SKPaintSurfaceEventArgs args)
    {
        SKImageInfo info = args.Info;
        SKSurface surface = args.Surface;
        SKCanvas canvas = surface.Canvas;

        canvas.Clear();

        SKColor[] colors = { SKColors.Red, SKColors.Green, SKColors.Blue };
        SKShaderTileMode tileMode =
            (SKShaderTileMode)(tileModePicker.SelectedIndex == -1 ?
                                        0 : tileModePicker.SelectedItem);

        using (SKPaint paint = new SKPaint())
        {
            paint.Shader = SKShader.CreateLinearGradient(touchPoints[0].Center,
                                                         touchPoints[1].Center,
                                                         colors,
                                                         null,
                                                         tileMode);
            canvas.DrawRect(info.Rect, paint);
        }
        ···
    }
}
PaintSurface ハンドラーは、そのすべての情報から SKShader オブジェクトを作成し、それを使用してキャンバス全体に色を付けます。 float 値の配列は null に設定されます。 それ以外の場合、3 色を均等に配置するには、そのパラメーターを 0、0.5、1 の値で配列に設定します。
PaintSurface ハンドラーの大部分は、複数のオブジェクト (円の輪郭との接点、グラデーション線、接点でグラデーション線に垂直な線) を表示することに使用されます。
public partial class InteractiveLinearGradientPage : InteractivePage
{
    ···
    void OnCanvasViewPaintSurface(object sender, SKPaintSurfaceEventArgs args)
    {
        ···
        // Display the touch points here rather than by TouchPoint
        using (SKPaint paint = new SKPaint())
        {
            paint.Style = SKPaintStyle.Stroke;
            paint.Color = SKColors.Black;
            paint.StrokeWidth = 3;

            foreach (TouchPoint touchPoint in touchPoints)
            {
                canvas.DrawCircle(touchPoint.Center, touchPoint.Radius, paint);
            }

            // Draw gradient line connecting touchpoints
            canvas.DrawLine(touchPoints[0].Center, touchPoints[1].Center, paint);

            // Draw lines perpendicular to the gradient line
            SKPoint vector = touchPoints[1].Center - touchPoints[0].Center;
            float length = (float)Math.Sqrt(Math.Pow(vector.X, 2) +
                                            Math.Pow(vector.Y, 2));
            vector.X /= length;
            vector.Y /= length;
            SKPoint rotate90 = new SKPoint(-vector.Y, vector.X);
            rotate90.X *= 200;
            rotate90.Y *= 200;

            canvas.DrawLine(touchPoints[0].Center,
                            touchPoints[0].Center + rotate90,
                            paint);

            canvas.DrawLine(touchPoints[0].Center,
                            touchPoints[0].Center - rotate90,
                            paint);

            canvas.DrawLine(touchPoints[1].Center,
                            touchPoints[1].Center + rotate90,
                            paint);

            canvas.DrawLine(touchPoints[1].Center,
                            touchPoints[1].Center - rotate90,
                            paint);
        }
    }
}
2 つの接点を結ぶグラデーション線は簡単に描画できますが、垂直線にはさらなる作業が必要になります。 グラデーション線はベクトルに変換され、1 単位の長さに正規化された後、90 度回転されます。 その後、そのベクターには 200 ピクセルの長さが指定されます。 これは、グラデーション線に対して垂直になるように接点から延びる 4 本の線を描画するために使用されます。
垂直線は、グラデーションの始点と終点と一致します。 これらの線を超えた部分の状態は、SKShaderTileMode 列挙型の設定によって異なります。
3 つのスクリーンショットは、SKShaderTileMode の 3 つの異なる値の結果を示しています。 iOS のスクリーンショットは、SKShaderTileMode.Clamp を示しており、これではグラデーションの境界の色がそのまま拡張されます。 Android のスクリーンショットでは、SKShaderTileMode.Repeat オプションでグラデーション パターンがどのように繰り返されるかを示しています。 UWP スクリーンショットの SKShaderTileMode.Mirror オプションでもパターンが繰り返されていますが、パターンは毎回反転され、色の途切れがありません。
グラデーション上のグラデーション
SKShader クラスでは、Dispose を除き、パブリック プロパティやメソッドは定義されません。 そのため、静的メソッドによって作成された SKShader オブジェクトは変更できません。 2 つの異なるオブジェクトに同じグラデーションを使用する場合でも、グラデーションを少し変える必要がある可能性があります。 そのためには、新しい SKShader オブジェクトを作成する必要があります。
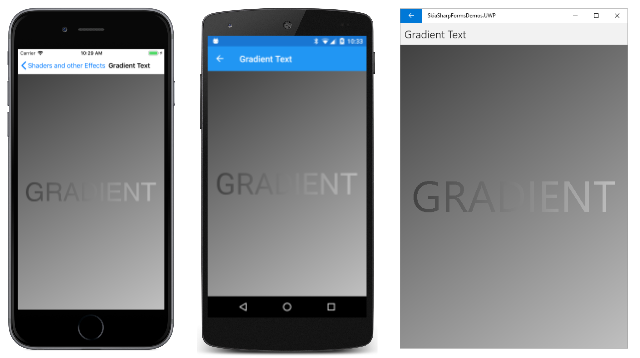
[Gradient Text] (グラデーション テキスト) ページには、どちらも同様のグラデーションで色付けされたテキストと背景が表示されます。
このグラデーションの唯一の違いは、始点と終点です。 テキストの表示に使用されているグラデーションは、テキストに外接する四角形の隅の 2 点に基づいています。 背景の 2 点は、キャンバス全体に基づいています。 のコードを次に示します。
public class GradientTextPage : ContentPage
{
    const string TEXT = "GRADIENT";

    public GradientTextPage ()
    {
        Title = "Gradient Text";

        SKCanvasView canvasView = new SKCanvasView();
        canvasView.PaintSurface += OnCanvasViewPaintSurface;
        Content = canvasView;
    }

    void OnCanvasViewPaintSurface(object sender, SKPaintSurfaceEventArgs args)
    {
        SKImageInfo info = args.Info;
        SKSurface surface = args.Surface;
        SKCanvas canvas = surface.Canvas;

        canvas.Clear();

        using (SKPaint paint = new SKPaint())
        {
            // Create gradient for background
            paint.Shader = SKShader.CreateLinearGradient(
                                new SKPoint(0, 0),
                                new SKPoint(info.Width, info.Height),
                                new SKColor[] { new SKColor(0x40, 0x40, 0x40),
                                                new SKColor(0xC0, 0xC0, 0xC0) },
                                null,
                                SKShaderTileMode.Clamp);

            // Draw background
            canvas.DrawRect(info.Rect, paint);

            // Set TextSize to fill 90% of width
            paint.TextSize = 100;
            float width = paint.MeasureText(TEXT);
            float scale = 0.9f * info.Width / width;
            paint.TextSize *= scale;

            // Get text bounds
            SKRect textBounds = new SKRect();
            paint.MeasureText(TEXT, ref textBounds);

            // Calculate offsets to center the text on the screen
            float xText = info.Width / 2 - textBounds.MidX;
            float yText = info.Height / 2 - textBounds.MidY;

            // Shift textBounds by that amount
            textBounds.Offset(xText, yText);

            // Create gradient for text
            paint.Shader = SKShader.CreateLinearGradient(
                                new SKPoint(textBounds.Left, textBounds.Top),
                                new SKPoint(textBounds.Right, textBounds.Bottom),
                                new SKColor[] { new SKColor(0x40, 0x40, 0x40),
                                                new SKColor(0xC0, 0xC0, 0xC0) },
                                null,
                                SKShaderTileMode.Clamp);

            // Draw text
            canvas.DrawText(TEXT, xText, yText, paint);
        }
    }
}
まず、SKPaint オブジェクトの Shader プロパティが、背景を塗りつぶすグラデーションを表示するために設定されます。 グラデーション点は、キャンバスの左上隅と右下隅に設定されています。
このコードでは、キャンバスの幅の 90% にテキストが表示されるように、SKPaint オブジェクトの TextSize プロパティを設定します。 テキスト境界は、DrawText メソッドに渡す xText と yText の値を計算して、テキストを中央に配置するために使用されます。
ただし、2 つ目の CreateLinearGradient 呼び出しのグラデーション点は、表示されるときに、キャンバスに対して相対的なテキストの左上隅と右下隅を参照する必要があります。 これは、同じ xText と yText の値で textBounds 四角形をシフトすることによって実現されます。
textBounds.Offset(xText, yText);
これで、四角形の左上隅と右下隅を使用して、グラデーションの始点と終点を設定できるようになりました。
グラデーションのアニメーション化
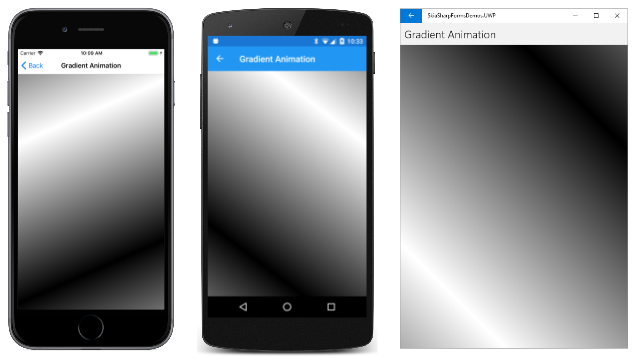
グラデーションをアニメーション化するには、いくつかの方法があります。 1 つの方法は、始点と終点をアニメーション化することです。 [Gradient Animation] (グラデーション アニメーション) ページでは、キャンバスの中央に配置された円上を 2 つの点が動き回ります。 この円の半径は、キャンバスの幅または高さの半分のいずれか小さい方です。 この円上の始点と終点は互いに反対側にあり、グラデーションは Mirror タイル モードで白から黒に変化しています。
コンストラクターによって SKCanvasView が作成されます。 OnAppearing および OnDisappearing メソッドは、アニメーション ロジックを処理します。
public class GradientAnimationPage : ContentPage
{
    SKCanvasView canvasView;
    bool isAnimating;
    double angle;
    Stopwatch stopwatch = new Stopwatch();

    public GradientAnimationPage()
    {
        Title = "Gradient Animation";

        canvasView = new SKCanvasView();
        canvasView.PaintSurface += OnCanvasViewPaintSurface;
        Content = canvasView;
    }

    protected override void OnAppearing()
    {
        base.OnAppearing();

        isAnimating = true;
        stopwatch.Start();
        Device.StartTimer(TimeSpan.FromMilliseconds(16), OnTimerTick);
    }

    protected override void OnDisappearing()
    {
        base.OnDisappearing();

        stopwatch.Stop();
        isAnimating = false;
    }

    bool OnTimerTick()
    {
        const int duration = 3000;
        angle = 2 * Math.PI * (stopwatch.ElapsedMilliseconds % duration) / duration;
        canvasView.InvalidateSurface();

        return isAnimating;
    }
    ···
}
OnTimerTick メソッドは、3 秒ごとに 0 から 2π までアニメーション化される angle 値を計算します。
2 つのグラデーション点を計算する 1 つの方法を次に示します。 vector という名前の SKPoint 値は、キャンバスの中心から円の半径上の点まで拡張するように計算されます。 このベクトルの方向は、角度の正弦値と余弦値に基づいています。 次に、反対側の 2 つのグラデーション点を計算します。1 つの点は中心点からそのベクトルを減算することによって計算され、もう 1 つの点は中心点にベクトルを加算することによって計算されます。
public class GradientAnimationPage : ContentPage
{
    ···
    void OnCanvasViewPaintSurface(object sender, SKPaintSurfaceEventArgs args)
    {
        SKImageInfo info = args.Info;
        SKSurface surface = args.Surface;
        SKCanvas canvas = surface.Canvas;

        canvas.Clear();

        using (SKPaint paint = new SKPaint())
        {
            SKPoint center = new SKPoint(info.Rect.MidX, info.Rect.MidY);
            int radius = Math.Min(info.Width, info.Height) / 2;
            SKPoint vector = new SKPoint((float)(radius * Math.Cos(angle)),
                                         (float)(radius * Math.Sin(angle)));

            paint.Shader = SKShader.CreateLinearGradient(
                                center - vector,
                                center + vector,
                                new SKColor[] { SKColors.White, SKColors.Black },
                                null,
                                SKShaderTileMode.Mirror);

            canvas.DrawRect(info.Rect, paint);
        }
    }
}
少し異なる方法を用いると、必要なコードが少なくなります。 この方法では、行列変換を含む SKShader.CreateLinearGradient オーバーロード メソッドを最後の引数として使用します。 この方法は、サンプルのバージョンです。
public class GradientAnimationPage : ContentPage
{
    ···
    void OnCanvasViewPaintSurface(object sender, SKPaintSurfaceEventArgs args)
    {
        SKImageInfo info = args.Info;
        SKSurface surface = args.Surface;
        SKCanvas canvas = surface.Canvas;

        canvas.Clear();

        using (SKPaint paint = new SKPaint())
        {
            paint.Shader = SKShader.CreateLinearGradient(
                                new SKPoint(0, 0),
                                info.Width < info.Height ? new SKPoint(info.Width, 0) :
                                                           new SKPoint(0, info.Height),
                                new SKColor[] { SKColors.White, SKColors.Black },
                                new float[] { 0, 1 },
                                SKShaderTileMode.Mirror,
                                SKMatrix.MakeRotation((float)angle, info.Rect.MidX, info.Rect.MidY));

            canvas.DrawRect(info.Rect, paint);
        }
    }
}
キャンバスの幅が高さより小さい場合、2 つのグラデーション点は (0, 0) と (info.Width, 0) に設定されます。 最後の引数として CreateLinearGradient に渡された回転変換により、これらの 2 つの点は画面中央を中心に回転します。
角度が 0 の場合、回転はなく、2 つのグラデーション点はキャンバスの左上隅と右上隅となることに注意してください。 これらの点は、前の CreateLinearGradient 呼び出しで示したように、計算されたグラデーション点とは異なります。 しかし、これらの点は、キャンバスの中心を二等分する水平グラデーション線と "平行" であるため、結果として同じグラデーションになります。
虹のグラデーション
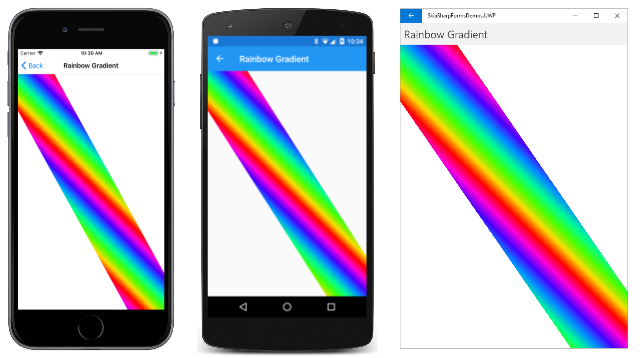
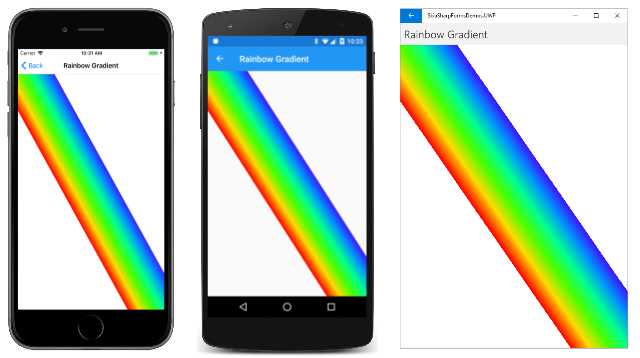
[Rainbow Gradient] (虹のグラデーション) ページでは、キャンバスの左上隅から右下隅に虹が描画されます。 しかし、この虹のグラデーションは本物の虹のようなものではありません。 曲線ではなく直線で、0 から 360 までの色相値を繰り返すことによって決定される 8 つの HSL (色相-彩度-明るさ) 色に基づいています。
SKColor[] colors = new SKColor[8];

for (int i = 0; i < colors.Length; i++)
{
    colors[i] = SKColor.FromHsl(i * 360f / (colors.Length - 1), 100, 50);
}
このコードは、次に示す PaintSurface ハンドラーの一部です。 このハンドラーは、まず、キャンバスの左上隅から右下隅まで延びる 6 辺の多隅形を定義するパスを作成します。
public class RainbowGradientPage : ContentPage
{
    public RainbowGradientPage ()
    {
        Title = "Rainbow Gradient";

        SKCanvasView canvasView = new SKCanvasView();
        canvasView.PaintSurface += OnCanvasViewPaintSurface;
        Content = canvasView;
    }

    void OnCanvasViewPaintSurface(object sender, SKPaintSurfaceEventArgs args)
    {
        SKImageInfo info = args.Info;
        SKSurface surface = args.Surface;
        SKCanvas canvas = surface.Canvas;

        canvas.Clear();

        using (SKPath path = new SKPath())
        {
            float rainbowWidth = Math.Min(info.Width, info.Height) / 2f;

            // Create path from upper-left to lower-right corner
            path.MoveTo(0, 0);
            path.LineTo(rainbowWidth / 2, 0);
            path.LineTo(info.Width, info.Height - rainbowWidth / 2);
            path.LineTo(info.Width, info.Height);
            path.LineTo(info.Width - rainbowWidth / 2, info.Height);
            path.LineTo(0, rainbowWidth / 2);
            path.Close();

            using (SKPaint paint = new SKPaint())
            {
                SKColor[] colors = new SKColor[8];

                for (int i = 0; i < colors.Length; i++)
                {
                    colors[i] = SKColor.FromHsl(i * 360f / (colors.Length - 1), 100, 50);
                }

                paint.Shader = SKShader.CreateLinearGradient(
                                    new SKPoint(0, rainbowWidth / 2),
                                    new SKPoint(rainbowWidth / 2, 0),
                                    colors,
                                    null,
                                    SKShaderTileMode.Repeat);

                canvas.DrawPath(path, paint);
            }
        }
    }
}
CreateLinearGradient メソッドの 2 つのグラデーション点は、このパスを定義する 2 点 (両方とも左上隅近くにあります) に基づいています。 1 つ目はキャンバスの上端にあり、2 つ目はキャンバスの左端にあります。 結果は次のとおりです。
これは興味深い画像ですが、意図したものとは少し異なります。 問題は、線状グラデーションを作成するときに、グラデーション線に対して垂直方向は色が変わらないということです。 グラデーション線は、図形が上端と左端に接する点に基づいており、その線は、一般に右下隅まで延びる図形の辺に対して垂直ではありません。 この方法は、キャンバスが正方形の場合にのみうまく機能します。
適切な虹のグラデーションを作成するには、グラデーション線が虹の端に対して垂直である必要があります。 これはより計算は複雑になります。 図の長辺と平行なベクトルを定義する必要があります。 そのベクトルを、その辺に垂直になるように 90 度回転します。 次に、図の幅まで延ばすために rainbowWidth を乗算します。 2 つのグラデーション点は、図の辺上の点を基に、その点にベクトルを加えて計算されます。 サンプルの[Rainbow Gradient] (虹のグラデーション) ページに表示されるコードを次に示します。
public class RainbowGradientPage : ContentPage
{
    ···
    void OnCanvasViewPaintSurface(object sender, SKPaintSurfaceEventArgs args)
    {
        ···
        using (SKPath path = new SKPath())
        {
            ···
            using (SKPaint paint = new SKPaint())
            {
                ···
                // Vector on lower-left edge, from top to bottom
                SKPoint edgeVector = new SKPoint(info.Width - rainbowWidth / 2, info.Height) -
                                     new SKPoint(0, rainbowWidth / 2);

                // Rotate 90 degrees counter-clockwise:
                SKPoint gradientVector = new SKPoint(edgeVector.Y, -edgeVector.X);

                // Normalize
                float length = (float)Math.Sqrt(Math.Pow(gradientVector.X, 2) +
                                                Math.Pow(gradientVector.Y, 2));
                gradientVector.X /= length;
                gradientVector.Y /= length;

                // Make it the width of the rainbow
                gradientVector.X *= rainbowWidth;
                gradientVector.Y *= rainbowWidth;

                // Calculate the two points
                SKPoint point1 = new SKPoint(0, rainbowWidth / 2);
                SKPoint point2 = point1 + gradientVector;

                paint.Shader = SKShader.CreateLinearGradient(point1,
                                                             point2,
                                                             colors,
                                                             null,
                                                             SKShaderTileMode.Repeat);

                canvas.DrawPath(path, paint);
            }
        }
    }
}
これで、図が虹色になりました。
無限色
[Infinity Colors] (無限色) ページでも虹のグラデーションが使用されます。 このページでは、「3 つの種類のベジエ曲線」で説明されているパス オブジェクトを使用して無限大記号を描画します。 その後、画像はアニメーション化された虹のグラデーションで色付けされ、画像全体が連続的にスイープされます。
コンストラクターは、無限大記号を描く SKPath オブジェクトを作成します。 パスが作成されると、コンストラクターはパスの四角形の境界を取得することもできます。 次に、gradientCycleLength という名前の値を計算します。 グラデーションが pathBounds 四角形の左上隅と右下隅に基づいている場合、この gradientCycleLength 値はグラデーション パターンの水平方向の幅の合計となります。
public class InfinityColorsPage : ContentPage
{
    ···
    SKCanvasView canvasView;

    // Path information
    SKPath infinityPath;
    SKRect pathBounds;
    float gradientCycleLength;

    // Gradient information
    SKColor[] colors = new SKColor[8];
    ···

    public InfinityColorsPage ()
    {
        Title = "Infinity Colors";

        // Create path for infinity sign
        infinityPath = new SKPath();
        infinityPath.MoveTo(0, 0);                                  // Center
        infinityPath.CubicTo(  50,  -50,   95, -100,  150, -100);   // To top of right loop
        infinityPath.CubicTo( 205, -100,  250,  -55,  250,    0);   // To far right of right loop
        infinityPath.CubicTo( 250,   55,  205,  100,  150,  100);   // To bottom of right loop
        infinityPath.CubicTo(  95,  100,   50,   50,    0,    0);   // Back to center
        infinityPath.CubicTo( -50,  -50,  -95, -100, -150, -100);   // To top of left loop
        infinityPath.CubicTo(-205, -100, -250,  -55, -250,    0);   // To far left of left loop
        infinityPath.CubicTo(-250,   55, -205,  100, -150,  100);   // To bottom of left loop
        infinityPath.CubicTo( -95,  100, - 50,   50,    0,    0);   // Back to center
        infinityPath.Close();

        // Calculate path information
        pathBounds = infinityPath.Bounds;
        gradientCycleLength = pathBounds.Width +
            pathBounds.Height * pathBounds.Height / pathBounds.Width;

        // Create SKColor array for gradient
        for (int i = 0; i < colors.Length; i++)
        {
            colors[i] = SKColor.FromHsl(i * 360f / (colors.Length - 1), 100, 50);
        }

        canvasView = new SKCanvasView();
        canvasView.PaintSurface += OnCanvasViewPaintSurface;
        Content = canvasView;
    }
    ···
}
コンストラクターは、虹と colors 配列と SKCanvasView オブジェクトも作成します。
OnAppearing および OnDisappearing メソッドのオーバーライドは、アニメーションのオーバーヘッドを実行します。 OnTimerTick メソッドは、offset フィールドを 0 から gradientCycleLength に 2 秒ごとにアニメーション化します。
public class InfinityColorsPage : ContentPage
{
    ···
    // For animation
    bool isAnimating;
    float offset;
    Stopwatch stopwatch = new Stopwatch();
    ···

    protected override void OnAppearing()
    {
        base.OnAppearing();

        isAnimating = true;
        stopwatch.Start();
        Device.StartTimer(TimeSpan.FromMilliseconds(16), OnTimerTick);
    }

    protected override void OnDisappearing()
    {
        base.OnDisappearing();

        stopwatch.Stop();
        isAnimating = false;
    }

    bool OnTimerTick()
    {
        const int duration = 2;     // seconds
        double progress = stopwatch.Elapsed.TotalSeconds % duration / duration;
        offset = (float)(gradientCycleLength * progress);
        canvasView.InvalidateSurface();

        return isAnimating;
    }
    ···
}
最後に、PaintSurface ハンドラーが無限大記号をレンダリングします。 パスには中心点 (0, 0) を囲む負の座標と正の座標が含まれているため、キャンバス上の Translate 変換を使用して中心にシフトします。 移動変換の後には、キャンバスの幅と高さの 95% 以内に収まる範囲で無限大記号を可能な限り大きくする倍率を適用する Scale 変換が続きます。
パスの外接する四角形の幅と高さに STROKE_WIDTH 定数が追加されることに注意してください。 パスの線はこの幅で引かれるため、レンダリングされる無限大記号のサイズは、4 辺すべてでその幅の半分だけ大きくなります。
public class InfinityColorsPage : ContentPage
{
    const int STROKE_WIDTH = 50;
    ···
    void OnCanvasViewPaintSurface(object sender, SKPaintSurfaceEventArgs args)
    {
        SKImageInfo info = args.Info;
        SKSurface surface = args.Surface;
        SKCanvas canvas = surface.Canvas;

        canvas.Clear();

        // Set transforms to shift path to center and scale to canvas size
        canvas.Translate(info.Width / 2, info.Height / 2);
        canvas.Scale(0.95f *
            Math.Min(info.Width / (pathBounds.Width + STROKE_WIDTH),
                     info.Height / (pathBounds.Height + STROKE_WIDTH)));

        using (SKPaint paint = new SKPaint())
        {
            paint.Style = SKPaintStyle.Stroke;
            paint.StrokeWidth = STROKE_WIDTH;
            paint.Shader = SKShader.CreateLinearGradient(
                                new SKPoint(pathBounds.Left, pathBounds.Top),
                                new SKPoint(pathBounds.Right, pathBounds.Bottom),
                                colors,
                                null,
                                SKShaderTileMode.Repeat,
                                SKMatrix.MakeTranslation(offset, 0));

            canvas.DrawPath(infinityPath, paint);
        }
    }
}
SKShader.CreateLinearGradient の最初の 2 つの引数として渡された点をご確認ください。 これらの点は、元のパスの外接する四角形に基づいています。 最初の点は (–250, –100) で、2 つ目は (250, 100) です。 SkiaSharp の内部では、これらの点は現在のキャンバス変換の対象になるため、表示される無限大記号に正しく配置されます。
CreateLinearGradient に対して最後の引数を指定しないと、無限大記号の左上から右下に延びる虹のグラデーションが表示されます。 (実際には、グラデーションは外接する四角形の左上隅から右下隅まで拡張されます。レンダリングされた無限大記号は、外接する四角形よりも、すべての辺の STROKE_WIDTH 値の半分だけ大きくなります。グラデーションは始点と終点の両方で赤であり、SKShaderTileMode.Repeat で作成されているため、違いは目立ちません)。
CreateLinearGradient に対するこの最後の引数を指定すると、グラデーション パターンが画像全体を連続的にスイープします。
透明度とグラデーション
グラデーションに使用する色には、透明度を組み込むことができます。 グラデーションをある色から別の色にフェードさせる代わりに、色から透明にフェードさせることができます。
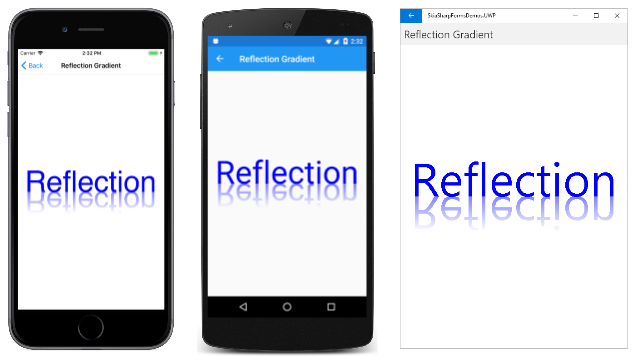
この手法で、興味深いエフェクトを可能にします。 以前から使用されていた例の 1 つである、反射するグラフィカル オブジェクトを示します。
逆さまになっているテキストは、上部に透明度が 50% のグラデーションが適用され、下部は完全に透明になっています。 これらの透明度レベルは、0x80 と 0 のアルファ値に関連付けられています。
[Reflection Gradient] (リフレクション グラデーション) ページの PaintSurface ハンドラーは、テキスト サイズをキャンバスの幅の 90% にスケーリングします。 次に、ページの水平方向の中央で、垂直方向の中央に対応するベースライン上にテキストを配置するために、xText および yText の値を計算します。
public class ReflectionGradientPage : ContentPage
{
    const string TEXT = "Reflection";

    public ReflectionGradientPage ()
    {
        Title = "Reflection Gradient";

        SKCanvasView canvasView = new SKCanvasView();
        canvasView.PaintSurface += OnCanvasViewPaintSurface;
        Content = canvasView;
    }

    void OnCanvasViewPaintSurface(object sender, SKPaintSurfaceEventArgs args)
    {
        SKImageInfo info = args.Info;
        SKSurface surface = args.Surface;
        SKCanvas canvas = surface.Canvas;

        canvas.Clear();

        using (SKPaint paint = new SKPaint())
        {
            // Set text color to blue
            paint.Color = SKColors.Blue;

            // Set text size to fill 90% of width
            paint.TextSize = 100;
            float width = paint.MeasureText(TEXT);
            float scale = 0.9f * info.Width / width;
            paint.TextSize *= scale;

            // Get text bounds
            SKRect textBounds = new SKRect();
            paint.MeasureText(TEXT, ref textBounds);

            // Calculate offsets to position text above center
            float xText = info.Width / 2 - textBounds.MidX;
            float yText = info.Height / 2;

            // Draw unreflected text
            canvas.DrawText(TEXT, xText, yText, paint);

            // Shift textBounds to match displayed text
            textBounds.Offset(xText, yText);

            // Use those offsets to create a gradient for the reflected text
            paint.Shader = SKShader.CreateLinearGradient(
                                new SKPoint(0, textBounds.Top),
                                new SKPoint(0, textBounds.Bottom),
                                new SKColor[] { paint.Color.WithAlpha(0),
                                                paint.Color.WithAlpha(0x80) },
                                null,
                                SKShaderTileMode.Clamp);

            // Scale the canvas to flip upside-down around the vertical center
            canvas.Scale(1, -1, 0, yText);

            // Draw reflected text
            canvas.DrawText(TEXT, xText, yText, paint);
        }
    }
}
これらの xText および yText の値は、PaintSurface ハンドラーの下部にある DrawText 呼び出しに、反射されたテキストを表示するために使用されるものと同じ値です。 しかし、そのコードの直前に SKCanvas の Scale メソッドに対する呼び出しが表示されます。 この Scale メソッドでは、水平方向に 1 (変化なし)、垂直方向に –1 だけスケーリングされ、すべてが逆さまに反転されます。 回転の中心は (0, yText) 点に設定されます。yText はキャンバスの垂直方向の中心であり、もともとは info.Height を 2 で割って計算されます。
Skia では、キャンバス変換の前にグラデーションを使用してグラフィカル オブジェクトに色を付けることに注意してください。 反射されていないテキストが描画されると、textBounds 四角形がシフトされ、表示されたテキストに対応します。
textBounds.Offset(xText, yText);
CreateLinearGradient 呼び出しでは、その四角形の上部から下部へのグラデーションが定義されます。 これは、完全に透明な青 (paint.Color.WithAlpha(0)) から透明度が 50% の青 (paint.Color.WithAlpha(0x80)) へのグラデーションです。 キャンバス変換はテキストを逆さまに反転するので、透明度が 50% の青がベースラインから始まり、テキストの上部で透明になります。


