Xamarin.Forms ボタン
ボタンは、特定のタスクを実行するようにアプリケーションに指示するタップまたはクリックに応答します。
すべての Xamarin.Forms の中で Button は最も基本的なインタラクティブなコントロールです。 Button には通常、コマンドを示す短いテキスト文字列が表示されますが、ビットマップ イメージや、テキストとイメージの組み合わせが表示されていることもあります。 ユーザーは、指で Button を押すか、マウスでクリックしてそのコマンドを開始します。
ボタンのクリックの処理
Button は、ユーザーが Button を指またはマウス ポインターでタップすると発生する Clicked イベントを定義します。 イベントは、指またはマウス ボタンが Button の表面から離されたときに発生します。 Button がタップに応答するには、IsEnabled プロパティが true に設定されている必要があります。
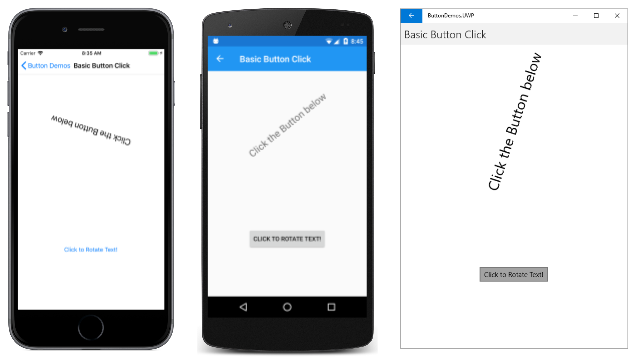
サンプルの [基本的なボタン クリック] ページでは、XAML で Button のインスタンスを作成し、その Clicked イベントを処理する方法を示します。 BasicButtonClickPage.xaml ファイルには、Label と Button の両方を含む StackLayoutが含まれています。
<ContentPage xmlns="http://xamarin.com/schemas/2014/forms"
             xmlns:x="http://schemas.microsoft.com/winfx/2009/xaml"
             x:Class="ButtonDemos.BasicButtonClickPage"
             Title="Basic Button Click">
    <StackLayout>

        <Label x:Name="label"
               Text="Click the Button below"
               FontSize="Large"
               VerticalOptions="CenterAndExpand"
               HorizontalOptions="Center" />

        <Button Text="Click to Rotate Text!"
                VerticalOptions="CenterAndExpand"
                HorizontalOptions="Center"
                Clicked="OnButtonClicked" />

    </StackLayout>
</ContentPage>
Button には、許可されているすべてのスペースを占有する傾向があります。 たとえば、Button の HorizontalOptions プロパティを Fill ではない設定にすると、Button はその親の幅全体を占めます。
既定では Button は四角形ですが、以下の「ボタンの外観」のセクションで説明しているように、CornerRadius プロパティを使用して角を丸くすることができます。
Text プロパティでは、Button に表示するテキストを指定します。 Clicked イベントは、OnButtonClicked という名前のイベント ハンドラーに設定されます。 このハンドラーは、分離コード ファイル BasicButtonClickPage.xaml.cs にあります。
public partial class BasicButtonClickPage : ContentPage
{
    public BasicButtonClickPage ()
    {
        InitializeComponent ();
    }

    async void OnButtonClicked(object sender, EventArgs args)
    {
        await label.RelRotateTo(360, 1000);
    }
}
Button をタップすると、OnButtonClicked メソッドが実行されます。 sender 引数は、このイベントを発生させる Button オブジェクトです。 これを使用して、Button オブジェクトにアクセスしたり、同じ Clicked イベントを共有する複数の Button オブジェクトを区別したりできます。
この特定の Clicked ハンドラーは、Label を 360 °、1000 ミリ秒で回転させるアニメーション関数を呼び出します。 iOS および Android デバイスで実行されているプログラムと、Windows 10 デスクトップ上の ユニバーサル Windows プラットフォーム (UWP) アプリケーションとして実行されているプログラムを次に示します。
イベント ハンドラー内で await が使用されるため、OnButtonClicked メソッドに async 修飾子が含まれていることに注意してください。 Clicked イベント ハンドラーには、ハンドラーの本体で await が使用される場合にのみ async 修飾子が必要です。
各プラットフォームでは、それぞれに独自の方法で Button がレンダリングされます。 ボタンの外観 セクションでは、色を設定し、Button 境界線を表示して、よりカスタマイズされた外観にする方法を説明します。 Button は IFontElement インターフェイスを実装するため、これには FontFamily、FontSize、FontAttributes の各プロパティが含まれます。
コード内のボタンの作成
XAML で Button をインスタンス化するのが一般的ですが、コード内で Button を作成することもできます。 これは、foreach ループで列挙可能なデータに基づいて複数のボタンをアプリケーションで作成する必要がある場合に便利です。
「コード ボタン クリック」 ページでは、「基本的なボタン クリック」ページと機能的に同等のページを作成する方法を示しますが、C# では完全に同じです。
public class CodeButtonClickPage : ContentPage
{
    public CodeButtonClickPage ()
    {
        Title = "Code Button Click";

        Label label = new Label
        {
            Text = "Click the Button below",
            FontSize = Device.GetNamedSize(NamedSize.Large, typeof(Label)),
            VerticalOptions = LayoutOptions.CenterAndExpand,
            HorizontalOptions = LayoutOptions.Center
        };

        Button button = new Button
        {
            Text = "Click to Rotate Text!",
            VerticalOptions = LayoutOptions.CenterAndExpand,
            HorizontalOptions = LayoutOptions.Center
        };
        button.Clicked += async (sender, args) => await label.RelRotateTo(360, 1000);

        Content = new StackLayout
        {
            Children =
            {
                label,
                button
            }
        };
    }
}
処理はすべてクラスのコンストラクターで行われます。 Clicked ハンドラーは長さが 1 ステートメントしかないため、非常にシンプルにイベントにアタッチできます。
button.Clicked += async (sender, args) => await label.RelRotateTo(360, 1000);
もちろん、イベント ハンドラーを別のメソッド (たとえば基本的なボタン クリックの OnButtonClick メソッドのように) として定義し、そのメソッドをイベントにアタッチすることもできます。
button.Clicked += OnButtonClicked;
ボタンの無効化
アプリケーションが、特定の Button クリックが有効な操作とならない特定の状態にある場合があります。 そのような場合は、Button の IsEnabled プロパティを false に設定して無効にする必要があります。 典型的な例としては、[ファイルを開く] Button を伴うファイル名の Entry コントロールがあります。Button は、Entry へのテキスト入力がある場合にのみ有効になるべきです。
このタスクには DataTrigger を使用できます。「データ トリガー」の記事で説明しています。
コマンド インターフェイスの使用
アプリケーションで、Clicked イベントを処理することなく Button タップに応答できるようにすることが可能です。 Button は、コマンド インターフェイスまたはコマンド実行インターフェイスと呼ばれる別の通知メカニズムを実装します。 これは、次の 2 つのプロパティで構成されます。
ICommand型のCommand(System.Windows.Input名前空間で定義されたインターフェイス)Object型のCommandParameterプロパティ
このアプローチはデータ バインディングに関連する場合に適しており、特に Model-View-ViewModel (MVVM) アーキテクチャを実装する場合に適しています。 これらのトピックについては、「データ バインディング」、「データ バインディングから MVVM へ」、「MVVM」に関する記事で説明しています。
MVVM アプリケーションでは、viewmodel はデータ バインディングを使用して XAML Button 要素に接続される ICommand 型のプロパティを定義します。 Xamarin.Forms では、ICommand インターフェイスを実装し、ICommand 型のプロパティを定義する viewmodel を支援する Command クラスと Command<T>クラスも定義します。
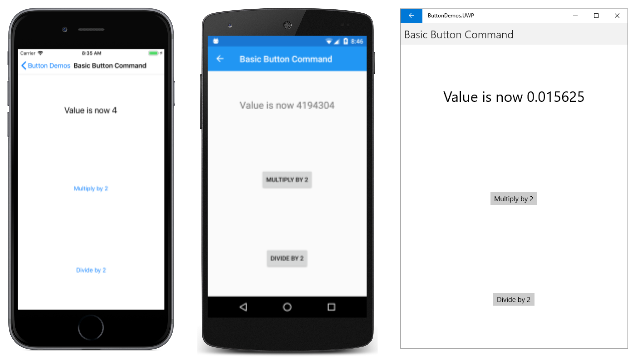
コマンド処理については、「コマンド インターフェイス」の記事でより詳しく説明されていますが、サンプルの [基本的なボタン コマンド] ページでも基本的なアプローチを説明しています。
CommandDemoViewModel クラスは、Number という名前の double 型のプロパティと、MultiplyBy2Command と DivideBy2Command という名前の型 ICommand の 2 つのプロパティを定義する非常にシンプルな viewmodel です。
class CommandDemoViewModel : INotifyPropertyChanged
{
    double number = 1;

    public event PropertyChangedEventHandler PropertyChanged;

    public CommandDemoViewModel()
    {
        MultiplyBy2Command = new Command(() => Number *= 2);

        DivideBy2Command = new Command(() => Number /= 2);
    }

    public double Number
    {
        set
        {
            if (number != value)
            {
                number = value;
                PropertyChanged?.Invoke(this, new PropertyChangedEventArgs("Number"));
            }
        }
        get
        {
            return number;
        }
    }

    public ICommand MultiplyBy2Command { private set; get; }

    public ICommand DivideBy2Command { private set; get; }
}
2 つの ICommand プロパティは、Command 型の 2 つのオブジェクトを使用してクラスのコンストラクターで初期化されます。 Command コンストラクターには、Number プロパティを 2 倍または半分にする小さい関数 (execute コンストラクター引数と呼ばれます) が含まれています。
BasicButtonCommand.xaml ファイルは、その BindingContext を CommandDemoViewModel のインスタンスに設定します。 Label 要素と 2 つの Button 要素には、CommandDemoViewModel の 3 つのプロパティへのバインディングが含まれています。
<ContentPage xmlns="http://xamarin.com/schemas/2014/forms"
             xmlns:x="http://schemas.microsoft.com/winfx/2009/xaml"
             xmlns:local="clr-namespace:ButtonDemos"
             x:Class="ButtonDemos.BasicButtonCommandPage"
             Title="Basic Button Command">

    <ContentPage.BindingContext>
        <local:CommandDemoViewModel />
    </ContentPage.BindingContext>

    <StackLayout>
        <Label Text="{Binding Number, StringFormat='Value is now {0}'}"
               FontSize="Large"
               VerticalOptions="CenterAndExpand"
               HorizontalOptions="Center" />

        <Button Text="Multiply by 2"
                VerticalOptions="CenterAndExpand"
                HorizontalOptions="Center"
                Command="{Binding MultiplyBy2Command}" />

        <Button Text="Divide by 2"
                VerticalOptions="CenterAndExpand"
                HorizontalOptions="Center"
                Command="{Binding DivideBy2Command}" />
    </StackLayout>
</ContentPage>
2 つの Button 要素がタップされると、コマンドが実行され、数値の値が変更されます。
Clicked ハンドラーの利点を上回るこのアプローチの利点は、このページの機能を含むすべてのロジックが分離コード ファイルではなくビューモデルに配置され、ビジネス ロジックからユーザー インターフェイスをより適切に分離できる点です。
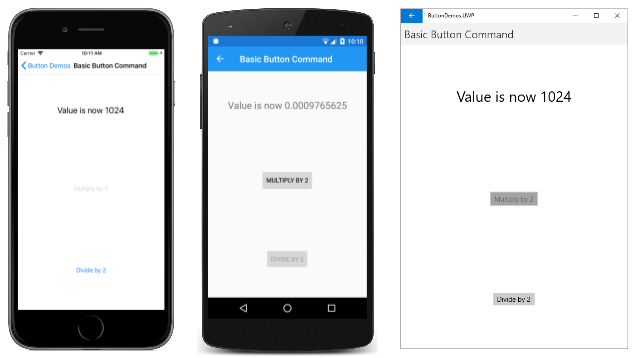
また、Command オブジェクトで Button 要素の有効化と無効化を制御することもできます。 たとえば、数値の範囲を 210 と 2-10 の範囲に制限するとします。 Button を有効にする必要がある場合は、別の関数を true を返すコンストラクター (canExecute 引数と呼ばれます) に追加できます。 CommandDemoViewModel コンストラクターの変更を次に示します。
class CommandDemoViewModel : INotifyPropertyChanged
{
    ···
    public CommandDemoViewModel()
    {
        MultiplyBy2Command = new Command(
            execute: () =>
            {
                Number *= 2;
                ((Command)MultiplyBy2Command).ChangeCanExecute();
                ((Command)DivideBy2Command).ChangeCanExecute();
            },
            canExecute: () => Number < Math.Pow(2, 10));

        DivideBy2Command = new Command(
            execute: () =>
            {
                Number /= 2;
                ((Command)MultiplyBy2Command).ChangeCanExecute();
                ((Command)DivideBy2Command).ChangeCanExecute();
            },
            canExecute: () => Number > Math.Pow(2, -10));
    }
    ···
}
Command の ChangeCanExecute メソッドの呼び出しが必要です。これにより、Command メソッドが canExecute メソッドを呼び出し Button を無効にするかどうかを判断できます。 このコードの変更により、数値が上限に達すると、Button は無効になります。
2 つ以上の Button 要素を同じ ICommand プロパティにバインドできます。 Button 要素は、Button の CommandParameter プロパティを使用して区別できます。 この場合は、ジェネリック Command<T> クラスを使用します。 CommandParameter オブジェクトは、引数として execute と canExecute のメソッドに渡されます。 この手法については、「コマンド インターフェイス」の記事の「基本的なコマンド」セクションで詳細に説明しています。
このサンプルでは、MainPage クラスの中でもこの手法を使用します。 MainPage.xaml ファイルには、サンプルの各ページの Button が含まれています。
<ContentPage xmlns="http://xamarin.com/schemas/2014/forms"
             xmlns:x="http://schemas.microsoft.com/winfx/2009/xaml"
             xmlns:local="clr-namespace:ButtonDemos"
             x:Class="ButtonDemos.MainPage"
             Title="Button Demos">
    <ScrollView>
        <FlexLayout Direction="Column"
                    JustifyContent="SpaceEvenly"
                    AlignItems="Center">

            <Button Text="Basic Button Click"
                    Command="{Binding NavigateCommand}"
                    CommandParameter="{x:Type local:BasicButtonClickPage}" />

            <Button Text="Code Button Click"
                    Command="{Binding NavigateCommand}"
                    CommandParameter="{x:Type local:CodeButtonClickPage}" />

            <Button Text="Basic Button Command"
                    Command="{Binding NavigateCommand}"
                    CommandParameter="{x:Type local:BasicButtonCommandPage}" />

            <Button Text="Press and Release Button"
                    Command="{Binding NavigateCommand}"
                    CommandParameter="{x:Type local:PressAndReleaseButtonPage}" />

            <Button Text="Button Appearance"
                    Command="{Binding NavigateCommand}"
                    CommandParameter="{x:Type local:ButtonAppearancePage}" />

            <Button Text="Toggle Button Demo"
                    Command="{Binding NavigateCommand}"
                    CommandParameter="{x:Type local:ToggleButtonDemoPage}" />

            <Button Text="Image Button Demo"
                    Command="{Binding NavigateCommand}"
                    CommandParameter="{x:Type local:ImageButtonDemoPage}" />

        </FlexLayout>
    </ScrollView>
</ContentPage>
各 Button には NavigateCommand という名前のプロパティにバインドされている Command プロパティがあり、CommandParameter はプロジェクト内のページ クラスのいずれかに対応する Type オブジェクトに設定されています。
その NavigateCommand プロパティは型 ICommand であり、分離コード ファイルで定義されています。
public partial class MainPage : ContentPage
{
    public MainPage()
    {
        InitializeComponent();

        NavigateCommand = new Command<Type>(async (Type pageType) =>
        {
            Page page = (Page)Activator.CreateInstance(pageType);
            await Navigation.PushAsync(page);
        });

        BindingContext = this;
    }

    public ICommand NavigateCommand { private set; get; }
}
Type はXAML ファイルで設定されている CommandParameter オブジェクトの型であるため、コンストラクターは NavigateCommand プロパティを Command<Type> オブジェクトに初期化します。 これは、execute メソッドには、この CommandParameter オブジェクトに対応する型 Type の引数があることを意味しています。 この関数はページをインスタンス化し、そのページに移動します。
コンストラクターが自身の BindingContext を自身に設定して終了することに注意してください。 これは、XAML ファイル内のプロパティが NavigateCommand プロパティにバインドするために必要です。
ボタンを押して離す
Clicked イベントのほかに、Button は Pressed イベントと Released イベントも定義します。 Pressed イベントは、指で Button を押すか、ポインターが Button 上にあるときにマウス ボタンを押すと発生します。 Released イベントは、指またはマウス ボタンが離されると発生します。 通常、Clicked イベントは Released イベントと同時に発生しますが、指またはマウス ポインターを離す前に Button の表面から移動すると、Clicked イベントが発生しない場合があります。
Pressed イベントと Released イベントは頻繁には使用されませんが、「ボタンを押して離す」ページで示すように、特別な目的で使用できます。 XAML ファイルには、Pressed イベントと Released イベントにアタッチされたハンドラーを含む Label と Button が含まれています。
<ContentPage xmlns="http://xamarin.com/schemas/2014/forms"
             xmlns:x="http://schemas.microsoft.com/winfx/2009/xaml"
             x:Class="ButtonDemos.PressAndReleaseButtonPage"
             Title="Press and Release Button">
    <StackLayout>

        <Label x:Name="label"
               Text="Press and hold the Button below"
               FontSize="Large"
               VerticalOptions="CenterAndExpand"
               HorizontalOptions="Center" />

        <Button Text="Press to Rotate Text!"
                VerticalOptions="CenterAndExpand"
                HorizontalOptions="Center"
                Pressed="OnButtonPressed"
                Released="OnButtonReleased" />

    </StackLayout>
</ContentPage>
分離ファイルは、Pressed イベントが発生すると Label をアニメーション化させますが、Released イベントが発生するとローテーションを中断します。
public partial class PressAndReleaseButtonPage : ContentPage
{
    bool animationInProgress = false;
    Stopwatch stopwatch = new Stopwatch();

    public PressAndReleaseButtonPage ()
    {
        InitializeComponent ();
    }

    void OnButtonPressed(object sender, EventArgs args)
    {
        stopwatch.Start();
        animationInProgress = true;

        Device.StartTimer(TimeSpan.FromMilliseconds(16), () =>
        {
            label.Rotation = 360 * (stopwatch.Elapsed.TotalSeconds % 1);

            return animationInProgress;
        });
    }

    void OnButtonReleased(object sender, EventArgs args)
    {
        animationInProgress = false;
        stopwatch.Stop();
    }
}
その結果、Label は指が Button に接触している間だけ回転し、指が離されると停止します。
この種の動作は、ゲーム用の用途があります。Button 上に指を置き続けると、画面上のオブジェクトが特定の方向に移動する場合などです。
ボタンの外観
Button では、その外観に影響を与えるいくつかのプロパティが継承または定義されています。
TextColorはButtonテキストの色ですBackgroundColorはそのテキストの背景の色ですBorderColorはButtonを囲んでいる領域の色ですFontFamilyはテキストに使用されるフォント ファミリですFontSizeはテキストのサイズですFontAttributesテキストが斜体や太字であるかどうかを示しますBorderWidthは境界の幅ですCornerRadiusはButtonの角の半径ですCharacterSpacingはButtonテキストの文字間の間隔ですTextTransformはButtonテキストの大文字と小文字の区別を決定します
Note
Button クラスには、Button のレイアウトの動作を制御する Margin プロパティと Padding プロパティもあります。 詳細については「Margin and Padding」 (余白とスペース) を参照してください。
これらのプロパティのうち 6 つ (FontFamily と FontAttributes を除く) の効果は、「ボタンの外観」ページで説明しています。 もう 1 つのプロパティ Image については、「ボタンでのビットマップの使用」で説明しています。
「ボタンの外観」ページのすべてのビューとデータ バインディングは、XAML ファイルで定義されています。
<ContentPage xmlns="http://xamarin.com/schemas/2014/forms"
             xmlns:x="http://schemas.microsoft.com/winfx/2009/xaml"
             xmlns:local="clr-namespace:ButtonDemos"
             x:Class="ButtonDemos.ButtonAppearancePage"
             Title="Button Appearance">
    <StackLayout>
        <Button x:Name="button"
                Text="Button"
                VerticalOptions="CenterAndExpand"
                HorizontalOptions="Center"
                TextColor="{Binding Source={x:Reference textColorPicker},
                                    Path=SelectedItem.Color}"
                BackgroundColor="{Binding Source={x:Reference backgroundColorPicker},
                                          Path=SelectedItem.Color}"
                BorderColor="{Binding Source={x:Reference borderColorPicker},
                                      Path=SelectedItem.Color}" />

        <StackLayout BindingContext="{x:Reference button}"
                     Padding="10">

            <Slider x:Name="fontSizeSlider"
                    Maximum="48"
                    Minimum="1"
                    Value="{Binding FontSize}" />

            <Label Text="{Binding Source={x:Reference fontSizeSlider},
                                  Path=Value,
                                  StringFormat='FontSize = {0:F0}'}"
                   HorizontalTextAlignment="Center" />

            <Slider x:Name="borderWidthSlider"
                    Minimum="-1"
                    Maximum="12"
                    Value="{Binding BorderWidth}" />

            <Label Text="{Binding Source={x:Reference borderWidthSlider},
                                  Path=Value,
                                  StringFormat='BorderWidth = {0:F0}'}"
                   HorizontalTextAlignment="Center" />

            <Slider x:Name="cornerRadiusSlider"
                    Minimum="-1"
                    Maximum="24"
                    Value="{Binding CornerRadius}" />

            <Label Text="{Binding Source={x:Reference cornerRadiusSlider},
                                  Path=Value,
                                  StringFormat='CornerRadius = {0:F0}'}"
                   HorizontalTextAlignment="Center" />

            <Grid>
                <Grid.RowDefinitions>
                    <RowDefinition Height="Auto" />
                    <RowDefinition Height="Auto" />
                    <RowDefinition Height="Auto" />
                </Grid.RowDefinitions>

                <Grid.ColumnDefinitions>
                    <ColumnDefinition Width="*" />
                    <ColumnDefinition Width="*" />
                </Grid.ColumnDefinitions>

                <Grid.Resources>
                    <Style TargetType="Label">
                        <Setter Property="VerticalOptions" Value="Center" />
                    </Style>
                </Grid.Resources>

                <Label Text="Text Color:"
                       Grid.Row="0" Grid.Column="0" />

                <Picker x:Name="textColorPicker"
                        ItemsSource="{Binding Source={x:Static local:NamedColor.All}}"
                        ItemDisplayBinding="{Binding FriendlyName}"
                        SelectedIndex="0"
                        Grid.Row="0" Grid.Column="1" />

                <Label Text="Background Color:"
                       Grid.Row="1" Grid.Column="0" />

                <Picker x:Name="backgroundColorPicker"
                        ItemsSource="{Binding Source={x:Static local:NamedColor.All}}"
                        ItemDisplayBinding="{Binding FriendlyName}"
                        SelectedIndex="0"
                        Grid.Row="1" Grid.Column="1" />

                <Label Text="Border Color:"
                       Grid.Row="2" Grid.Column="0" />

                <Picker x:Name="borderColorPicker"
                        ItemsSource="{Binding Source={x:Static local:NamedColor.All}}"
                        ItemDisplayBinding="{Binding FriendlyName}"
                        SelectedIndex="0"
                        Grid.Row="2" Grid.Column="1" />
            </Grid>
        </StackLayout>
    </StackLayout>
</ContentPage>
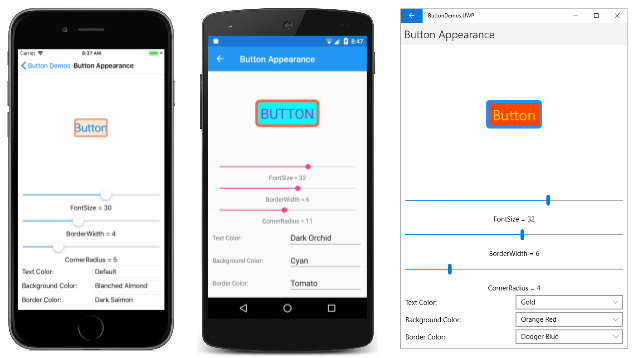
ページの上部の Button には、ページの下部にある Picker 要素にバインドされた 3 つの Color プロパティがあります。 Picker 要素内の項目は、プロジェクトに含まれている NamedColor クラスの色です。 3 つの Slider 要素には、Button の FontSize、BorderWidth、CornerRadius 各プロパティへの両方向のバインドが含まれています。
このプログラムでは、これらすべてのプロパティの組み合わせを試すことができます。
Button の境界線を表示するには、BorderColor を Default 以外の値に、BorderWidth を正の値に設定する必要があります。
iOS では、境界線の幅を大きくすると Button の内部に侵入し、テキストの表示と干渉していることがわかります。 iOS Button で境界線を使用することを選択する場合は、可視性を維持するために、Text プロパティの最初と最後をスペースにすることが必要な場合があります。
UWP では、Button の高さの半分を超える CornerRadius を選択すると例外が 発生します。
ボタンの表示状態
Buttonには、ユーザーが押したときにButtonへの視覚的な変更を開始するために使用できるPressed VisualStateがあります (有効になっている場合)。
次の XAML の例は、Pressed 状態の表示状態を定義する方法を示しています。
<Button Text="Click me!"
        ...>
    <VisualStateManager.VisualStateGroups>
        <VisualStateGroup x:Name="CommonStates">
            <VisualState x:Name="Normal">
                <VisualState.Setters>
                    <Setter Property="Scale"
                            Value="1" />
                </VisualState.Setters>
            </VisualState>

            <VisualState x:Name="Pressed">
                <VisualState.Setters>
                    <Setter Property="Scale"
                            Value="0.8" />
                </VisualState.Setters>
            </VisualState>

        </VisualStateGroup>
    </VisualStateManager.VisualStateGroups>
</Button>
Pressed VisualStateは、Buttonが押されると、そのScaleプロパティが既定値の 1 から 0.8 に変更されることを指定します。 Normal VisualState は Button が通常状態の場合、その Scale プロパティが 1 に設定されることを指定します。 したがって、全体的な効果は、Button が押されると、少し小さいサイズに再スケーリングされ、Button が離されると既定のサイズに再スケーリングされることです。
ビジュアルの状態の詳細については、「Xamarin.FormsVisual State Manager」を参照してください。
トグル ボタンの作成
Button をサブクラス化して、オンオフスイッチのように動作するようにできます。ボタンを1回タップするとボタンがオンに切り替わり、もう一度タップするとオフに切り替わります。
次の ToggleButton クラスは Button から派生され、Toggled という名前の新しいイベントと IsToggled という名前のブール値プロパティを定義します。 これらは、Xamarin.FormsSwitch で定義されている 2 つの同じプロパティです。
class ToggleButton : Button
{
    public event EventHandler<ToggledEventArgs> Toggled;

    public static BindableProperty IsToggledProperty =
        BindableProperty.Create("IsToggled", typeof(bool), typeof(ToggleButton), false,
                                propertyChanged: OnIsToggledChanged);

    public ToggleButton()
    {
        Clicked += (sender, args) => IsToggled ^= true;
    }

    public bool IsToggled
    {
        set { SetValue(IsToggledProperty, value); }
        get { return (bool)GetValue(IsToggledProperty); }
    }

    protected override void OnParentSet()
    {
        base.OnParentSet();
        VisualStateManager.GoToState(this, "ToggledOff");
    }

    static void OnIsToggledChanged(BindableObject bindable, object oldValue, object newValue)
    {
        ToggleButton toggleButton = (ToggleButton)bindable;
        bool isToggled = (bool)newValue;

        // Fire event
        toggleButton.Toggled?.Invoke(toggleButton, new ToggledEventArgs(isToggled));

        // Set the visual state
        VisualStateManager.GoToState(toggleButton, isToggled ? "ToggledOn" : "ToggledOff");
    }
}
ToggleButton コンストラクターは、IsToggled プロパティの値を変更できるように、ハンドラーを Clicked イベントに アタッチします。 OnIsToggledChanged メソッドで Toggled イベントが発生します。
OnIsToggledChanged メソッドの最後の行は、2 つのテキスト文字列 "ToggledOn" と "ToggledOff" を使用して静的 VisualStateManager.GoToState メソッドを呼び出します。 このメソッドと、アプリケーションがビジュアル状態に応答する方法については、「The Xamarin.Forms Visual State Manager」を参照してください。
ToggleButton は VisualStateManager.GoToState の呼び出しを行うため、その IsToggled の状態に基づいてボタンの外観を変更するために、クラス自体に追加の機能を含める必要はありません。 これは、ToggleButton をホストする XAML の責任で行うことです。
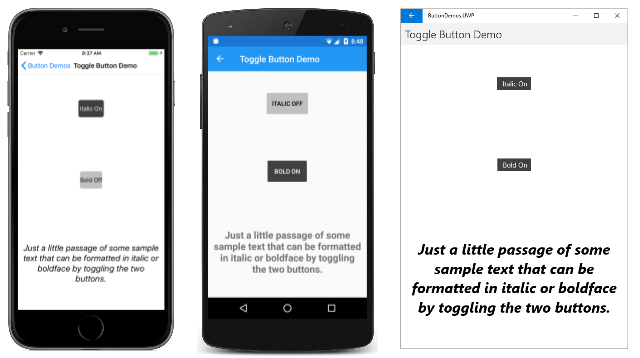
「ボタンの切り替えデモ」ページには、表示状態に基づいてボタンの Text、BackgroundColor、TextColor を設定する Visual State Manager マークアップを含む、ToggleButton の 2 つのインスタンスが含まれています。
<?xml version="1.0" encoding="utf-8" ?>
<ContentPage xmlns="http://xamarin.com/schemas/2014/forms"
             xmlns:x="http://schemas.microsoft.com/winfx/2009/xaml"
             xmlns:local="clr-namespace:ButtonDemos"
             x:Class="ButtonDemos.ToggleButtonDemoPage"
             Title="Toggle Button Demo">

    <ContentPage.Resources>
        <Style TargetType="local:ToggleButton">
            <Setter Property="VerticalOptions" Value="CenterAndExpand" />
            <Setter Property="HorizontalOptions" Value="Center" />
        </Style>
    </ContentPage.Resources>

    <StackLayout Padding="10, 0">
        <local:ToggleButton Toggled="OnItalicButtonToggled">
            <VisualStateManager.VisualStateGroups>
                <VisualStateGroup Name="ToggleStates">
                    <VisualState Name="ToggledOff">
                        <VisualState.Setters>
                            <Setter Property="Text" Value="Italic Off" />
                            <Setter Property="BackgroundColor" Value="#C0C0C0" />
                            <Setter Property="TextColor" Value="Black" />
                        </VisualState.Setters>
                    </VisualState>

                    <VisualState Name="ToggledOn">
                        <VisualState.Setters>
                            <Setter Property="Text" Value=" Italic On " />
                            <Setter Property="BackgroundColor" Value="#404040" />
                            <Setter Property="TextColor" Value="White" />
                        </VisualState.Setters>
                    </VisualState>
                </VisualStateGroup>
            </VisualStateManager.VisualStateGroups>
        </local:ToggleButton>

        <local:ToggleButton Toggled="OnBoldButtonToggled">
            <VisualStateManager.VisualStateGroups>
                <VisualStateGroup Name="ToggleStates">
                    <VisualState Name="ToggledOff">
                        <VisualState.Setters>
                            <Setter Property="Text" Value="Bold Off" />
                            <Setter Property="BackgroundColor" Value="#C0C0C0" />
                            <Setter Property="TextColor" Value="Black" />
                        </VisualState.Setters>
                    </VisualState>

                    <VisualState Name="ToggledOn">
                        <VisualState.Setters>
                            <Setter Property="Text" Value=" Bold On " />
                            <Setter Property="BackgroundColor" Value="#404040" />
                            <Setter Property="TextColor" Value="White" />
                        </VisualState.Setters>
                    </VisualState>
                </VisualStateGroup>
            </VisualStateManager.VisualStateGroups>
        </local:ToggleButton>

        <Label x:Name="label"
               Text="Just a little passage of some sample text that can be formatted in italic or boldface by toggling the two buttons."
               FontSize="Large"
               HorizontalTextAlignment="Center"
               VerticalOptions="CenterAndExpand" />

    </StackLayout>
</ContentPage>
Toggled イベント ハンドラーは分離コード ファイルにあります。 これらは、ボタンの状態に基づいて Label の FontAttributes プロパティを設定する役割を担います。
public partial class ToggleButtonDemoPage : ContentPage
{
    public ToggleButtonDemoPage ()
    {
        InitializeComponent ();
    }

    void OnItalicButtonToggled(object sender, ToggledEventArgs args)
    {
        if (args.Value)
        {
            label.FontAttributes |= FontAttributes.Italic;
        }
        else
        {
            label.FontAttributes &= ~FontAttributes.Italic;
        }
    }

    void OnBoldButtonToggled(object sender, ToggledEventArgs args)
    {
        if (args.Value)
        {
            label.FontAttributes |= FontAttributes.Bold;
        }
        else
        {
            label.FontAttributes &= ~FontAttributes.Bold;
        }
    }
}
iOS、Android、UWP:デバイスで実行されているプログラムを次に示します。
ボタンにビットマップを使用する
Button クラスは ImageSource プロパティを定義します。このプロパティを使用すると、単独で、またはテキストと組み合わせて、Buttonにビットマップイメージを表示できます。 テキストと画像の配置方法を指定することもできます。
ImageSource 型の ImageSource プロパティは、ビットマップをファイル、埋め込みリソース、URI、またはストリームから読み込むことができることを意味します
Note
Button はアニメーション GIF を読み込むことができますが、GIF の最初のフレームのみが表示されます。
Xamarin.Forms でサポートされる各プラットフォームでは、アプリケーションが実行される可能性のあるさまざまなデバイスの異なるピクセル解像度に対応するよう、画像を複数のサイズで格納できます。 これらの複数のビットマップは、オペレーティング システムによって、デバイスのビデオ表示解像度に最適な方法で名前を付けられ、保存されます。
Button 上のビットマップの場合、最適なサイズは、通常、デバイスに依存しない単位で 32 から 64 の間です (使用するサイズに応じて異なります)。 この例で使用しているイメージは、デバイスに依存しない単位で 48 のサイズに基づいています。
iOS プロジェクトの Resources フォルダーには、このイメージの 3 つのサイズが含まれています。
- /Resources/MonkeyFace.png として格納されている 48 ピクセルの正方形のビットマップ
- /Resource/MonkeyFace@2x.png として格納されている 96 ピクセルの正方形のビットマップ
- /Resource/MonkeyFace@3x.png として格納されている 144 ピクセルの正方形のビットマップ
3 つのビットマップはすべて、BundleResource. の Build Action が与えられました。
Android プロジェクトの場合、ビットマップはすべて同じ名前ですがResources フォルダーの異なるサブフォルダーに格納されます。
- /Resources/drawable-hdpi/MonkeyFace.png として格納されている 72 ピクセルの正方形のビットマップ
- /Resources/drawable-xhdpi/MonkeyFace.png として格納されている 96 ピクセルの正方形のビットマップ
- /Resources/drawable-xxhdpi/MonkeyFace.png として格納されている 144 ピクセルの正方形のビットマップ
- /Resources/drawable-xxxhdpi/MonkeyFace.png として格納されている 192 ピクセルの正方形のビットマップ
これらは AndroidResource の Build Action が与えられました。
UWP プロジェクトでは、ビットマップはプロジェクト内の任意の場所に格納できますが、通常はカスタム フォルダーまたは Assets の既存のフォルダーに格納されます。 UWP プロジェクトには、次のビットマップが含まれています。
- /Assets/MonkeyFace.scale-100.png として格納されている 48 ピクセルの正方形のビットマップ
- /Assets/MonkeyFace.scale-200.png として格納されている 96 ピクセルの正方形のビットマップ
- /Assets/MonkeyFace.scale-400.png として格納されている 192 ピクセルの正方形のビットマップ
これらはすべてf Content の Build Action が与えられました。
Button の ContentLayout プロパティを使って、Button 上の Text プロパティと ImageSource プロパティの配置を指定することができます。 このプロパティは型が ButtonContentLayout で、これは Button の埋め込みクラスです。 constructor には 2 つの引数があります。
ImagePosition列挙型のメンバーLeft、Top、Right、Bottomのいずれかで、テキストに対してどのようにビットマップが表示されるかを示します。- ビットマップとテキストの間隔を表す
doubleの値。
既定値は Left で 10 単位です。 Position および Spacing という名前の ButtonContentLayout の読み取り専用プロパティによって、これらのプロパティの値が提供されます。
コードでは、次のように Button を作成して ContentLayout プロパティを設定できます。
Button button = new Button
{
    Text = "button text",
    ImageSource = new FileImageSource
    {
        File = "image filename"
    },
    ContentLayout = new Button.ButtonContentLayout(Button.ButtonContentLayout.ImagePosition.Right, 20)
};
XAML では、列挙メンバーのみ、またはスペース、またはその両方をコンマで区切って任意の順序で指定する必要があります。
<Button Text="button text"
        ImageSource="image filename"
        ContentLayout="Right, 20" />
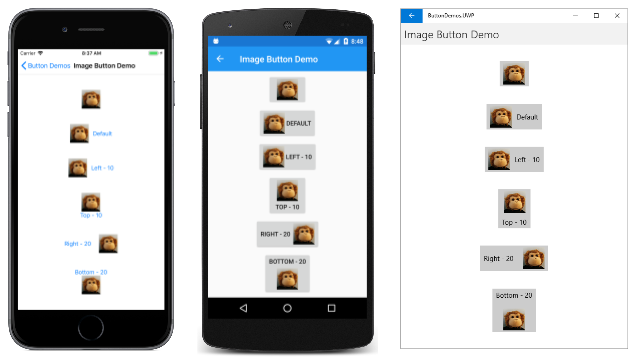
「イメージ ボタンのデモ」ページでは、OnPlatform を使用 して、iOS、Android、UWP ビットマップ ファイルのさまざまなファイル名を指定します。 各プラットフォームで同じファイル名を使用し、OnPlatform を使用しない場合は、プロジェクトのルート ディレクトリに UWP ビットマップを格納する必要があります。
「イメージ ボタン デモ」ページの最初の Button で、Image プロパティが設定されますが、Text プロパティは設定されません。
<Button>
    <Button.ImageSource>
        <OnPlatform x:TypeArguments="ImageSource">
            <On Platform="iOS, Android" Value="MonkeyFace.png" />
            <On Platform="UWP" Value="Assets/MonkeyFace.png" />
        </OnPlatform>
    </Button.ImageSource>
</Button>
UWP ビットマップがプロジェクトのルート ディレクトリに格納されている場合、このマークアップは大幅に簡略化できます。
<Button ImageSource="MonkeyFace.png" />
ImageButtonDemo.xaml ファイルで多くの繰り返しのマークアップを回避するために、ImageSource プロパティを設定する暗黙的な Style も定義されています。 この Style は、他の 5 つの Button 要素に自動的に適用されます。 完成した XAML ファイルはこのようになります。
<ContentPage xmlns="http://xamarin.com/schemas/2014/forms"
             xmlns:x="http://schemas.microsoft.com/winfx/2009/xaml"
             x:Class="ButtonDemos.ImageButtonDemoPage">

    <FlexLayout Direction="Column"
                JustifyContent="SpaceEvenly"
                AlignItems="Center">

        <FlexLayout.Resources>
            <Style TargetType="Button">
                <Setter Property="ImageSource">
                    <OnPlatform x:TypeArguments="ImageSource">
                        <On Platform="iOS, Android" Value="MonkeyFace.png" />
                        <On Platform="UWP" Value="Assets/MonkeyFace.png" />
                    </OnPlatform>
                </Setter>
            </Style>
        </FlexLayout.Resources>

        <Button>
            <Button.ImageSource>
                <OnPlatform x:TypeArguments="ImageSource">
                    <On Platform="iOS, Android" Value="MonkeyFace.png" />
                    <On Platform="UWP" Value="Assets/MonkeyFace.png" />
                </OnPlatform>
            </Button.ImageSource>
        </Button>

        <Button Text="Default" />

        <Button Text="Left - 10"
                ContentLayout="Left, 10" />

        <Button Text="Top - 10"
                ContentLayout="Top, 10" />

        <Button Text="Right - 20"
                ContentLayout="Right, 20" />

        <Button Text="Bottom - 20"
                ContentLayout="Bottom, 20" />
    </FlexLayout>
</ContentPage>
最後の 4 つの Button 要素では、ContentLayout プロパティを使用して、テキストとビットマップの位置と間隔を指定します。
これで、Button イベントを処理 したり Button の外観を変更したりできるさまざまな方法を確認できました。
