Azure Active Directory B2C を使用してユーザーを認証する
Azure Active Directory B2C は、コンシューマー向け Web およびモバイル アプリケーションにクラウド ID 管理を提供します。 この記事では、Azure Active Directory B2C と Microsoft Authentication Library を使用して ID 管理をモバイル アプリケーションに統合する方法について説明します。
概要
Azure Active Directory B2C (ADB2C) は、コンシューマー向けアプリケーション用の ID 管理サービスです。 これにより、ユーザーは、既存のソーシャル アカウントまたはカスタム資格情報 (メールアドレス、ユーザー名など) とパスワードを使用してアプリケーションにサインインできるようになります。 カスタム資格情報アカウントは、"ローカル" アカウントとも呼ばれます。
Azure Active Directory B2C ID 管理サービスをモバイル アプリケーションに統合するプロセスは、次のとおりです。
- Azure Active Directory B2C テナントを作成する。
- モバイル アプリケーションを Azure Active Directory B2C テナントに登録します。
- サインアップとサインインのポリシーと、パスワードを忘れた場合のユーザー フローを作成します。
- Microsoft Authentication Library (MSAL) を使用して、Azure Active Directory B2C テナントで認証ワークフローを開始します。
Note
Azure サブスクリプションをお持ちでない場合は、開始する前に無料アカウントを作成してください。
Azure Active Directory B2C では、Microsoft、GitHub、Facebook、Twitter など、複数の ID プロバイダーがサポートされています。 Azure Active Directory B2C の機能の詳細については、「Azure Active Directory B2C のドキュメント」を参照してください。
Microsoft Authentication Library では、複数のアプリケーション アーキテクチャとプラットフォームがサポートされています。 MSAL の機能については、GitHub の Microsoft Authentication Library を参照してください。
Azure Active Directory B2C テナントを構成する
サンプル プロジェクトを実行するには、Azure Active Directory B2C テナントを作成する必要があります。 詳細については、Azure portal での Azure Active Directory B2C テナントの作成に関するページを参照してください。
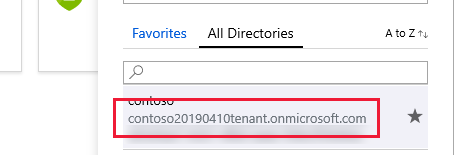
テナントを作成したら、モバイル アプリケーションを構成するために、テナント名とテナント ID が必要になります。 テナントの ID と名前は、テナント URL の作成時に生成されたドメインによって定義されます。 生成したテナント URL が https://contoso20190410tenant.onmicrosoft.com/ の場合、テナント ID は contoso20190410tenant.onmicrosoft.com で、テナント名は contoso20190410tenant になります。 上部のメニューで [ディレクトリとサブスクリプション] フィルターをクリックして、Azure portal でテナント ドメインを見つけます。 次のスクリーンショットは、Azure の [ディレクトリとサブスクリプション] フィルター ボタンとテナント ドメインを示しています。
サンプル プロジェクトで、Constants.cs ファイルを編集して、tenantName および tenantId フィールドを設定します。 次のコードは、テナント ドメインが https://contoso20190410tenant.onmicrosoft.com/ の場合に、これらの値を設定する方法を示しています。これらの値をポータルの値に置き換えています。
public static class Constants
{
    static readonly string tenantName = "contoso20190410tenant";
    static readonly string tenantId = "contoso20190410tenant.onmicrosoft.com";
    ...
}
モバイル アプリケーションを Active Directory B2C に登録する
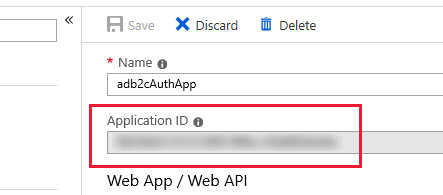
モバイル アプリケーションは、接続してユーザーを認証する前に、テナントに登録する必要があります。 登録プロセスを実行すると、一意の アプリケーション ID がアプリケーションに割り当てられ、認証後に応答をアプリケーションに返すリダイレクト URL が割り当てられます。 詳細については、Azure Active Directory B2C へのアプリケーションの登録に関するページを参照してください。 アプリケーションに割り当てられた アプリケーション ID を知っておく必要があります。これは、プロパティ ビューでアプリケーション名の後に表示されます。 次のスクリーンショットは、アプリケーション ID が表示される場所を示しています。
Microsoft Authentication Library では、リダイレクト URL として、アプリケーション ID に "msal" というテキストのプレフィックスが付き、後に "auth" という名前のエンドポイントが続く値が想定されます。 アプリケーション ID が "1234abcd" の場合、完全な URL は msal1234abcd://auth になります。 次のスクリーンショットに示すように、アプリケーションで、[ネイティブ クライアント] 設定が有効になっていることを確認し、アプリケーション ID を使用して [カスタム リダイレクト URI] を作成します。
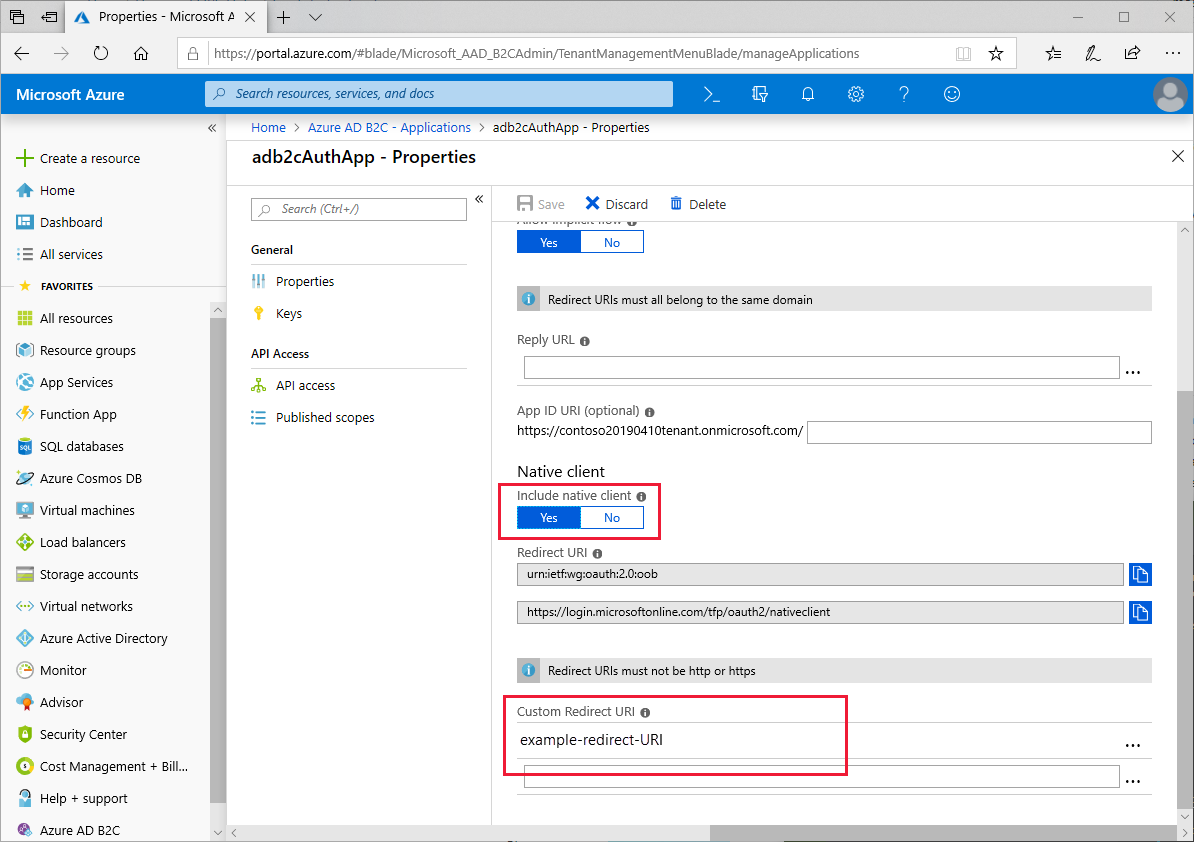
この URL は、後で、Android の ApplicationManifest.xml と iOS の Info.plist の両方で使用されます。
サンプル プロジェクトで、Constants.cs ファイルを編集して、clientId フィールドを アプリケーション ID に設定します。 次のコードは、アプリケーション ID が 1234abcd の場合にこの値を設定する方法を示しています。
public static class Constants
{
    static readonly string tenantName = "contoso20190410tenant";
    static readonly string tenantId = "contoso20190410tenant.onmicrosoft.com";
    static readonly string clientId = "1234abcd";
    ...
}
サインアップとサインインのポリシーと、パスワードを忘れた場合のユーザー フローを作成する
ポリシーは、ユーザーがアカウントの作成やパスワードのリセットなどのタスクを完了するために実行するエクスペリエンスです。 また、ポリシーには、ユーザーがエクスペリエンスから戻るときにアプリケーションに渡されるトークンの内容も指定します。 アカウントのサインアップおよびサインインのポリシーと、パスワードのリセット ポリシーの両方を設定する必要があります。 Azure には、一般的なポリシーの作成を簡略化する組み込みのポリシーがあります。 詳細については、Azure Active Directory B2C の組み込みポリシーに関するページを参照してください。
ポリシーの設定を完了すると、Azure portal の [ユーザー フロー (ポリシー)] ビューに 2 つのポリシーが表示されます。 次のスクリーンショットは、Azure portal に表示される 2 つの構成済みポリシーを示しています。
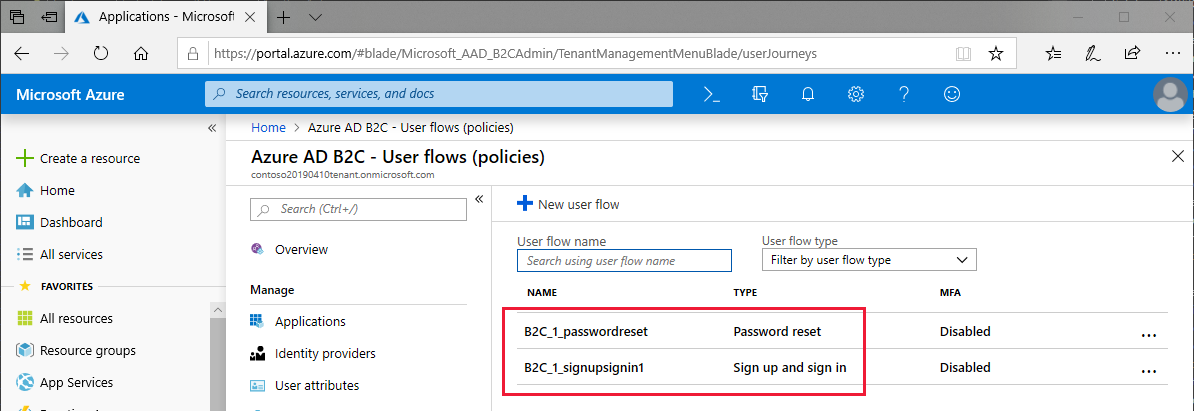
サンプル プロジェクトで、Constants.cs ファイルを編集して、ポリシーの設定時に選択した名前を反映するように policySignin および policyPassword フィールドを設定します。
public static class Constants
{
    static readonly string tenantName = "contoso20190410tenant";
    static readonly string tenantId = "contoso20190410tenant.onmicrosoft.com";
    static readonly string clientId = "1234abcd";
    static readonly string policySignin = "B2C_1_signupsignin1";
    static readonly string policyPassword = "B2C_1_passwordreset";
    ...
}
認証に Microsoft Authentication Library (MSAL) を使用する
Microsoft Authentication Library (MSAL) NuGet パッケージを、共有の .NET Standard プロジェクトと、Xamarin.Forms ソリューションのプラットフォーム プロジェクトに追加する必要があります。 MSAL には、IPublicClientApplication インターフェイスに準拠するオブジェクトを構築する PublicClientApplicationBuilder クラスが含まれています。 MSAL では、With 句を使用して、コンストラクターと認証方法に追加のパラメーターを指定します。
サンプル プロジェクトでは、App.xaml の分離コードで、AuthenticationClient および UIParent という名前の静的プロパティを定義し、コンストラクターで AuthenticationClient オブジェクトのインスタンスを作成します。 WithIosKeychainSecurityGroup 句は、iOS アプリケーションのセキュリティ グループ名を指定します。 WithB2CAuthority 句は、ユーザーの認証に使用される既定の機関 (ポリシー) を指定します。 WithRedirectUri 句は、複数の URI が指定されている場合に使用するリダイレクト URI を Azure Notification Hubs インスタンスに指示します。 次の例は、PublicClientApplication のインスタンスを作成する方法を示しています。
public partial class App : Application
{
    public static IPublicClientApplication AuthenticationClient { get; private set; }

    public static object UIParent { get; set; } = null;

    public App()
    {
        InitializeComponent();

        AuthenticationClient = PublicClientApplicationBuilder.Create(Constants.ClientId)
            .WithIosKeychainSecurityGroup(Constants.IosKeychainSecurityGroups)
            .WithB2CAuthority(Constants.AuthoritySignin)
            .WithRedirectUri($"msal{Constants.ClientId}://auth")
            .Build();

        MainPage = new NavigationPage(new LoginPage());
    }

    ...
Note
Azure Notification Hubs インスタンスにリダイレクト URI が 1 つのみ定義されている場合、WithRedirectUri 句を使用してリダイレクト URI を指定しなくても、AuthenticationClient インスタンスは動作する可能性があります。 ただし、他のクライアントまたは認証方法をサポートするために Azure 構成を拡張する場合に備えて、常にこの値を指定する必要があります。
LoginPage.xaml.cs 分離コードのイベント ハンドラー OnAppearing は AcquireTokenSilentAsync を呼び出して、その前にログインしたユーザーの認証トークンを更新します。 認証プロセスが成功した場合は LogoutPage にリダイレクトされ、失敗した場合は何も実行されません。 次の例は、OnAppearing のサイレント再認証プロセスを示しています。
public partial class LoginPage : ContentPage
{
    ...

    protected override async void OnAppearing()
    {
        try
        {
            // Look for existing account
            IEnumerable<IAccount> accounts = await App.AuthenticationClient.GetAccountsAsync();

            AuthenticationResult result = await App.AuthenticationClient
                .AcquireTokenSilent(Constants.Scopes, accounts.FirstOrDefault())
                .ExecuteAsync();

            await Navigation.PushAsync(new LogoutPage(result));
        }
        catch
        {
            // Do nothing - the user isn't logged in
        }
        base.OnAppearing();
    }

    ...
}
イベント ハンドラー OnLoginButtonClicked ([ログイン] ボタンがクリックされたときに起動されます) は、AcquireTokenAsync を呼び出します。 MSAL ライブラリによってモバイル デバイスのブラウザーが自動的に開き、ログイン ページに移動します。 機関 と呼ばれるサインイン URL は、Constants.cs ファイルで定義されているテナント名とポリシーの組み合わせです。 ユーザーが [パスワードを忘れた場合] オプションを選択した場合、例外を除き、アプリに戻り、パスワードを忘れた場合のエクスペリエンスが起動されます。 次の例は、認証プロセスを示しています。
public partial class LoginPage : ContentPage
{
    ...

    async void OnLoginButtonClicked(object sender, EventArgs e)
    {
        AuthenticationResult result;
        try
        {
            result = await App.AuthenticationClient
                .AcquireTokenInteractive(Constants.Scopes)
                .WithPrompt(Prompt.SelectAccount)
                .WithParentActivityOrWindow(App.UIParent)
                .ExecuteAsync();

            await Navigation.PushAsync(new LogoutPage(result));
        }
        catch (MsalException ex)
        {
            if (ex.Message != null && ex.Message.Contains("AADB2C90118"))
            {
                result = await OnForgotPassword();
                await Navigation.PushAsync(new LogoutPage(result));
            }
            else if (ex.ErrorCode != "authentication_canceled")
            {
                await DisplayAlert("An error has occurred", "Exception message: " + ex.Message, "Dismiss");
            }
        }
    }

    ...
}
OnForgotPassword メソッドはサインイン プロセスと同様ですが、カスタム ポリシーを実装します。 OnForgotPassword は、AcquireTokenAsync の別のオーバーロードを使用します。これにより、特定の機関 を指定できます。 次の例は、トークンを取得するときにカスタム機関を指定する方法を示しています。
public partial class LoginPage : ContentPage
{
    ...
    async Task<AuthenticationResult> OnForgotPassword()
    {
        try
        {
            return await App.AuthenticationClient
                .AcquireTokenInteractive(Constants.Scopes)
                .WithPrompt(Prompt.SelectAccount)
                .WithParentActivityOrWindow(App.UIParent)
                .WithB2CAuthority(Constants.AuthorityPasswordReset)
                .ExecuteAsync();
        }
        catch (MsalException)
        {
            // Do nothing - ErrorCode will be displayed in OnLoginButtonClicked
            return null;
        }
    }
}
認証の最後の部分は、サインアウト プロセスです。 OnLogoutButtonClicked メソッドは、ユーザーが [サインアウト] ボタンを押したときに呼び出されます。 これは、すべてのアカウントをループし、トークンが無効になっていることを確認します。 次のサンプルは、サインアウトの実装を示しています。
public partial class LogoutPage : ContentPage
{
    ...
    async void OnLogoutButtonClicked(object sender, EventArgs e)
    {
        IEnumerable<IAccount> accounts = await App.AuthenticationClient.GetAccountsAsync();

        while (accounts.Any())
        {
            await App.AuthenticationClient.RemoveAsync(accounts.First());
            accounts = await App.AuthenticationClient.GetAccountsAsync();
        }

        await Navigation.PopAsync();
    }
}
iOS
iOS では、Azure Active Directory B2C に登録されたカスタム URL スキームを Info.plist に登録する必要があります。 MSAL では、URL スキームが、「モバイル アプリケーションを Azure Active Directory B2C に登録する」で説明した特定のパターンに準拠していると想定されます。 次のスクリーンショットは、Info.plist 内のカスタム URL スキームを示しています。

次のスクリーンショットに示すように、MSAL には、Entitilements.plist に登録されている iOS 上のキーチェーン エンタイトルメントも必要です。
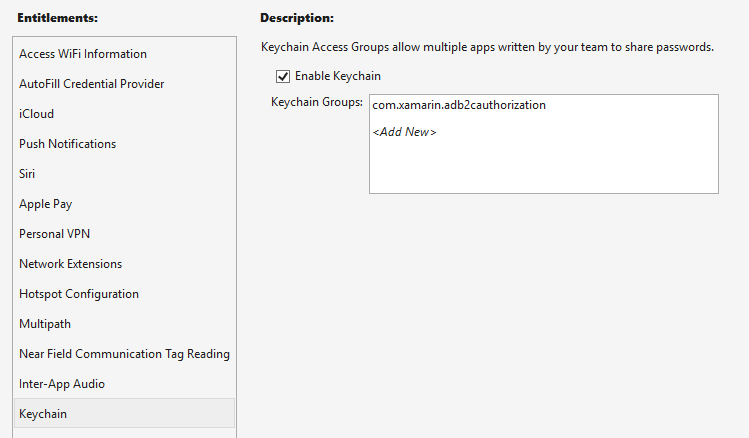
Azure Active Directory B2C が認証要求を完了すると、登録されたリダイレクト URL にリダイレクトされます。 カスタム URL スキームにより、iOS はモバイル アプリケーションを起動し、URL を起動パラメーターとして渡します。このパラメーターは、アプリケーションの AppDelegate クラスの OpenUrl オーバーライドによって処理され、エクスペリエンスの制御が MSAL に返されます。 OpenUrl 実装を次のコード例に示します。
using Microsoft.Identity.Client;

namespace TodoAzure.iOS
{
    [Register("AppDelegate")]
    public partial class AppDelegate : global::Xamarin.Forms.Platform.iOS.FormsApplicationDelegate
    {
        ...
        public override bool OpenUrl(UIApplication app, NSUrl url, NSDictionary options)
        {
            AuthenticationContinuationHelper.SetAuthenticationContinuationEventArgs(url);
            return base.OpenUrl(app, url, options);
        }
    }
}
Android
Android では、Azure Active Directory B2C に登録された URL スキームを AndroidManifest.xml に登録する必要があります。 MSAL では、URL スキームが、「モバイル アプリケーションを Azure Active Directory B2C に登録する」で説明した特定のパターンに準拠していると想定されます。 次の例は、AndroidManifest.xml 内のカスタム URL スキームを示しています。
<?xml version="1.0" encoding="utf-8"?>
<manifest xmlns:android="http://schemas.android.com/apk/res/android" android:versionCode="1" android:versionName="1.0" package="com.xamarin.adb2cauthorization">
  <uses-sdk android:minSdkVersion="15" />
  <application android:label="ADB2CAuthorization">
    <activity android:name="microsoft.identity.client.BrowserTabActivity">
      <intent-filter>
        <action android:name="android.intent.action.VIEW" />
        <category android:name="android.intent.category.DEFAULT" />
        <category android:name="android.intent.category.BROWSABLE" />
        <!-- example -->
        <!-- <data android:scheme="msalaaaaaaaa-bbbb-cccc-dddd-eeeeeeeeeeee" android:host="auth" /> -->
        <data android:scheme="INSERT_URI_SCHEME_HERE" android:host="auth" />
      </intent-filter>
    </activity>"
  </application>
</manifest>
OnCreate の呼び出し時に UIParent オブジェクトをアプリケーションに提供するように MainActivity クラスを変更する必要があります。 Azure Active Directory B2C が認証要求を完了すると、AndroidManifest.xml の登録されたリダイレクト URL スキームにリダイレクトされます。 登録された URI により、Android は、URL を起動パラメーターとして OnActivityResult メソッドを呼び出します。このパラメーターは、SetAuthenticationContinuationEventArgs メソッドによって処理されます。
public class MainActivity : FormsAppCompatActivity
{
    protected override void OnCreate(Bundle bundle)
    {
        TabLayoutResource = Resource.Layout.Tabbar;
        ToolbarResource = Resource.Layout.Toolbar;

        base.OnCreate(bundle);

        Forms.Init(this, bundle);
        LoadApplication(new App());
        App.UIParent = this;
    }

    protected override void OnActivityResult(int requestCode, Result resultCode, Intent data)
    {
        base.OnActivityResult(requestCode, resultCode, data);
        AuthenticationContinuationHelper.SetAuthenticationContinuationEventArgs(requestCode, resultCode, data);
    }
}
ユニバーサル Windows プラットフォーム
ユニバーサル Windows プラットフォームで MSAL を使用するために追加の設定は必要ありません
プロジェクトを実行する
仮想または物理デバイスでアプリケーションを実行します。 [ログイン] ボタンをタップすると、ブラウザーが開き、サインインできる、またはアカウントを作成できるページに移動します。 サインイン プロセスが完了したら、アプリケーションのログアウト ページに戻ります。 次のスクリーンショットは、Android と iOS で実行されるユーザー サインイン画面を示しています。

