Xamarin.Forms の文字列の書式設定
データ バインディングを使用して、オブジェクトや値の文字列表現を表示することは便利な場合があります。 たとえば、Label を使用して、現在の Slider の値を表示したい場合があります。 このデータ バインディングでは、Slider はソースであり、ターゲットは Label の Text プロパティです。
コードで文字列を表示している場合、最も強力なツールは静的な String.Format メソッドです。 書式設定文字列には、オブジェクトのさまざまな種類に固有の書式設定コードが含まれており、書式設定されている値とともに他のテキストを含めることができます。 文字列の書式設定の詳細については、「.NET での型の書式設定」の記事を参照してください。
StringFormat プロパティ
この機能はデータ バインディングに引き継がれます。Binding の StringFormat プロパティ (Binding マークアップ拡張の StringFormat プロパティ) に標準の .NET 書式設定文字列と 1 つのプレースホルダーを設定します。
<Slider x:Name="slider" />
<Label Text="{Binding Source={x:Reference slider},
                      Path=Value,
                      StringFormat='The slider value is {0:F2}'}" />
書式設定文字列は、XAML パーサーで中かっこを別の XAML マークアップ拡張として処理することを避けるために、一重引用符文字 (アポストロフィ) で区切られます。 それ以外の場合、一重引用符文字のない文字列は、String.Format への呼び出しで浮動小数点の値を表示するために使用するのと同じ文字列になります。 F2 の形式の指定は、小数点以下が 2 桁で表示される値になります。
StringFormat プロパティは、ターゲット プロパティが string 型で、バインディング モードが OneWay または TwoWay の場合にのみ意味があります。 両方向のバインドでは、StringFormat はソースからターゲットに渡す値にのみ適用されます。
バインディング パスに関する次の記事で示されるように、データ バインディングは非常に複雑になることがあります。 これらのデータ バインディングをデバッグするときに、Label を StringFormat とともに XAML ファイルに追加して、中間結果を表示できます。 オブジェクトの種類を表示するためだけに使用する場合でも、これが役立つ場合があります。
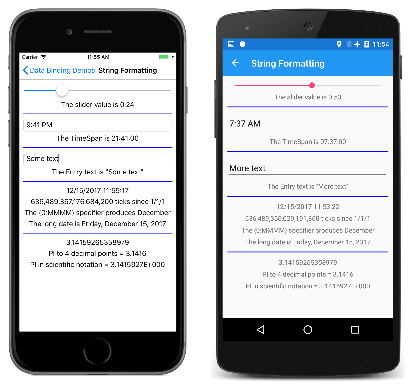
String Formatting ページでは、いくつかの StringFormat プロパティの使用を示しています。
<ContentPage xmlns="http://xamarin.com/schemas/2014/forms"
xmlns:x="http://schemas.microsoft.com/winfx/2009/xaml"
xmlns:sys="clr-namespace:System;assembly=netstandard"
x:Class="DataBindingDemos.StringFormattingPage"
Title="String Formatting">
<ContentPage.Resources>
<ResourceDictionary>
<Style TargetType="Label">
<Setter Property="HorizontalTextAlignment" Value="Center" />
</Style>
<Style TargetType="BoxView">
<Setter Property="Color" Value="Blue" />
<Setter Property="HeightRequest" Value="2" />
<Setter Property="Margin" Value="0, 5" />
</Style>
</ResourceDictionary>
</ContentPage.Resources>
<StackLayout Margin="10">
<Slider x:Name="slider" />
<Label Text="{Binding Source={x:Reference slider},
Path=Value,
StringFormat='The slider value is {0:F2}'}" />
<BoxView />
<TimePicker x:Name="timePicker" />
<Label Text="{Binding Source={x:Reference timePicker},
Path=Time,
StringFormat='The TimeSpan is {0:c}'}" />
<BoxView />
<Entry x:Name="entry" />
<Label Text="{Binding Source={x:Reference entry},
Path=Text,
StringFormat='The Entry text is "{0}"'}" />
<BoxView />
<StackLayout BindingContext="{x:Static sys:DateTime.Now}">
<Label Text="{Binding}" />
<Label Text="{Binding Path=Ticks,
StringFormat='{0:N0} ticks since 1/1/1'}" />
<Label Text="{Binding StringFormat='The {{0:MMMM}} specifier produces {0:MMMM}'}" />
<Label Text="{Binding StringFormat='The long date is {0:D}'}" />
</StackLayout>
<BoxView />
<StackLayout BindingContext="{x:Static sys:Math.PI}">
<Label Text="{Binding}" />
<Label Text="{Binding StringFormat='PI to 4 decimal points = {0:F4}'}" />
<Label Text="{Binding StringFormat='PI in scientific notation = {0:E7}'}" />
</StackLayout>
</StackLayout>
</ContentPage>
Slider と TimePicker のバインディングでは、double と TimeSpan のデータ型に固有の形式の指定の使用について示しています。 Entry ビューからテキストを表示する StringFormat には、" HTML エンティティを使って書式設定文字列に二重引用符を指定する方法が示されています。
XAML ファイルの次のセクションは、BindingContext を静的な DateTime.Now プロパティを参照する x:Static マークアップ拡張に設定した StackLayout です。 最初のバインディングにはプロパティがありません。
<Label Text="{Binding}" />
このセクションでは、既定の書式設定で BindingContext の DateTime 値が表示されるだけです。 2 つ目のバインディングでは DateTime の Ticks プロパティが表示されますが、他の 2 つのバインディングでは特定の書式設定で DateTime 自体が表示されます。 次の StringFormat に注目してください。
<Label Text="{Binding StringFormat='The {{0:MMMM}} specifier produces {0:MMMM}'}" />
左右の中かっこを書式設定文字列に表示する必要がある場合、単にそれらのペアを使用します。
最後のセクションでは、Math.PI の値に BindingContext を設定し、既定の書式設定と 2 つの異なる数値型の書式設定で表示します。
実行中のプログラムを次に示します。
ViewModels と String Formatting
Label と StringFormat を使用して、ViewModel のターゲットでもあるビューの値を表示している場合、ビューから Label に、または ViewModel から Label にバインディングを定義できます。 一般に、2 番目の手法は、View と ViewModel の間のバインディングが機能していることを確認するために最適な手法です。
この手法は、Better Color Selector サンプルで示されています。ここでは、バインディング モードに関する記事で示されている Simple Color Selector プログラムと同じ ViewModel を使用します。
<ContentPage xmlns="http://xamarin.com/schemas/2014/forms"
             xmlns:x="http://schemas.microsoft.com/winfx/2009/xaml"
             xmlns:local="clr-namespace:DataBindingDemos"
             x:Class="DataBindingDemos.BetterColorSelectorPage"
             Title="Better Color Selector">

    <ContentPage.Resources>
        <ResourceDictionary>
            <Style TargetType="Slider">
                <Setter Property="VerticalOptions" Value="CenterAndExpand" />
            </Style>

            <Style TargetType="Label">
                <Setter Property="HorizontalTextAlignment" Value="Center" />
            </Style>
        </ResourceDictionary>
    </ContentPage.Resources>

    <StackLayout>
        <StackLayout.BindingContext>
            <local:HslColorViewModel Color="Sienna" />
        </StackLayout.BindingContext>

        <BoxView Color="{Binding Color}"
                 VerticalOptions="FillAndExpand" />

        <StackLayout Margin="10, 0">
            <Label Text="{Binding Name}" />

            <Slider Value="{Binding Hue}" />
            <Label Text="{Binding Hue, StringFormat='Hue = {0:F2}'}" />

            <Slider Value="{Binding Saturation}" />
            <Label Text="{Binding Saturation, StringFormat='Saturation = {0:F2}'}" />

            <Slider Value="{Binding Luminosity}" />
            <Label Text="{Binding Luminosity, StringFormat='Luminosity = {0:F2}'}" />
        </StackLayout>
    </StackLayout>
</ContentPage>
現在、HslColorViewModel オブジェクトの同じソース プロパティにバインドされている Slider 要素と Label 要素の 3 つのペアがあります。 Label には、それぞれの Slider 値を表示する StringFormat プロパティがあることが唯一の違いです。
RGB (赤、緑、青) の値を従来の 2 桁の 16 進数形式でどのように表示するかと疑問に思うかもしれません。 これらの整数値を Color 構造から直接使用することはできません。 1 つのソリューションとして、ViewModel 内で色コンポーネントの整数値を計算し、プロパティとして公開することができます。 その後、X2 の形式の指定を使用して書式設定することができます。
もう 1 つの手法はより一般的です。後の記事の値コンバーターのバインディングに関する記事で示されているように、値コンバーターのバインディングを記述することができます。
次の記事では、バインディング パスの詳細を参照し、バインディング パスを使って、コレクションのサブ プロパティとアイテムを参照する方法について示しています。

