Xamarin.Forms のバインディング モード
前の記事 では、Alternative Code Binding ページと Alternative XAML Binding ページに Label が備わっていて、その Scale プロパティは Slider の Value プロパティにバインドされていました。 Slider の初期値が 0 であるため、Label の Scale プロパティは 1 ではなく 0 に設定され、Label は非表示となりました。
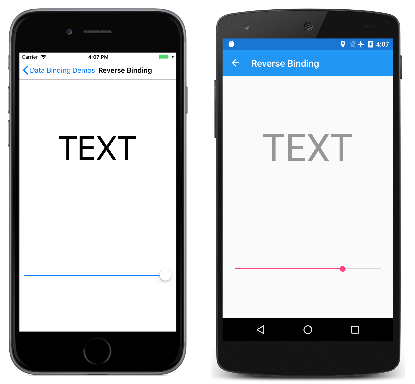
Reverse Binding ページは、データ バインディングが Label ではなく Slider に対して定義されているという点を除けば、前の記事のプログラムに類似しています。
<ContentPage xmlns="http://xamarin.com/schemas/2014/forms"
             xmlns:x="http://schemas.microsoft.com/winfx/2009/xaml"
             x:Class="DataBindingDemos.ReverseBindingPage"
             Title="Reverse Binding">
    <StackLayout Padding="10, 0">

        <Label x:Name="label"
               Text="TEXT"
               FontSize="80"
               HorizontalOptions="Center"
               VerticalOptions="CenterAndExpand" />

        <Slider x:Name="slider"
                VerticalOptions="CenterAndExpand"
                Value="{Binding Source={x:Reference label},
                                Path=Opacity}" />
    </StackLayout>
</ContentPage>
まず、これは逆になるかもしれませんが、ここでは、Label がデータ バインディングのソースであり、Slider がターゲットです。 このバインディングでは、Label の Opacity プロパティが参照され、この既定値は 1 になっています。
ご想像のとおり、Slider の値は、Label の Opacity 初期値から 1 に初期化されます。 これは、左側の iOS のスクリーンショットに示されています。
しかし、Android のスクリーンショットで示すように、Slider が引き続き動作することに驚かれるかもしれません。 これは、期待したとおりに初期化が機能したことから、Label ではなく Slider がバインディング ターゲットである場合にデータ バインディングは適切に機能することを示唆しているようです。
Reverse Binding サンプルと以前のサンプルとの違いは、"バインディング モード" に関係しています。
既定のバインディング モード
バインディング モードは、次の BindingMode 列挙型のメンバーを使用して指定されます。
DefaultTwoWay– データは、ソースとターゲット間で両方向に移動しますOneWay– データは、ソースからターゲットに移動しますOneWayToSource– データは、ターゲットからソースに移動しますOneTime– データはソースからターゲットに移動しますが、BindingContextが変更された場合のみとなります (Xamarin.Forms 3.0 の新機能)
すべてのバインド可能なプロパティに既定のバインディング モードがあります。既定のバインディング モードは、バインド可能なプロパティの作成時に設定し、BindableProperty オブジェクトの DefaultBindingMode プロパティから利用できます。 この既定のバインディング モードは、バインド可能なプロパティがデータ バインディングのターゲットであるときに有効なモードを示します。
Rotation、Scale、Opacity などのほとんどのプロパティにおいて、既定のバインディング モードは OneWay です。 これらのプロパティがデータ バインディングのターゲットである場合、ターゲット プロパティはソースから設定されます。
しかし、Slider の Value プロパティの場合、既定のバインディング モードは TwoWay です。 これは、Value プロパティがデータ バインディングのターゲットである場合、(通常どおり) ターゲットはソースから設定されますが、ソースもターゲットから設定されることを意味します。 これは、Opacity の初期値から Slider を設定できるようにするためのものです。
この両方向のバインディングの場合、無限ループが作成されるように思えますが、それは発生しません。 バインド可能プロパティからは、プロパティが実際に変更されなければ、プロパティの変更は通知されません。 これにより無限ループは回避されます。
両方向のバインディング
大部分のバインド可能プロパティの既定のバインディング モードは OneWay になっていますが、次のプロパティについては、既定のバインディング モードが TwoWay になっています。
DatePickerのDateプロパティEditor、Entry、SearchBar、EntryCellのTextプロパティListViewのIsRefreshingプロパティMultiPageのSelectedItemプロパティPickerのSelectedIndexプロパティとSelectedItemプロパティSliderとStepperのValueプロパティSwitchのIsToggledプロパティSwitchCellのOnプロパティTimePickerのTimeプロパティ
このような特定のプロパティは、次に示すような相応の理由により、TwoWay として定義されています。
Model-View-ViewModel (MVVM) アプリケーション アーキテクチャでデータ バインディングを使用する場合、ViewModel クラスがデータ バインディングのソースとなり、Slider などのビューから成る View がデータ バインディングのターゲットとなります。 MVVM バインディングは、以前のサンプル内のバインディングにも増して Reverse Binding サンプルに類似しています。 ページ上の各ビューが ViewModel 内の対応するプロパティの値によって初期化されるようにしたくても、ビューでの変更に ViewModel プロパティも影響されてしまうという可能性が高くなります。
既定のバインディング モードが TwoWay であるプロパティは、MVVM シナリオで使用される可能性が最も高いプロパティです。
ソースへの一方向のバインディング
バインド可能な読み取り専用プロパティの既定のバインディング モードは OneWayToSource になります。 既定のバインディング モードが OneWayToSource であるバインド可能な読み取り/書き込みプロパティは 1 つしかありません。
ListViewのSelectedItemプロパティ
その理由は、SelectedItem プロパティでのバインディングによってバインディング ソースが設定されるということにあります。 この記事で後述する例では、そのビヘイビアーがオーバーライドされます。
1 回限りのバインディング
いくつかのプロパティには、Entry の IsTextPredictionEnabled プロパティなど、OneTime の既定のバインディング モードが含まれています。
バインディング モードが OneTime であるターゲット プロパティは、バインディング コンテキストが変更された場合にのみ更新されます。 このようなターゲット プロパティでのバインディングの場合、ソース プロパティの変更を監視する必要がないため、バインディング インフラストラクチャは簡略化されます。
Viewmodel とプロパティ変更通知
Simple Color Selector ページに、シンプルな ViewModel の使用方法が示されています。 データ バインディングにより、ユーザーは色相、彩度、明度用の 3 つの Slider 要素を使用して色を選択することができます。
ViewModel はデータ バインディングのソースです。 ViewModel ではバインド可能プロパティは定義されません。しかし、プロパティの値が変更されたタイミングをバインディング インフラストラクチャに通知するメカニズムが ViewModel によって実装されます。 この通知メカニズムは INotifyPropertyChanged インターフェイスであり、PropertyChanged という名前の 1 つのイベントを定義しています。 通常は、このインターフェイスを実装するクラスでは、そのパブリック プロパティのいずれかで値が変更されたときにイベントが発生します。 プロパティが変更されることがない場合、イベントを発生させる必要はありません。 (INotifyPropertyChanged インターフェイスも BindableObject によって実装されます。PropertyChanged イベントは、バインド可能なプロパティで値が変更されるたびに発生します)。
HslColorViewModel クラスでは、5 つのプロパティが定義されます。Hue、Saturation、Luminosity、および Color のプロパティは相互に関連しています。 3 つの色コンポーネントのいずれかで値が変更されると、Color プロパティが再計算され、4 つのプロパティすべてに対して PropertyChanged イベントが発生します。
public class HslColorViewModel : INotifyPropertyChanged
{
    Color color;
    string name;

    public event PropertyChangedEventHandler PropertyChanged;

    public double Hue
    {
        set
        {
            if (color.Hue != value)
            {
                Color = Color.FromHsla(value, color.Saturation, color.Luminosity);
            }
        }
        get
        {
            return color.Hue;
        }
    }

    public double Saturation
    {
        set
        {
            if (color.Saturation != value)
            {
                Color = Color.FromHsla(color.Hue, value, color.Luminosity);
            }
        }
        get
        {
            return color.Saturation;
        }
    }

    public double Luminosity
    {
        set
        {
            if (color.Luminosity != value)
            {
                Color = Color.FromHsla(color.Hue, color.Saturation, value);
            }
        }
        get
        {
            return color.Luminosity;
        }
    }

    public Color Color
    {
        set
        {
            if (color != value)
            {
                color = value;
                PropertyChanged?.Invoke(this, new PropertyChangedEventArgs("Hue"));
                PropertyChanged?.Invoke(this, new PropertyChangedEventArgs("Saturation"));
                PropertyChanged?.Invoke(this, new PropertyChangedEventArgs("Luminosity"));
                PropertyChanged?.Invoke(this, new PropertyChangedEventArgs("Color"));

                Name = NamedColor.GetNearestColorName(color);
            }
        }
        get
        {
            return color;
        }
    }

    public string Name
    {
        private set
        {
            if (name != value)
            {
                name = value;
                PropertyChanged?.Invoke(this, new PropertyChangedEventArgs("Name"));
            }
        }
        get
        {
            return name;
        }
    }
}
Color プロパティが変更されると、NamedColor クラス内の静的な GetNearestColorName メソッド (DataBindingDemos ソリューションにも含まれている) によって、最も近い名前付きの色が取得され、Name プロパティが設定されます。 この Name プロパティはプライベートな set アクセサーを備えているので、クラスの外部から設定することはできません。
ViewModel がバインディング ソースとして設定されると、バインディング インフラストラクチャによってハンドラーが PropertyChanged イベントにアタッチされます。 このようにして、プロパティへの変更をバインディングに通知することができます。次にバインディングで、変更された値を基にターゲット プロパティを設定することができます。
ただし、ターゲット プロパティ (またはターゲット プロパティ上の Binding 定義) に OneTime の BindingMode が含まれている場合、バインディング インフラストラクチャから PropertyChanged イベントにハンドラーがアタッチされる必要はありません。 ターゲット プロパティは、BindingContext が変更されたときにのみ更新され、ソース プロパティ自体が変更されたときは更新されません。
Simple Color Selector XAML ファイルでは、ページのリソース ディクショナリ内の HslColorViewModel がインスタンス化され、Color プロパティが初期化されます。 Grid の BindingContext プロパティを StaticResource バインディング拡張機能に設定すると、そのリソースが参照されます。
<ContentPage xmlns="http://xamarin.com/schemas/2014/forms"
             xmlns:x="http://schemas.microsoft.com/winfx/2009/xaml"
             xmlns:local="clr-namespace:DataBindingDemos"
             x:Class="DataBindingDemos.SimpleColorSelectorPage">

    <ContentPage.Resources>
        <ResourceDictionary>
            <local:HslColorViewModel x:Key="viewModel"
                                     Color="MediumTurquoise" />

            <Style TargetType="Slider">
                <Setter Property="VerticalOptions" Value="CenterAndExpand" />
            </Style>
        </ResourceDictionary>
    </ContentPage.Resources>

    <Grid BindingContext="{StaticResource viewModel}">
        <Grid.RowDefinitions>
            <RowDefinition Height="*" />
            <RowDefinition Height="*" />
        </Grid.RowDefinitions>

        <BoxView Color="{Binding Color}"
                 Grid.Row="0" />

        <StackLayout Grid.Row="1"
                     Margin="10, 0">

            <Label Text="{Binding Name}"
                   HorizontalTextAlignment="Center" />

            <Slider Value="{Binding Hue}" />

            <Slider Value="{Binding Saturation}" />

            <Slider Value="{Binding Luminosity}" />
        </StackLayout>
    </Grid>
</ContentPage>
BoxView、Label、および 3 つの Slider ビューでは、Grid からバインディング コンテキストが継承されます。 これらのビューはすべてバインディング ターゲットであり、ViewModel のソース プロパティを参照します。 BoxView の Color プロパティと、Label の Text プロパティの場合、データ バインディングは OneWay となります。ビュー内のプロパティは ViewModel 内のプロパティから設定されます。
ただし、Slider の Value プロパティは TwoWay です。 これにより、各 Slider は ViewModel から設定できるようになり、また、ViewModel を各 Slider から設定できるようになります。
プログラムの最初の実行時に、BoxView、Label、および 3 つの Slider 要素はすべて、ViewModel がインスタンス化されたときに設定された初期の Color プロパティに基づいて、ViewModel から設定されます。 これは、左側の iOS のスクリーンショットに示されています。
Android のスクリーンショットに示したように、スライダーを操作すると、それに応じて BoxView と Label が更新されます。
リソース ディクショナリ内で ViewModel をインスタンス化することは、1 つの一般的なアプローチです。 BindingContext プロパティ用のプロパティ要素タグ内で ViewModel をインスタンス化することもできます。 Simple Color Selector XAML ファイル内で、リソース ディクショナリから HslColorViewModel を削除することを試みてから、それを次のように Grid の BindingContext プロパティに設定します。
<Grid>
    <Grid.BindingContext>
        <local:HslColorViewModel Color="MediumTurquoise" />
    </Grid.BindingContext>

    ···

</Grid>
バインディング コンテキストはさまざまな方法で設定することができます。 場合によっては、分離コード ファイルによって ViewModel がインスタンス化され、それがページの BindingContext プロパティに設定されます。 これらはすべての有効なアプローチです。
バインディング モードのオーバーライド
ターゲット プロパティでの既定のバインディング モードが特定のデータ バインディングに適していない場合は、それをオーバーライドすることができます。そのためには、Binding の Mode プロパティ (または Binding マークアップ拡張の Mode プロパティ) を BindingMode 列挙型のメンバーの 1 つに設定します。
ただし、Mode プロパティを TwoWay に設定しても、それが常に期待どおりに動作するとは限りません。 たとえば、バインディング定義に TwoWay を含めるように Alternative XAML Binding XAML ファイルを変更してみてください。
<Label Text="TEXT"
       FontSize="40"
       HorizontalOptions="Center"
       VerticalOptions="CenterAndExpand"
       Scale="{Binding Source={x:Reference slider},
                       Path=Value,
                       Mode=TwoWay}" />
Slider が Scale プロパティの初期値 (1) に初期化されるように予想するかもしれませんが、それは行われません。 TwoWay バインディングの初期化の際は、まず、ソースからターゲットが設定されます。これは、Scale プロパティが Slider の既定値 0 に設定されることを意味します。 Slider 上で TwoWay バインディングが設定されると、Slider は最初にソースから設定されます。
Alternative XAML Binding サンプルでは、バインディング モードを OneWayToSource に設定することができます。
<Label Text="TEXT"
       FontSize="40"
       HorizontalOptions="Center"
       VerticalOptions="CenterAndExpand"
       Scale="{Binding Source={x:Reference slider},
                       Path=Value,
                       Mode=OneWayToSource}" />
これで、Slider は 1 (Scale の既定値) に初期化されますが、Slider を操作しても Scale プロパティには影響がないので、これはあまり便利ではありません。
Note
VisualElement クラスでは、ScaleX プロパティと ScaleY プロパティも定義しています。これにより、VisualElement を縦方向と横方向に別々にスケールできます。
既定のバインディング モードを TwoWay でオーバーライドするプログラムを非常に便利なものとするには、ListView の SelectedItem プロパティが必要です。 既定のバインディング モードは OneWayToSource です。 ViewModel 内のソース プロパティを参照するように、SelectedItem プロパティ上にデータ バインディングが設定されると、そのソース プロパティは ListView の選択範囲から設定されます。 ただし、状況によっては、ListView が ViewModel から初期化されるようにすることもお勧めします。
このテクニックは、Sample Settings ページで示します。 このページには、アプリケーション設定のシンプルな実装が示されています。これらの設定は、多くの場合、ViewModel (このSampleSettingsViewModel ファイルなどの) で定義されます。
public class SampleSettingsViewModel : INotifyPropertyChanged
{
    string name;
    DateTime birthDate;
    bool codesInCSharp;
    double numberOfCopies;
    NamedColor backgroundNamedColor;

    public event PropertyChangedEventHandler PropertyChanged;

    public SampleSettingsViewModel(IDictionary<string, object> dictionary)
    {
        Name = GetDictionaryEntry<string>(dictionary, "Name");
        BirthDate = GetDictionaryEntry(dictionary, "BirthDate", new DateTime(1980, 1, 1));
        CodesInCSharp = GetDictionaryEntry<bool>(dictionary, "CodesInCSharp");
        NumberOfCopies = GetDictionaryEntry(dictionary, "NumberOfCopies", 1.0);
        BackgroundNamedColor = NamedColor.Find(GetDictionaryEntry(dictionary, "BackgroundNamedColor", "White"));
    }

    public string Name
    {
        set { SetProperty(ref name, value); }
        get { return name; }
    }

    public DateTime BirthDate
    {
        set { SetProperty(ref birthDate, value); }
        get { return birthDate; }
    }

    public bool CodesInCSharp
    {
        set { SetProperty(ref codesInCSharp, value); }
        get { return codesInCSharp; }
    }

    public double NumberOfCopies
    {
        set { SetProperty(ref numberOfCopies, value); }
        get { return numberOfCopies; }
    }

    public NamedColor BackgroundNamedColor
    {
        set
        {
            if (SetProperty(ref backgroundNamedColor, value))
            {
                OnPropertyChanged("BackgroundColor");
            }
        }
        get { return backgroundNamedColor; }
    }

    public Color BackgroundColor
    {
        get { return BackgroundNamedColor?.Color ?? Color.White; }
    }

    public void SaveState(IDictionary<string, object> dictionary)
    {
        dictionary["Name"] = Name;
        dictionary["BirthDate"] = BirthDate;
        dictionary["CodesInCSharp"] = CodesInCSharp;
        dictionary["NumberOfCopies"] = NumberOfCopies;
        dictionary["BackgroundNamedColor"] = BackgroundNamedColor.Name;
    }

    T GetDictionaryEntry<T>(IDictionary<string, object> dictionary, string key, T defaultValue = default(T))
    {
        return dictionary.ContainsKey(key) ? (T)dictionary[key] : defaultValue;
    }

    bool SetProperty<T>(ref T storage, T value, [CallerMemberName] string propertyName = null)
    {
        if (object.Equals(storage, value))
            return false;

        storage = value;
        OnPropertyChanged(propertyName);
        return true;
    }

    protected void OnPropertyChanged([CallerMemberName] string propertyName = null)
    {
        PropertyChanged?.Invoke(this, new PropertyChangedEventArgs(propertyName));
    }
}
各アプリケーション設定はプロパティであり、このプロパティは、SaveState という名前のメソッドで Xamarin.Forms プロパティのディクショナリに保存され、コンストラクターでそのディクショナリから読み込まれます。 クラスの下部に移動すると、ViewModel を効率化して、それらでエラーが発生する可能性を低くするのに役立つ 2 つのメソッドがあります。 下部にある OnPropertyChanged メソッドには、呼び出し元のプロパティに設定される省略可能なパラメーターがあります。 これにより、プロパティの名前を文字列で指定するときにスペル ミスを回避できます。
クラス内の SetProperty メソッドではさらに多くのことができます。プロパティに設定されている値が、フィールドとして格納されている値と比較され、この 2 つの値が等しくない場合は、OnPropertyChanged のみが呼び出されます。
SampleSettingsViewModel クラスでは、背景色のための 2 つのプロパティが定義されます。BackgroundNamedColor プロパティは NamedColor 型です。これは DataBindingDemos ソリューションにも含まれているクラスです。 BackgroundColor プロパティは Color 型であり、NamedColor オブジェクトの Color プロパティから取得されます。
NamedColor クラスでは .NET リフレクションを使用して、Xamarin.Forms の Color 構造体の静的なパブリック フィールドがすべて列挙され、それらが、静的な All プロパティからアクセス可能なコレクションに名前と一緒に格納されます。
public class NamedColor : IEquatable<NamedColor>, IComparable<NamedColor>
{
    // Instance members
    private NamedColor()
    {
    }

    public string Name { private set; get; }

    public string FriendlyName { private set; get; }

    public Color Color { private set; get; }

    public string RgbDisplay { private set; get; }

    public bool Equals(NamedColor other)
    {
        return Name.Equals(other.Name);
    }

    public int CompareTo(NamedColor other)
    {
        return Name.CompareTo(other.Name);
    }

    // Static members
    static NamedColor()
    {
        List<NamedColor> all = new List<NamedColor>();
        StringBuilder stringBuilder = new StringBuilder();

        // Loop through the public static fields of the Color structure.
        foreach (FieldInfo fieldInfo in typeof(Color).GetRuntimeFields())
        {
            if (fieldInfo.IsPublic &&
                fieldInfo.IsStatic &&
                fieldInfo.FieldType == typeof(Color))
            {
                // Convert the name to a friendly name.
                string name = fieldInfo.Name;
                stringBuilder.Clear();
                int index = 0;

                foreach (char ch in name)
                {
                    if (index != 0 && Char.IsUpper(ch))
                    {
                        stringBuilder.Append(' ');
                    }
                    stringBuilder.Append(ch);
                    index++;
                }

                // Instantiate a NamedColor object.
                Color color = (Color)fieldInfo.GetValue(null);

                NamedColor namedColor = new NamedColor
                {
                    Name = name,
                    FriendlyName = stringBuilder.ToString(),
                    Color = color,
                    RgbDisplay = String.Format("{0:X2}-{1:X2}-{2:X2}",
                                                (int)(255 * color.R),
                                                (int)(255 * color.G),
                                                (int)(255 * color.B))
                };

                // Add it to the collection.
                all.Add(namedColor);
            }
        }
        all.TrimExcess();
        all.Sort();
        All = all;
    }

    public static IList<NamedColor> All { private set; get; }

    public static NamedColor Find(string name)
    {
        return ((List<NamedColor>)All).Find(nc => nc.Name == name);
    }

    public static string GetNearestColorName(Color color)
    {
        double shortestDistance = 1000;
        NamedColor closestColor = null;

        foreach (NamedColor namedColor in NamedColor.All)
        {
            double distance = Math.Sqrt(Math.Pow(color.R - namedColor.Color.R, 2) +
                                        Math.Pow(color.G - namedColor.Color.G, 2) +
                                        Math.Pow(color.B - namedColor.Color.B, 2));

            if (distance < shortestDistance)
            {
                shortestDistance = distance;
                closestColor = namedColor;
            }
        }
        return closestColor.Name;
    }
}
DataBindingDemos プロジェクト内の App クラスでは、SampleSettingsViewModel 型の Settings という名前のプロパティが定義されます。 このプロパティは App クラスのインスタンス化の際に初期化されます。そして、OnSleep メソッドが呼び出されると、SaveState メソッドが呼び出されます。
public partial class App : Application
{
    public App()
    {
        InitializeComponent();

        Settings = new SampleSettingsViewModel(Current.Properties);

        MainPage = new NavigationPage(new MainPage());
    }

    public SampleSettingsViewModel Settings { private set; get; }

    protected override void OnStart()
    {
        // Handle when your app starts
    }

    protected override void OnSleep()
    {
        // Handle when your app sleeps
        Settings.SaveState(Current.Properties);
    }

    protected override void OnResume()
    {
        // Handle when your app resumes
    }
}
アプリケーションのライフサイクル メソッドの詳細については、アプリのライフ サイクルに関する記事を参照してください。
他のほぼすべてのことは、SampleSettingsPage.xaml ファイル内で処理されます。 ページの BindingContext は Binding マークアップ拡張を使用して設定されます: バインディング ソースは静的な Application.Current プロパティ (プロジェクト内の App クラスのインスタンス) です。Path は Settings プロパティ (SampleSettingsViewModel オブジェクト) に設定されます。
<ContentPage xmlns="http://xamarin.com/schemas/2014/forms"
             xmlns:x="http://schemas.microsoft.com/winfx/2009/xaml"
             xmlns:local="clr-namespace:DataBindingDemos"
             x:Class="DataBindingDemos.SampleSettingsPage"
             Title="Sample Settings"
             BindingContext="{Binding Source={x:Static Application.Current},
                                      Path=Settings}">

    <StackLayout BackgroundColor="{Binding BackgroundColor}"
                 Padding="10"
                 Spacing="10">

        <StackLayout Orientation="Horizontal">
            <Label Text="Name: "
                   VerticalOptions="Center" />

            <Entry Text="{Binding Name}"
                   Placeholder="your name"
                   HorizontalOptions="FillAndExpand"
                   VerticalOptions="Center" />
        </StackLayout>

        <StackLayout Orientation="Horizontal">
            <Label Text="Birth Date: "
                   VerticalOptions="Center" />

            <DatePicker Date="{Binding BirthDate}"
                        HorizontalOptions="FillAndExpand"
                        VerticalOptions="Center" />
        </StackLayout>

        <StackLayout Orientation="Horizontal">
            <Label Text="Do you code in C#? "
                   VerticalOptions="Center" />

            <Switch IsToggled="{Binding CodesInCSharp}"
                    VerticalOptions="Center" />
        </StackLayout>

        <StackLayout Orientation="Horizontal">
            <Label Text="Number of Copies: "
                   VerticalOptions="Center" />

            <Stepper Value="{Binding NumberOfCopies}"
                     VerticalOptions="Center" />

            <Label Text="{Binding NumberOfCopies}"
                   VerticalOptions="Center" />
        </StackLayout>

        <Label Text="Background Color:" />

        <ListView x:Name="colorListView"
                  ItemsSource="{x:Static local:NamedColor.All}"
                  SelectedItem="{Binding BackgroundNamedColor, Mode=TwoWay}"
                  VerticalOptions="FillAndExpand"
                  RowHeight="40">
            <ListView.ItemTemplate>
                <DataTemplate>
                    <ViewCell>
                        <StackLayout Orientation="Horizontal">
                            <BoxView Color="{Binding Color}"
                                     HeightRequest="32"
                                     WidthRequest="32"
                                     VerticalOptions="Center" />

                            <Label Text="{Binding FriendlyName}"
                                   FontSize="24"
                                   VerticalOptions="Center" />
                        </StackLayout>
                    </ViewCell>
                </DataTemplate>
            </ListView.ItemTemplate>
        </ListView>
    </StackLayout>
</ContentPage>
ページのすべての子によって、バインディング コンテキストが継承されます。 このページのその他のバインディングのほとんどは、SampleSettingsViewModel 内のプロパティに対するものです。 BackgroundColor プロパティは StackLayout の BackgroundColor プロパティを設定するために使用されます。Entry、DatePicker、Switch、および Stepper プロパティはすべて、ViewModel 内のその他のプロパティにバインドされます。
ListView の ItemsSource プロパティは、静的な NamedColor.All プロパティに設定されます。 これによって、ListView にすべての NamedColor インスタンスが含められます。 ListView の各項目については、その項目のバインド コンテキストが NamedColor オブジェクトに設定されます。 ViewCell 内の BoxView および Label 要素は、NamedColor 内のプロパティにバインドされます。
ListView の SelectedItem プロパティは NamedColor 型であり、SampleSettingsViewModel の BackgroundNamedColor プロパティにバインドされます。
SelectedItem="{Binding BackgroundNamedColor, Mode=TwoWay}"
SelectedItem の既定のバインディング モードは OneWayToSource であり、選択した項目を基に ViewModel プロパティが設定されます。 TwoWay モードでは、ViewModel から SelectedItem を初期化できます。
ただし、SelectedItem をこのように設定すると、自動的にスクロールして選択した項目を表示する処理が ListView によって行われません。 次のように、分離コード ファイル内で必要なコードは少しです。
public partial class SampleSettingsPage : ContentPage
{
    public SampleSettingsPage()
    {
        InitializeComponent();

        if (colorListView.SelectedItem != null)
        {
            colorListView.ScrollTo(colorListView.SelectedItem,
                                   ScrollToPosition.MakeVisible,
                                   false);
        }
    }
}
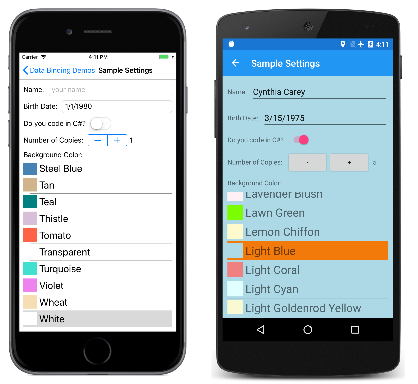
左側にある iOS のスクリーンショットには、最初に実行されたときのプログラムが示されています。 SampleSettingsViewModel 内のコンストラクターによって、背景色が白に初期化されます。これは、ListView で選択した内容です。
他のスクリーンショットは、変更された設定を示しています。 このページを試してみる場合は、プログラムが実行されているデバイスまたはエミュレーター上でプログラムをスリープ状態にするか、または終了することを忘れないでください。 Visual Studio デバッガーからプログラムを終了すると、App クラス内の OnSleep オーバーライドは呼び出されません。
次の記事では、Label の Text プロパティで設定されたデータ バインディングの文字列の書式設定を指定する方法を説明します。


