Quickstart: Call a web API that is protected by the Microsoft identity platform
Applies to:  Workforce tenants
  External tenants (learn more)
In this quickstart, you use a sample web app to show you how to protect an ASP.NET web API by using the Microsoft identity platform. The sample uses Microsoft Authentication Library (MSAL) to handle authentication.
Prerequisites
- An Azure account with an active subscription. Create an account for free.
- Visual Studio 2022. Download Visual Studio for free.
Register web API application
To complete registration, provide the application a name and specify the supported account types. Once registered, the application Overview page displays the identifiers needed in the application source code.
Sign in to the Microsoft Entra admin center as at least an Application Developer.
If you have access to multiple tenants, use the Settings icon
 in the top menu to switch to the tenant in which you want to register the application from the Directories + subscriptions menu.
Browse to Identity > Applications > App registrations.
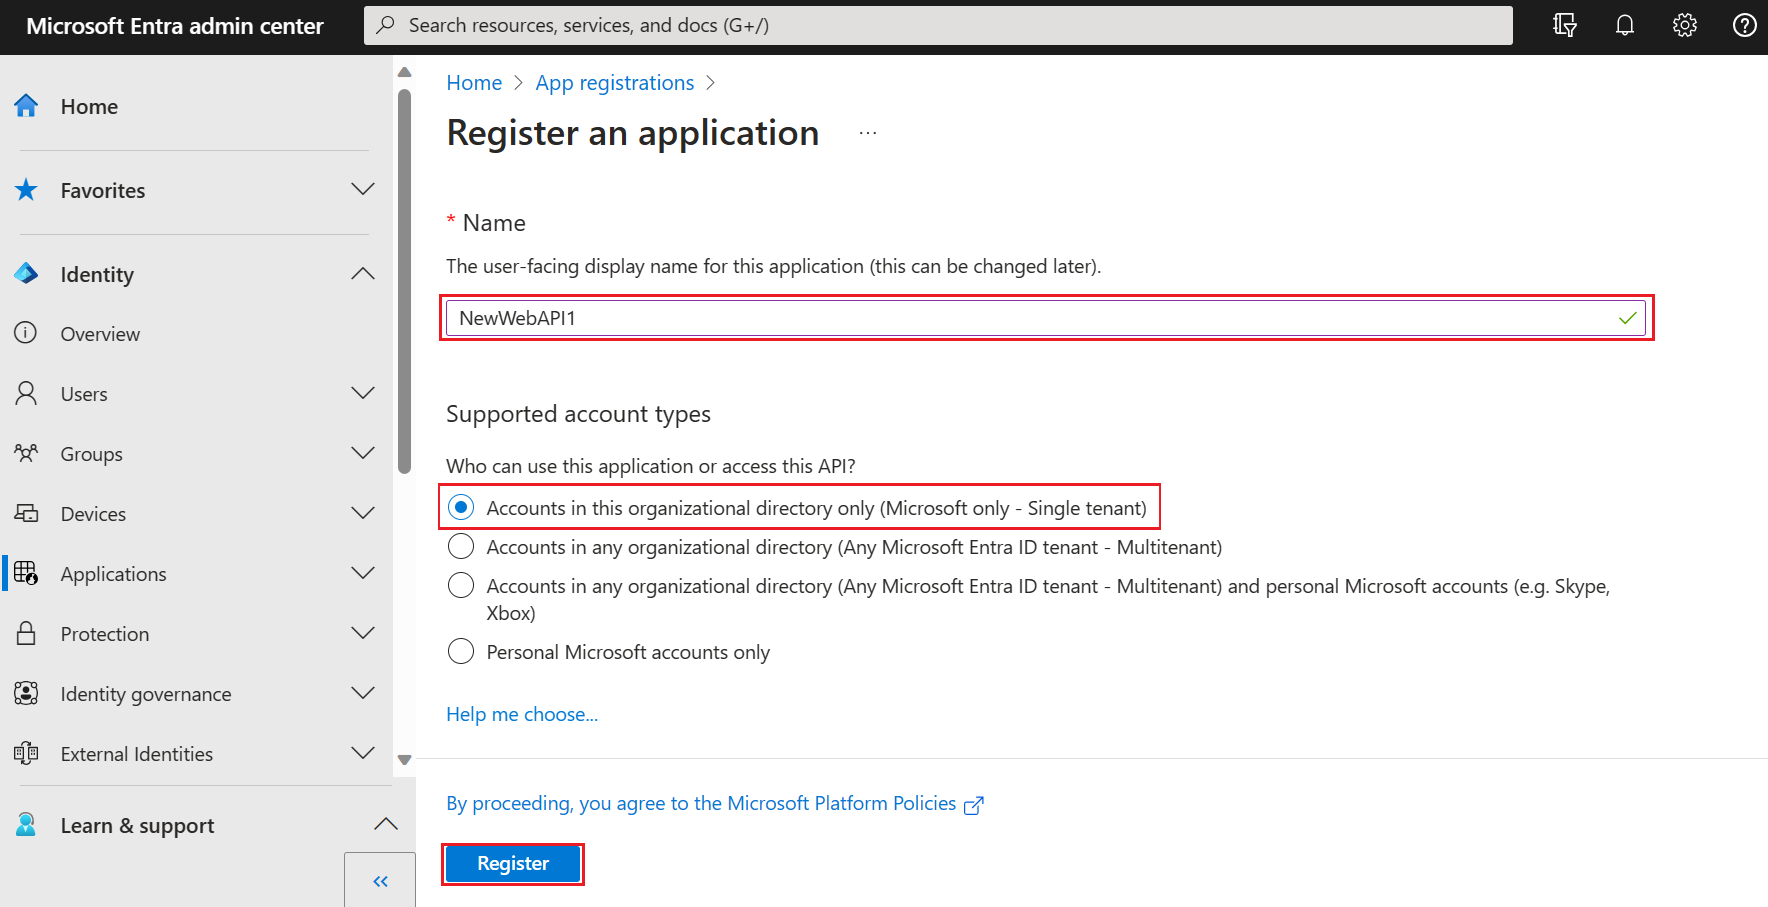
Select New registration.
Enter a Name for the application, such as NewWebAPI1.
For Supported account types, select Accounts in this organizational directory only. For information on different account types, select Help me choose option.
Select Register.
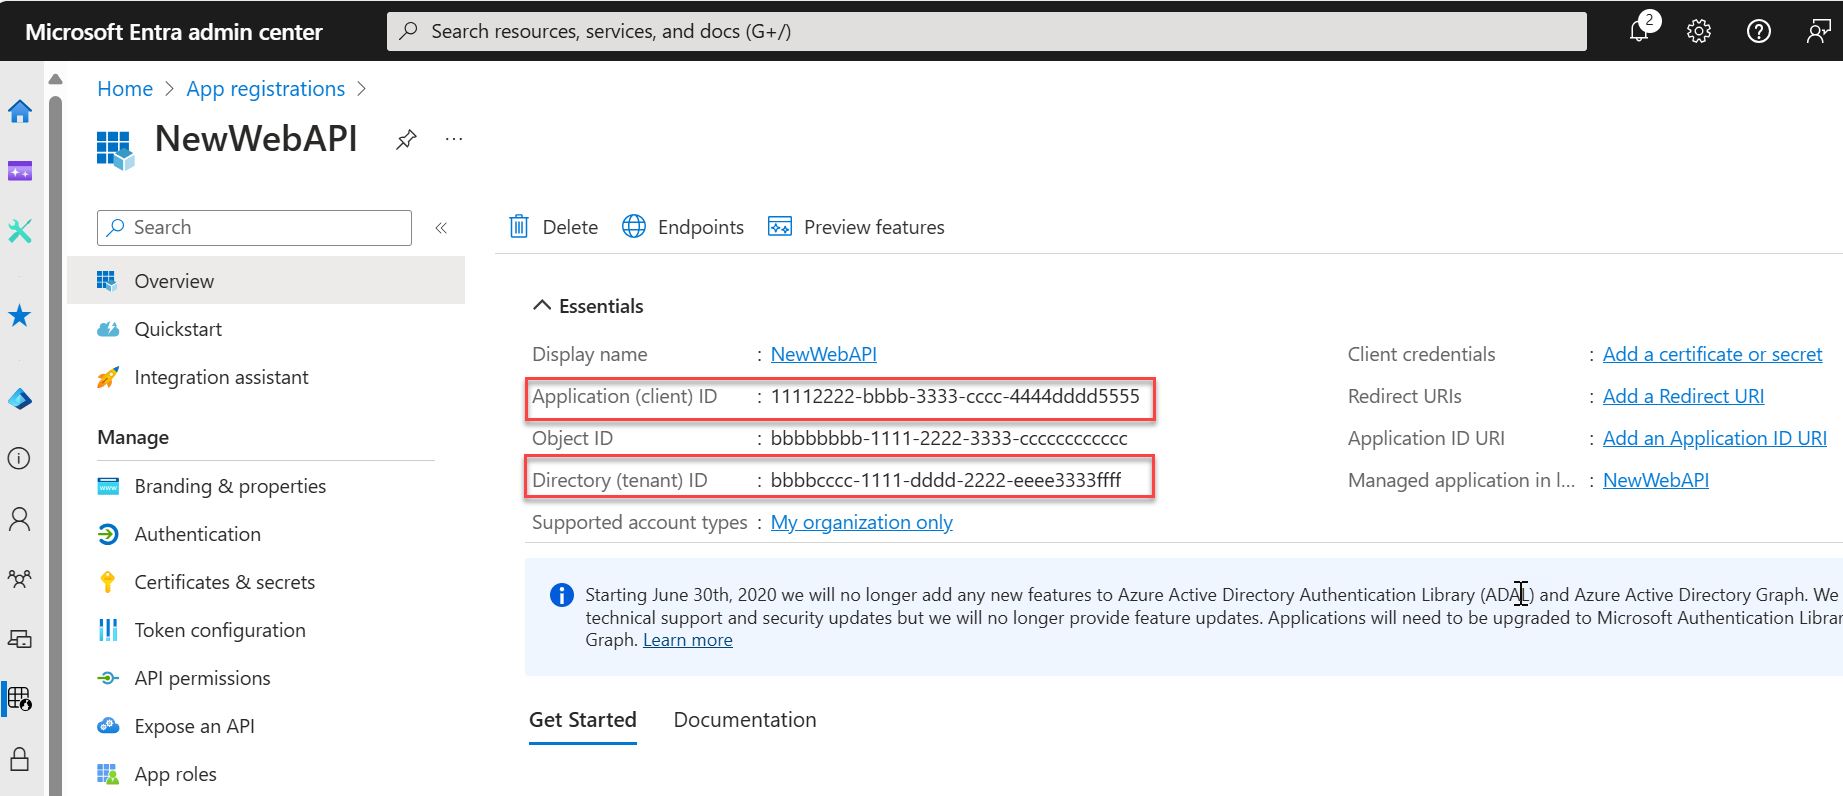
The application's Overview pane is displayed when registration is complete. Record the Directory (tenant) ID and the Application (client) ID to be used in your application source code.
Note
The Supported account types can be changed by referring to Modify the accounts supported by an application.
Expose an API
Once the API is registered, you can configure its permission by defining the scopes that the API exposes to client applications. Client applications request permission to perform operations by passing an access token along with its requests to the protected web API. The web API then performs the requested operation only if the access token it receives contains the required scopes.
Under Manage, select Expose an API > Add a scope. Accept the proposed Application ID URI (
api://{clientId}) by selecting Save and continue, and then enter the following information:- For Scope name, enter
access_as_user. - For Who can consent, ensure that the Admins and users option is selected.
- In the Admin consent display name box, enter
Access TodoListService as a user. - In the Admin consent description box, enter
Accesses the TodoListService web API as a user. - In the User consent display name box, enter
Access TodoListService as a user. - In the User consent description box, enter
Accesses the TodoListService web API as a user. - For State, keep Enabled.
- For Scope name, enter
Select Add scope.

Clone or download the sample application
To obtain the sample application, you can either clone it from GitHub or download it as a .zip file.
git clone https://github.com/AzureADQuickStarts/AppModelv2-NativeClient-DotNet.git
Tip
To avoid errors caused by path length limitations in Windows, we recommend extracting the archive or cloning the repository into a directory near the root of your drive.
Configure the sample application
Configure the code sample to match the registered web API.
Open the solution in Visual Studio, and then open the appsettings.json file under the root of the TodoListService project.
Replace the value of the
Enter_the_Application_Id_hereby the Client ID (Application ID) value from the application you registered in the App registrations portal both in theClientIDand theAudienceproperties.
Add the new scope to the app.config file
To add the new scope to the TodoListClient app.config file, follow these steps:
In the TodoListClient project root folder, open the app.config file.
Paste the Application ID from the application that you registered for your TodoListService project in the
TodoListServiceScopeparameter, replacing the{Enter the Application ID of your TodoListService from the app registration portal}string.
Note
Make sure that the Application ID uses the following format: api://{TodoListService-Application-ID}/access_as_user (where {TodoListService-Application-ID} is the GUID representing the Application ID for your TodoListService app).
Register the web app (TodoListClient)
Register your TodoListClient app in App registrations in the Azure portal, and then configure the code in the TodoListClient project. If the client and server are considered the same application, you can reuse the application that's registered in step 2. Use the same application if you want users to sign in with a personal Microsoft account.
Register the app
To register the TodoListClient app, follow these steps:
Sign in to the Microsoft Entra admin center as at least a Cloud Application Administrator.
Browse to Identity > Applications > App registrations and select New registration.
Select New registration.
When the Register an application page opens, enter your application's registration information:
- In the Name section, enter a meaningful application name that will be displayed to users of the app (for example, NativeClient-DotNet-TodoListClient).
- For Supported account types, select Accounts in any organizational directory.
- Select Register to create the application.
Note
In the TodoListClient project app.config file, the default value of
ida:Tenantis set tocommon. The possible values are:common: You can sign in by using a work or school account or a personal Microsoft account (because you selected Accounts in any organizational directory in a previous step).organizations: You can sign in by using a work or school account.consumers: You can sign in only by using a Microsoft personal account.
On the app Overview page, select Authentication, and then complete these steps to add a platform:
- Under Platform configurations, select the Add a platform button.
- For Mobile and desktop applications, select Mobile and desktop applications.
- For Redirect URIs, select the
https://login.microsoftonline.com/common/oauth2/nativeclientcheck box. - Select Configure.
Select API permissions, and then complete these steps to add permissions:
- Select the Add a permission button.
- Select the My APIs tab.
- In the list of APIs, select AppModelv2-NativeClient-DotNet-TodoListService API or the name you entered for the web API.
- Select the access_as_user permission check box if it's not already selected. Use the Search box if necessary.
- Select the Add permissions button.
Configure your project
Configure your TodoListClient project by adding the Application ID to the app.config file.
In the App registrations portal, on the Overview page, copy the value of the Application (client) ID.
From the TodoListClient project root folder, open the app.config file, and then paste the Application ID value in the
ida:ClientIdparameter.
Run the sample application
Start both projects. For Visual Studio users;
Right click on the Visual Studio solution and select Properties
In the Common Properties select Startup Project and then Multiple startup projects.
For both projects choose Start as the action
Ensure the TodoListService service starts first by moving it to the first position in the list, using the up arrow.
Sign in to run your TodoListClient project.
Press F5 to start the projects. The service page opens, as well as the desktop application.
In the TodoListClient, at the upper right, select Sign in, and then sign in with the same credentials you used to register your application, or sign in as a user in the same directory.
If you're signing in for the first time, you might be prompted to consent to the TodoListService web API.
To help you access the TodoListService web API and manipulate the To-Do list, the sign-in also requests an access token to the access_as_user scope.
Pre-authorize your client application
You can allow users from other directories to access your web API by pre-authorizing the client application to access your web API. You do this by adding the Application ID from the client app to the list of pre-authorized applications for your web API. By adding a pre-authorized client, you're allowing users to access your web API without having to provide consent.
- In the App registrations portal, open the properties of your TodoListService app.
- In the Expose an API section, under Authorized client applications, select Add a client application.
- In the Client ID box, paste the Application ID of the TodoListClient app.
- In the Authorized scopes section, select the scope for the
api://<Application ID>/access_as_userweb API. - Select Add application.
Run your project
- Press F5 to run your project. Your TodoListClient app opens.
- At the upper right, select Sign in, and then sign in by using a personal Microsoft account, such as a live.com or hotmail.com account, or a work or school account.
Optional: Limit sign-in access to certain users
By default, any personal accounts, such as outlook.com or live.com accounts, or work or school accounts from organizations that are integrated with Microsoft Entra ID can request tokens and access your web API.
To specify who can sign in to your application, by changing the TenantId property in the appsettings.json file.
Next steps
Learn more by building a protected ASP.NET Core web api in the following tutorial series: