Baidu クラウド プッシュは、プッシュ通知をモバイル デバイスに送信するために使用することのできる中国のクラウド サービスです。
Google Play と FCM (Firebase Cloud Messaging) は中国では利用できないため、別のアプリ ストアとプッシュ サービスを使用する必要があります。 Baidu はその 1 つで、現在 Notification Hub で使用されています。
前提条件
このチュートリアルには、次のものが必要です。
- Android SDK (Android Studio を使用することが前提)。Android サイトからダウンロードできます。
- Baidu Push Android SDK
注意
このチュートリアルを完了するには、アクティブな Azure アカウントが必要です。 アカウントがない場合は、無料試用アカウントを数分で作成することができます。 詳細については、「Azure の無料試用版サイト」を参照してください。
使用を開始するには、以下を実行します。
- Baidu アカウントを作成します。
- Baidu クラウド プッシュ プロジェクトを作成し、API キーと秘密鍵をメモしておきます。
新しい Notification Hub を構成する
Azure portal にサインインします。
左側のメニューから、 [すべてのサービス] を選択します。

[サービスのフィルター] テキスト ボックスに「Notification Hubs」と入力します。 サービス名の横にある星のアイコンを選択して、左側のメニューにある [お気に入り] セクションにサービスを追加します。 [Notification Hubs] を選択します。
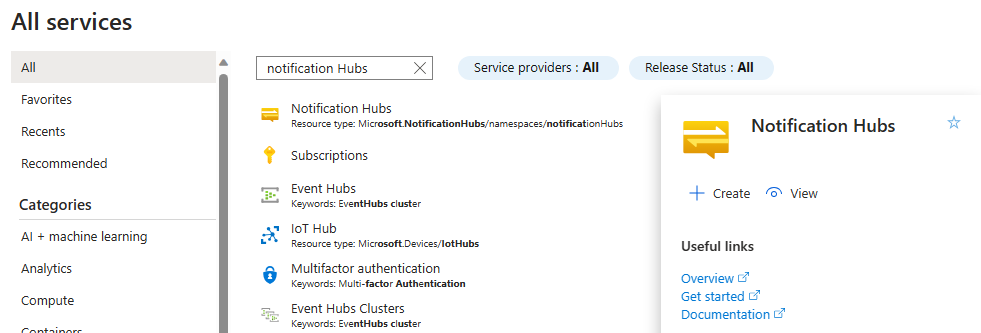
[Notification Hubs] ページで、ツール バーの [作成] を選択します。

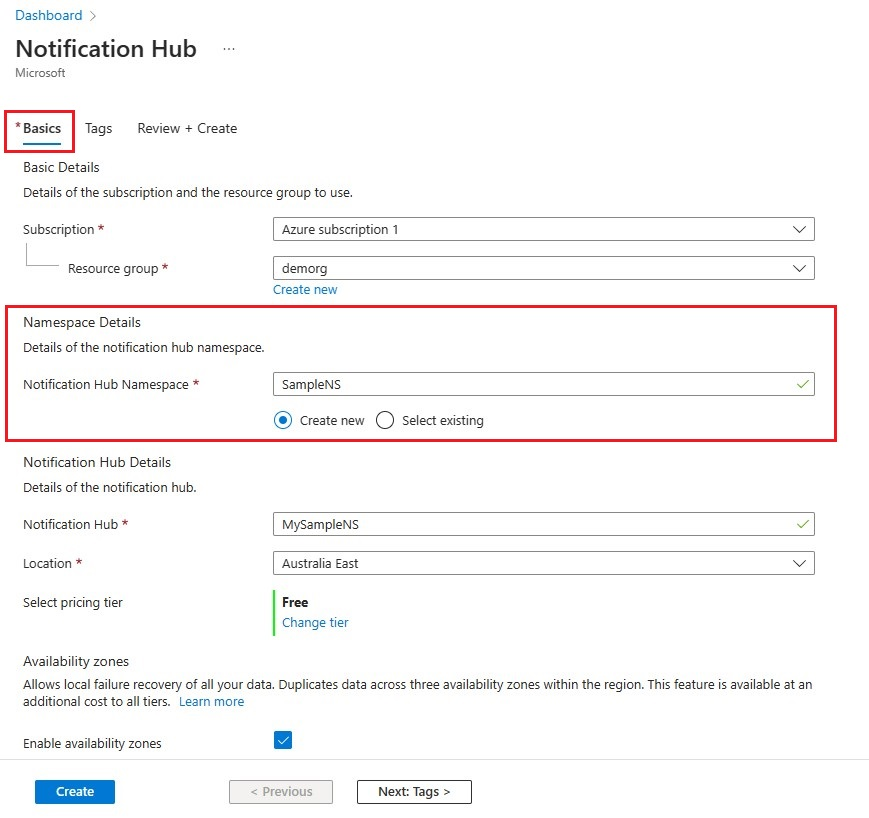
[Notification Hub] ページの [基本] タブで、次の手順を行います。
[サブスクリプション] で、使用する Azure サブスクリプションの名前を選択し、既存のリソース グループを選択するか、新しいリソース グループを作成します。
[名前空間の詳細] に新しい名前空間の一意の名前を入力します。
名前空間には 1 つ以上の通知ハブが含まれているので、 [通知ハブの詳細] にそのハブの名前を入力します。
[場所] ドロップダウン リスト ボックスで値を選択します。 この値には、ハブを作成する場所を指定します。
Availability Zones オプションをレビューします。 可用性ゾーンがあるリージョンを選んだ場合は、既定でチェック ボックスが選択されます。 Availability Zones は有料機能であるため、追加料金がレベルに追加されます。
[ディザスター リカバリー] オプションを選びます。[None] (なし)、[Paired recovery region] (ペアの復旧リージョン)、または [Flexible recovery region] (フレキシブル復旧リージョン) のオプションがあります。 Paired recovery region (ペアリングされた復旧リージョン) を選択すると、フェールオーバー リージョンが表示されます。 Flexible recovery region (柔軟な復旧リージョン) を選択した場合は、ドロップダウンを使用して復旧リージョンの一覧から選択します。
[作成] を選択します
デプロイが完了したら、[リソースに移動] を選択します。
6. 通知ハブで [Notification Services] を選択し、[Baidu (Android China)] を選択します。
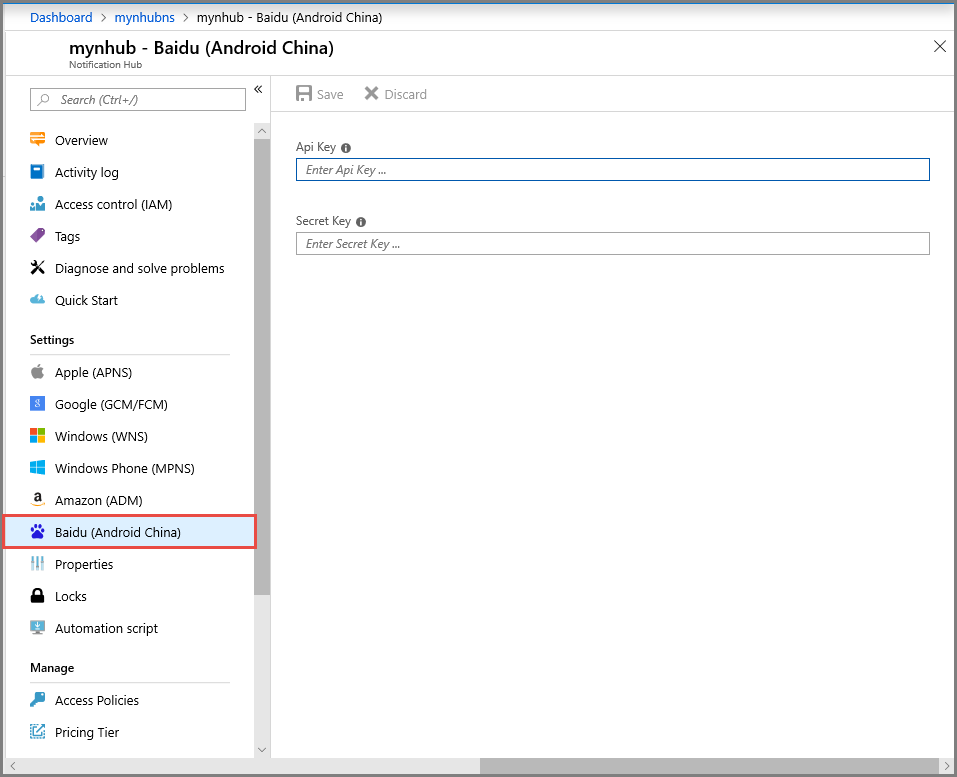
7. 下へスクロールして、[Baidu 通知設定] セクションに移動します。 Baidu コンソールから取得した API キーとシークレット キーを Baidu クラウド プッシュ プロジェクトに入力します。 その後、[保存] をクリックします。

これで、通知ハブが Baidu と連携するように構成されました。 また、アプリを登録してプッシュ通知を送受信するための接続文字列も得られました。
[接続情報へのアクセス] ウィンドウの DefaultListenSharedAccessSignature と DefaultFullSharedAccessSignature を書き留めておいてください。
通知ハブにアプリケーションを接続する
Android Studio で新しい Android プロジェクトを作成します ([File](ファイル) > [New](新規) > [New Project](新しいプロジェクト))。

アプリケーション名を入力し、最小必須 SDK のバージョンが API 16: Android 4.1 に設定されていることを確認します。 また、パッケージ名 (应用包名) が Baidu クラウド プッシュ ポータルでの名前と一致していることも確認してください。
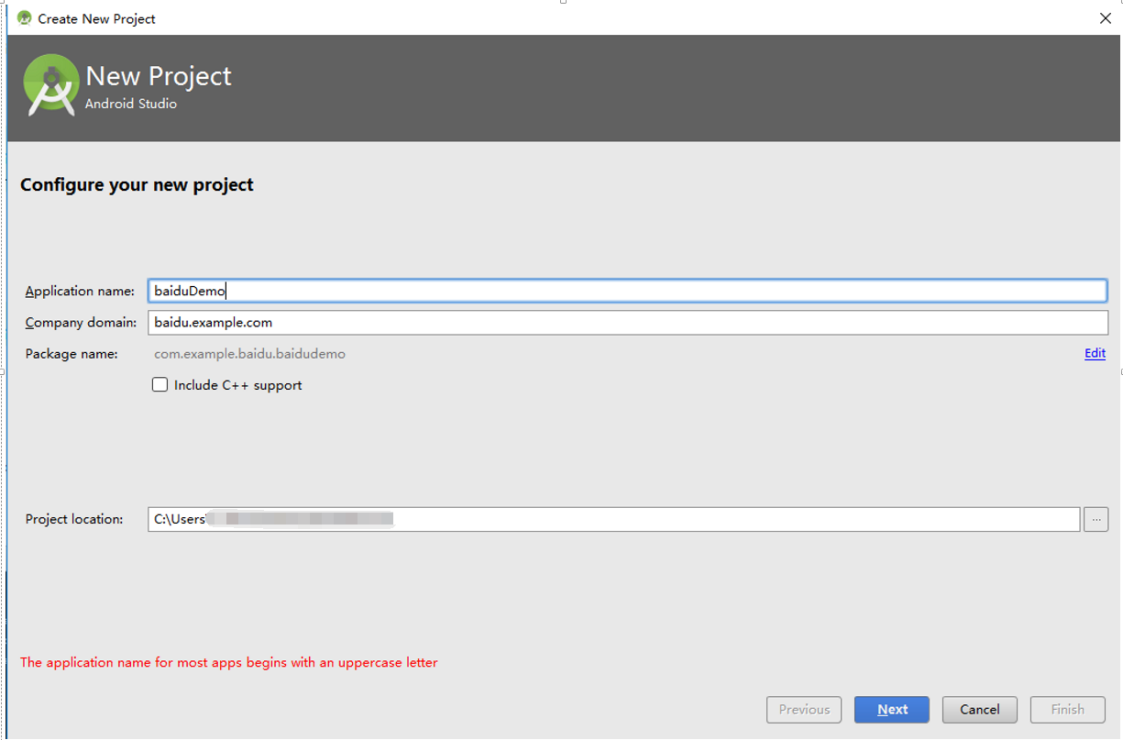
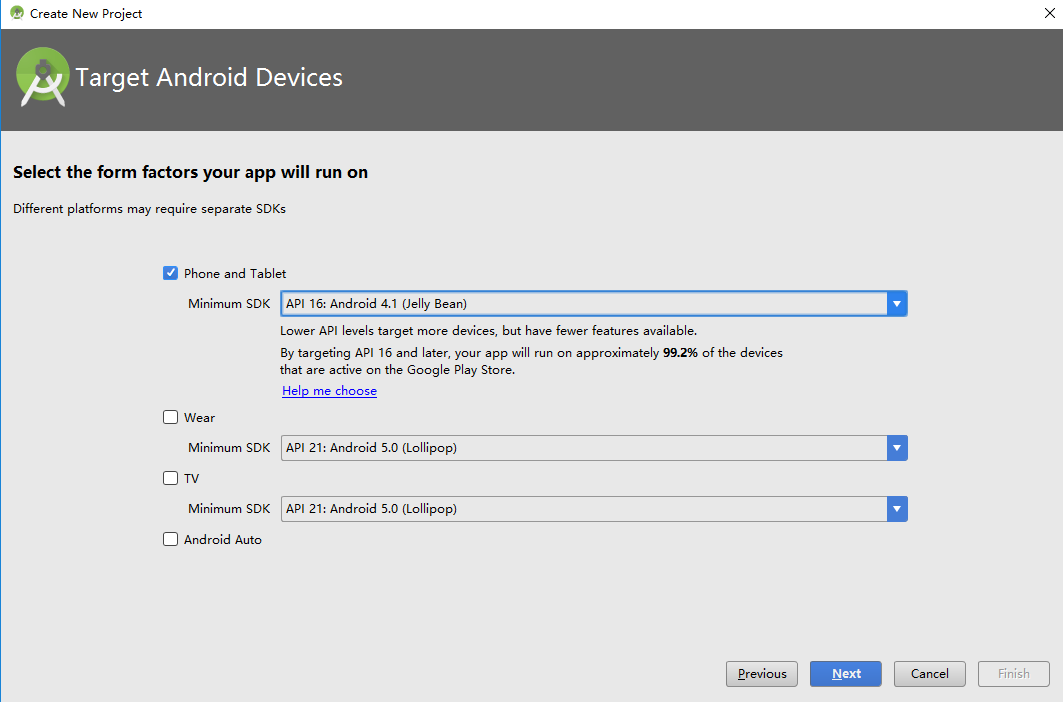
[Next](次へ) をクリックし、[Create Activity](アクティビティの作成) ウィンドウが表示されるまでウィザードに従います。 [Empty Activity](空のアクティビティ) が選択されていることを確認し、最後に [Finish](完了) を選択して新しい Android アプリケーションを作成します。
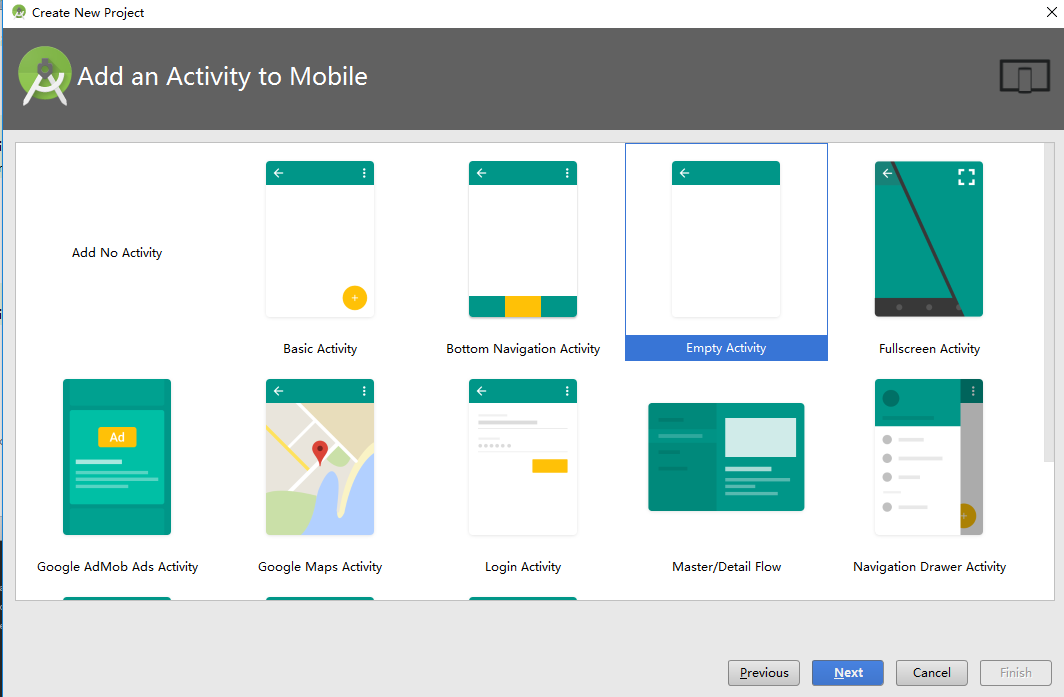
プロジェクト ビルド ターゲットが正しく設定されていることを確認します。
次に、Azure Notification Hubs ライブラリを追加します。 アプリの
Build.Gradleファイルの dependencies セクションに次の行を追加します。implementation 'com.microsoft.azure:notification-hubs-android-sdk:0.6@aar' implementation 'com.microsoft.azure:azure-notifications-handler:1.0.1@aar'dependencies セクションの後に次のリポジトリを追加します。
repositories {
    maven {
        url "https://dl.bintray.com/microsoftazuremobile/SDK"
    }
}
リストの競合を防ぐために、次のコードをプロジェクトの
Manifest.xmlファイルに追加します。<manifest package="YOUR.PACKAGE.NAME" xmlns:tools="http://schemas.android.com/tools" xmlns:android="http://schemas.android.com/apk/res/android">また、
<application/>タグには、次のコードを追加します。<application tools:replace="android:allowBackup,icon,theme,label">Baidu Push Android SDK をダウンロードして解凍します。 libs フォルダー内の
pushservice-x.y.z jarファイルをコピーします。 さらに、.soファイルを Android アプリケーションのsrc/main/jniLibsフォルダー (新しいフォルダーを作成してください) にコピーします。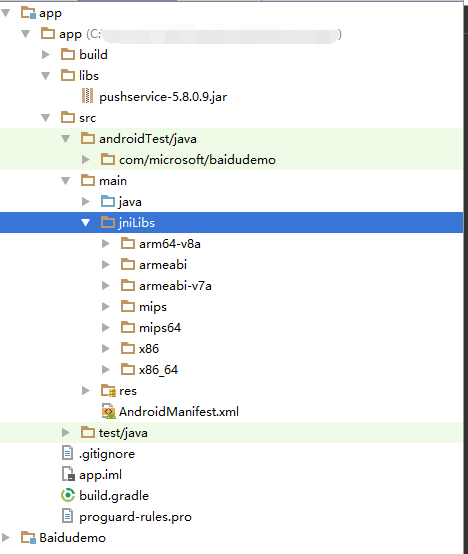
プロジェクトの
libsフォルダーで、pushervice-x.y.z.jarファイルを右クリックし、 [ライブラリとして追加] を選択して、このライブラリをプロジェクトにインクルードします。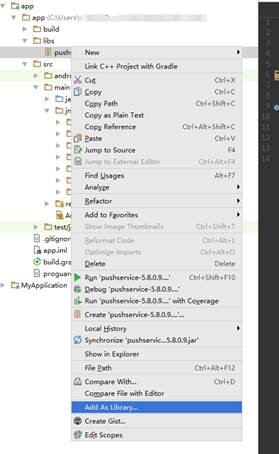
Android プロジェクトの
AndroidManifest.xmlファイルを開いて、Baidu SDK に必要なアクセス許可を追加します。YOURPACKAGENAMEは実際のパッケージ名に置き換えてください。<uses-permission android:name="android.permission.INTERNET" /> <uses-permission android:name="android.permission.READ_PHONE_STATE" /> <uses-permission android:name="android.permission.ACCESS_NETWORK_STATE" /> <uses-permission android:name="android.permission.RECEIVE_BOOT_COMPLETED" /> <uses-permission android:name="android.permission.WRITE_SETTINGS" /> <uses-permission android:name="android.permission.VIBRATE" /> <uses-permission android:name="android.permission.WRITE_EXTERNAL_STORAGE" /> <uses-permission android:name="android.permission.DISABLE_KEYGUARD" /> <uses-permission android:name="android.permission.ACCESS_COARSE_LOCATION" /> <uses-permission android:name="android.permission.ACCESS_WIFI_STATE" /> <uses-permission android:name="android.permission.ACCESS_DOWNLOAD_MANAGER" /> <uses-permission android:name="android.permission.DOWNLOAD_WITHOUT_NOTIFICATION" /> <uses-permission android:name="android.permission.EXPAND_STATUS_BAR" /> !! <uses-permission android:name="baidu.push.permission.WRITE_PUSHINFOPROVIDER.YOURPACKAGENAME" /> !!<permission android:name="baidu.push.permission.WRITE_PUSHINFOPROVIDER.YOURPACKAGENAME" android:protectionLevel="normal" />application 要素内で、
.MainActivityアクティビティ要素の後に次の構成を追加し、yourprojectname を置き換えます (例:com.example.BaiduTest)。<activity android:name="com.baidu.android.pushservice.richmedia.MediaViewActivity" android:configChanges="orientation|keyboardHidden" android:label="MediaViewActivity" /> <activity android:name="com.baidu.android.pushservice.richmedia.MediaListActivity" android:configChanges="orientation|keyboardHidden" android:label="MediaListActivity" android:launchMode="singleTask" /> <!-- Push application definition message --> <receiver android:name=".MyPushMessageReceiver"> <intent-filter> <!-- receive push message--> <action android:name="com.baidu.android.pushservice.action.MESSAGE" /> <!-- receive bind,unbind,fetch,delete.. message--> <action android:name="com.baidu.android.pushservice.action.RECEIVE" /> <action android:name="com.baidu.android.pushservice.action.notification.CLICK" /> </intent-filter> </receiver> <receiver android:name="com.baidu.android.pushservice.PushServiceReceiver" android:process=":bdservice_v1"> <intent-filter> <action android:name="android.intent.action.BOOT_COMPLETED" /> <action android:name="android.net.conn.CONNECTIVITY_CHANGE" /> <action android:name="com.baidu.android.pushservice.action.notification.SHOW" /> <action android:name="com.baidu.android.pushservice.action.media.CLICK" /> <action android:name="android.intent.action.MEDIA_MOUNTED" /> <action android:name="android.intent.action.USER_PRESENT" /> <action android:name="android.intent.action.ACTION_POWER_CONNECTED" /> <action android:name="android.intent.action.ACTION_POWER_DISCONNECTED" /> </intent-filter> </receiver> <receiver android:name="com.baidu.android.pushservice.RegistrationReceiver" android:process=":bdservice_v1"> <intent-filter> <action android:name="com.baidu.android.pushservice.action.METHOD" /> <action android:name="com.baidu.android.pushservice.action.BIND_SYNC" /> </intent-filter> <intent-filter> <action android:name="android.intent.action.PACKAGE_REMOVED" /> <data android:scheme="package" /> </intent-filter> </receiver> <service android:name="com.baidu.android.pushservice.PushService" android:exported="true" android:process=":bdservice_v1"> <intent-filter> <action android:name="com.baidu.android.pushservice.action.PUSH_SERVICE" /> </intent-filter> </service> <service android:name="com.baidu.android.pushservice.CommandService" android:exported="true" /> <!-- Adapt the ContentProvider declaration required for the Android N system, and the write permissions include the application package name--> <provider android:name="com.baidu.android.pushservice.PushInfoProvider" android:authorities="com.baidu.push.example.bdpush" android:exported="true" android:protectionLevel="signature" android:writePermission="baidu.push.permission.WRITE_PUSHINFOPROVIDER. yourprojectname " /> <!-- API Key of the Baidu application --> <meta-data android:name="api_key" !! android:value="api_key" /> </application>ConfigurationSettings.javaという新しいクラスをプロジェクトに追加します。public class ConfigurationSettings { public static String API_KEY = "..."; public static String NotificationHubName = "..."; public static String NotificationHubConnectionString = "..."; }Baidu クラウド プロジェクトからの API_KEY を使用して
API_KEY文字列の値を設定します。Azure Portal から得られる実際の通知ハブ名を使用して
NotificationHubName文字列の値を設定します。次に、Azure Portal から得られるDefaultListenSharedAccessSignatureを使用してNotificationHubConnectionStringを設定してください。MainActivity.java を開き、onCreate メソッドに次のコードを追加します。
PushManager.startWork(this, PushConstants.LOGIN_TYPE_API_KEY, API_KEY );MyPushMessageReceiver.javaという名前の新しいクラスを追加し、それに次のコードを追加します。 これは、Baidu プッシュ サーバーから受信したプッシュ通知を処理するクラスです。package your.package.name; import android.content.Context; import android.content.Intent; import android.os.AsyncTask; import android.text.TextUtils; import android.util.Log; import com.baidu.android.pushservice.PushMessageReceiver; import com.microsoft.windowsazure.messaging.NotificationHub; import org.json.JSONException; import org.json.JSONObject; import java.util.List; public class MyPushMessageReceiver extends PushMessageReceiver { public static final String TAG = MyPushMessageReceiver.class .getSimpleName(); public static NotificationHub hub = null; public static String mChannelId, mUserId; @Override public void onBind(Context context, int errorCode, String appid, String userId, String channelId, String requestId) { String responseString = "onBind errorCode=" + errorCode + " appid=" + appid + " userId=" + userId + " channelId=" + channelId + " requestId=" + requestId; Log.d(TAG, responseString); if (errorCode == 0) { // Binding successful Log.d(TAG, " Binding successful"); } try { if (hub == null) { hub = new NotificationHub( ConfigurationSettings.NotificationHubName, ConfigurationSettings.NotificationHubConnectionString, context); Log.i(TAG, "Notification hub initialized"); } } catch (Exception e) { Log.e(TAG, e.getMessage()); } mChannelId = channelId; mUserId = userId; registerWithNotificationHubs(); } private void registerWithNotificationHubs() { new AsyncTask<Void, Void, Void>() { @Override protected Void doInBackground(Void... params) { try { hub.registerBaidu(mUserId, mChannelId); Log.i(TAG, "Registered with Notification Hub - '" + ConfigurationSettings.NotificationHubName + "'" + " with UserId - '" + mUserId + "' and Channel Id - '" + mChannelId + "'"); } catch (Exception e) { Log.e(TAG, e.getMessage()); } return null; } }.execute(null, null, null); } @Override public void onMessage(Context context, String message, String customContentString) { String messageString = " onMessage=\"" + message + "\" customContentString=" + customContentString; Log.d(TAG, messageString); if (!TextUtils.isEmpty(customContentString)) { JSONObject customJson = null; try { customJson = new JSONObject(customContentString); String myvalue = null; if (!customJson.isNull("mykey")) { myvalue = customJson.getString("mykey"); } } catch (JSONException e) { e.printStackTrace(); } } } @Override public void onNotificationArrived(Context context, String title, String description, String customContentString) { String notifyString = " Notice Arrives onNotificationArrived title=\"" + title + "\" description=\"" + description + "\" customContent=" + customContentString; Log.d(TAG, notifyString); if (!TextUtils.isEmpty(customContentString)) { JSONObject customJson = null; try { customJson = new JSONObject(customContentString); String myvalue = null; if (!customJson.isNull("mykey")) { myvalue = customJson.getString("mykey"); } } catch (JSONException e) { // TODO Auto-generated catch block e.printStackTrace(); } } } @Override public void onNotificationClicked(Context context, String title, String description, String customContentString) { String notifyString = " onNotificationClicked title=\"" + title + "\" description=\"" + description + "\" customContent=" + customContentString; Log.d(TAG, notifyString); Intent intent = new Intent(context.getApplicationContext(),MainActivity.class); intent.putExtra("title",title); intent.putExtra("description",description); intent.putExtra("isFromNotify",true); intent.addFlags(Intent.FLAG_ACTIVITY_NEW_TASK); context.getApplicationContext().startActivity(intent); } @Override public void onSetTags(Context context, int errorCode, List<String> successTags, List<String> failTags, String requestId) { String responseString = "onSetTags errorCode=" + errorCode + " successTags=" + successTags + " failTags=" + failTags + " requestId=" + requestId; Log.d(TAG, responseString); } @Override public void onDelTags(Context context, int errorCode, List<String> successTags, List<String> failTags, String requestId) { String responseString = "onDelTags errorCode=" + errorCode + " successTags=" + successTags + " failTags=" + failTags + " requestId=" + requestId; Log.d(TAG, responseString); } @Override public void onListTags(Context context, int errorCode, List<String> tags, String requestId) { String responseString = "onListTags errorCode=" + errorCode + " tags=" + tags; Log.d(TAG, responseString); } @Override public void onUnbind(Context context, int errorCode, String requestId) { String responseString = "onUnbind errorCode=" + errorCode + " requestId = " + requestId; Log.d(TAG, responseString); if (errorCode == 0) { // Unbinding is successful Log.d(TAG, " Unbinding is successful "); } } }
アプリケーションに通知を送信する
以下の画面に示すように、通知ハブの構成画面にある [送信] ボタンを使用して、Azure Portal から通知の受信テストをすばやく行うことができます:
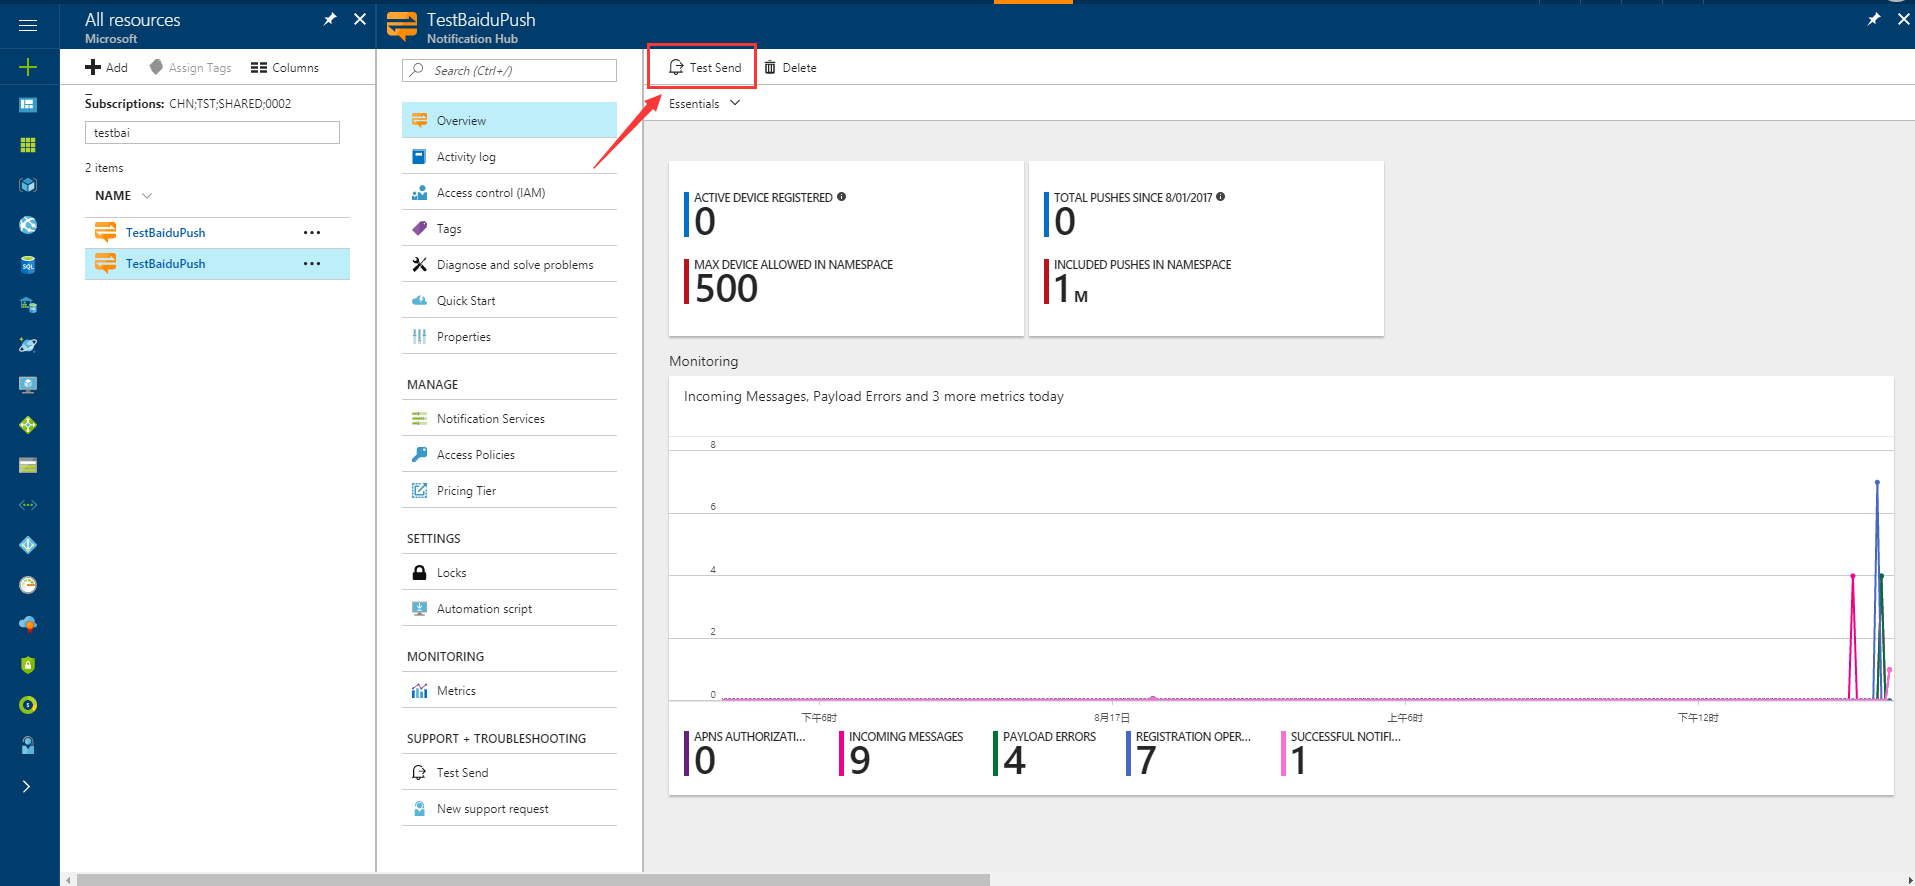
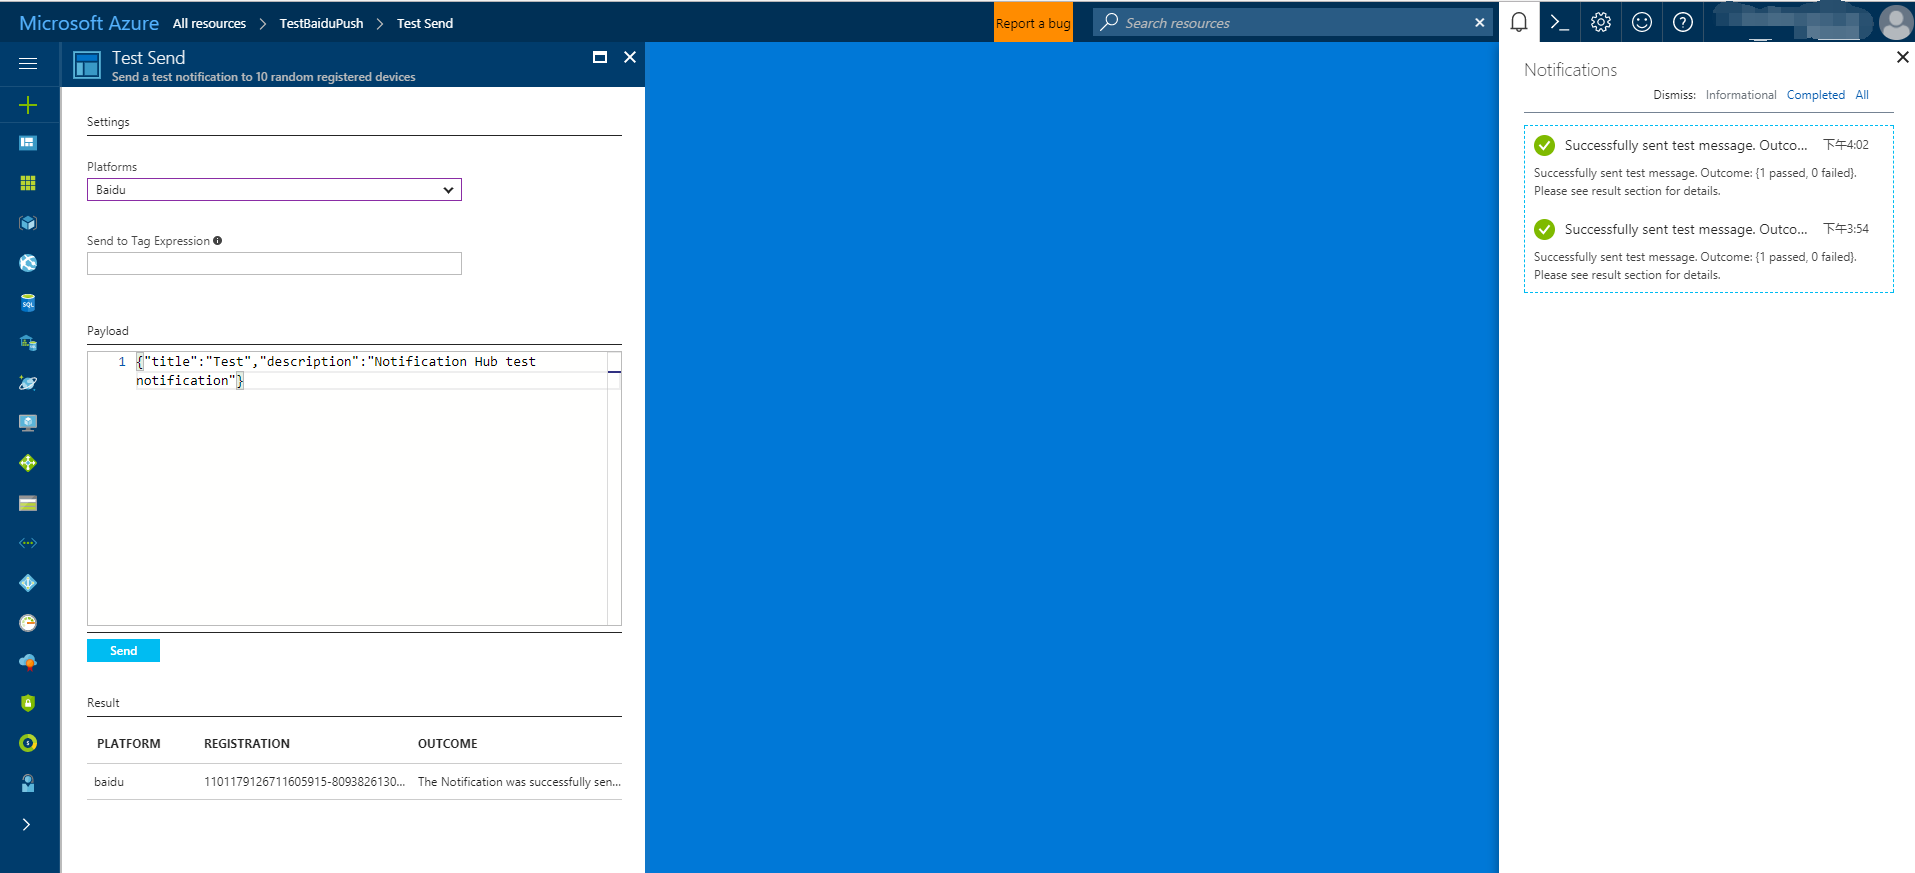
プッシュ通知は通常、互換性のあるライブラリを使用して Mobile Services などのバックエンド サービスや ASP.NET に送信されます。 バックエンドでライブラリを利用できない場合、REST API を直接使用して通知メッセージを送信できます。
このチュートリアルでは、単純化するために、.NET SDK で通知を送信する方法のデモンストレーションとしてコンソール アプリを使用しています。 ただし、ASP.NET バックエンドから通知を送信するには、次のステップとして Notification Hubs を使用したユーザーへのプッシュ通知に関するページを参照することをお勧めします。
通知を送信するためのさまざまな手法を次に示します。
- REST インターフェイス: REST インターフェイスを使用すると、任意のバックエンド プラットフォームの通知をサポートできます。
- Microsoft Azure Notification Hubs .NET SDK: Visual Studio 用の NuGet パッケージ マネージャーで、Install-Package Microsoft.Azure.NotificationHubs を実行します。
- Node.js:Node.js から Notification Hubs を使用する方法。
- Mobile Apps: Notification Hubs に統合されている Azure App Service Mobile Apps のバックエンドから通知を送信する方法の例については、モバイル アプリにプッシュ通知を追加する方法を説明したページを参照してください。
- Java / PHP: REST API を使用した通知の送信方法の例については、「Java/PHP から Notification Hubs を使用する方法」(Java | PHP) を参照してください。
(省略可能) .NET コンソール アプリケーションから通知を送信する
このセクションでは、.NET コンソール アプリケーションを使用した通知の送信方法について説明します。
Visual C# の新しいコンソール アプリケーションを作成します。
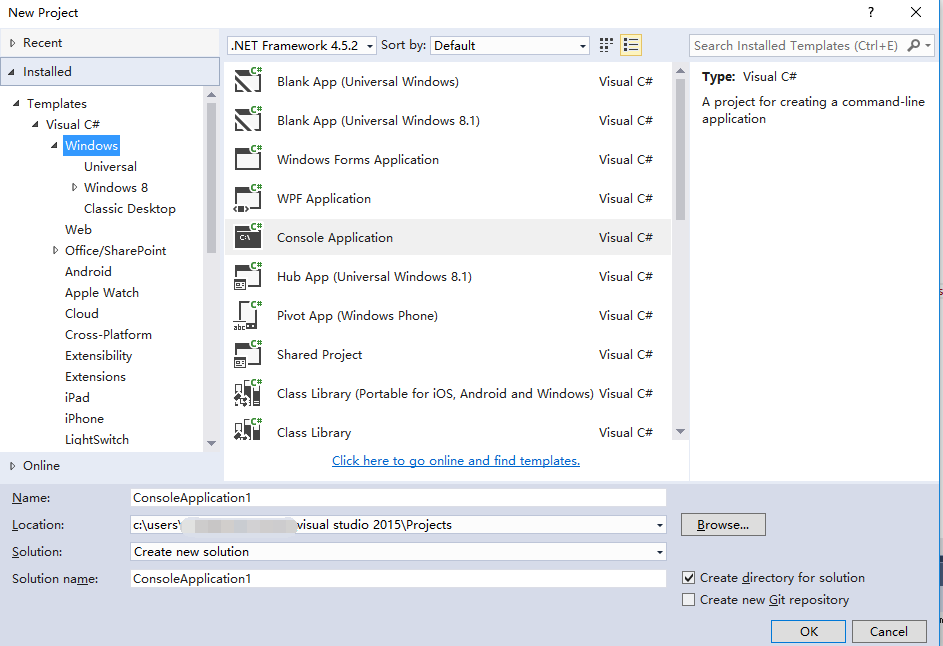
パッケージ マネージャー コンソール ウィンドウで [既定のプロジェクト] に新しいコンソール アプリケーション プロジェクトを設定した後、そのコンソール ウィンドウから次のコマンドを実行します。
Install-Package Microsoft.Azure.NotificationHubsこの手順により、Microsoft.Azure.Notification Hubs NuGet パッケージを利用して Azure Notification Hubs SDK に参照が追加されます。

Program.csファイルを開き、次の using ステートメントを追加します。using Microsoft.Azure.NotificationHubs;Programクラスに次のメソッドを追加し、DefaultFullSharedAccessSignatureSASConnectionStringとNotificationHubNameを実際の値に置き換えます。private static async void SendNotificationAsync() { NotificationHubClient hub = NotificationHubClient.CreateClientFromConnectionString("DefaultFullSharedAccessSignatureSASConnectionString", "NotificationHubName"); string message = "{\"title\":\"((Notification title))\",\"description\":\"Hello from Azure\"}"; var result = await hub.SendBaiduNativeNotificationAsync(message); }Mainメソッド内に次の行を追加します。SendNotificationAsync(); Console.ReadLine();
アプリをテストする
実際の電話でこのアプリケーションをテストする場合は、USB ケーブルを使用してコンピューターに電話を接続するだけです。 この操作によって、接続した電話にアプリケーションが読み込まれます。
エミュレーターでこのアプリをテストするには、上部の Android Studio ツール バーで [Run](実行) をクリックし、アプリを選択します。エミュレーターが起動され、アプリが読み込まれて実行されます。
アプリが Baidu プッシュ通知サービスから userId と channelId を取得し、通知ハブに登録します。
テスト通知は、Azure Portal の [デバッグ] タブを使用して送信できます。 Visual Studio で .Net コンソール アプリケーションを作成する場合、Visual Studio で F5 キーを押してアプリケーションを実行します。 アプリケーションから通知が送信され、デバイスまたはエミュレーターの上部の通知領域に表示されます。
