次の方法で共有


静的 Webアプリを構築して Azure にデプロイする

このチュートリアルでは、GitHub アクションを使用して、React/TypeScript クライアント アプリケーションをローカル環境で構築し、Azure Static Web アプリにデプロイします。 React アプリにより、ユーザーは Cognitive Services Computer Vision を使用してイメージを分析できます。

Azure サブスクリプションを作成するか、既存のものを使用する

アクティブなサブスクリプションがある Azure アカウントが必要です。 無料で作成できます。

前提条件

  • Node.js および npm - ローカル コンピューターにインストール済み。
  • Visual Studio Code - ローカル コンピューターにインストール済み。
    • Azure Static Web Apps - React アプリを Azure Static Web Apps にデプロイするために使用されます。
  • Git - GitHub にプッシュするために使用されます。これにより GitHub アクションがアクティブになります。
  • GitHub アカウント - フォークしてリポジトリにプッシュするため
  • Bash 環境で Azure Cloud Shell を使用します。
  • 責任ある AI 用語に同意してリソースを作成するには、Azure アカウントに Cognitive Services 共同作成者 ロールが割り当てられている必要があります。 このロールをアカウントに割り当てるには、ロールの割り当てに関するドキュメントの手順に従うか、管理者にお問い合わせください。

Azure Static Web アプリとは

静的 Web アプリを構築する場合、Azure ではユーザーが関心を持つ機能と制御のレベルによって、いくつかの選択肢があります。 このチュートリアルでは、最も簡単なサービスについて重点的に説明します。選択の多くが自動的に行われるため、ユーザーはホスティング環境ではなくフロントエンド コードに集中できます。

React (create-react-app) は次の機能を提供します。

  • Cognitive Services Computer Vision の Azure キーとエンドポイントが見つからない場合にメッセージを表示します
  • Cognitive Services Computer Vision を使用してイメージを分析できるようにします
    • パブリック イメージの URL を入力するか、コレクション内のイメージを分析します
    • 分析が完了したとき
      • 表示する画像
      • Computer Vision JSON の結果を表示する

Partial browser screenshot of React Cognitive Service Computer Vision sample results.

静的 Web アプリをデプロイするには、特定のブランチへのプッシュ発生時に開始される GitHub アクションを使用します。

  • Computer Vision キーとエンドポイントの GitHub シークレットをビルドに挿入します
  • React (create-react-app) クライアントを構築します
  • 生成されたファイルを Azure 静的 Web アプリ リソースに移動します

1. サンプル リポジトリをフォークする

変更のプッシュ先となる独自の GitHub リポジトリを作成するには、ローカル コンピューターに単純に複製する代わりにリポジトリをフォークします。

  1. 別のブラウザー ウィンドウまたはタブを開き、GitHub にサインインします。

  2. GitHub サンプル リポジトリに移動します。

    https://github.com/Azure-Samples/js-e2e-client-cognitive-services
    
  3. ページの右上のセクションで、[Fork]\(フォーク\) を選択します。

  4. [Code]\(コード\) を選択し、フォークの場所の URL をコピーします。

    Partial screenshot of GitHub website, select **Code** then copy the location for your fork.

2. ローカル開発環境を作成する

  1. ターミナルまたは bash ウィンドウで、フォークをローカル コンピューターに複製します。 YOUR-ACCOUNT-NAME を GitHub アカウント名に置き換えます。

    git clone https://github.com/YOUR-ACCOUNT-NAME/js-e2e-client-cognitive-services
    
  2. 新しいディレクトリに移動し、依存関係をインストールします。

    cd js-e2e-client-cognitive-services && npm install
    

    インストール手順では、必要な依存関係 (@azure/cognitiveservices-computervision など) がインストールされます。

3. ローカルのサンプルを実行する

  1. サンプルを実行します。

    npm start
    

    Partial browser screenshot of React Cognitive Service Computer Vision sample for image analysis before key and endpoint set.

  2. アプリを停止します。 ターミナル ウィンドウを閉じるか、ターミナルで control+c を使用します。

4. リソース グループを作成する

ターミナルまたは bash シェルで、Azure リソース グループを作成する Azure CLI コマンドを入力して、rg-demo という名前を指定します。

az group create \
    --location eastus \
    --name rg-demo \
    --subscription YOUR-SUBSCRIPTION-NAME-OR-ID

5. Computer Vision リソースを作成する

リソース グループを作成することにより、リソースを見つけやすくなり、完了時に削除しやすくなります。 この種類のリソースでは、責任ある使用の条件に同意する必要があります。 適切なリソースをすばやく作成する方法については、次の一覧をご覧ください。

6. 最初の Computer Vision リソースを作成する

これが初めての AI サービスの場合は、ポータルでサービスを作成し、そのリソースの作成の一環として、責任ある使用の条件に同意する必要があります。 これが責任ある使用への同意を必要とする最初のリソースではない場合は、次のセクションの Azure CLI を使用してリソースを作成できます。

次の表を使用して、Azure portal 内にリソースを作成してください。

設定
リソース グループ rg-demo
名前 demo-ComputerVision
Sku S1
場所 eastus

7. 追加の Computer Vision リソースを作成する

次のコマンドを実行して、Computer Vision リソースを作成します

az cognitiveservices account create \
    --name demo-ComputerVision \
    --resource-group rg-demo \
    --kind ComputerVision \
    --sku S1 \
    --location eastus \
    --yes

8. Computer Vision リソースのエンドポイントとキーを取得する

  1. その結果から properties.endpoint を見つけてコピーします。 この情報は後で必要になります。

    ...
    "properties":{
        ...
        "endpoint": "https://eastus.api.cognitive.microsoft.com/",
        ...
    }
    ...
    
  2. 次のコマンドを実行して、キーを取得します。

    az cognitiveservices account keys list \
    --name demo-ComputerVision \
    --resource-group rg-demo
    
  3. キーの 1 つをコピーします。これは後で必要になります。

    {
      "key1": "8eb7f878bdce4e96b26c89b2b8d05319",
      "key2": "c2067cea18254bdda71c8ba6428c1e1a"
    }
    

9. 環境変数をローカル環境に追加する

リソースを使用するには、ローカル コードでキーとエンドポイントを使用できるようにする必要があります。 このコード ベースは、これらを環境変数に格納します。

  • REACT_APP_AZURE_COMPUTER_VISION_KEY
  • REACT_APP_AZURE_COMPUTER_VISION_ENDPOINT
  1. 次のコマンドを実行して、これらの変数を環境に追加します。

    export REACT_APP_AZURE_COMPUTER_VISION_KEY="REPLACE-WITH-YOUR-KEY"
    export REACT_APP_AZURE_COMPUTER_VISION_ENDPOINT="REPLACE-WITH-YOUR-ENDPOINT"
    

10. 環境変数をリモート環境に追加する

Azure Static Web Apps を使用する場合、シークレットなどの環境変数を GitHub アクションから静的 Web アプリに渡す必要があります。 この GitHub アクションでは、そのリポジトリの GitHub シークレットから渡された Computer Vision キーとエンドポイントを含むアプリがビルドされ、その後、環境変数を含むコードが静的 Web アプリにプッシュされます。

  1. Web ブラウザーの GitHub リポジトリで、[Settings]\(設定\)[Secrets]\(シークレット\)[New repository secret]\(新しいリポジトリ シークレット\) を選択します。

    Partial browser screenshot of GitHub repository, creating new repository secret.

  2. エンドポイントに対して前のセクションで使用したものと同じ名前と値を入力します。 次に、前のセクションで使用したものと同じ名前と値のキーを持つ、別のシークレットを作成します。

    Enter the same name and value for the endpoint. Then create another secret with the same name and value for the key.

11. Computer Vision リソースでローカルの React アプリを実行する

  1. コマンドラインで再度アプリを起動します。

    npm start
    

    Partial browser screenshot of React Cognitive Service Computer Vision sample ready for URL or press enter.

  2. 既定のカタログからイメージを選択するために、テキスト フィールドを空のままにして、[Analyze] ボタンを選択します。

    Partial browser screenshot of React Cognitive Service Computer Vision sample results.

    イメージは、./src/DefaultImages.js で定義されているイメージのカタログからランダムに選択されます。

  3. 他のイメージと結果を表示するには、[Analyze] ボタンを選択して続行します。

12. ローカル ブランチを GitHub にプッシュする

Visual Studio Code ターミナルで、ローカル ブランチ main をリモート リポジトリにプッシュます。

git push origin main

変更がまだ行われていないため、変更をコミットする必要はありませんでした。

13. 静的 Web アプリのリソースを作成する

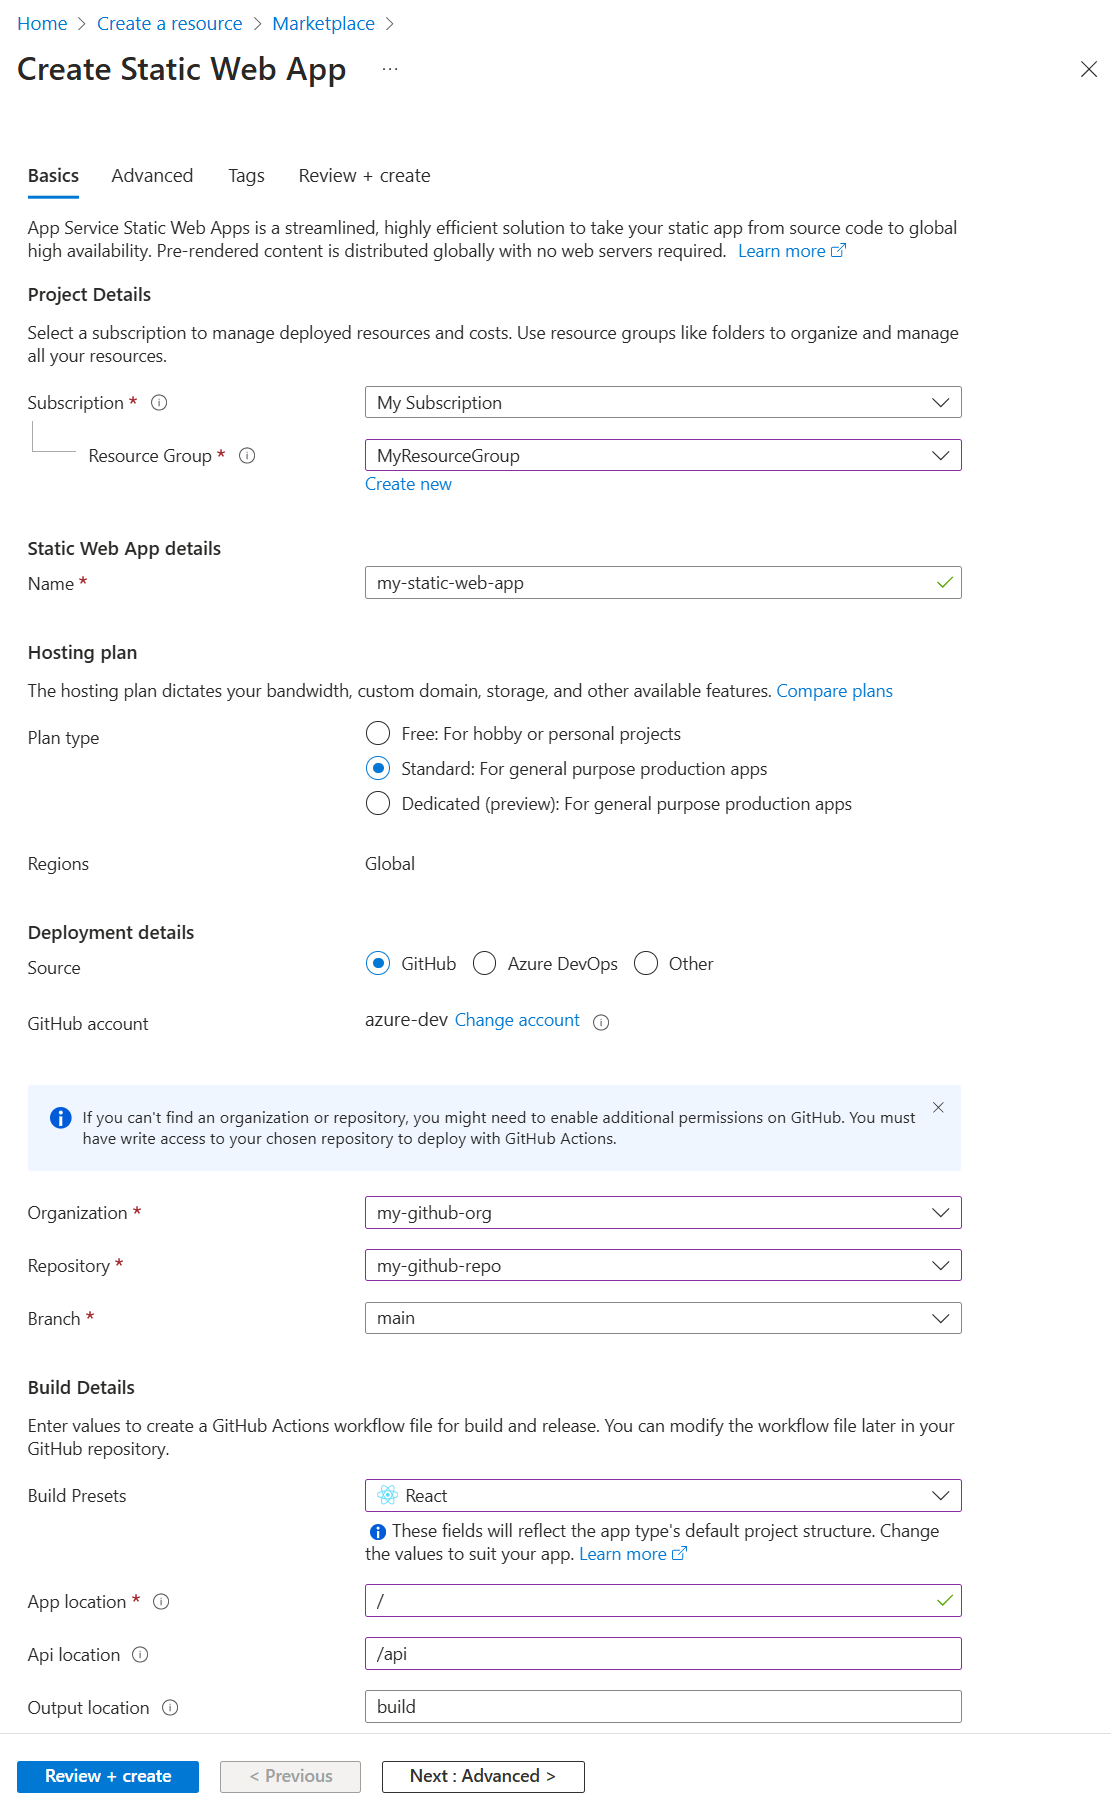
  1. [Azure] アイコンを選択し、[Static Web Apps] サービスを右クリックして、[Create Static Web App (Advanced)]\(静的 Web アプリを作成する (詳細)\) を選択します。

    Visual Studio Code screenshot with Visual Studio extension

  2. main 分岐に対して続行するかどうかを確認するポップアップウィンドウが表示されたら、[続行] を選択します。

  3. 次の情報を、一度に 1 つずつ表示される後続のフィールドに入力します。

    フィールド名
    新しいリソース用のリソース グループの選択。 ComputerVision リソース用に作成したリソース グループ demo-ComputerVision を選択します。
    新しい静的 Web アプリの名前を入力してください。 Demo-ComputerVisionAnalyzer
    価格オプションの選択 [Free] を選択します。
    [Select the location of your application code.]\(アプリケーション コードの場所を選択してください。\) リソース グループの作成時に選択したのと同じ場所 (eastus) を選択します。
    既定のプロジェクト構造を構成するためのビルド プリセットの選択。 React
    Choose the location of your application code (アプリケーション コードの場所を選択してください)。 /
    Enter the location of your Azure Functions code (Azure Functions コードの場所を入力してください)。 既定値を取ります。
    [Enter the path of your build output relative to your app's location.]\(アプリの場所を基準とした、ビルド出力のパスを入力します。\) build

14. シークレット環境変数を使用して GitHub アクションを更新する

Computer Vision のキーとエンドポイントは、リポジトリのシークレット コレクションに含まれていますが、まだ GitHub アクションにはありません。 この手順では、キーとエンドポイントをアクションに追加します。

  1. Azure リソースの作成から行った変更をプルし、GitHub アクション ファイルを取得します。

    git pull origin main
    
  2. Visual Studio Code エディターで、./.github/workflows/ にある GitHub アクション ファイルを編集して、シークレットを追加します。

    name: Azure Static Web Apps CI/CD
    
    on:
      push:
        branches:
          - from-local
      pull_request:
        types: [opened, synchronize, reopened, closed]
        branches:
          - from-local
    
    jobs:
      build_and_deploy_job:
        if: github.event_name == 'push' || (github.event_name == 'pull_request' && github.event.action != 'closed')
        runs-on: ubuntu-latest
        name: Build and Deploy Job
        steps:
          - uses: actions/checkout@v2
            with:
              submodules: true
          - name: Build And Deploy
            id: builddeploy
            uses: Azure/static-web-apps-deploy@v0.0.1-preview
            with:
              azure_static_web_apps_api_token: ${{ secrets.AZURE_STATIC_WEB_APPS_API_TOKEN_RANDOM_NAME_HERE }}
              repo_token: ${{ secrets.GITHUB_TOKEN }} # Used for Github integrations (i.e. PR comments)
              action: "upload"
              ###### Repository/Build Configurations - These values can be configured to match you app requirements. ######
              # For more information regarding Static Web App workflow configurations, please visit: https://aka.ms/swaworkflowconfig
              app_location: "/" # App source code path
              api_location: "api" # Api source code path - optional
              output_location: "build" # Built app content directory - optional
              ###### End of Repository/Build Configurations ######
            env:
              REACT_APP_AZURE_COMPUTER_VISION_ENDPOINT: ${{secrets.REACT_APP_AZURE_COMPUTER_VISION_ENDPOINT}}
              REACT_APP_AZURE_COMPUTER_VISION_KEY:  ${{secrets.REACT_APP_AZURE_COMPUTER_VISION_KEY}}
    
      close_pull_request_job:
        if: github.event_name == 'pull_request' && github.event.action == 'closed'
        runs-on: ubuntu-latest
        name: Close Pull Request Job
        steps:
          - name: Close Pull Request
            id: closepullrequest
            uses: Azure/static-web-apps-deploy@v0.0.1-preview
            with:
              azure_static_web_apps_api_token: ${{ secrets.AZURE_STATIC_WEB_APPS_API_TOKEN_RANDOM_NAME_HERE }}
              action: "close"
    
  3. ローカルの main ブランチに変更を追加してコミットします。

    git add . && git commit -m "add secrets to action"
    
  4. 変更をリモート リポジトリにプッシュし、Azure Static Web アプリに対する新しい build and deploy アクションを開始します。

    git push origin main
    

15. GitHub アクションのビルド プロセスを表示する

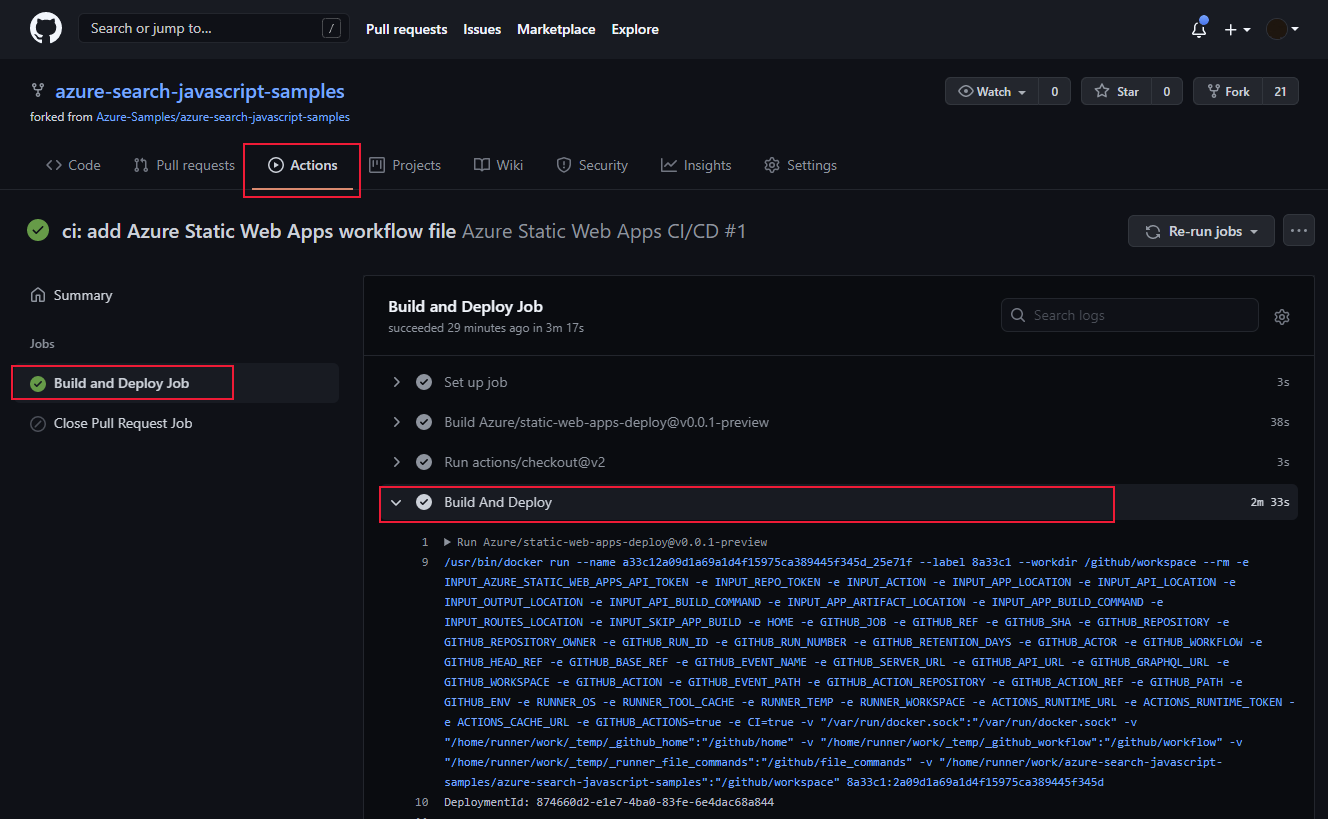
  1. Web ブラウザーで、このチュートリアル用に GitHub リポジトリを開き、[Actions]\(アクション\) を選択します。

  2. 一覧の一番上のビルドを選択し、左側のメニューの [Build and Deploy Job]\(ビルドとデプロイ ジョブ\) を選択してビルド プロセスを監視します。 [Build And Deploy]\(ビルドとデプロイ\) が正常に終了するまで待ちます。

     Select the top build in the list, then select `Build and Deploy Job` on the left-side menu to watch the build process. Wait until the build successfully finishes.

16. ブラウザーでリモートの Azure 静的 Web サイトを表示する

  1. Visual Studio Code で、右端のメニューの [Azure] アイコンを選択し、静的 Web アプリを選択します。次に [Browse site]\(サイトの参照\) を右クリックし、[Open]\(開く\) を選択して、パブリックな静的 Web サイトを表示します。

Select `Browse site`, then select `Open` to view the public static web site.

サイトの URL は次の場所で見つけることもできます。

  • リソースの Azure portal ([Overview]\(概要\) ページ)。
  • GitHub アクションの build and deploy 出力には、スクリプトの最後にサイトの URL が含まれています

17. 静的 Web アプリのリソースをクリーンアップする

このチュートリアルを完了したら、Computer Vision リソースおよび静的 Web アプリが含まれているリソース グループを削除し、さらなる使用によって課金されないようにする必要があります。

VS Code で、Azure エクスプローラーを選択し、サブスクリプションの下に一覧表示されているリソース グループを右クリックして、[削除] を選択します。

Partial screen shot of VS Code, selecting resource group from list of resource groups, then right-clicking to select `Delete`.

コード: Computer Vision をローカルの React アプリに追加する

npm を使用して、Computer Vision を package.json ファイルに追加します。

npm install @azure/cognitiveservices-computervision 

コード: Computer Vision コードを別のモジュールとして追加する

Computer Vision コードは、./src/azure-cognitiveservices-computervision.js という名前の別のファイルに含まれています。 このモジュールの主要な関数が強調表示されています。

// ./src/azure-cognitiveservices-computervision.js

// Azure SDK client libraries
import { ComputerVisionClient } from '@azure/cognitiveservices-computervision';
import { ApiKeyCredentials } from '@azure/ms-rest-js';

// List of sample images to use in demo
import RandomImageUrl from './DefaultImages';

// Authentication requirements
const key = process.env.REACT_APP_AZURE_COMPUTER_VISION_KEY;
const endpoint = process.env.REACT_APP_AZURE_COMPUTER_VISION_ENDPOINT;

console.log(`key = ${key}`)
console.log(`endpoint = ${endpoint}`)

// Cognitive service features
const visualFeatures = [
    "ImageType",
    "Faces",
    "Adult",
    "Categories",
    "Color",
    "Tags",
    "Description",
    "Objects",
    "Brands"
];

export const isConfigured = () => {
    const result = (key && endpoint && (key.length > 0) && (endpoint.length > 0)) ? true : false;
    console.log(`key = ${key}`)
    console.log(`endpoint = ${endpoint}`)
    console.log(`ComputerVision isConfigured = ${result}`)
    return result;
}

// Computer Vision detected Printed Text
const includesText = async (tags) => {
    return tags.filter((el) => {
        return el.name.toLowerCase() === "text";
    });
}
// Computer Vision detected Handwriting
const includesHandwriting = async (tags) => {
    return tags.filter((el) => {
        return el.name.toLowerCase() === "handwriting";
    });
}
// Wait for text detection to succeed
const wait = (timeout) => {
    return new Promise(resolve => {
        setTimeout(resolve, timeout);
    });
}

// Analyze Image from URL
export const computerVision = async (url) => {

    // authenticate to Azure service
    const computerVisionClient = new ComputerVisionClient(
        new ApiKeyCredentials({ inHeader: { 'Ocp-Apim-Subscription-Key': key } }), endpoint);

    // get image URL - entered in form or random from Default Images
    const urlToAnalyze = url || RandomImageUrl();
    
    // analyze image
    const analysis = await computerVisionClient.analyzeImage(urlToAnalyze, { visualFeatures });

    // text detected - what does it say and where is it
    if (includesText(analysis.tags) || includesHandwriting(analysis.tags)) {
        analysis.text = await readTextFromURL(computerVisionClient, urlToAnalyze);
    }

    // all information about image
    return { "URL": urlToAnalyze, ...analysis};
}
// analyze text in image
const readTextFromURL = async (client, url) => {
    
    let result = await client.read(url);
    let operationID = result.operationLocation.split('/').slice(-1)[0];

    // Wait for read recognition to complete
    // result.status is initially undefined, since it's the result of read
    const start = Date.now();
    console.log(`${start} -${result?.status} `);
    
    while (result.status !== "succeeded") {
        await wait(500);
        console.log(`${Date.now() - start} -${result?.status} `);
        result = await client.getReadResult(operationID);
    }
    
    // Return the first page of result. 
    // Replace[0] with the desired page if this is a multi-page file such as .pdf or.tiff.
    return result.analyzeResult; 
}

コード: イメージのカタログを個別のモジュールとして追加する

ユーザーがイメージの URL を入力しない場合、カタログからランダムなイメージが選択されます。 ランダム選択関数が強調表示されています

// ./src/DefaultImages.js

const describeURL = 'https://raw.githubusercontent.com/Azure-Samples/cognitive-services-sample-data-files/master/ComputerVision/Images/celebrities.jpg';
const categoryURLImage = 'https://moderatorsampleimages.blob.core.windows.net/samples/sample16.png';
const tagsURL = 'https://moderatorsampleimages.blob.core.windows.net/samples/sample16.png';
const objectURL = 'https://raw.githubusercontent.com/Azure-Samples/cognitive-services-node-sdk-samples/master/Data/image.jpg';
const brandURLImage = 'https://docs.microsoft.com/en-us/azure/cognitive-services/computer-vision/images/red-shirt-logo.jpg';
const facesImageURL = 'https://raw.githubusercontent.com/Azure-Samples/cognitive-services-sample-data-files/master/ComputerVision/Images/faces.jpg';
const printedTextSampleURL = 'https://moderatorsampleimages.blob.core.windows.net/samples/sample2.jpg';
const multiLingualTextURL = 'https://raw.githubusercontent.com/Azure-Samples/cognitive-services-sample-data-files/master/ComputerVision/Images/MultiLingual.png';
const adultURLImage = 'https://raw.githubusercontent.com/Azure-Samples/cognitive-services-sample-data-files/master/ComputerVision/Images/celebrities.jpg';
const colorURLImage = 'https://raw.githubusercontent.com/Azure-Samples/cognitive-services-sample-data-files/master/ComputerVision/Images/celebrities.jpg';
// don't use with picture analysis
// eslint-disable-next-line
const mixedMultiPagePDFURL = 'https://raw.githubusercontent.com/Azure-Samples/cognitive-services-sample-data-files/master/ComputerVision/Images/MultiPageHandwrittenForm.pdf';
const domainURLImage = 'https://raw.githubusercontent.com/Azure-Samples/cognitive-services-sample-data-files/master/ComputerVision/Images/landmark.jpg';
const typeURLImage = 'https://raw.githubusercontent.com/Azure-Samples/cognitive-services-python-sdk-samples/master/samples/vision/images/make_things_happen.jpg';

const DefaultImages = [
    describeURL,
    categoryURLImage,
    tagsURL,
    objectURL,
    brandURLImage,
    facesImageURL,
    adultURLImage,
    colorURLImage,
    domainURLImage,
    typeURLImage,
    printedTextSampleURL,
    multiLingualTextURL,
    //mixedMultiPagePDFURL
];

const RandomImageUrl = () => {
    return DefaultImages[Math.floor(Math.random() * Math.floor(DefaultImages.length))];
}

export default RandomImageUrl;

コード: カスタムの Computer Vision モジュールを React アプリに追加する

メソッドを React app.js に追加します。 イメージの分析と結果の表示が強調表示されています。

// ./src/App.js

import React, { useState } from 'react';
import './App.css';
import { computerVision, isConfigured as ComputerVisionIsConfigured } from './azure-cognitiveservices-computervision';

function App() {

  const [fileSelected, setFileSelected] = useState(null);
  const [analysis, setAnalysis] = useState(null);
  const [processing, setProcessing] = useState(false);
  
  const handleChange = (e) => {
    setFileSelected(e.target.value)
  }
  const onFileUrlEntered = (e) => {

    // hold UI
    setProcessing(true);
    setAnalysis(null);

    computerVision(fileSelected || null).then((item) => {
      // reset state/form
      setAnalysis(item);
      setFileSelected("");
      setProcessing(false);
    });

  };

  // Display JSON data in readable format
  const PrettyPrintJson = (data) => {
    return (<div><pre>{JSON.stringify(data, null, 2)}</pre></div>);
  }

  const DisplayResults = () => {
    return (
      <div>
        <h2>Computer Vision Analysis</h2>
        <div><img src={analysis.URL} height="200" border="1" alt={(analysis.description && analysis.description.captions && analysis.description.captions[0].text ? analysis.description.captions[0].text : "can't find caption")} /></div>
        {PrettyPrintJson(analysis)}
      </div>
    )
  };
  
  const Analyze = () => {
    return (
    <div>
      <h1>Analyze image</h1>
      {!processing &&
        <div>
          <div>
            <label>URL</label>
            <input type="text" placeholder="Enter URL or leave empty for random image from collection" size="50" onChange={handleChange}></input>
          </div>
          <button onClick={onFileUrlEntered}>Analyze</button>
        </div>
      }
      {processing && <div>Processing</div>}
      <hr />
      {analysis && DisplayResults()}
      </div>
    )
  }
  
  const CantAnalyze = () => {
    return (
      <div>Key and/or endpoint not configured in ./azure-cognitiveservices-computervision.js</div>
    )
  }
  
  function Render() {
    const ready = ComputerVisionIsConfigured();
    if (ready) {
      return <Analyze />;
    }
    return <CantAnalyze />;
  }

  return (
    <div>
      {Render()}
    </div>
    
  );
}

export default App;

次のステップ