Azure Blob Storage を使用した Azure Communication Services Chat で UI ライブラリを使ったファイル共有を有効にする
重要
Azure Communication Services のこの機能は、現在プレビュー段階にあります。
プレビューの API と SDK は、サービス レベル アグリーメントなしに提供されます。 運用環境のワークロードには使用しないことをお勧めします。 一部の機能はサポート対象ではなく、機能が制限されることがあります。
詳細については、「Microsoft Azure プレビューの追加利用規約」を確認してください。
Azure Communication Services Chat では、通信ユーザー間のファイル共有を有効にすることができます。 Azure Communication Services チャットは、Teams 相互運用性チャット ("相互運用チャット") とは異なることにご注意ください。 相互運用チャットでファイル共有を有効にする場合は、Teams の相互運用性チャットでの UI ライブラリを使用したファイル共有の追加に関するページを参照してください。
このチュートリアルでは、ファイル共有を有効にするために、Azure Communication Services UI ライブラリ チャット コンポジットを構成します。 UI ライブラリ チャット コンポジットには、ファイル共有を有効にするために使用できる一連の高機能コンポーネントと UI コントロールが用意されています。 Azure Blob Storage を使用して、チャット スレッドで共有されるファイルを格納できるようにします。
重要
Azure Communication Services では、ファイル ストレージ サービスは提供されません。 ファイルを共有するために独自のファイル ストレージ サービスを使用する必要があります。 このチュートリアルでは、Azure Blob Storage を使用します。**
コードをダウンロードする
このチュートリアルの完全なコードには GitHub でアクセスしてください。 UI コンポーネントを使用してファイル共有を使用する場合は、このサンプルを参照してください。
前提条件
- アクティブなサブスクリプションが含まれる Azure アカウント。 詳細については、アカウントの無料作成に関するページを参照してください。
- サポートされているプラットフォームのいずれかにインストールされた Visual Studio Code。
- Node.js。アクティブ LTS およびメンテナンス LTS バージョン (10.14.1 を推奨)。
node --versionコマンドを使用して、現在のバージョンを確認してください。 - アクティブな Communication Services リソースと接続文字列。 Communication Services リソースを作成します。
このチュートリアルでは、チャット コンポジットを設定して実行する方法を既に理解していることを前提としています。 チャット コンポジットを設定する方法については、チャット コンポジットのチュートリアルを参照してください。
概要
UI ライブラリ チャット コンポジットは、ホストされるファイルの URL を開発者が渡す (Azure Communication Services チャット サービスを介して送信される) ことを可能にして、ファイル共有をサポートします。 UI ライブラリは、添付されたファイルをレンダリングします。また、送信されたファイルの外観を構成するために複数の拡張機能がサポートされています。 具体的には、次の機能がサポートされています。
- OS ファイル ピッカーを使用してファイルを選択するための [ファイルの添付] ボタン
- 許可されるファイル拡張子を構成します。
- 複数のアップロードを有効または無効にします。
- ファイルの種類ごとのさまざまなファイル アイコン。
- 進行状況インジケーターを含む [ファイルのアップロード]/[ファイルのダウンロード] カード。
- ファイルのアップロードそれぞれを動的に検証して UI にエラーを表示する機能。
- アップロードを取り消し、アップロードしファイルを送信前に削除する機能。
- アップロードしたファイルを MessageThread に表示し、ダウンロードします。 非同期ダウンロードを許可します。
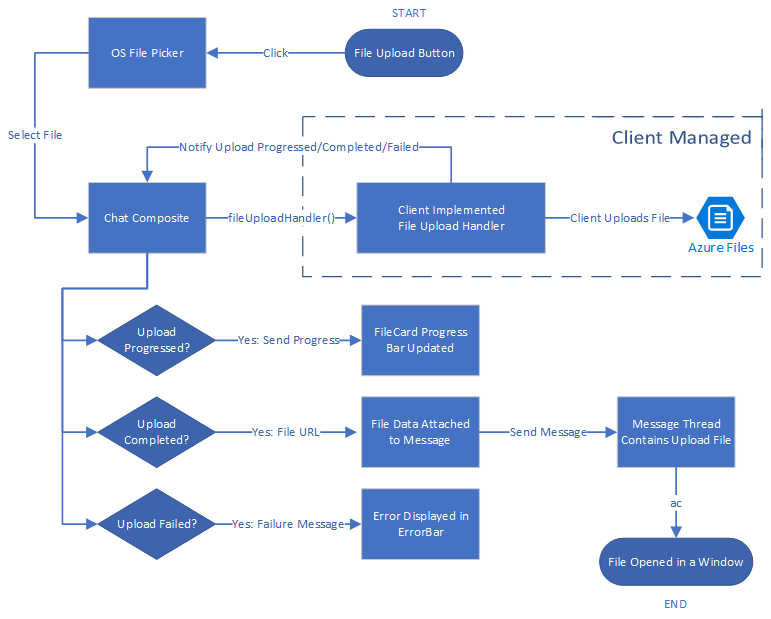
以下の図は、ファイル共有シナリオのアップロードとダウンロード両方の典型的なフローを示しています。 Client Managed としてマークされたセクションは、開発者が実装する必要がある構成要素を示しています。

Azure BLOB を使用してファイル ストレージを設定する
チュートリアル「Azure 関数を使用してファイルを Azure Blob Storage にアップロードする」に従って、ファイル共有に必要なバックエンド コードを作成できます。
実装が完了したら、この Azure 関数を handleAttachmentSelection 関数内で呼び出して、ファイルを Azure Blob Storage にアップロードできます。 このチュートリアルの残りの部分では、以前にリンクの Azure Blob Storage チュートリアルを使用して関数を生成したことを前提としています。
Azure Blob ストレージ コンテナーのセキュリティ保護
このチュートリアルでは、お使いの Azure Blob ストレージ コンテナーでアップロードするファイルへのパブリック アクセスが許可されていることを前提としています。 実際の運用アプリケーションでは、Azure Storage コンテナーをパブリックにすることはお勧めしません。
Azure Blob ストレージにアップロードするファイルをダウンロードするには、Shared Access Signature (SAS) を使用できます。 Shared Access Signature (SAS) を使用すると、ストレージ アカウント内のリソースへのセキュリティで保護された委任アクセスが可能になります。 SAS を使用すると、クライアントがデータにアクセスする方法をきめ細かく制御できます。
ダウンロード可能な GitHub サンプルは、Azure Storage コンテンツに SAS URL を作成するための SAS の使用方法を示しています。 SAS についてさらに詳しい情報は、こちらをご覧ください。
UI ライブラリでは、React 環境を設定する必要があります。 これは、次に行う予定です。 既に React アプリをお持ちの場合は、このセクションをスキップしてかまいません。
React アプリを設定する
このクイックスタートでは、create-react-app テンプレートを使用します。 詳細については、次を参照してください。React の概要に関するページ
npx create-react-app ui-library-quickstart-composites --template typescript

cd ui-library-quickstart-composites
このプロセスが終了すると、ui-library-quickstart-composites フォルダー内に完全なアプリケーションが作成されます。
このクイックスタートでは、src フォルダー内のファイルを変更します。
パッケージをインストールする
npm install コマンドを使用して、JavaScript 用のベータ版 Azure Communication Services UI ライブラリをインストールします。
npm install @azure/communication-react@1.16.0-beta.1
@azure/communication-react はコア Azure Communication Services を peerDependencies として指定するため、アプリケーションでコア ライブラリの API を一貫して使用できます。 これらのライブラリもインストールする必要があります。
npm install @azure/communication-calling@1.24.1-beta.2
npm install @azure/communication-chat@1.6.0-beta.1
React アプリを作成する
次を実行して、create-react-app のインストールをテストしましょう。
npm run start
ファイル共有を有効にするチャット コンポジットの構成
チャット コンポジットを初期化するために必要な両方の共通変数の変数値を置き換える必要があります。
App.tsx
import { initializeFileTypeIcons } from '@fluentui/react-file-type-icons';
import {
  ChatComposite,
  AttachmentUploadTask,
  AttachmentUploadOptions,
  AttachmentSelectionHandler,
  fromFlatCommunicationIdentifier,
  useAzureCommunicationChatAdapter
} from '@azure/communication-react';
import React, { useMemo } from 'react';

initializeFileTypeIcons();

function App(): JSX.Element {
  // Common variables
  const endpointUrl = 'INSERT_ENDPOINT_URL';
  const userId = ' INSERT_USER_ID';
  const displayName = 'INSERT_DISPLAY_NAME';
  const token = 'INSERT_ACCESS_TOKEN';
  const threadId = 'INSERT_THREAD_ID';

  // We can't even initialize the Chat and Call adapters without a well-formed token.
  const credential = useMemo(() => {
    try {
      return new AzureCommunicationTokenCredential(token);
    } catch {
      console.error('Failed to construct token credential');
      return undefined;
    }
  }, [token]);

  // Memoize arguments to `useAzureCommunicationChatAdapter` so that
  // a new adapter is only created when an argument changes.
  const chatAdapterArgs = useMemo(
    () => ({
      endpoint: endpointUrl,
      userId: fromFlatCommunicationIdentifier(userId) as CommunicationUserIdentifier,
      displayName,
      credential,
      threadId
    }),
    [userId, displayName, credential, threadId]
  );
  const chatAdapter = useAzureCommunicationChatAdapter(chatAdapterArgs);

  if (!!chatAdapter) {
    return (
      <>
        <div style={containerStyle}>
          <ChatComposite
            adapter={chatAdapter}
            options={{
              attachmentOptions: {
                uploadOptions: uploadOptions,
                downloadOptions: downloadOptions,
              }
            }} />
        </div>
      </>
    );
  }
  if (credential === undefined) {
    return <h3>Failed to construct credential. Provided token is malformed.</h3>;
  }
  return <h3>Initializing...</h3>;
}

const uploadOptions: AttachmentUploadOptions = {
  // default is false
  disableMultipleUploads: false,
  // define mime types
  supportedMediaTypes: ["image/jpg", "image/jpeg"]
  handleAttachmentSelection: attachmentSelectionHandler,
}

const attachmentSelectionHandler: AttachmentSelectionHandler = async (uploadTasks) => {
  for (const task of uploadTasks) {
    try {
      const uniqueFileName = `${v4()}-${task.file?.name}`;
      const url = await uploadFileToAzureBlob(task);
      task.notifyUploadCompleted(uniqueFileName, url);
    } catch (error) {
      if (error instanceof Error) {
        task.notifyUploadFailed(error.message);
      }
    }
  }
}

const uploadFileToAzureBlob = async (uploadTask: AttachmentUploadTask) => {
  // You need to handle the file upload here and upload it to Azure Blob Storage.
  // This is how you can configure the upload
  // Optionally, you can also update the file upload progress.
  uploadTask.notifyUploadProgressChanged(0.2);
  return {
    url: 'https://sample.com/sample.jpg', // Download URL of the file.
  };
Azure Blob ストレージを使用するようにアップロード方法を構成する
Azure Blob Storage のアップロードを有効にするには、以前に宣言した uploadFileToAzureBlob メソッドを次のコードで変更します。 ファイルをアップロードするには、Azure 関数情報を置き換える必要があります。
App.tsx
const uploadFileToAzureBlob = async (uploadTask: AttachmentUploadTask) => {
  const file = uploadTask.file;
  if (!file) {
    throw new Error("uploadTask.file is undefined");
  }

  const filename = file.name;
  const fileExtension = file.name.split(".").pop();

  // Following is an example of calling an Azure Function to handle file upload
  // The https://learn.microsoft.com/azure/developer/javascript/how-to/with-web-app/azure-function-file-upload
  // tutorial uses 'username' parameter to specify the storage container name.
  // the container in the tutorial is private by default. To get default downloads working in
  // this sample, you need to change the container's access level to Public via Azure Portal.
  const username = "ui-library";

  // You can get function url from the Azure Portal:
  const azFunctionBaseUri = "<YOUR_AZURE_FUNCTION_URL>";
  const uri = `${azFunctionBaseUri}&username=${username}&filename=${filename}`;

  const formData = new FormData();
  formData.append(file.name, file);

  const response = await axios.request({
    method: "post",
    url: uri,
    data: formData,
    onUploadProgress: (p) => {
      // Optionally, you can update the file upload progress.
      uploadTask.notifyUploadProgressChanged(p.loaded / p.total);
    },
  });

  const storageBaseUrl = "https://<YOUR_STORAGE_ACCOUNT>.blob.core.windows.net";

  return {
    url: `${storageBaseUrl}/${username}/${filename}`,
  };
};
エラー処理
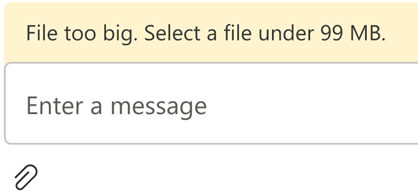
アップロードが失敗すると、UI ライブラリ チャット コンポジットにエラー メッセージが表示されます。

次のサンプル コードでは、サイズ検証エラーのためにアップロードがどのように失敗するかを示します:
App.tsx
import { AttachmentSelectionHandler } from from '@azure/communication-react';

const attachmentSelectionHandler: AttachmentSelectionHandler = async (uploadTasks) => {
  for (const task of uploadTasks) {
    if (task.file && task.file.size > 99 * 1024 * 1024) {
      // Notify ChatComposite about upload failure.
      // Allows you to provide a custom error message.
      task.notifyUploadFailed('File too big. Select a file under 99 MB.');
    }
  }
}

export const attachmentUploadOptions: AttachmentUploadOptions = {
  handleAttachmentSelection: attachmentSelectionHandler
};
ファイルのダウンロード - 高度な使用法
既定では、UI ライブラリは、notifyUploadCompleted したときに設定した URL を指す新しいタブを開きます。 または、actionsForAttachment 経由で添付ファイルのダウンロードを処理するカスタム ロジックを用意することもできます。 1 つ例を見てみましょう。
App.tsx
import { AttachmentDownloadOptions } from "communication-react";

const downloadOptions: AttachmentDownloadOptions = {
  actionsForAttachment: handler
}

const handler = async (attachment: AttachmentMetadata, message?: ChatMessage) => {
   // here we are returning a static action for all attachments and all messages
   // alternately, you can provide custom menu actions based on properties in `attachment` or `message`
   return [defaultAttachmentMenuAction];
};

const customHandler = = async (attachment: AttachmentMetadata, message?: ChatMessage) => {
   if (attachment.extension === "pdf") {
    return [
      {
        title: "Custom button",
        icon: (<i className="custom-icon"></i>),
        onClick: () => {
          return new Promise((resolve, reject) => {
              // custom logic here
              window.alert("custom button clicked");
              resolve();
              // or to reject("xxxxx") with a custom message
          })
        }
      },
      defaultAttachmentMenuAction
    ];
  } else if (message?.senderId === "user1") {
    return [
      {
        title: "Custom button 2",
        icon: (<i className="custom-icon-2"></i>),
        onClick: () => {
          return new Promise((resolve, reject) => {
            window.alert("custom button 2 clicked");
            resolve();
          })
        }
      },
      // you can also override the default action partially
      {
        ...defaultAttachmentMenuAction,
        onClick: () => {
          return new Promise((resolve, reject) => {
            window.alert("default button clicked");
            resolve();
          })
        }
      }
    ];
  }
}
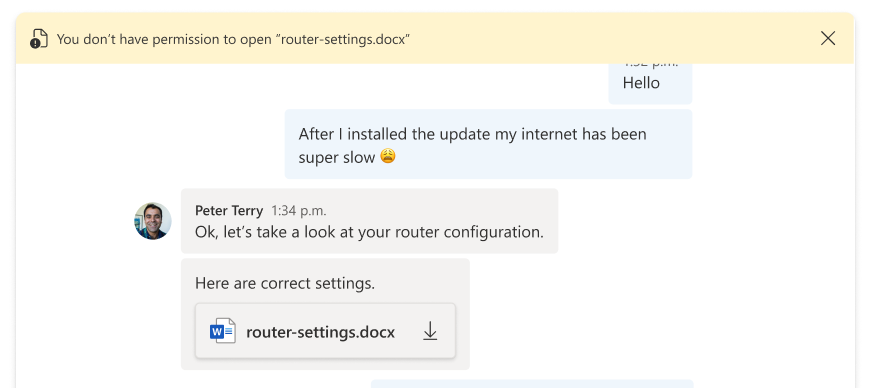
ダウンロード中に問題が発生し、ユーザーに通知する必要がある場合は、onClick 関数のメッセージでエラーを throw するだけで、Chat Composite の上のエラー バーにメッセージが表示されます。

リソースをクリーンアップする
Communication Services サブスクリプションをクリーンアップして解除する場合は、リソースまたはリソース グループを削除できます。 リソース グループを削除すると、それに関連付けられている他のリソースも削除されます。 「Azure Communication Services のリソースのクリーンアップ」と「Azure Functions のリソースのクリーンアップ」で詳細を確認できます。
次のステップ
次のことも実行できます。