クイックスタート: メール通信サービスに Azure マネージド ドメインを追加する方法
この記事では、Azure Communication Services でメール通信サービス用に Azure マネージド ドメインをプロビジョニングする方法について説明します。
前提条件
- アクティブなサブスクリプションが含まれる Azure アカウント。 無料でアカウントを作成できます。
- Azure Communication Services メール リソースが作成され、ドメインを追加する準備が整いました。 「Email 通信リソースを作成して開始する」をご覧ください。
Azure マネージド ドメインをプロビジョニングする
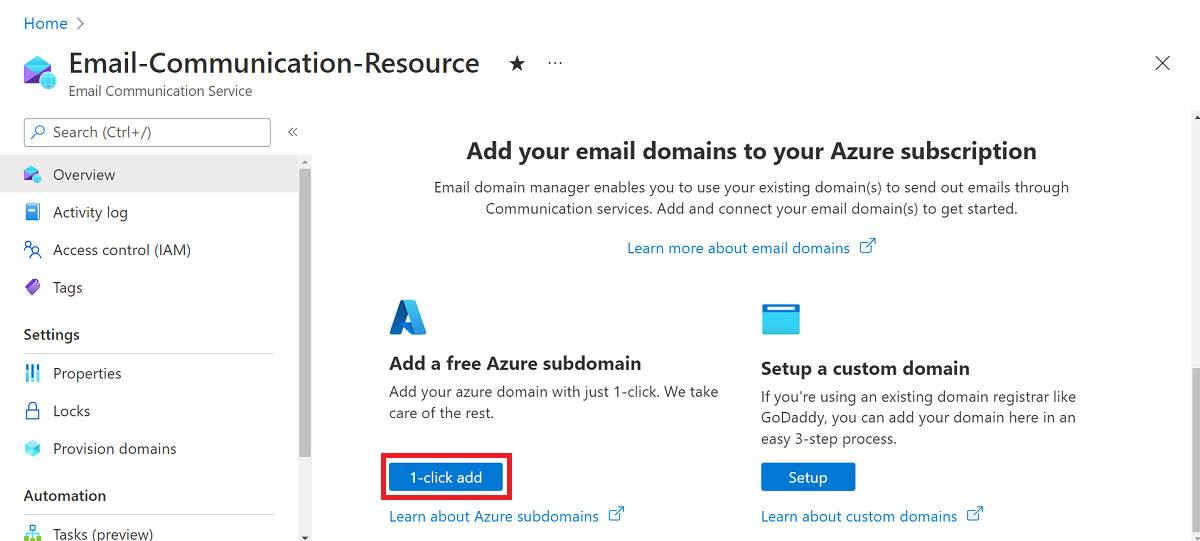
「メール通信リソースを作成して開始する」で作成したメール通信サービス リソースの [概要] ページを開きます。
次のいずれかのオプションを使用して Azure マネージド ドメインを作成します。
- (オプション 1) [Add a free Azure subdomain] (無料の Azure サブドメインを追加する) で [1-click add] (1 クリックで追加) ボタンをクリックします。 手順 3 に進みます。

- (オプション 2) 左側のナビゲーション パネルで [Provision Domains] (ドメインのプロビジョニング) をクリックします。
![[ドメインのプロビジョニング] ナビゲーション ページを示すスクリーンショット。](media/email-add-azure-domain-navigation.png)
- 上部のナビゲーション バーで [ドメインの追加] をクリックします。
- ドロップダウンから [Azure domain] (Azure ドメイン) を選択します。
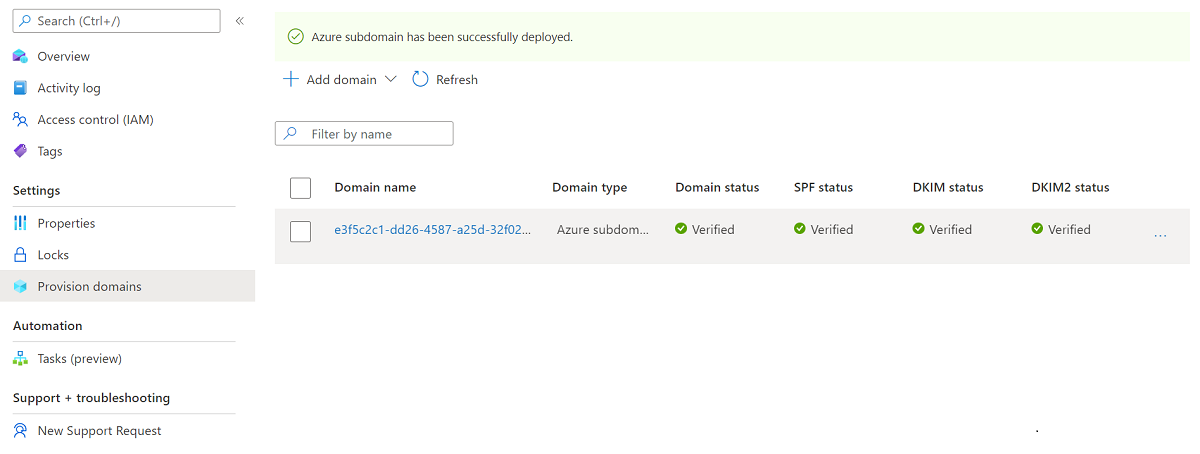
デプロイが完了するまで待ちます。
ドメインが作成されると、新しいドメインを含むリスト ビューが表示されます。
プロビジョニングされたドメインの名前をクリックすると、ドメイン リソースの種類の概要ページが開きます。
前提条件
- アクティブなサブスクリプションが含まれる Azure アカウント。 無料でアカウントを作成できます。
- Azure CLI
- Email Communication Service を作成します。
ドメイン リソースを作成する
ドメイン リソースを作成するには、Azure CLI にサインインします。 ターミナルから az login コマンドを実行し、資格情報を入力してサインインできます。 リソースを作成するには、次のコマンドを実行します:
az communication email domain create --domain-name AzureManagedDomain --email-service-name "<EmailServiceName>" --location "Global" --resource-group "<resourceGroup>" --domain-management AzureManaged
特定のサブスクリプションを選択したい場合は、--subscription フラグを指定してサブスクリプション ID を指定することもできます。
az communication email domain create --domain-name AzureManagedDomain --email-service-name "<EmailServiceName>" --location "Global" --resource-group "<resourceGroup>" --domain-management AzureManaged --subscription "<subscriptionId>"
ドメイン リソースは、以下のオプションを使用して構成できます。
- リソース グループ
- Email Communication Services リソースの名前
- リソースが関連付けられる地理的な場所
- ドメイン リソースの名前:
- Azure ドメインの場合、名前は AzureManagedDomain である必要があります。
- ドメイン管理プロパティの値。
- Azure ドメインの場合、値は AzureManaged である必要があります。
次の手順では、ドメイン リソースにタグを割り当てることができます。 タグは、ドメイン リソースを整理するために使用できます。 タグの詳細については、リソースのタグ付けに関するドキュメントを参照してください。
ドメイン リソースを管理する
ドメイン リソースにタグを追加するには、次のコマンドを実行します。 また、特定のサブスクリプションを対象にすることもできます。
az communication email domain update --domain-name AzureManagedDomain --email-service-name "<EmailServiceName>" --resource-group "<resourceGroup>" --tags newTag="newVal1"

az communication email domain update --domain-name AzureManagedDomain --email-service-name "<EmailServiceName>" --resource-group "<resourceGroup>" --tags newTag="newVal1" --subscription "<subscriptionId>"
特定の Email Communication Service 内のすべてのドメイン リソースを一覧表示するには、次のコマンドを使用します。
az communication email domain list --email-service-name "<EmailServiceName>" --resource-group "<resourceGroup>"
特定のドメイン リソースに関するすべての情報を表示するには、次のコマンドを使用します。
az communication email domain show --domain-name AzureManagedDomain --email-service-name "<EmailServiceName>" --resource-group "<resourceGroup>"
ドメイン リソースをクリーンアップする
ドメイン リソースをクリーンアップして削除する場合は、次のコマンドを実行して削除できます。
az communication email domain delete --domain-name AzureManagedDomain --email-service-name "<EmailServiceName>" --resource-group "<resourceGroup>"
Note
リソースの削除は永続的であり、リソースを削除すると、イベント グリッド フィルター、電話番号など、リソースに関連付けられたデータを含むデータを復元できなくなります。
その他のコマンドについては、ドメイン CLI に関するページを参照してください。
前提条件
- アクティブなサブスクリプションが含まれる Azure アカウント。 無料でアカウントを作成できます。
- お使いのオペレーティング システムに対応した最新バージョンの .NET Core SDK。
- .NET Identity SDK の最新バージョンを取得します。
- .NET Management SDK の最新バージョンを取得します。
SDK のインストール
まず、Communication Services Management SDK を C# プロジェクトにインクルードします。
using Azure.ResourceManager.Communication;
サブスクリプション ID
Azure サブスクリプションの ID を把握しておく必要があります。 これは、ポータルから取得できます。
- Azure アカウントにログインします
- 左側のサイドバーで サブスクリプション を選択します
- 必要なサブスクリプションを選択します
- [概要] をクリックします
- サブスクリプション ID を選択します
このクイックスタートでは、 AZURE_SUBSCRIPTION_ID という名前の環境変数にサブスクリプション ID を格納していることを前提としています。
認証
ドメイン リソースと通信するには、まず自分自身を Azure に対して認証する必要があります。
クライアントを認証する
認証されたクライアントを作成する既定のオプションは、DefaultAzureCredential を使用することです。 すべての管理 API は同じエンドポイントを経由するため、リソースを操作するために、最上位レベルの ArmClient を 1 つだけ作成する必要があります。
Azure に対して認証を行い、ArmClient を作成するには、次のコードを実行します:
using System;
using System.Threading.Tasks;
using Azure;
using Azure.Core;
using Azure.Identity;
using Azure.ResourceManager;
using Azure.ResourceManager.Communication;
using Azure.ResourceManager.Resources;
...
// get your azure access token, for more details of how Azure SDK get your access token, please refer to https://learn.microsoft.com/dotnet/azure/sdk/authentication?tabs=command-line
TokenCredential cred = new DefaultAzureCredential();
// authenticate your client
ArmClient client = new ArmClient(cred);
Azure リソースの操作
これで認証されました。
次の各例では、ドメイン リソースを既存の Email Communication Service.に割り当てます。
Email Communication Service を作成する必要がある場合は、Azure portal を使用してそのようにすることができます。
ドメイン リソースを作成する
ドメイン リソースを作成するときは、リソース グループ名、Email Communication Service 名、リソース名、DomainManagement を指定する必要があります。
Note
Location プロパティは常に globalです。
// this example assumes you already have this EmailServiceResource created on azure
// for more information of creating EmailServiceResource, please refer to the document of EmailServiceResource
string subscriptionId = "aaaa0a0a-bb1b-cc2c-dd3d-eeeeee4e4e4e";
string resourceGroupName = "MyResourceGroup";
string emailServiceName = "MyEmailServiceResource";
ResourceIdentifier emailServiceResourceId = EmailServiceResource.CreateResourceIdentifier(subscriptionId, resourceGroupName, emailServiceName);
EmailServiceResource emailServiceResource = client.GetEmailServiceResource(emailServiceResourceId);

// get the collection of this CommunicationDomainResource
CommunicationDomainResourceCollection collection = emailServiceResource.GetCommunicationDomainResources();

// invoke the operation
string domainName = "AzureManagedDomain";
CommunicationDomainResourceData data = new CommunicationDomainResourceData(new AzureLocation("Global"))
{
    DomainManagement = DomainManagement.AzureManaged,
};
ArmOperation<CommunicationDomainResource> lro = await collection.CreateOrUpdateAsync(WaitUntil.Completed, domainName, data);
CommunicationDomainResource result = lro.Value;

// the variable result is a resource, you could call other operations on this instance as well
// but just for demo, we get its data from this resource instance
CommunicationDomainResourceData resourceData = result.Data;
// for demo we just print out the id
Console.WriteLine($"Succeeded on id: {resourceData.Id}");
ドメイン リソースを管理する
ドメイン リソースを更新する
...
// this example assumes you already have this CommunicationDomainResource created on azure
// for more information of creating CommunicationDomainResource, please refer to the document of CommunicationDomainResource
string subscriptionId = "aaaa0a0a-bb1b-cc2c-dd3d-eeeeee4e4e4e";
string resourceGroupName = "MyResourceGroup";
string emailServiceName = "MyEmailServiceResource";
string domainName = "AzureManagedDomain";
ResourceIdentifier communicationDomainResourceId = CommunicationDomainResource.CreateResourceIdentifier(subscriptionId, resourceGroupName, emailServiceName, domainName);
CommunicationDomainResource communicationDomainResource = client.GetCommunicationDomainResource(communicationDomainResourceId);

// invoke the operation
CommunicationDomainResourcePatch patch = new CommunicationDomainResourcePatch()
{
    Tags =
    {
    ["newTag"] = "newVal",
    },
};
ArmOperation<CommunicationDomainResource> lro = await communicationDomainResource.UpdateAsync(WaitUntil.Completed, patch);
CommunicationDomainResource result = lro.Value;

// the variable result is a resource, you could call other operations on this instance as well
// but just for demo, we get its data from this resource instance
CommunicationDomainResourceData resourceData = result.Data;
// for demo we just print out the id
Console.WriteLine($"Succeeded on id: {resourceData.Id}");
メール サービス別に一覧表示する
// this example assumes you already have this EmailServiceResource created on azure
// for more information of creating EmailServiceResource, please refer to the document of EmailServiceResource
string subscriptionId = "aaaa0a0a-bb1b-cc2c-dd3d-eeeeee4e4e4e";
string resourceGroupName = "MyResourceGroup";
string emailServiceName = "MyEmailServiceResource";
ResourceIdentifier emailServiceResourceId = EmailServiceResource.CreateResourceIdentifier(subscriptionId, resourceGroupName, emailServiceName);
EmailServiceResource emailServiceResource = client.GetEmailServiceResource(emailServiceResourceId);

// get the collection of this CommunicationDomainResource
CommunicationDomainResourceCollection collection = emailServiceResource.GetCommunicationDomainResources();

// invoke the operation and iterate over the result
await foreach (CommunicationDomainResource item in collection.GetAllAsync())
{
    // the variable item is a resource, you could call other operations on this instance as well
    // but just for demo, we get its data from this resource instance
    CommunicationDomainResourceData resourceData = item.Data;
    // for demo we just print out the id
    Console.WriteLine($"Succeeded on id: {resourceData.Id}");
}

Console.WriteLine($"Succeeded");
ドメイン リソースを取得する
// this example assumes you already have this EmailServiceResource created on azure
// for more information of creating EmailServiceResource, please refer to the document of EmailServiceResource
string subscriptionId = "aaaa0a0a-bb1b-cc2c-dd3d-eeeeee4e4e4e";
string resourceGroupName = "MyResourceGroup";
string emailServiceName = "MyEmailServiceResource";
ResourceIdentifier emailServiceResourceId = EmailServiceResource.CreateResourceIdentifier(subscriptionId, resourceGroupName, emailServiceName);
EmailServiceResource emailServiceResource = client.GetEmailServiceResource(emailServiceResourceId);

// get the collection of this CommunicationDomainResource
CommunicationDomainResourceCollection collection = emailServiceResource.GetCommunicationDomainResources();

// invoke the operation
string domainName = "AzureManagedDomain";
bool result = await collection.ExistsAsync(domainName);

Console.WriteLine($"Succeeded: {result}");
ドメイン リソースをクリーンアップする
// this example assumes you already have this CommunicationDomainResource created on azure
// for more information of creating CommunicationDomainResource, please refer to the document of CommunicationDomainResource
string subscriptionId = "aaaa0a0a-bb1b-cc2c-dd3d-eeeeee4e4e4e";
string resourceGroupName = "MyResourceGroup";
string emailServiceName = "MyEmailServiceResource";
string domainName = "AzureManagedDomain";
ResourceIdentifier communicationDomainResourceId = CommunicationDomainResource.CreateResourceIdentifier(subscriptionId, resourceGroupName, emailServiceName, domainName);
CommunicationDomainResource communicationDomainResource = client.GetCommunicationDomainResource(communicationDomainResourceId);

// invoke the operation
await communicationDomainResource.DeleteAsync(WaitUntil.Completed);

Console.WriteLine($"Succeeded");
Note
リソースの削除は永続的であり、リソースを削除すると、イベント グリッド フィルター、電話番号など、リソースに関連付けられたデータを含むデータを復元できなくなります。
前提条件
- アクティブなサブスクリプションが含まれる Azure アカウント。 無料でアカウントを作成できます。
- Azure Az PowerShell モジュールをインストールする
- Email Communication Service を作成します。
ドメイン リソースを作成する
ドメイン リソースを作成するには、次のコマンドを使用し、Connect-AzAccount を使って Azure アカウントにサインインし、資格情報を入力します。
PS C:\> Connect-AzAccount
まず、次のコマンドを使用して、Azure Communication Services モジュール Az.Communication をインストールします。
PS C:\> Install-Module Az.Communication
次のコマンドを実行して、Azure マネージド ドメイン リソースを作成します。
PS C:\> New-AzEmailServiceDomain -ResourceGroupName ContosoResourceProvider1 -EmailServiceName ContosoEmailServiceResource1 -Name AzureManagedDomain -DomainManagement AzureManaged
ドメイン リソースは、次のオプションを使用して構成できます。
- リソース グループ
- Email Communication Services リソースの名前。
- ドメイン リソースの名前:
- Azure ドメインの場合、名前は AzureManagedDomain である必要があります。
- ドメイン管理プロパティの値。
- Azure ドメインの場合、値は AzureManaged である必要があります。
次の手順では、ドメイン リソースにタグを割り当てることができます。 タグは、ドメイン リソースを整理するために使用できます。 タグの詳細については、リソースのタグ付けに関するドキュメントを参照してください。
ドメイン リソースを管理する
ドメイン リソースにタグを追加するには、次のコマンドを実行します。 また、特定のサブスクリプションを対象にすることもできます。
PS C:\> Update-AzEmailServiceDomain -Name AzureManagedDomain -EmailServiceName ContosoEmailServiceResource1 -ResourceGroupName ContosoResourceProvider1 -Tag @{ExampleKey1="ExampleValue1"}

PS C:\> Update-AzEmailServiceDomain -Name AzureManagedDomain -EmailServiceName ContosoEmailServiceResource1 -ResourceGroupName ContosoResourceProvider1 -Tag @{ExampleKey1="ExampleValue1"} -SubscriptionId SubscriptionID
特定の Email Communication Service 内のすべてのドメイン リソースを一覧表示するには、次のコマンドを使用します。
PS C:\> Get-AzEmailServiceDomain -EmailServiceName ContosoEmailServiceResource1 -ResourceGroupName ContosoResourceProvider1
特定のドメイン リソースに関するすべての情報を一覧表示するには、次のコマンドを使用します。
PS C:\> Get-AzEmailServiceDomain -Name AzureManagedDomain -EmailServiceName ContosoEmailServiceResource1 -ResourceGroupName ContosoResourceProvider1
ドメイン リソースをクリーンアップする
ドメイン リソースをクリーンアップして削除する場合は、次のコマンドを実行してドメイン リソースを削除できます。
PS C:\> Remove-AzEmailServiceDomain -Name AzureManagedDomain -EmailServiceName ContosoEmailServiceResource1 -ResourceGroupName ContosoResourceProvider1
Note
リソースの削除は永続的であり、リソースを削除すると、イベント グリッド フィルター、電話番号など、リソースに関連付けられたデータを含むデータを復元できなくなります。
Azure マネージド ドメインとカスタム ドメインの比較
Azure マネージド ドメインをプロビジョニングする前に、次の表を確認して、ニーズに最も適したドメインの種類を決定します。
| Azure マネージド ドメイン | カスタム ドメイン | |
|---|---|---|
| 長所: | - 設定がすばやく簡単 - ドメインの検証が不要 |
- 独自のドメインからメールを送信 |
| 短所: | - 送信者ドメインは個人用に設定されず、変更不可 - 送信者のユーザー名はカスタマイズ不可 - 送信ボリュームが非常に限られている - ユーザー エンゲージメント追跡を有効化できない |
- ドメイン レコードの検証が必要 - 検証のセットアップ時間が長くなります |
サービスの制限
Azure マネージド ドメインとカスタム ドメインはどちらもサービス制限の対象です。 サービス制限には、失敗、レート、サイズの制限が含まれます。 詳しくは、「Azure Communication Services のサービス制限」 > 「メール」をご覧ください。
Azure マネージド ドメインの送信者認証
メール認証のベスト プラクティスに関するページで説明されているように、Azure Communication Services では、メールに必要なメール認証プロトコルが自動的に構成されます。
これで、メール ドメインでメールを送信する準備ができました。
次のステップ
関連記事
- メール クライアント ライブラリについて理解する。
- 「Azure Communication Services のサービス制限 > メール」で、メールの失敗制限、レート制限、およびサイズ制限を確認する。
- 「クイック スタート: カスタムの検証済みドメインを追加する方法」で、カスタムの検証済みドメインを使用してメールを送信する方法を学習する。


