How to Migrate an On-Premises SQL Server 2012 Database to Windows Azure SQL Database
Overview
This next lab is about migrating an on-premises database to the cloud. As the diagram below suggests, there are two ways to support SQL Server databases in the public cloud.
The concept is simple - how do you take an on-premises database and move it to the cloud. You have two choices. In this lab we will move the database to Windows Azure SQL Database.
SQL Database
Because Windows Azure SQL Database is indeed a database as a service, there are some real advantages. First, it can be fantastically economical—some companies have reduced their database costs by more than 90 percent by using Windows Azure SQL Database. Second, it provides self-managing capabilities, enabling organizations to provision data services for applications throughout the enterprise without adding to the support burden of the central IT department. Third, the service replicates three copies of your data, and in the case of a hardware failure, it provides automatic failover.
But there are limitations. The maximum database size is 150GB, though this can be increased through sharding (the horizontal partitioning of data). This approach is also subject to more latency issues, due to the fact that it runs on a shared infrastructure in the Microsoft datacenter. Another drawback is that you must expect transient faults and program your code accordingly. Finally, Windows Azure SQL Database represents a subset of SQL Server, meaning that some features, such as XML, system stored procedures, distributed transactions, synonyms, CLR procedures, Full Text Search and the ability to have linked servers are not supported. Because of these limitations, migrating to Windows Azure SQL Database may not work for some scenarios.
Objectives
In this hands-on lab, you will learn how to:
- Create a Server to host our Windows Azure SQL Database
- Open IP addresses on the Server virtual machine to allow for incoming connections
- Use SQL Server Management Studio 2012 to export an on-premises database to the Server you previously created
- Validate the migration using the portal tooling and SQL Server Management Studio
Prerequisites
The following is required to complete this hands-on lab:
- A Windows Azure subscription
- An on-premises SQL Server 2012 Management Studio
- MVC4Sample database
Setup
In order to execute the exercises in this hands-on lab you need to set up your environment.
- Start by logging into the Windows Azure Portal (https://manage.windowsazure.com).
- Complete the previous lab of configuration SQL Server 2012 Management Studio (Express)
A set of database-oriented posts
This post is part of a set of posts that go together:
- How to create a Windows Azure Storage Account
- How to Export an On-Premises SQL Server Database to Windows Azure Storage
- How to Migrate an On-Premises SQL Server 2012 Database to Windows Azure SQL Virtual Machine
- How to Migrate an On-Premises SQL Server 2012 Database to Windows Azure SQL Database
- Setting up an Azure Virtual Machine For Developers with Visual Studio 2013 Ultimate and SQL Server 2012 Express
Exercises
This hands-on lab includes the following exercises:
Getting Started: Creating an MVC 4 Application using Entity Framework Code First
In this section, you will log into the Windows Azure Portal and create an Azure Virtual Machine using the Windows Azure Gallery.
Task 1 – Provisioning a Server in Windows Azure SQL Virtual Machine
On the left menu pane, select SQL Databases. You will see a list of existing databases. Toward the top you will see Servers as an option. Select Servers.
Creating a server to host your Windows Azure SQL Database
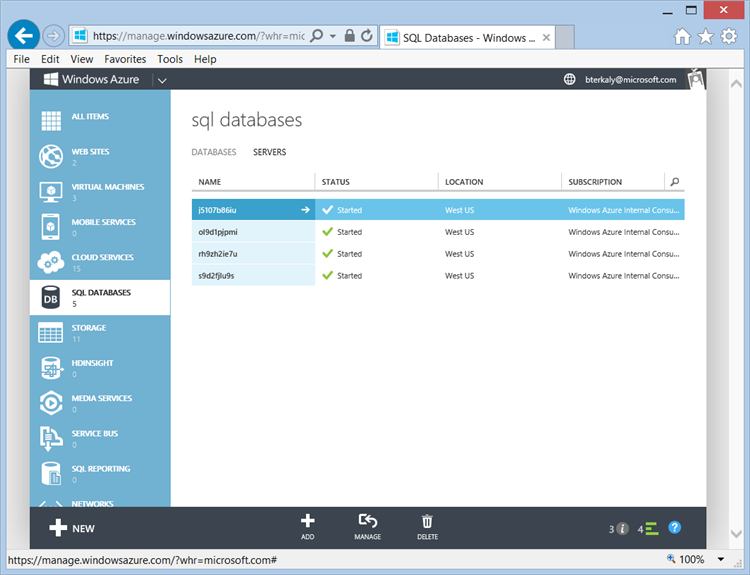
You will see a list of servers. You could simply get the name of an existing server or you can choose to click on the Add button on the lower menu bar. This will create an additional server.
Creating a server to host your Windows Azure SQL Database
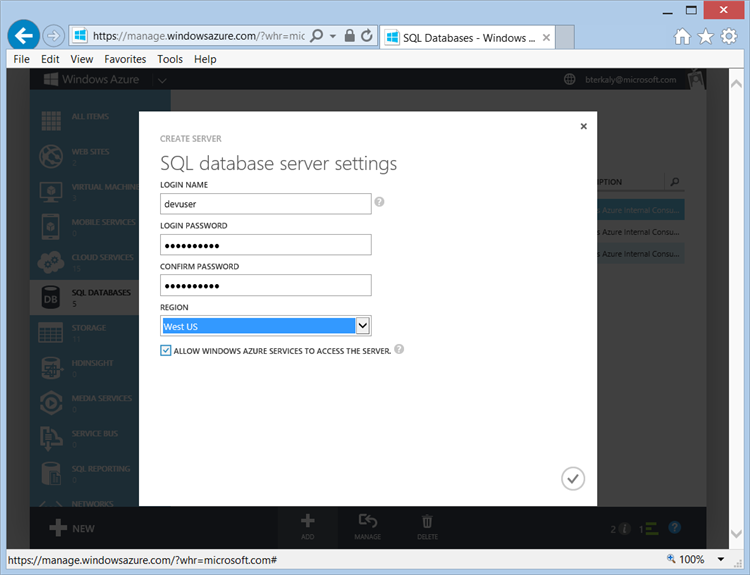
Before the Server is actually created, you will need to indicate the Login Name, Login Password, and the Region. You can optionally indicate, Allow Windows Azure Services to access the server - if you want to expose the server through TCP/IP to other servers in a Microsoft data center.
Specifying Login, and Region
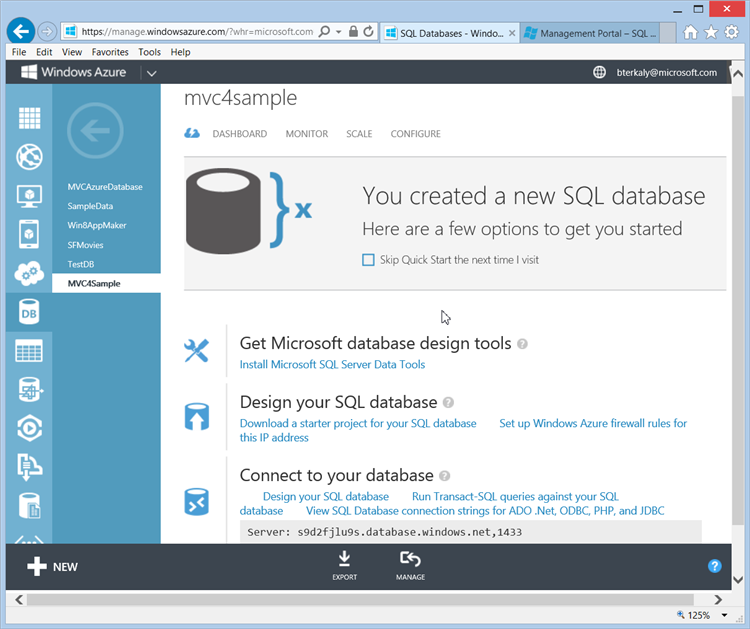
The new Server should appear in the portal. The name of the Server is s9d2fjlu9s. The full name is s9d2fjlu9s.database.windows.net.
Verifying server creation
The name of the Server is s9d2fjlu9s. Take note of the Server name. It will be needed by SQL Server Management Studio during the migration process.
Verifying server creation
Task 2 – Configuring Allowed IP Access
In this task you will return back to the Windows Azure Portal and configure the firewall for your Windows Azure SQL Database. The goal of this task is to configure Windows Azure SQL Database to detect the IP address used by a client trying to connect connection and accept accept the connection requests from the client.
If client computers use dynamically assigned IP addresses, you must specify a range that is broad enough to include IP addresses assigned to computers in your network. Start with a narrow range, and then expand it only if you need to.
You will enter a name for the firewall rule, such as the name of your computer or company.
In this step you will be required to access the Configure menu near the top. It will allow you to enter a range of IP addresses that can have access to the server. One or more ranges can be added. Each range of IP addresses represents allowed IP addresses to access the server. This is a way to enforce some degree of security. It assumes that you know the potential IP addresses of clients connecting to your server.
Selecting the Configure Menu
Note that to keep this demo simple we allowed all clients to connect to the server s9d2fjlu9s. This is not a recommended practice.
Adding Allowed IP addresses
To be clear, this is not a recommended practice. Notice the rule name is DoNotUse. Notice the allowed IP range is 0.0.0.0 to 255.255.255.255.
Adding Allowed IP addresses
Task 3 – Deploying from On-Premises SQL Server to Windows Azure SQL Database
In this task you use ##Microsoft SQL Server 2012 Express Management Studio ## to deploy the database to Windows Azure SQL Database. We will need the Server Name to accomplish this task. We created this server in a previous step.
We will perform the migration to Windows Azure SQL Database from an on-premises database. But to do so, we need the full address of our server (the server for Windows Azure SQL Database). The name of the Server is s9d2fjlu9s. The full name is s9d2fjlu9s.database.windows.net.
Getting the full server name
Now that we have the Server name, we are ready to perform the migration using SQL Server Management Studio, which has the built-in tooling to perform the migration process. Launch SQL Server Management Studio and login to your on-premises database server where you would like to do your migration from.
Migrating the on-premises database
Right mouse click on MVC4Sample and choose Tasks | Deploy Database to SQL Azure.
Migrating the on-premises database
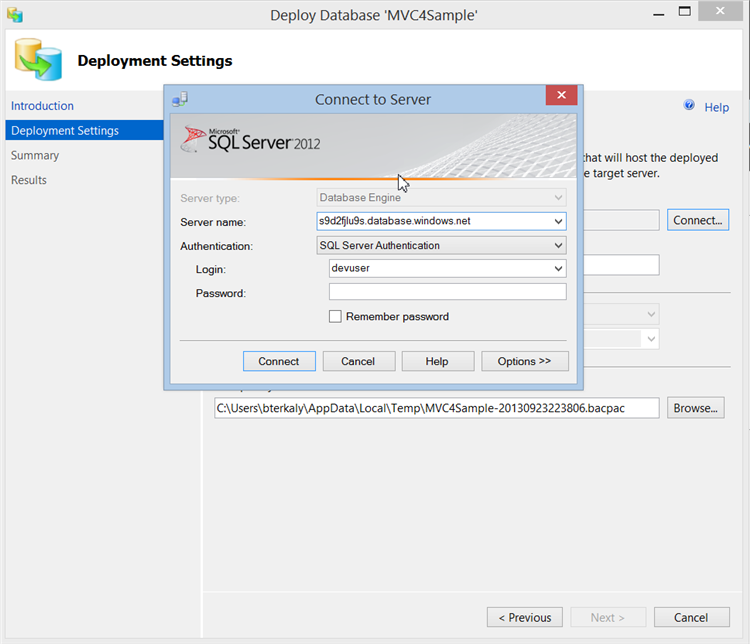
The migration wizard needs to know the Server name you wish to target with the migration. In previous steps we've identified, the full address of our server. The full name is s9d2fjlu9s.database.windows.net. You Server name will be different. Server names are globally unique. Click the Connect button to the right of Server connection on the migration wizard.
Migrating the on-premises database
You will now be asked for the Server name, Login/Password. Be sure to select SQL Server Authentication. You will need to recall all of this information during the Windows Azure SQL Database Server creation process in earlier steps.
Identifying the target database server in Windows Azure
Once you've finished Connecting to the target server for the migration, you are ready to enter some more information, such as New database name, the edition of SQL Database (SQL Azure is the old name, btw), and the maximum database size (5 GB) . Click Next when you have entered in this information.
Deployment Settings
You have now finished specifying the details for the migration to Windows Azure SQL Database. Click Finish to start the actual and physical migration.
Viewing the summary information
If everything goes as planned, you will see the Operation Complete dialog box with the Result being Success for all activities. Click Close to dismiss the migration wizard.
Viewing the migration results
Task 4 – Verifying our migration to Windows Azure SQL Database
In this task you use the Windows Azure Portal as well as Microsoft SQL Server 2012 Express Management Studio to verify the successful migration of the database to Windows Azure SQL Database.
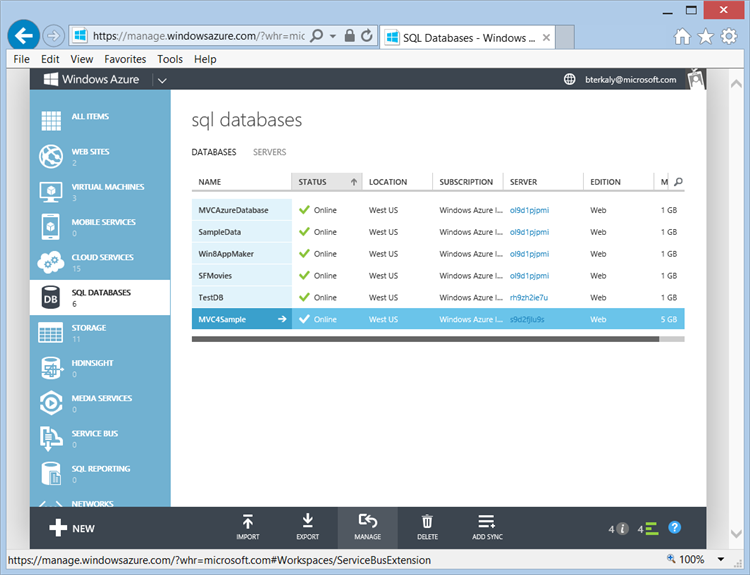
Return back to the Windows Azure Portal. Click on SQL databases on the left pane. The list of databases should include MVC4Sample. Next, click on the Manage menu so that we can take a look inside the database at specific data structures, such as the customers table.
Confirming the migration at the Windows Azure Portal
Enter in your login credentials and click on the Log on button.
Logging In
Notice that in the lower left corner there is a menu item called Design. Click on it and validate that you can see the Customers table.
Verifying the existence of the customers table
Towards the top of the window you will see a New Query button. Click on it and type in a simple select query as seen below (select * from customers). Then click the Run menu item. You should be able to see data for the customers table.
Issuing a query
You can also connect to the Windows Azure SQL Database from any running instance of SQL Server Management Studio. You can use it to connect to Windows Azure SQL Database. SQL Server Management Studio is a familiar tool to most developers and can boost productivity tremendously. Launch SQL Server Management Studio from any computer connected to the Internet. Click the Connect button on Object Explorer. as stated earlier in this lab, you will need the Server Name as well as the Login Credentials to connect to the cloud hosted instance of Windows Azure SQL Database. Click Connect when you have entered in this information.
Using SQL Server Management Studio
You can right mouse click on the customers table and select Script Table As | Select To | New Query Editor Window. Next, click on the Execute toolbar button at the top. You should see the same customer information as in the previous step.
Entering the select query
Task 4 – Getting the connection string to your Windows Azure SQL Database
In this task you get the connection string to your newly created ##Windows Azure SQL Database##.
The final step to this lab is to get the actual connection string that can be used by client applications. The Windows Azure portal gives this to you with just a simple mouse click. Return back to the SQL database selection at the Windows Azure portal. Note the selection at the bottom of the portal, View SQL Database connection strings for ADO .Net, ODBC, PHP, and JDBC. Click on it.
Getting the connection string
You now have all the needed information to connect up to your Windows Azure SQL Database.
Viewing all available connection strings
Summary
In this lab, you have learned how to migrate an on-premises database to Windows Azure SQL Database. The built in tooling inside of SQL Server Management Studio makes the process very easy.
Comments
Anonymous
April 21, 2015
Hi Sir, It's work only for the tables which are having the clustered index on the database. The migration wizard is not working if the tables having the non-clustered index. What are the limitations to deploy on premises db to azure sql db. Thanks, sreeAnonymous
December 22, 2015
Nice article. Thank you for your efforts.Anonymous
January 03, 2016
You can use an other method to migrate your SQL Server Database to your SQL Azure Databse, you can see this : code.msdn.microsoft.com/The-best-way-to-migrate-6c4a7326 Please rate it if you find it useful ;)


