Création d’une expérience de préparation des appels à l’aide de Azure Communication Services
Important
Cette fonctionnalité d’Azure Communication Services est actuellement en préversion.
Ces interfaces de programmation d’applications et kits de développement logiciel (SDK) en préversion sont fournis sans contrat au niveau du service. Nous vous recommandons de ne pas les utiliser pour les charges de travail de production. Certaines fonctionnalités peuvent être limitées ou non prises en charge.
Pour plus d’informations, consultez Conditions d’utilisation supplémentaires relatives aux préversions de Microsoft Azure.
Dans ce tutoriel, nous utilisons Azure Communication Services avec la bibliothèque d’interface utilisateur pour créer une expérience qui prépare les utilisateurs à rejoindre un appel. La bibliothèque d’interface utilisateur fournit un ensemble de composants et de contrôles d’interface utilisateur riches qui peuvent être utilisés pour produire une expérience de préparation des appels, ainsi qu’un ensemble complet d’API pour comprendre l’état utilisateur.
Prérequis
- Suivez le processus de configuration de l’application dans la partie précédente de ce tutoriel : Préparation des appels - Vue d’ensemble
Télécharger le code
Accédez au code complet de ce tutoriel sur GitHub.
Vérification de la prise en charge des navigateurs
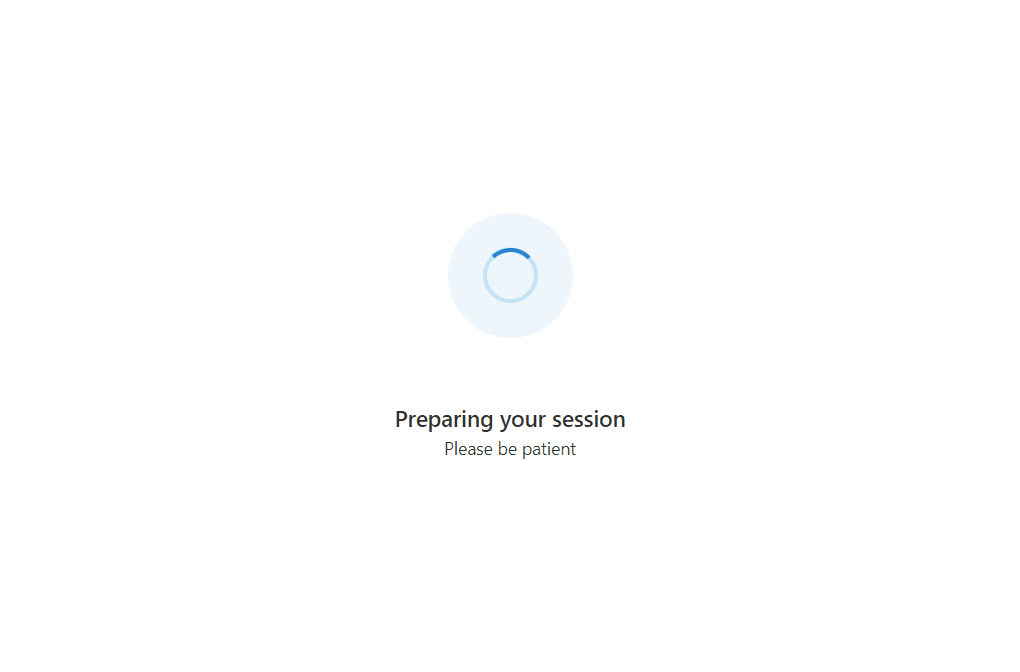
Pour garantir la meilleure expérience possible à l’utilisateur, nous voulons d’abord nous assurer qu’il se trouve sur un navigateur pris en charge. Dans cette section, nous créons une page qui affiche « Préparation de votre session » pendant que nous effectuons une vérification rapide du support en arrière-plan sur le navigateur de l’utilisateur.
Page Préparation de votre session
Créez un fichier appelé PreparingYourSession.tsx dans lequel nous créons un spinner à afficher à l’utilisateur pendant que nous effectuons des vérifications asynchrones en arrière-plan :
src/PreparingYourSession.tsx
import { useTheme } from '@azure/communication-react';
import { ISpinnerStyles, IStackStyles, ITextStyles, ITheme, Spinner, Stack, Text } from '@fluentui/react';

/** This page displays a spinner to the user. This is used to show the user that background checks are being performed. */
export const PreparingYourSession = (): JSX.Element => {
  const theme = useTheme();
  return (
    <Stack verticalFill verticalAlign="center" horizontalAlign="center" tokens={{ childrenGap: '3rem' }}>
      <Stack styles={spinnerContainerStyles(theme)}>
        <Spinner styles={spinnerStyles} />
      </Stack>
      <Stack horizontalAlign="center">
        <Text styles={headingStyles} variant="large">Preparing your session</Text>
        <Text variant="medium">Please be patient</Text>
      </Stack>
    </Stack>
  );
};

const headingStyles: ITextStyles = {
  root: {
    fontWeight: '600',
    lineHeight: '2rem'
  }
};

const spinnerStyles: ISpinnerStyles = {
  circle: {
    height: '2.75rem',
    width: '2.75rem',
    borderWidth: '0.2rem'
  }
};

const spinnerContainerStyles = (theme: ITheme): IStackStyles => ({
  root: {
    padding: '1.75rem',
    borderRadius: '50%',
    background: theme.palette?.themeLighterAlt
  }
});
Nous pouvons ensuite connecter cet écran Préparation de votre session à notre application.
Dans App.tsx et une variable testState pour suivre l’état de l’application et tant que testState est dans l’état runningEnvironmentChecks, nous affichons l’écran Préparation de votre session.
Tout d’abord, ajoutez les importations suivantes à notre fichier App.tsx que nous avons créé dans la vue d’ensemble :
import { useState } from 'react';
import { PreparingYourSession } from './PreparingYourSession';
Une fois cette opération terminée, mettez à jour notre fichier App.tsx pour inclure le nouveau spinner.
type TestingState = 'runningEnvironmentChecks' | 'finished';

const App = (): JSX.Element => {
  const [testState, setTestState] = useState<TestingState>('runningEnvironmentChecks');

  return (
    <FluentThemeProvider>
      <CallClientProvider callClient={callClient}>
        {/* Show a Preparing your session screen while running the call readiness checks */}
        {testState === 'runningEnvironmentChecks' && (
          <>
            <PreparingYourSession />
          </>
        )}

        {/* After the device setup is complete, take the user to the call. For this sample we show a test complete page. */}
        {testState === 'finished' && <TestComplete />}
      </CallClientProvider>
    </FluentThemeProvider>
  );
}
Exécution d’une vérification des informations sur l’environnement
Commencez par créer un appel environmentSupportUtils.tsde fichier utilitaire . À l’intérieur de cet appel, nous ajoutons une méthode checkEnvironmentSupport. Cette méthode utilise le client appelant avec état pour effectuer une requête d’informations d’environnement sur laquelle le client avec état d’appel s’exécute.
src/environmentSupportUtils.ts
import { Features, EnvironmentInfo } from "@azure/communication-calling";
import { StatefulCallClient } from "@azure/communication-react";

/** Use the CallClient's getEnvironmentInfo() method to check if the browser is supported. */
export const checkEnvironmentSupport = async (callClient: StatefulCallClient): Promise<EnvironmentInfo> => {
  const environmentInfo = await callClient.feature(Features.DebugInfo).getEnvironmentInfo();
  console.info(environmentInfo); // view console logs in the browser to see what environment info is returned
  return environmentInfo;
}
Les données retournées par checkEnvironmentSupport contient les informations suivantes :
- Prise en charge des navigateurs
- Prise en charge de la version du navigateur
- Système d’exploitation (plateforme)
- Informations détaillées sur l’environnement
Informer l’utilisateur qu’il se trouve sur un navigateur non pris en charge
Ensuite, nous devons utiliser ces informations fournies par le Kit de développement logiciel (SDK) Appelant pour informer l’utilisateur de l’état de son environnement en cas de problème. La bibliothèque d’interface utilisateur fournit trois composants différents pour remplir cet objectif en fonction du problème.
UnsupportedOperatingSystemUnsupportedBrowserUnsupportedBrowserVersion
Nous commençons par héberger les composants de la bibliothèque d’interface utilisateur à l’intérieur d’un fichier FluentUI Modal : créez un fichier appelé UnsupportedEnvironmentPrompts.tsx où nous créons les différentes invites :
src/UnsupportedEnvironmentPrompts.tsx
import { UnsupportedOperatingSystem, UnsupportedBrowser, UnsupportedBrowserVersion } from '@azure/communication-react';
import { Modal } from '@fluentui/react';

/**
 * Modal dialog that shows a Browser Version Unsupported Prompt
 * Use the `onTroubleShootingClick` argument to redirect the user to further troubleshooting.
 * Use the `onContinueAnywayClick` argument to allow the user to continue to the next step even though they are on an unsupported browser version.
 */
export const BrowserVersionUnsupportedPrompt = (props: { isOpen: boolean, onContinueAnyway:() => void }): JSX.    Element => (
  <Modal isOpen={props.isOpen}>
    <UnsupportedBrowserVersion
      onTroubleshootingClick={() => alert('This callback should be used to take the user to further troubleshooting')}
      onContinueAnywayClick={() => props.onContinueAnyway()}
    />
  </Modal>
);

/**
 * Modal dialog that shows a Browser Unsupported Prompt
 * Use the `onTroubleShootingClick` argument to redirect the user to further troubleshooting.
 */
export const BrowserUnsupportedPrompt = (props: { isOpen: boolean }): JSX.Element => (
  <Modal isOpen={props.isOpen}>
    <UnsupportedBrowser
      onTroubleshootingClick={() => alert('This callback should be used to take the user to further troubleshooting')}
    />
  </Modal>
);

/**
 * Modal dialog that shows an Operating System Unsupported Prompt
 * Use the `onTroubleShootingClick` argument to redirect the user to further troubleshooting.
 */
export const OperatingSystemUnsupportedPrompt = (props: { isOpen: boolean }): JSX.Element => (
  <Modal isOpen={props.isOpen}>
    <UnsupportedOperatingSystem
      onTroubleshootingClick={() => alert('This callback should be used to take the user to further troubleshooting')}
    />
  </Modal>
);
Nous pouvons ensuite afficher ces invites dans un composant de vérification d’environnement.
Créez un fichier appelé EnvironmentChecksComponent.tsx qui contient la logique d’affichage de cette invite : ce composant a un rappel onTestsSuccessful qui peut amener l’utilisateur à la page suivante de l’application.
src/EnvironmentChecksComponent.tsx
import { useEffect, useState } from 'react';
import { BrowserUnsupportedPrompt, BrowserVersionUnsupportedPrompt, OperatingSystemUnsupportedPrompt } from './UnsupportedEnvironmentPrompts';
import { useCallClient } from '@azure/communication-react';
import { checkEnvironmentSupport } from './environmentSupportUtils';

export type EnvironmentChecksState = 'runningEnvironmentChecks' |
  'operatingSystemUnsupported' |
  'browserUnsupported' |
  'browserVersionUnsupported';

/**
 * This component is a demo of how to use the StatefulCallClient with CallReadiness Components to get a user
 * ready to join a call.
 * This component checks the browser support.
 */
export const EnvironmentChecksComponent = (props: {
  /**
   * Callback triggered when the tests are complete and successful
   */
  onTestsSuccessful: () => void
}): JSX.Element => {
  const [currentCheckState, setCurrentCheckState] = useState<EnvironmentChecksState>('runningEnvironmentChecks');


  // Run call readiness checks when component mounts
  const callClient = useCallClient();
  useEffect(() => {
    const runEnvironmentChecks = async (): Promise<void> => {

      // First we get the environment information from the calling SDK.
      const environmentInfo = await checkEnvironmentSupport(callClient);

      if (!environmentInfo.isSupportedPlatform) {
        setCurrentCheckState('operatingSystemUnsupported');
        // If the platform or operating system is not supported we stop here and display a modal to the user.
        return;
      } else if (!environmentInfo.isSupportedBrowser) {
        setCurrentCheckState('browserUnsupported');
        // If browser support fails, we stop here and display a modal to the user.
        return;
      } else if (!environmentInfo.isSupportedBrowserVersion) {
        setCurrentCheckState('browserVersionUnsupported');
        /**
         *  If the browser version is unsupported, we stop here and show a modal that can allow the user
         *  to continue into the call.
         */
        return;
      } else {
        props.onTestsSuccessful();
      }
    };

    runEnvironmentChecks();
    // eslint-disable-next-line react-hooks/exhaustive-deps
  }, []);

  return (
    <>
      {/* We show this when the operating system is unsupported */}
      <OperatingSystemUnsupportedPrompt isOpen={currentCheckState === 'operatingSystemUnsupported'} />

      {/* We show this when the browser is unsupported */}
      <BrowserUnsupportedPrompt isOpen={currentCheckState === 'browserUnsupported'} />

      {/* We show this when the browser version is unsupported */}
      <BrowserVersionUnsupportedPrompt isOpen={currentCheckState === 'browserVersionUnsupported'} onContinueAnyway={props.onTestsSuccessful} />
    </>
  );
}
Nous pouvons ensuite ajouter EnvironmentChecksComponent à App.tsx. L’application déplace ensuite l’utilisateur vers l’étape Vérifications de l’appareil une fois le test réussi à l’aide du rappel onTestsSuccessful :
Maintenant, nous importons le nouveau composant dans notre application dans App.tsx
import { EnvironmentChecksComponent } from './EnvironmentChecksComponent';
Nous allons ensuite mettre à jour le composant App dans App.tsx :
const App = (): JSX.Element => {
  const [testState, setTestState] = useState<TestingState>('runningEnvironmentChecks');

  return (
    <FluentThemeProvider>
      <CallClientProvider callClient={callClient}>
        {/* Show a Preparing your session screen while running the call readiness checks */}
        {testState === 'runningEnvironmentChecks' && (
          <>
            <PreparingYourSession />
            <EnvironmentChecksComponent
              onTestsSuccessful={() => setTestState('finished')}
            />
          </>
        )}

        {/* After the device setup is complete, take the user to the call. For this sample we show a test complete page. */}
        {testState === 'finished' && <TestComplete />}
      </CallClientProvider>
    </FluentThemeProvider>
  );
}
Vous pouvez maintenant exécuter l’application. Essayez de l’exécuter sur un navigateur non pris en charge et vous voyez l’invite de navigateur non pris en charge :