Provision a computer for driver deployment and testing (WDK 10)
Provisioning a target or test computer is the process of configuring a computer for automatic driver deployment, testing, and debugging. To provision a computer, use Microsoft Visual Studio.
A testing and debugging environment has two computers: the host computer and the target computer. The target computer is also called the test computer. You develop and build your driver in Visual Studio on the host computer. The debugger runs on the host computer and is available in the Visual Studio user interface. When you test and debug a driver, the driver runs on the target computer.
Make sure that the host and target computers can ping each other by name. This process is simpler if both computers belong to the same workgroup or network domain. If your computers are in a workgroup, connect them with a router rather than a hub or switch.
When provisioning systems for driver deployment, the host and the target machines must have the same version of Windows operating system.
Tip
For community support on the WDK, see the Windows Hardware Performance Forum on Microsoft Q&A.
Prepare the target computer for provisioning
On the target computer, install the operating system that you'll use to run and test your driver.
Install the WDK. You only need to install Visual Studio if you plan on doing driver development on the target computer.
If Secure Boot is enabled on the target computer, disable it. For information about Unified Extensible Firmware Interface (UEFI) and Secure Boot, see UEFI Firmware.
If the target computer is a VM, it should be started in non-enhanced mode, for disabling VM enhanced mode configuration, see share devices with your virtual machine
If you will be deploying a test driver on the target machine, enable test signing from an elevated command with bcdedit /set testsigning on
If you will be testing the driver with WDTF, make sure to enable Driver Verifier using the properties page and restart the target machine after the deployment
- On the host computer, in Visual Studio, right click on the driver project go to Properties > Configuration Properties > Driver Install > Driver Verification > Enable Driver Verification
On the target computer, run the WDK Test Target Setup MSI that matches the platform of the target computer. You can find the MSI in the Windows Driver Kit (WDK) installation directory under Remote.
Example: C:\Program Files (x86)\Windows Kits\10\Remote\x64\WDK Test Target Setup x64-x64_en-us.msi
If your target computer is running Windows Server, find the DriverTest folder that was just created by WDK Test Target Setup MSI. (Example: c:\DriverTest). Select and hold (or right-select) the DriverTest folder, and choose Properties. On the Security tab, give Modify permission to the Authenticated Users group.
Verify that the host and target computers can ping each other. Open a Command Prompt window, and enter ping ComputerName.
If the host and target computers are joined to a workgroup and are on different subnets, you might have to adjust some firewall settings so that the host and target computers can communicate. Follow these steps:
- On the target computer, in Control Panel, go to Network and Internet > Network Sharing Center. Note your active network. This will be Public network, Private network, or Domain.
- On the target computer, in Control Panel, go to System and Security > Windows Firewall > Advanced settings > Inbound Rules.
- In the list of inbound rules, find all Network Discovery rules for your active network. (For example, find all Network Discovery rules that have a Profile of Private.) Double click each rule and open the Scope tab. Under Remote IP address, select Any IP address.
- In the list of inbound rules, locate all File and Printer Sharing rules for your active network. For each of those rules, double click the rule, and open the Scope tab. Under Remote IP address, select Any IP address.
Provision the target computer
Now you're ready to provision the target computer from the host computer in Visual Studio.
On the host computer, in Visual Studio, select the Extensions menu, point to Driver, point to Test, and select Configure Devices.
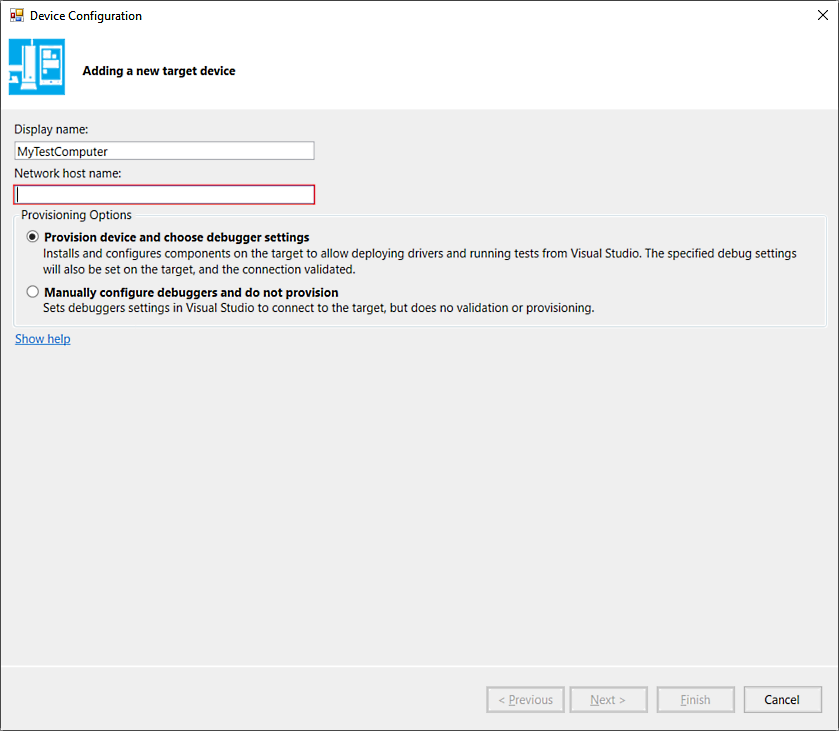
In the Configure Devices dialog, select Add new device.
For Network host name, enter the name or local IP address of your target computer. Select Provision device and choose debugger settings.

Select Next.
Select a type of debugging connection, and enter the required parameters.
For more information about setting up debugging over various types of connections, see Setting Up KDNET Network Kernel Debugging Manually and the related documentation for the Debugging Tools for Windows.
The provisioning process takes several minutes and might automatically reboot the target computer once or twice. When provisioning is complete, select Finish.
Restart the computer.