Repair Visual Studio
Sometimes your Visual Studio installation becomes damaged or corrupted. A repair is useful for fixing a wide variety of install-time issues, including update issues.
When to use repair
Use repair if you're having issues with:
- Installation payload, which can happen when writing a file to disk is unsuccessful and the file gets corrupted. Repair can reacquire needed files.
- Client-side download, assuming that you fixed any internet connection or proxy issues.
- Updating Visual Studio. Repair fixes many common update issues.
Tip
An unstable internet connection or an issue in a Windows service, like Windows Installer, can cause install issues. In those scenarios, repair might also be affected. To check for underlying issues, review the error report generated by the Visual Studio Installer.
Note
Repairing Visual Studio resets user settings and reinstalls your existing assemblies. If you're experiencing a product issue and repair doesn't fix it, create a Visual Studio Feedback Ticket. For more information, see How to report a problem with Visual Studio or Visual Studio Installer.
How to repair
To repair your installation, follow these steps.
Find the Visual Studio Installer on your computer.
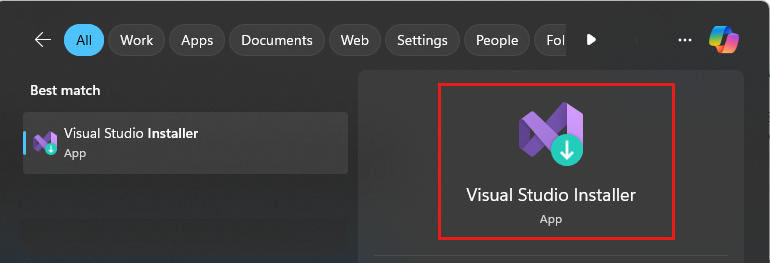
In the Windows Start menu, you can search for installer.

Note
You can also find the Visual Studio Installer in the following location:
C:\Program Files (x86)\Microsoft Visual Studio\Installer\setup.exe
You might have to update the installer before you continue. If so, follow the prompts.
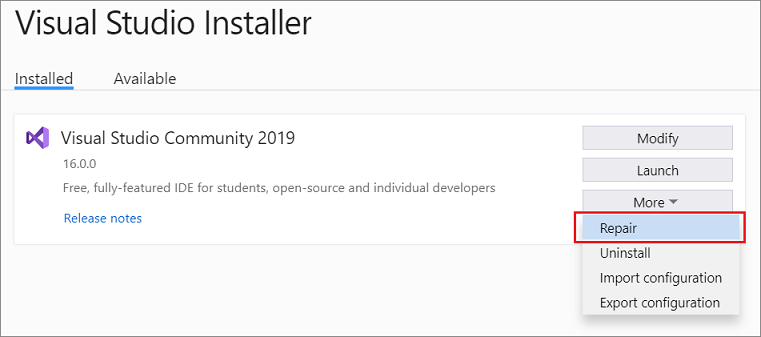
In the installer, look for the edition of Visual Studio that you want to repair. Next, choose More, and then choose Repair.

Note
Repairing Visual Studio resets its environment. Repairing removes local customizations like per-user extensions installed without elevation, user settings, and profiles. It restores your synchronized settings such as themes, colors, and key bindings.
The Repair option appears only for installed instances of Visual Studio. If you don't see the Repair option, check whether you selected More in a version that appears in the Visual Studio Installer as Available rather than Installed.
Find the Visual Studio Installer on your computer.
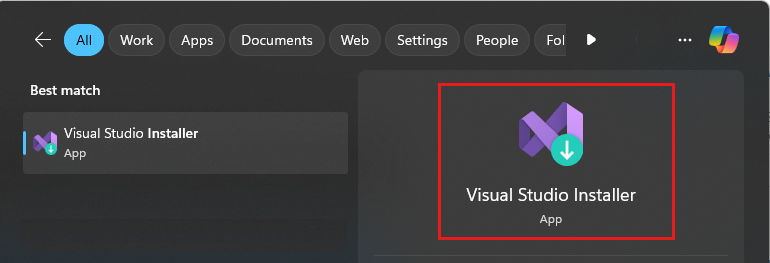
In the Windows Start menu, you can search for installer, and then select Visual Studio Installer from the results.

Note
You can also find the Visual Studio Installer in the following location:
C:\Program Files (x86)\Microsoft Visual Studio\Installer\setup.exe
You might be prompted to update the Visual Studio Installer before you continue. If so, follow the prompts.
In the Visual Studio Installer, look for the installation of Visual Studio that you want to repair. Then choose Repair from the More dropdown menu.

Note
Repairing Visual Studio resets its environment. Repairing removes local customizations like per-user extensions installed without elevation, user settings, and profiles. It restores your synchronized settings such as themes, colors, and key bindings.
The Repair option appears only for installed instances of Visual Studio. If you don't see the Repair option, check whether you selected More in a version that appears in the Visual Studio Installer as Available rather than Installed.
Support or troubleshooting
Sometimes, things can go wrong. If your Visual Studio installation fails, see Troubleshoot Visual Studio installation and upgrade issues for step-by-step guidance.
Here are a few more support options:
- Use the installation chat (English only) support option for installation-related issues.
- Report product issues to us by using the Report a Problem tool that appears both in the Visual Studio Installer and in the Visual Studio IDE. If you're an IT Administrator and don't have Visual Studio installed, you can submit IT Admin feedback.
- Suggest a feature, track product issues, and find answers in the Visual Studio Developer Community.